WalkMe Learning Arc's free trial gives you 30 days to build, publish, and distribute training content — no credit card required. This article walks you through signing up and completing the onboarding flow.

Before You Start
Make sure you're using a supported browser before signing up. For browser requirements, refer to the following article: Supported Browsers in WalkMe Learning Arc
Access
To access WalkMe Learning Arc, go to app.learningarc.com
Sign Up
- Go to the WalkMe Learning Arc sign-up page
- Select one of the following options:
- Continue with Google
- Continue with Microsoft
- Sign up with email: Type your work email address and select Continue. Personal email addresses aren't accepted.
- If you signed up with email, check your inbox for a verification email from WalkMe Learning Arc
Note
- If someone in your organization already started a trial, you'll get your own workspace and your own portal, and you'll be added as a Contributor to your organization's main workspace
- If a colleague invited you, you'll skip the setup steps and go straight to the workspace or portal you were invited to
Complete the Onboarding Flow
Step 1: Area of work
Select the area that best describes your team or function:
- Accounting & Finance
- Consulting & Client Services
- Customer Support
- Engineering, Product & Design
- Human Resources
- IT
- Learning & Development
- Marketing
- Operations
- Project & Program Management
- Sales & Customer Success
- Other
Step 2: Your role
Select the option that best describes your role:
- Individual Contributor
- Director
- Team Manager
- Executive (C-Level, VP)
Step 3: Company size
Select the option that best describes your organization:
- 1–50
- 51–200
- 201–500
- 501–1,000
- 1,000+
Step 4: How you plan to use WalkMe Learning Arc
Select the option that best describes your plans:
- Just for me
- For my team
- For my entire company
- For my customers or partners
Step 5: Set up your workspace
- In the Workspace name field, type a name for your workspace
- To invite a team member now, type their email address and select Invite (optional)
- Select Done to finish setup and open your workspace
Note
To invite more team members after setup, select Invite Members in the left sidebar, or go to Account settings and open the Workspaces tab
What to Expect After Setup
After setup is complete, WalkMe Learning Arc creates a default workspace and a main portal for you. The main portal is branded for your organization and uses your organization's subdomain — for example, acme.learningarc.com. Any additional portals you create reuse that prefix, and you can edit only the part after it. You can't delete the main portal.
After setup, you can:
- Create a course using AI authoring
- Record and simulate a workflow
- Set up your branded portal, or create additional portals for different learner audiences
- Invite your team to collaborate
- Explore the Account section in the left sidebar, which contains Portals, Account settings, and the Invite Members button
The Home Page
The Home page is where you land after you sign in, and it's the main entry point for building content.
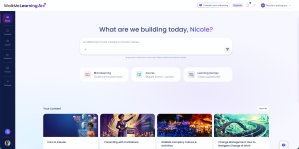
Build with AI
Describe what you want to build in the AI chat, and WalkMe Learning Arc generates it and opens it in the course builder. This is the same generation engine as Create with AI, reached from a different place.
Quick-start cards
Quick-start cards start a build with the content type already set:
- Microlearning: One focused lesson
- Course: Multiple lessons and quizzes
- Learning Journey: A guided path across several courses
Your content and your portals
The Home page also shows two lists:
- Your content: The items you opened most recently
- Your portals: Every portal in the account
Select View All on either list to see the full set.
Getting Invited as a Learner
Learners get a different sign-up email than builders do. After you sign up, you go straight to the portal or course you were invited to — there are no setup steps.
Your access doesn't change after someone else's trial ends. You keep access to each portal you've been added to for as long as that portal exists.


