Brief Overview
Segments let you target and organize learning content for specific user groups in the portal. Each segment defines which users can access particular courses, paths, or learning items, so admins can deliver tailored learning experiences.
Each segment gets its users from one source: identity provider (IDP), SCIM, CSV integration, or User list. You choose the source when you create the segment.
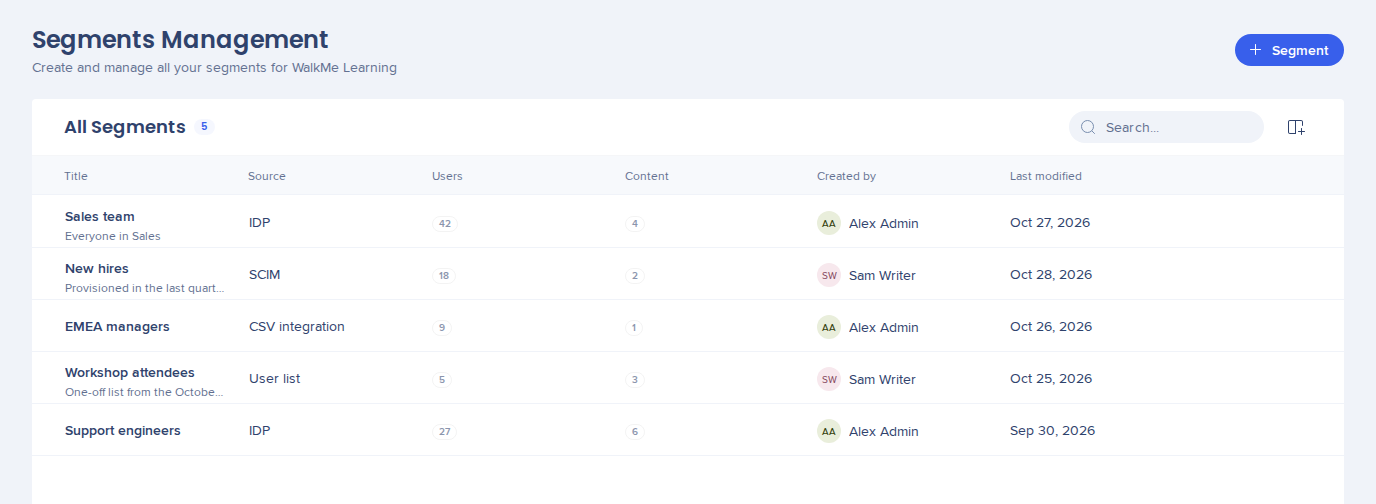
Access
Access the Segments page in the console:
- Open the WalkMe Console
- Go to the Content category
- Select Learning Arc, and then select the Segments tab
How It Works
Segment sources
When you create a segment, you choose one of four sources. The source decides which users you can add. For IDP, SCIM, and CSV integration, it also decides which attributes you can use as conditions.
- IDP: Build the segment from users and attributes synced from your identity provider. Users appear after their first portal login.
- SCIM: Build the segment from users and attributes provisioned through SCIM. Users appear as soon as they're synced, before their first login. SCIM is available only when it's set up for your account. If your user identifier isn't an email, your identity provider also needs to send an email attribute.
- CSV integration: Build the segment from a CSV file uploaded to WalkMe through the integration center, and use the file's properties as conditions. This source shows only when a CSV integration is set up.
- User list: Add users one by one or upload a CSV file. Best for one-off lists without a connected source. The users are saved with the segment and show again when you edit it. Users are matched when the portal loads, and the list is never written back to your identity provider or SCIM.
User identifier
Every source matches users on the user identifier, the value your identity provider sends for each user. It can be an email or another unique value, like a user name, user ID, employee ID, or Okta ID.
When you choose a source, the User identifier tag under it shows which identifier is used. The tag doesn't show for SCIM.
注
Set the user identifier in the Admin Console, where your identity provider is connected.
Segments Management Page
The Segments Management page lets you add, edit, rename, or delete segments used in learning content.
Add a segment from the Segments Management page
- Go to the Segments page
- Select + Segment
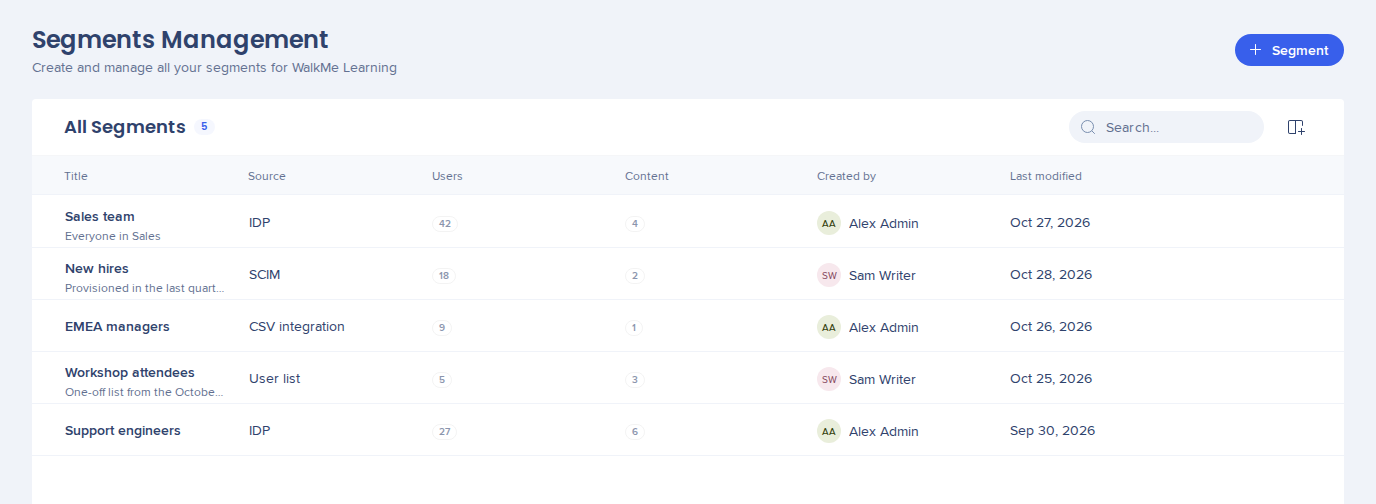
- The Create a segment dialog opens
- Type a name in Segment name
- Under Select a source, choose where the users in this segment come from:
- IDP: Users who logged in at least once, based on data from your identity provider
- SCIM: Users your identity provider provisions to WalkMe, whether or not they've logged in
- CSV integration: Users from a CSV file uploaded to WalkMe through the integration center
- User list: Users you add manually or upload in a CSV file. Best for one-off lists without a connected source. See Add a User list segment below
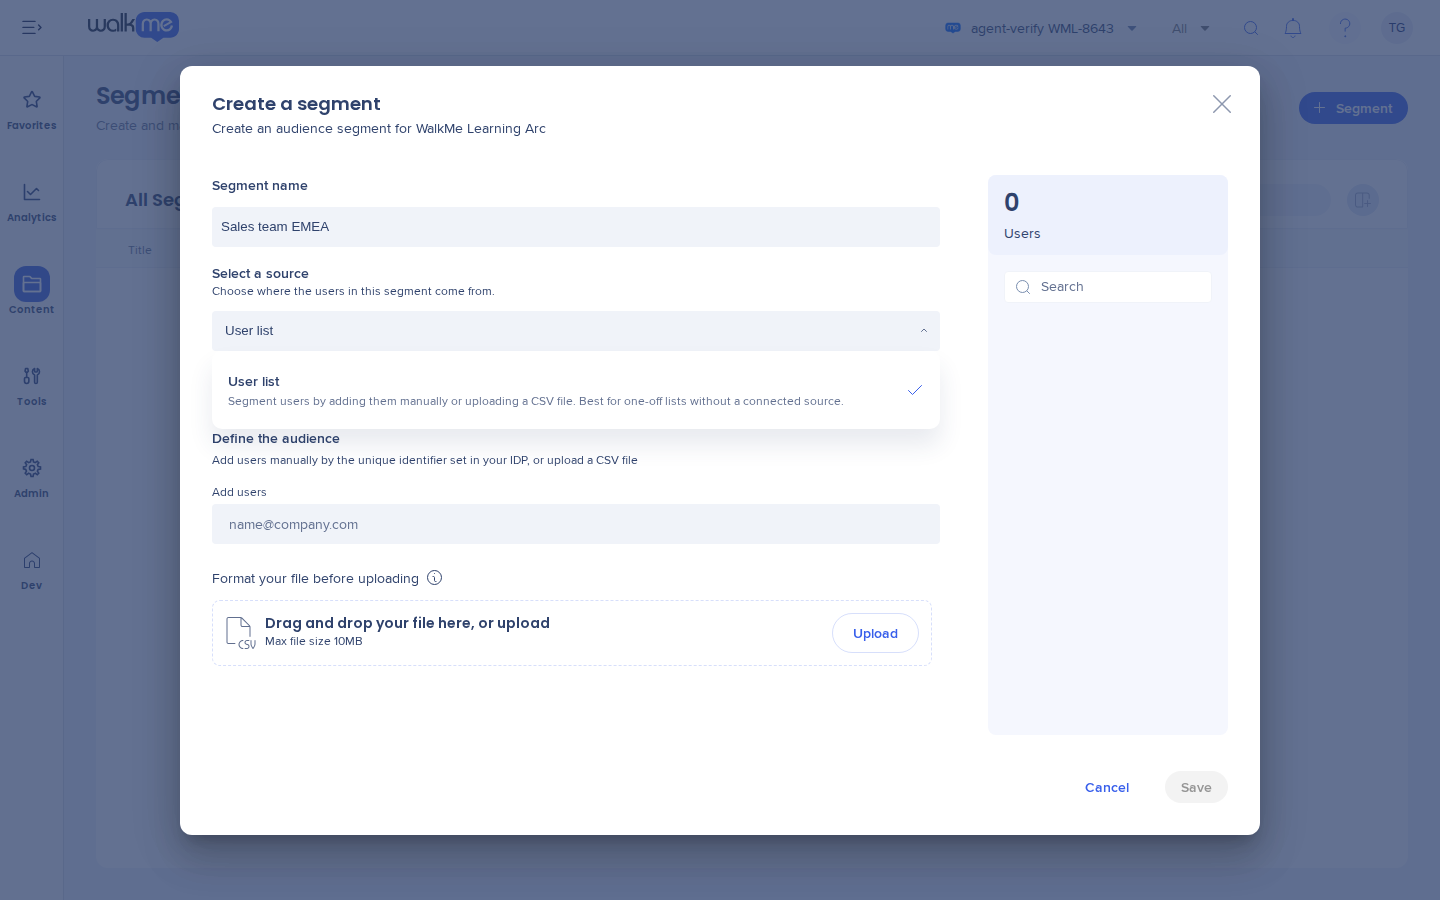
- The User identifier tag under the source shows which identifier is used to match users, for example email. It doesn't show for SCIM.
- Under Define the audience, set the rules for who belongs to the segment. For a User list segment, add users instead.
- The User list panel updates in real time as you make selections
- Select Save
Condition Builder
Rule operators
- is / is not: Match one or more values. With more than one value, any of them can match.
- exists / doesn't exist: Check whether the user has a value for the attribute
- value is like / value is not like: Match part of a value. You can use wildcards.
注
Each segment uses one source. SCIM segments support only the is and is not operators.
Add a User list segment
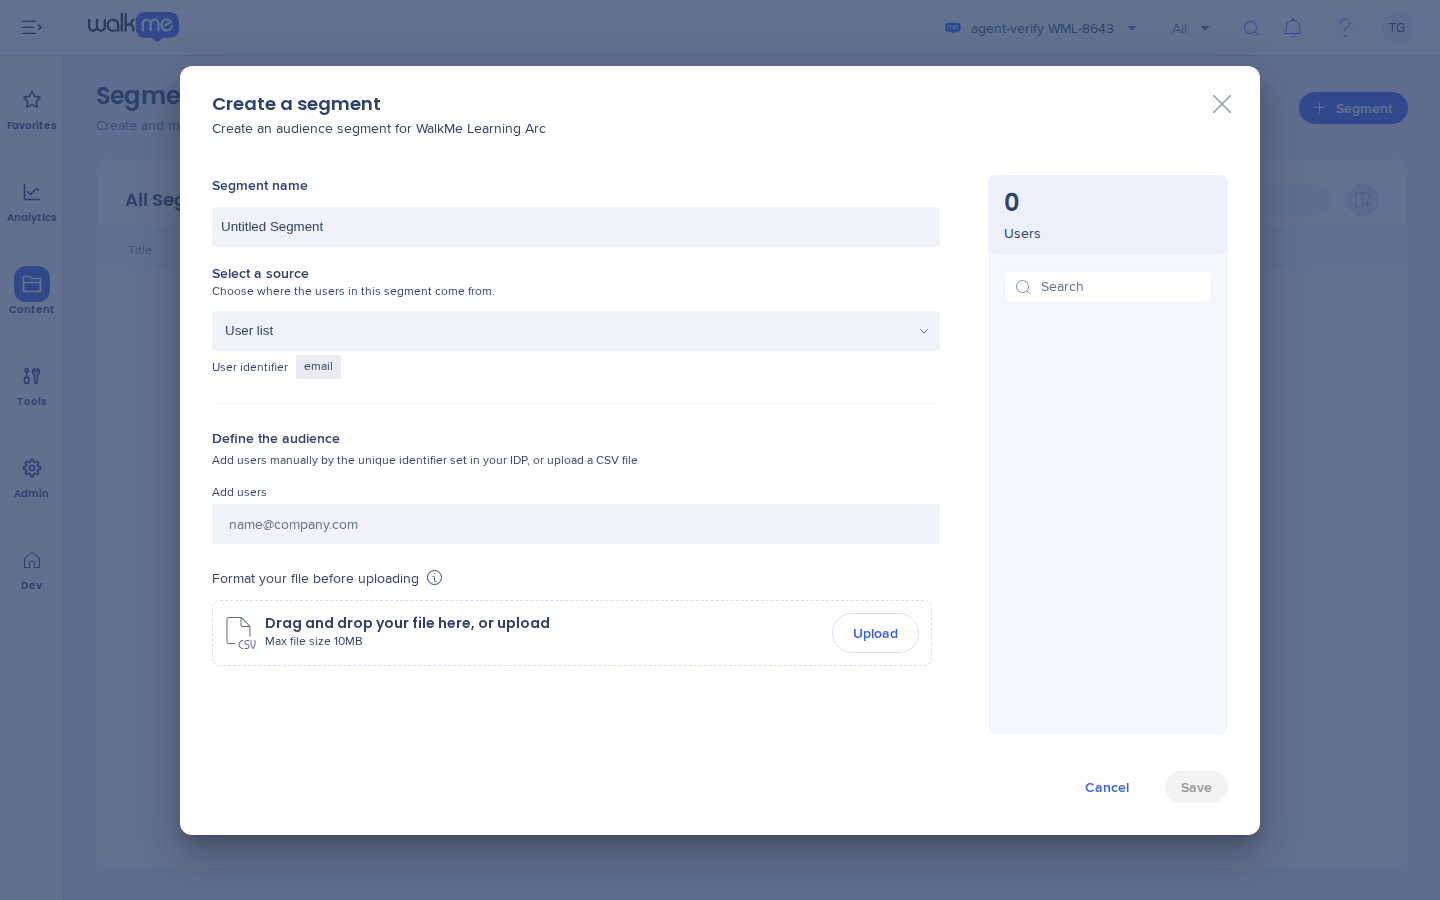
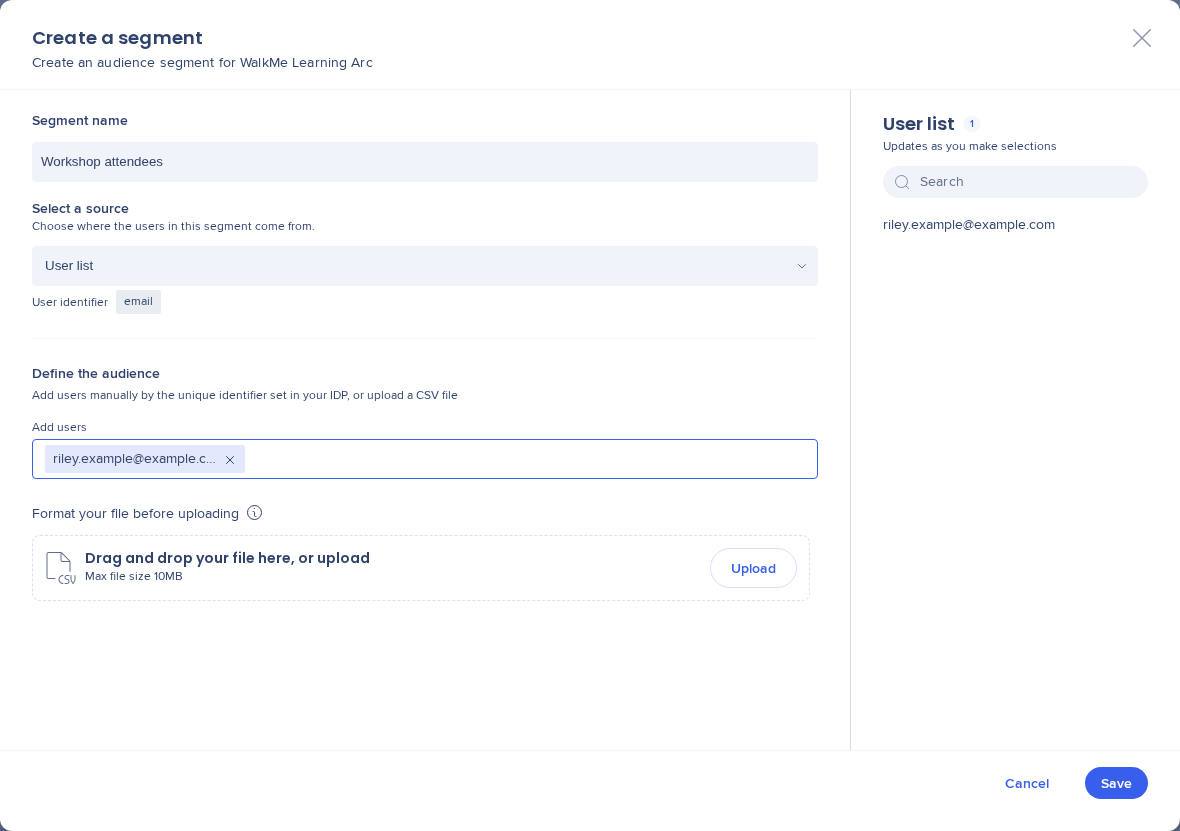
User list segments let you group users who don't share a common IDP attribute. When an attribute-based rule can't capture the users you want, list their user identifiers in a CSV file and upload it to build the segment from that list. Membership comes only from the identifiers on the list. To enter, a user needs to meet both of these conditions:
- Their identifier is on the list
- They're signed in to the portal
The identifier on the list needs to match the one the user signs in to the portal with.
- In the Create a segment dialog, choose User list as the source
- Under Define the audience, type user identifiers in the Add users field and select Add, or upload a CSV file
- Select Format your file before uploading to see the file guidelines
- Select Download template to format your CSV file correctly (recommended)
- Drag and drop your file, or select Upload (up to 10MB)
- The User list panel updates with the total number of users found in the file
- Select Save
Search capabilities
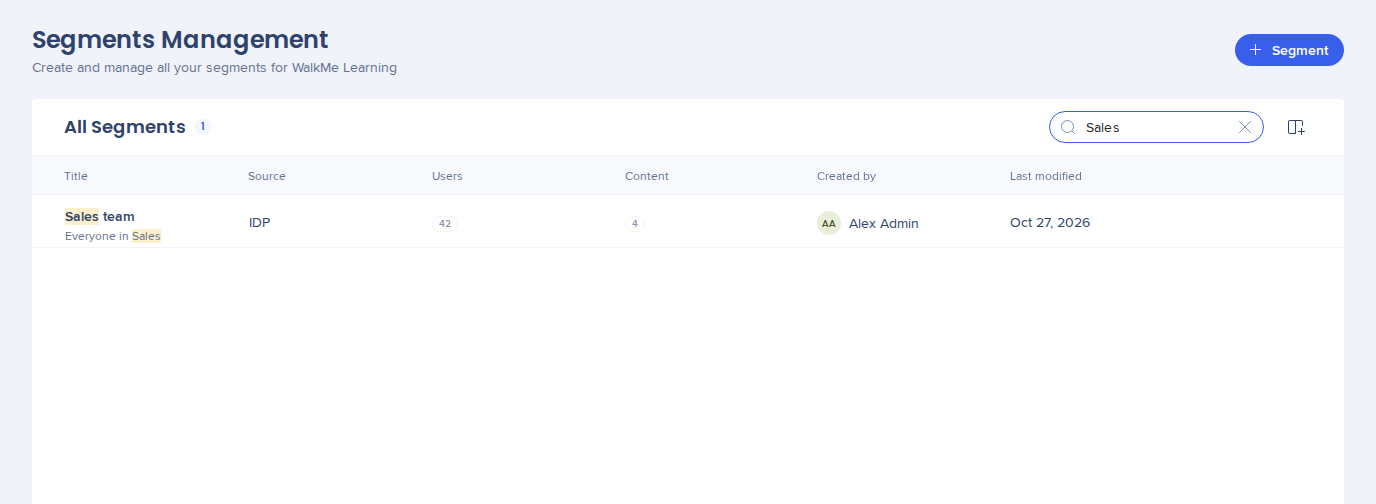
- Use the Search bar to find a segment by name or attribute
Columns
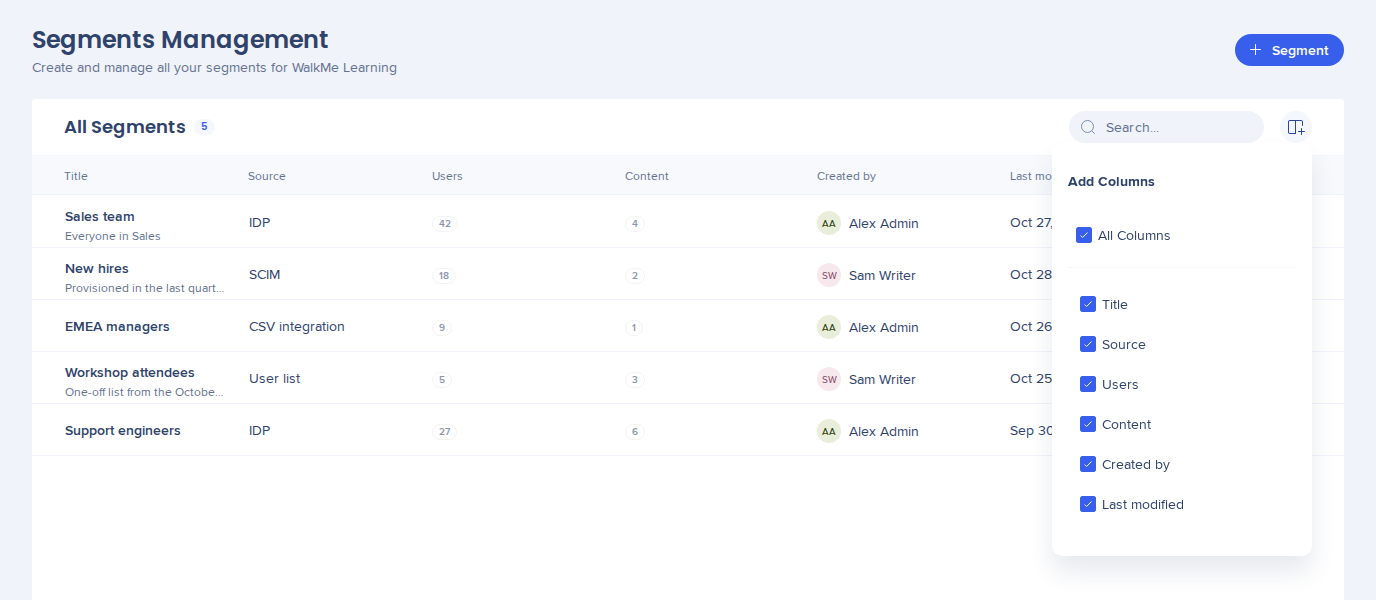
- Select the Manage Columns icon to choose which columns appear in the table
- The Source column shows where each segment gets its users
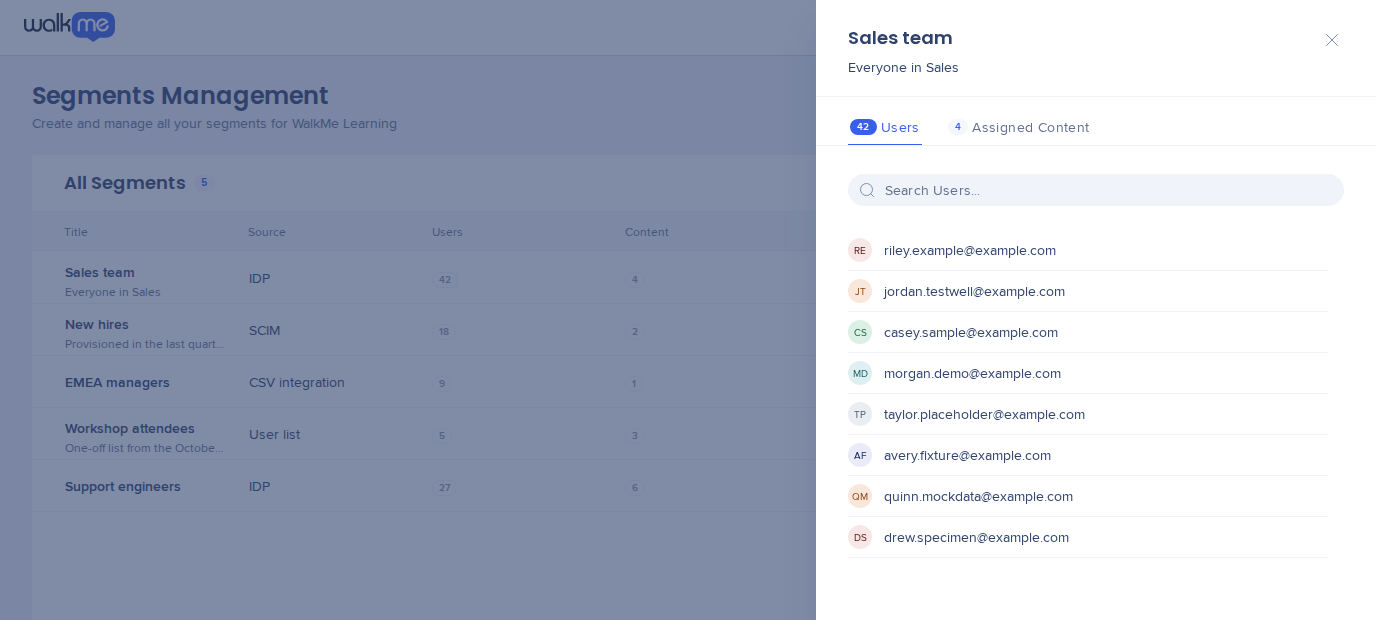
- Select the Segment information icon next to the item row to open the information panel
- The panel includes two tabs:
- Users
- Assigned content
Edit segment
- Select the Edit icon next to a segment
- The Edit Segment dialog opens with your current conditions
- Update the rules or users. The source is locked. To use a different source, create a new segment.
- Select Update to save your changes
注
Editing a segment resets all its saved data and can disrupt the delivery of WalkMe items connected to the segment.
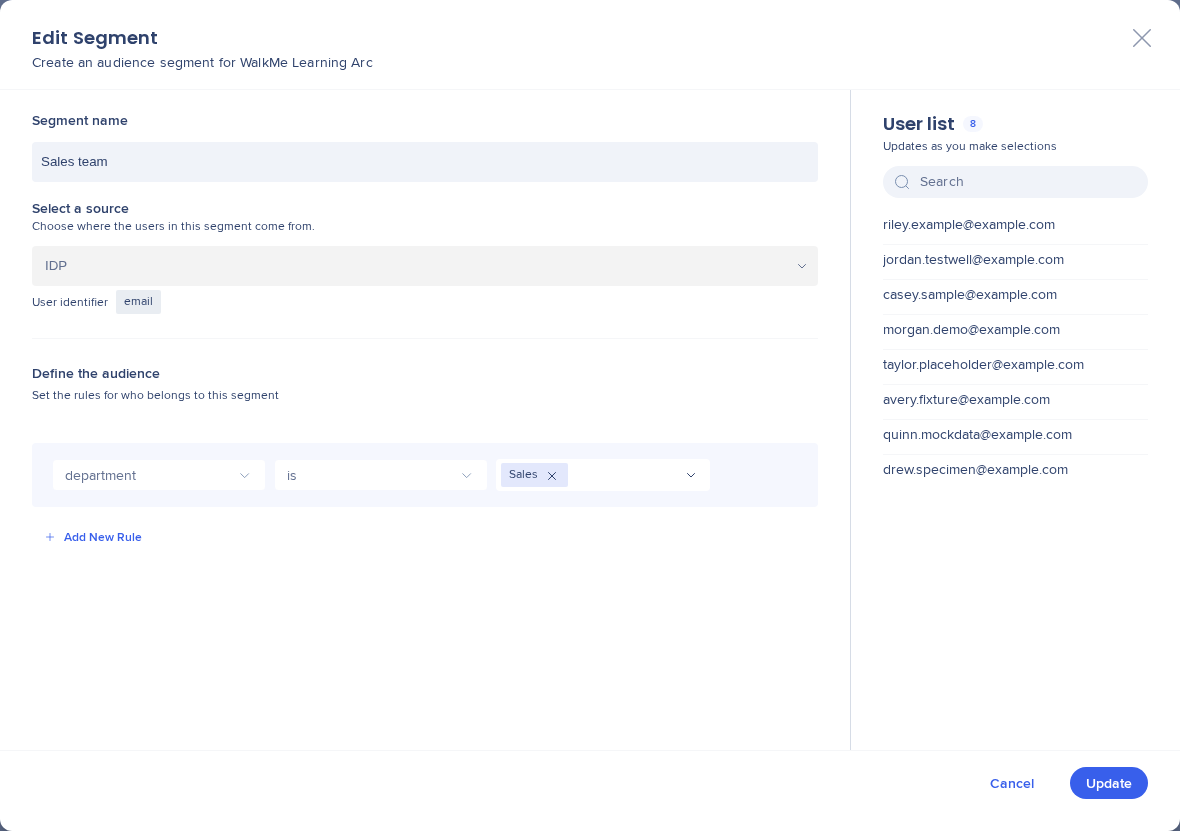
Segment options
- Open the Options menu next to a segment, then select one of the following actions:
- Rename: Change the segment's name
- Delete: Remove the segment
注
You can't delete a segment that's connected to content. To delete it, first remove it from the Learning Content page, then go back to the Segments Management page and delete it.
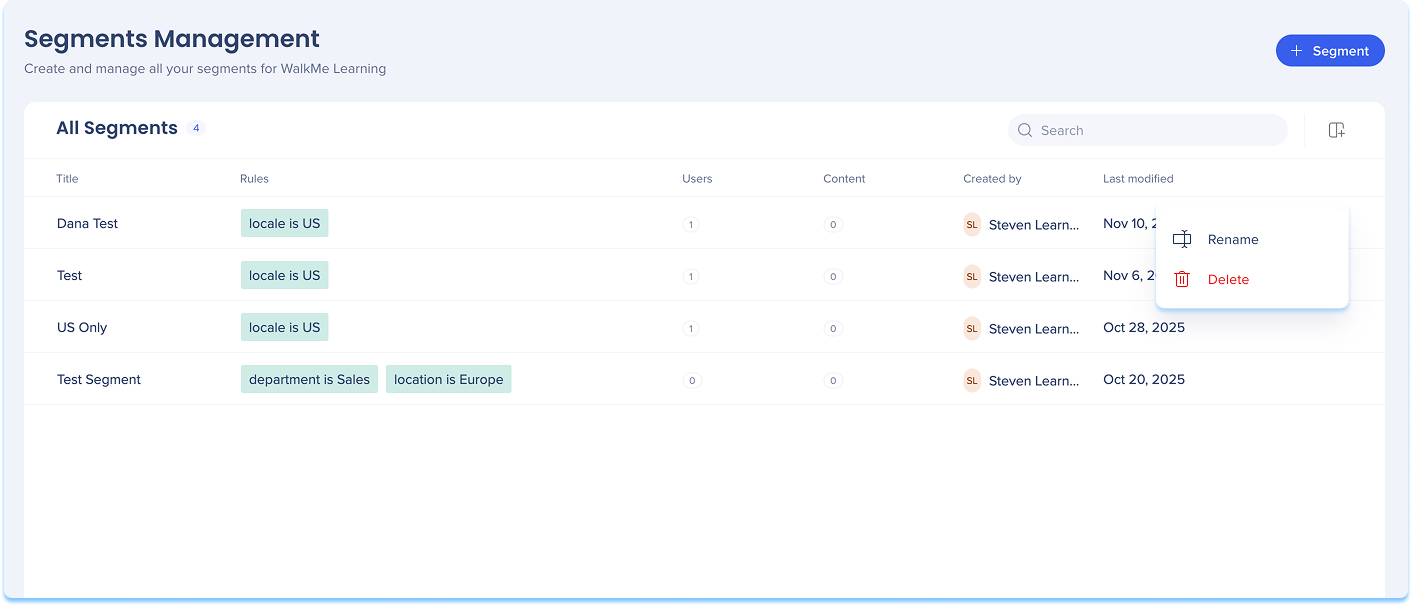
Segments in the Learning Content Page
Use the Learning Content page to create new segments or apply existing ones to learning items.
Add a segment from the Learning Content page
- Go to the Learning Content page
- In the Segment column, select the + Add icon
- Follow the steps in Add a segment from Segment Management above.
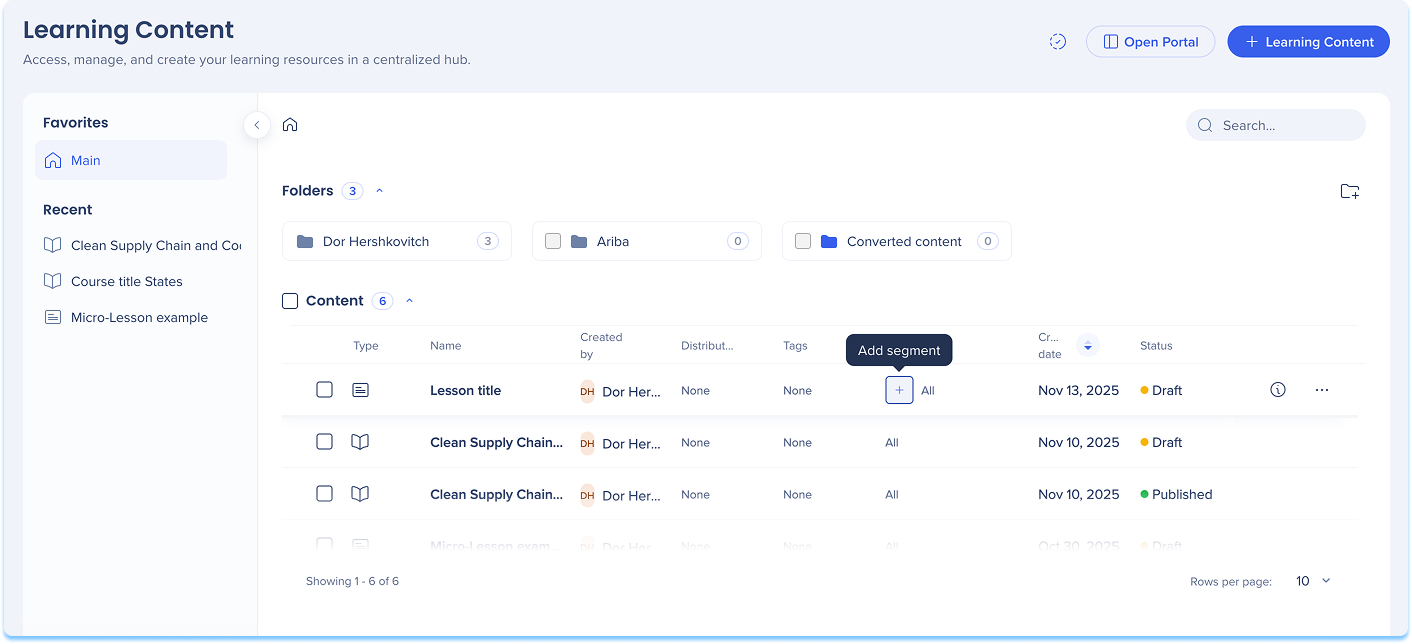
Apply segments
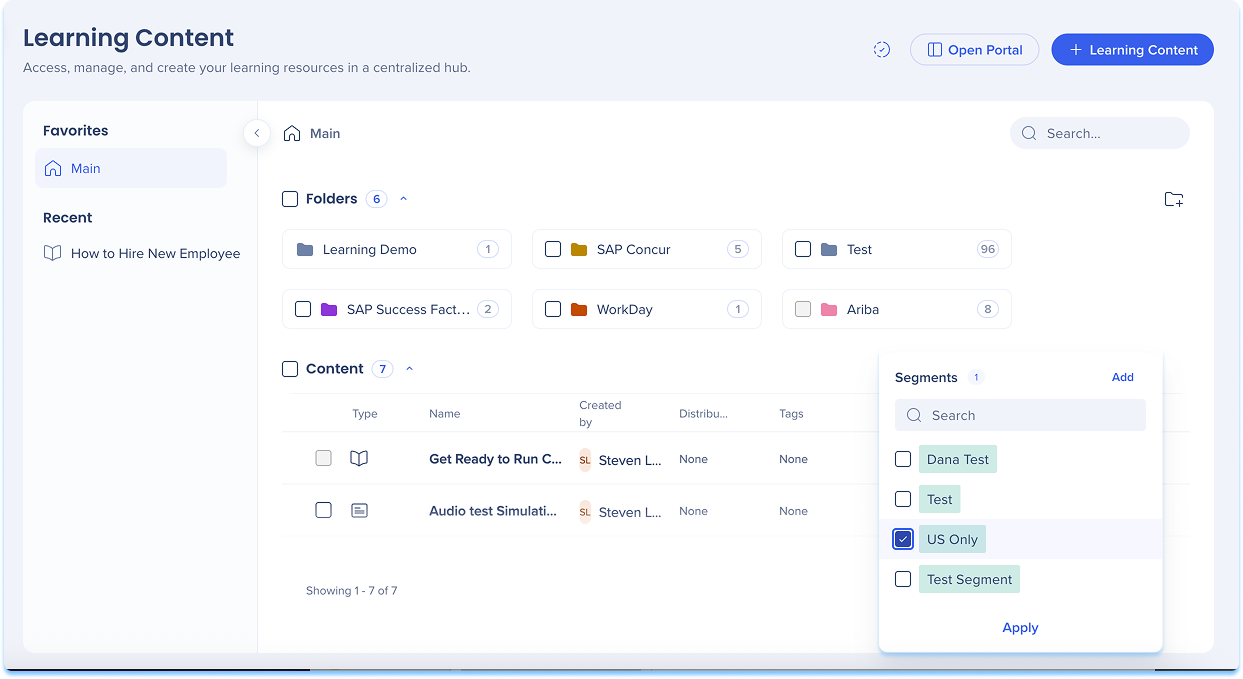
Apply an existing segment to content:
- In the Segment column, select the + Add icon
- Choose an existing segment from the list
- Select Apply to connect it to your content
注
Users without an email address are still assigned but don't get a notification email.
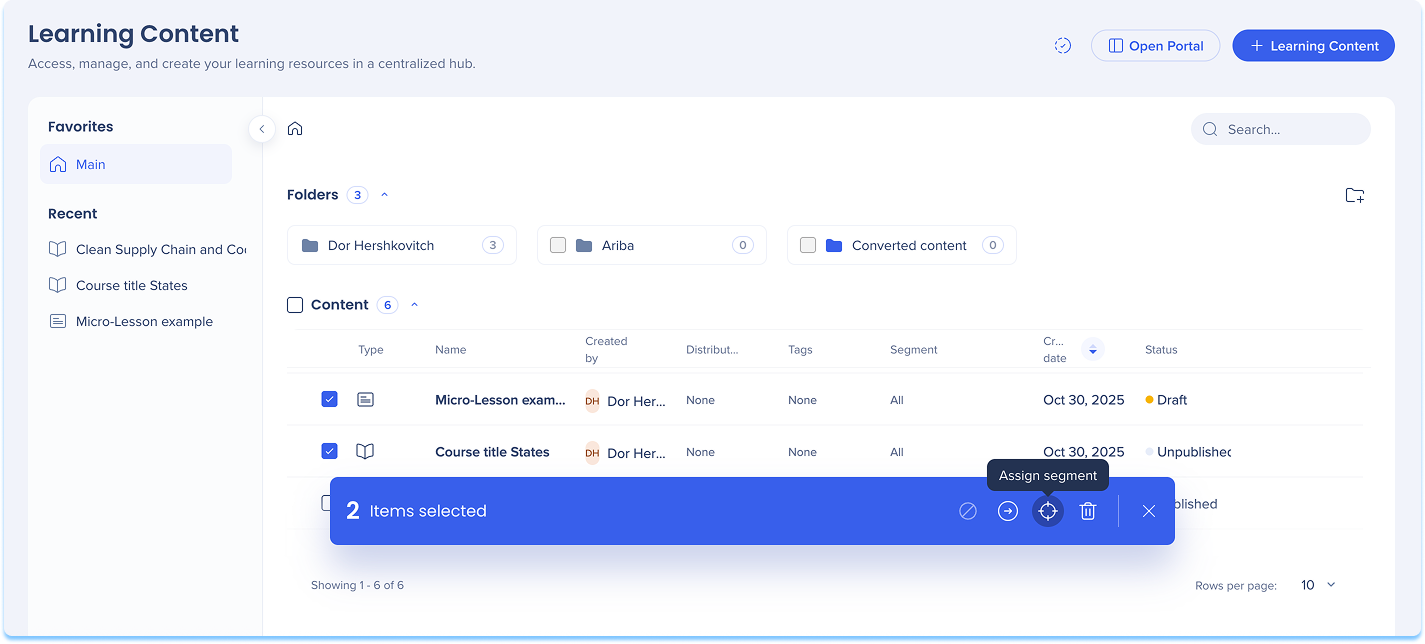
Apply segments to multiple items
- Select the checkboxes next to the learning items you want to assign
- In the floating toolbar, select Assign Segments
- Choose one or more segments
- Select Apply
FAQs
Q: Why aren't users showing up in my segments?
A: A few common reasons:
- If the segment uses the IDP source, users appear only after their first portal login. The segment still works, but users don't show up in the UI for selection until then.
- If the segment uses the SCIM source, only users in the SCIM-assigned group are synced.
- Check that your segment conditions match the attributes available in your IDP or SCIM setup.
Q: I set up SCIM but users aren't syncing. What should I check?
A: Select Settings, then Identity & Access, and then IDP & SCIM. Check the SCIM Provisioning status. If it shows "No users provisioned," assign a user group to the WalkMe app in your identity provider.
Learn more: Configure SCIM with Okta
Q: Why is a user seeing in-app content when they're not in the segment?
A: Segments gate access to content in the portal. In-app content appears to all users regardless of segment. Users are gated by segment only when they're redirected to the portal.
Q: Can I use IDP and SCIM at the same time?
A: Yes, in different segments. Each segment uses one source, so you choose IDP or SCIM when you create the segment.
Q: What happens to my existing IDP-based segments when I turn on SCIM?
A: Existing segments keep working. They show IDP as their source, or User list for manual and CSV segments, and their source can't be changed. New segments use the source you choose.
Q: Can I segment users who don't have an email address?
A: Yes. Users are matched by the user identifier set in your identity provider, which doesn't have to be an email. These users can be assigned content, but they don't get email notifications.
Q: Why can't I select SCIM?
A: The SCIM source is available only when SCIM is set up for your account. If your user identifier isn't an email, SCIM segments also need an email attribute in your identity provider, so SCIM users can be matched to their user identifier.
Technical Notes
Limitations
- IDP and SCIM segments need a connected identity provider. User list segments work without one.
- Users are matched by the user identifier set in your identity provider. The identifier can be an email or another unique value, like a user name, user ID, employee ID, or Okta ID.
- Users without an email address can still be assigned content, but they don't get email notifications.
- When using IDP (no SCIM)
- Segments use IDP attributes
- Users appear in segment selection only after their first portal login. Until then, segments still work, but you can't see or select those users in the UI.
- When using SCIM
- SCIM segments use SCIM attributes only. The SCIM source is available only when SCIM is set up.
- If your user identifier isn't an email, SCIM segments also need an email attribute in your identity provider. Without it, the SCIM source isn't available.
- SCIM conditions support only the is and is not operators
- Only users in the SCIM-assigned group are available for segmentation
- Only attributes set up in SCIM are available as segmentation conditions
User list segments
- File and parsing
- Runtime behavior
- Identifiers are matched against the list when the portal loads
- Users who aren't provisioned yet qualify on their first login
- Uploading a new file replaces the entire list. Previous entries aren't kept.
- The list is never written back to IDP or SCIM
CSV integration segments
- Built from a CSV file uploaded to WalkMe through the integration center
- Use the file's properties to build segment rules
- The CSV integration source is available only when a CSV integration is set up