Brief Overview
End-User Update API is an Integration that allows you to call a customer-facing API to update end users' attributes of a specific end-user. This can be used to send server-side update calls from any SaaS service that can send callbacks to an endpoint (i.e. URL).
This provides the ability to receive real-time updates to WalkMe's End User Object, the integration set up allows you to identify the fields you want to import from any payload (allowlist) that will be stored in WalkMe's end-user object and will later be available for filtering on Insights, reporting, and segmentation.
Please Note:
If you are interested in enabling this feature for your account, please speak to your WalkMe Account Manager.
Use Cases
- Update WalkMe's end-user object in real-time when a new end-user is registered.
- Update WalkMe's end-user object in real-time when an end-user upgrades from a free to a paying user - and having this data available for content segmentation evaluation.
- Update WalkMe's end-user object in real-time when a customer churns.
- Set up a webhook in your CRM to update WalkMe's end-user object whenever a customer reaches over $1M ARR and can be defined as a "premium customer".
Creating an End User Update API Integration
Step 1 - Create a new End User Update API Integration
- Navigate to Insights
- Go to the Integrations tab (bottom left on the menu)
- C
Step 2 - Define the Integration
- Give the Integration a Name - Notice this is the name that will be shown on the Editor's Segmentation Center rule engine as well as on Insights so use a meaningful name.
- Provide the User Identifier Property - Enter the field that will hold the end-user identifier as identified in WalkMe - for example, if your selected End User Identifier method is a variable containing the end user's email, the field entered should be the field in the payload JSON that will hold the end user's email. If your payload is in a format of a JSON object use dot-separated names (<object name>.<field name>)
- Enter the Properties to Import - Enter the fields and their type from the payload JSON that you wish to Import into WalkMe. These are the fields that will be available for Segmentation, Filtering on Insights and Reporting. If your payload is in a format of a JSON object use dot-separated names (<object name>.<field name>). Supported Types are: String, Number, Date (in the format of YYYY-MM-DD)
- Click on Continue
Step 3 - Get Integration Endpoint and Test
- The integration now displays the endpoint to send your API request to
curl -L -X POST 'https://api.walkme.com/public/v1/user/data'

--header 'Content-Type: application/json'

--header 'Authorization: Bearer <access-token>'

--data-raw '{

"token": "c865ab9ec9ffd1fbbe18a452951329bdd3e814484086bc0068da807208062c40",

"data": [

{

"properties.ID": "name@company.com",

"field1": "value",

"field2": 123,

"nested": {

"field": 456

}

}

]

}'
- Copy this Endpoint to the service you are using to send WalkMe the requests
Step 4 - Send Update Requests to the Update API Endpoint
The End User Update API is accessible through WalkMe's Public API. In order to use it, two calls should be made
- A call to get get an Authorization token (See: https://developer.walkme.com/reference#getting-started-with-your-api-1)
- Using the token Authorization extracted, send a POST request to the endpoint received in Step 3. The payload of your request should correspond with the integration set up (see examples below)
- Request body must be a valid Json object with 'token' and 'data' properties.
- The 'token' property should contain the value received when the endpoint was created on the integration center. It should not be confused with the "acess-token".
- The 'data' property is an array of Json objects with a user identifier field and at least one other field with value ("null" is not a valid value"). The fields names should align with the integration schema as defined when setting up the integration point.
Please note:
- It is not allowed to send "null" values in the API. Such calls will be considered illegal and will be ignored.
- The data properties do not have to include all of the attributes that were defined in the integration.
- Only the field for the user identifier property is mandatory.
- In case of missing fields: When updating a single user, missing fields value will remain as is.
- When updating multiple users, missing fields values will be deleted.
Using the End User Update API for Segmentation
- Once the Integration is set up - Perform an empty publish so you can segment based on the imported fields in your Editor.
- In WalkMe's Editor, go to the Manage Segments Menu
- Create a new segment or edit an existing one
- In the rule engine - select group "user attributes" → select your integration name (given in Step 2- Define your Integration) → select the field from the list you wish to segment by
- Define your condition (notice the operators shown are defined by the type of the field you inserted in Step 2 - Define your Integration)
- Click Done
Please Note:
The specified conditions are only evaluated on page load.
Using the End User Update API for Filtering Data in Insights
- In Insights - create a new Filter or update an existing one.
- Select USER → Click on the field you imported in Step 2 - Define your Integration. Notice the descriptive text next to each field in the list since you can have multiple fields with the same name coming from several integrations
- Define your condition (notice the operators shown are defined by the type of the field you inserted in Step 2 - Define your Integration)
- Click Save Filter
Best practices
- When modifying an integration, changes will be updated immediately.
- Once the End User Update API is called - the End User object will be updated immediately. Keep in mind that the conditions are evaluated at every WM load, so if the end-user clicked on a button that is connected to a webhook sending this call (for example a button for upgrading the account) - the condition will only be re-evaluated on the next WM load (next page or refresh).
- Less is more - Be sensitive to the total number of attributes that you integrate to WalkMe. We allow a total of 100 attributes total across all incoming integrations.
- It is important to emphasize that unlike other Incoming Integrations, the End User Update API will only be updated once the API is called, and only for the specific End User that the API was called with.
- If you want to batch-set the attributes for all their end-users ahead of time, they can use the Incoming Integration - CSV Upload.
In this case, please note that the 2 integrations will set 2 different attributes, so:
- The limitation of the 100 attributes is across all integrations - both the API and the Incoming batch integration - so if they have all fields in both that will decrease the actual limit to 15.
- In terms of rule definition for segmentation, they will have to build it with two rules and use an "OR" relation in between. For example:
Incoming Integration customer type = 'paying' OR API integration customer type = 'paying'.
Process Example
Below is a real-life example of how to update the Customer Status and Type attributes on a WalkMe system with an identifier that is in a format of the end user's email:
Step 1 - Create a new End User Update API Integration
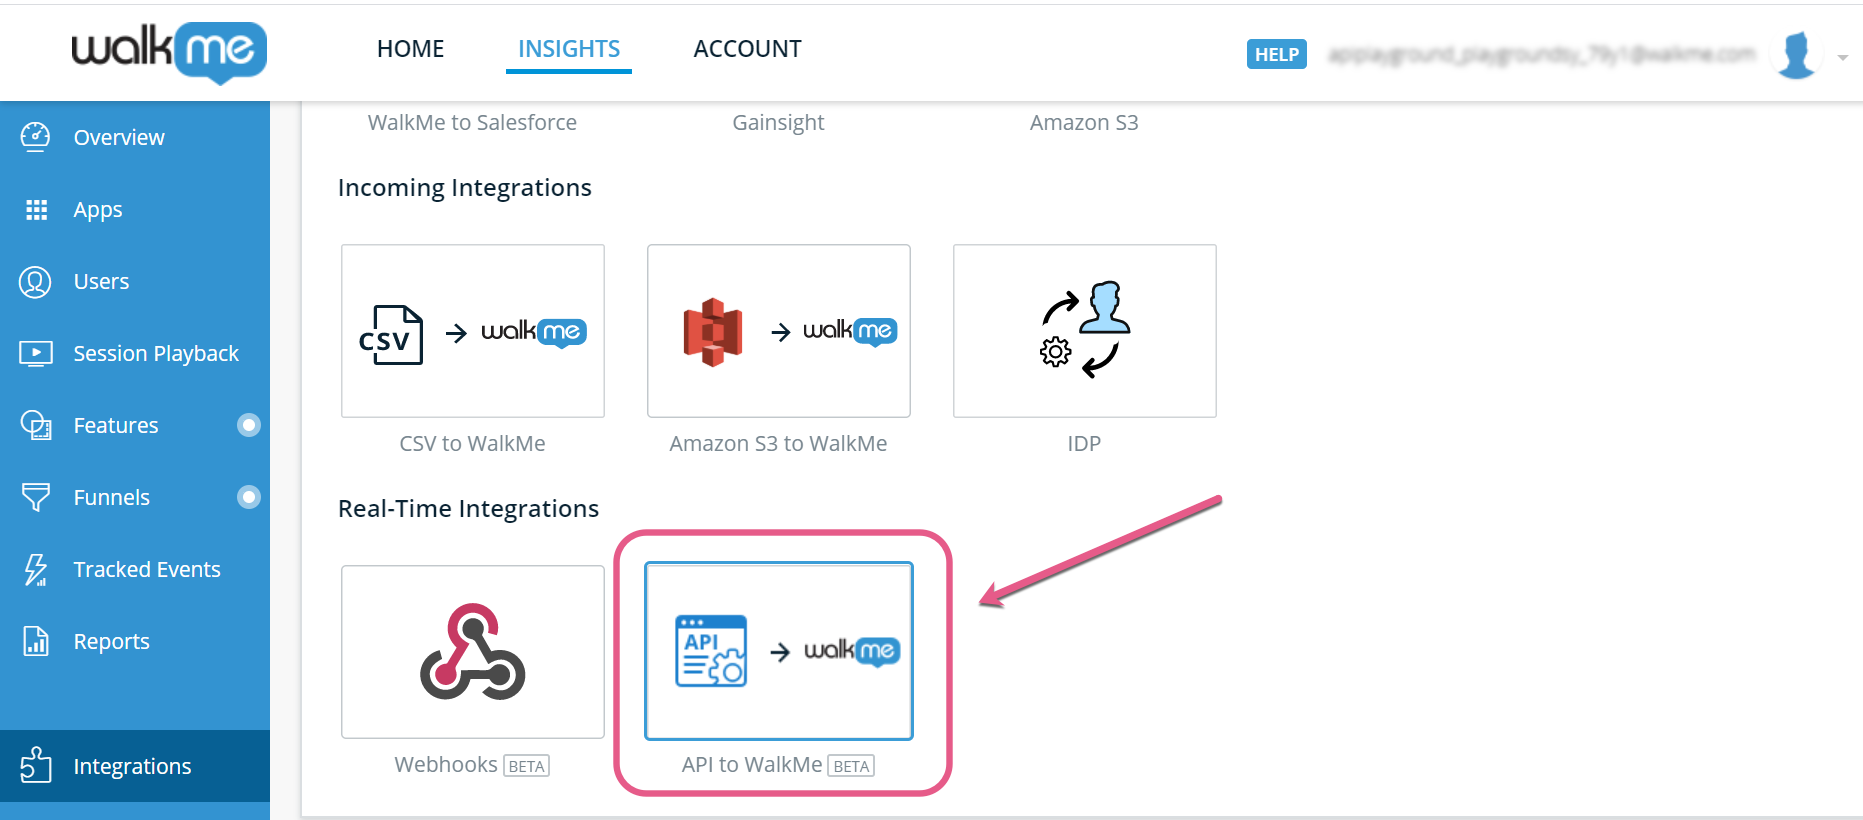
- Navigate to Insights
- Go to the Integrations tab (bottom left on the menu)
- Click on 'API to WalkMe' - this will open up the integration wizard
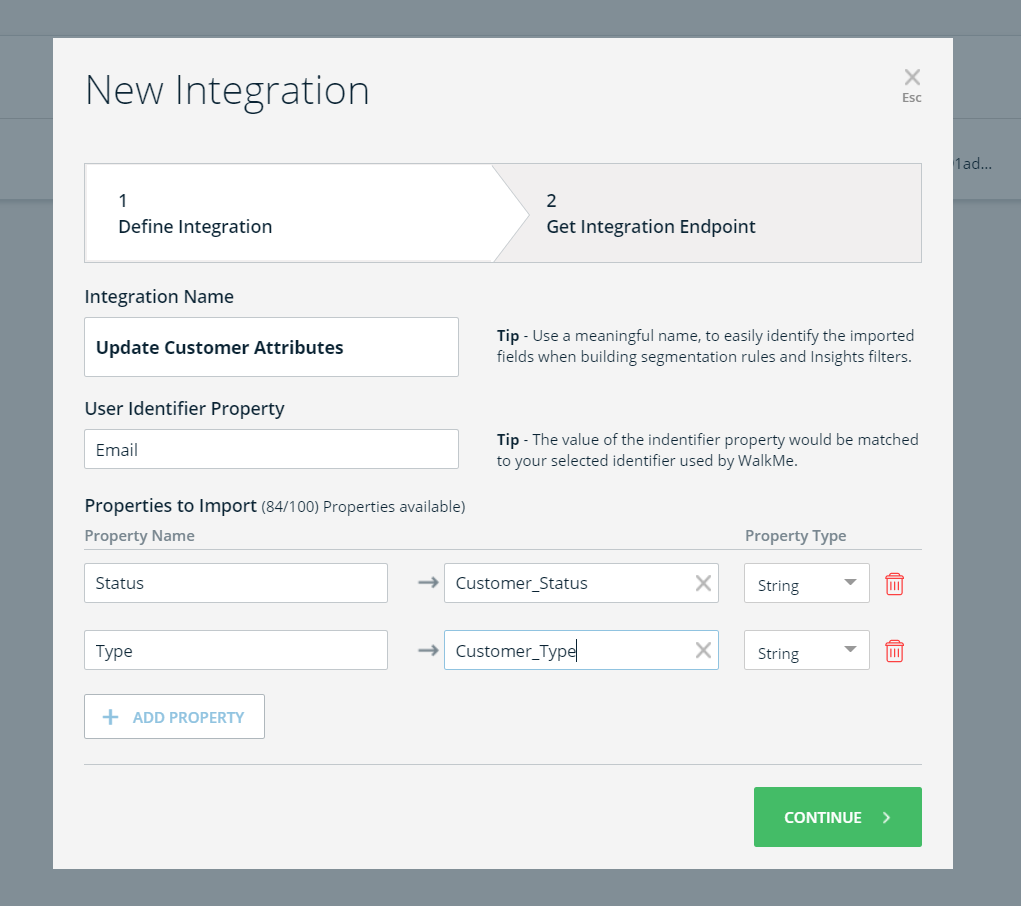
Step 2 - Define the Integration
- Give the Integration a Name - "Update Customer Attributes"
- Provide the User Identifier Property - My WalkMe Identifier method is a variable returning the end user's email and my payload will have the end user's email under the property "Email" so I will choose: "Email".
- Enter the Properties to Import - My payload contains 2 properties I would like to import: "Type" and "Status". I want to rename those to "Customer_Type" and "Customer_Status" so these are the attribute names shown in the Segmentation Rule Engine and on Insights:

Both of these properties will contain string-type values, which is why I selected "Property Type" = String.
- Click on Continue
Step 3 - Get Integration Endpoint
- The integration now displays the endpoint to send your API request to.
- Click on the Copy icon and copy this Endpoint to the service you are using to send WalkMe the requests.
Step 4 - Send Update Requests to the Update API Endpoint by making two calls
- Get an Authorization Token (See: Getting started with your API in the Developers Hub ) Send a POST call to:https://api.walkme.com/accounts/connect/tokenAuthorization Type = Basic Auth ( Username and password should be the username and password received for the Account (See Prerequisites) )Token = <access token received in Step 4.1>Body:
"{["grant_type" : "client_credentials"]}"

An access token will be received in the response:"access_token": "eyJhbGciOiJSUzI1NiIsImtpZNURDNTY1NkU4RDc4NEUiLCJ0eXAiOiJKV1QiLCJ4NXQiOiJhYzRpVXJXLUNZSDNHUjY3LVYzRlpXNk5lRTQifQ.eyJuYmYiOjE1Nzc2Mjk1MzYsImV4cCI6MTU3NzcxNTkzNiwiaXNzIjoiaHR0cHM6Ly9hcGkud2Fsa21lcWEuY29tL2FjY291bnRzIiwiYXVkIjpbImh0dHBzOi8vYXBpLndhbGttZXFhLmNvbS9hY2NvdW50cy9yZXNvdXJjZXMiLCJXYWxrTWUgcHVibGljIl0sImNsaWVudF9pZCI6IjdkNjhiYTUwMGQwYTExZTk4MWI4MDJlZGRhNjMiLCJqdGkiOiI4NmQyZmE1Mi00YjkxLTQyZjUtOTgxMS0wZDUxOWM4YTI1ZGMiLCJqd2siOiIzYzM4eVVwbGVrSFJHWEFoVTVKajl3Z0JBYXBBdFoyQSIsInNjb3BlIjpbImxhbmd1YWdlczpyZWFkIiwibGFuZ3VhZ2VzOndyaXRlIiwicm9sZXM6cmVhZCIsInVzZXJzOnJlYWQiLCJ1c2Vyczp3cml0ZSJdfQ.Ufmo0cR6L9LfAfFl8tE-ZwQmFS5db0IRmXeRtDw2RZ88n1yV7wJ-bHKkZcIObv90achf2-3MhSdELZPH_YJQLz858Y79szfyUi5kraX2dHfA3U7UujjuL3qEUZMK0NR5JC37RIm-tvApOrbzl0Vc4aFKSF5Ae8pBOd2zfdsTvMkczI928AFJ-ieO9-U8Pl3vrYLNjaG-WzRE111ckQzzWMf1F2svdx9VRxxLOfm8TtVatuvcAS4uQFW1XKVVAn7VLMyGJDoM6Q03UXhUsyWwtQ78wilqY2xNEM0iQS9iuDfwp5dZEzw8nrIepKBoskBGXTac8z6QQXlHfpI3Gu64YyIQc2rDyyoFFZvPNOYbV5REI6rIKpYMWvTmDXyvnON84_Ojiq0HW-ikQmMSyvHWQpS0mXDiw4x3vkwOxUIaYwQJpCILGcqgomLr7XfoqRtPz25kG2ezneCuP0WpEGsT0K2I29m0pI4HwChXOY4UeRvbTpmCWBXnfYeE8RKNClnpFGv6Vl13hvVIu42IVTXy6w8dbngf9p0L9XzwaDRXnb6apDNow49gzVidjdSw1pe2A_INGbyyNeE-mxm-rIOTeqqY5q8MK62wOeF14W3KjztHhD0q7sMhaTrXHyk3pucK6LtDsdVSFWIpGKwI6L1yBNaujDOqxuhMzkblfDB7eXUCI6IjY5Q0UyMjUyQjVCRTA5ODFGNzE5MUVCQkY5",    "expires_in": 86400,    "token_type": "Bearer",    "scope": "languages:read languages:write roles:read users:read users:write"}
- Using the token extracted, send a POST request to the Integration Endpoint received in Step 3.
Token = "eyJhbGciOiJSUzI1NiIsImtpZNURDNTY1NkU4RDc4NEUiLCJ0eXAiOiJKV1QiLCJ4NXQiOiJhYzRpVXJXLUNZSDNHUjY3LVYzRlpXNk5lRTQifQ.eyJuYmYiOjE1Nzc2Mjk1MzYsImV4cCI6MTU3NzcxNTkzNiwiaXNzIjoiaHR0cHM6Ly9hcGkud2Fsa21lcWEuY29tL2FjY291bnRzIiwiYXVkIjpbImh0dHBzOi8vYXBpLndhbGttZXFhLmNvbS9hY2NvdW50cy9yZXNvdXJjZXMiLCJXYWxrTWUgcHVibGljIl0sImNsaWVudF9pZCI6IjdkNjhiYTUwMGQwYTExZTk4MWI4MDJlZGRhNjMiLCJqdGkiOiI4NmQyZmE1Mi00YjkxLTQyZjUtOTgxMS0wZDUxOWM4YTI1ZGMiLCJqd2siOiIzYzM4eVVwbGVrSFJHWEFoVTVKajl3Z0JBYXBBdFoyQSIsInNjb3BlIjpbImxhbmd1YWdlczpyZWFkIiwibGFuZ3VhZ2VzOndyaXRlIiwicm9sZXM6cmVhZCIsInVzZXJzOnJlYWQiLCJ1c2Vyczp3cml0ZSJdfQ.Ufmo0cR6L9LfAfFl8tE-ZwQmFS5db0IRmXeRtDw2RZ88n1yV7wJ-bHKkZcIObv90achf2-3MhSdELZPH_YJQLz858Y79szfyUi5kraX2dHfA3U7UujjuL3qEUZMK0NR5JC37RIm-tvApOrbzl0Vc4aFKSF5Ae8pBOd2zfdsTvMkczI928AFJ-ieO9-U8Pl3vrYLNjaG-WzRE111ckQzzWMf1F2svdx9VRxxLOfm8TtVatuvcAS4uQFW1XKVVAn7VLMyGJDoM6Q03UXhUsyWwtQ78wilqY2xNEM0iQS9iuDfwp5dZEzw8nrIepKBoskBGXTac8z6QQXlHfpI3Gu64YyIQc2rDyyoFFZvPNOYbV5REI6rIKpYMWvTmDXyvnON84_Ojiq0HW-ikQmMSyvHWQpS0mXDiw4x3vkwOxUIaYwQJpCILGcqgomLr7XfoqRtPz25kG2ezneCuP0WpEGsT0K2I29m0pI4HwChXOY4UeRvbTpmCWBXnfYeE8RKNClnpFGv6Vl13hvVIu42IVTXy6w8dbngf9p0L9XzwaDRXnb6apDNow49gzVidjdSw1pe2A_INGbyyNeE-mxm-rIOTeqqY5q8MK62wOeF14W3KjztHhD0q7sMhaTrXHyk3pucK6LtDsdVSFWIpGKwI6L1yBNaujDOqxuhMzkblfDB7eXUCI6IjY5Q0UyMjUyQjVCRTA5ODFGNzE5MUVCQkY5"
JSON payload example for one user:
{

"token": "0c29ceeb01402d61b822bb4d2bf71ae8e3d94737ec60ca8f0f83503d0f69d16e",

"data": [

{

"Email": "John@walkme.com",

"Status": "New",

"Type": "Internal"

}

]

}
Body example for multiple users:
{

"token": "0c29ceeb01402d61b822bb4d2bf71ae8e3d94737ec60ca8f0f83503d0f69d16e",

"data": [

{

"Email": "John@walkme.com",

"Status": "New",

"Type": "Internal"

},

{

"Email": "Bill@walkme.com",

"Status": "Retired",

"Type": "Internal"

},

{

"Email": "Tom@walkme.com",

"Status": "Veteran",

"Type": "External"

}

]

}


