Simulation Editing in WalkMe Learning Arc
Brief Overview
Simulations in WalkMe Learning Arc let you capture real workflows and play them in demo, practice, or test modes. This helps learners understand processes in a guided, controlled environment. Editing a simulation lets you modify slides, add visual annotations, and switch between modes. You can also adjust mode-specific settings and preview the experience from a learner's point of view. Together, these tools make it simple to create detailed, interactive simulations that enhance the learning experience.
How It Works
Access simulation editing
- Go to the simulation element in the learning content builder
- Open the simulation in edit mode using one of these actions:
- Select the simulation element, then select Edit Simulation in the toolbar
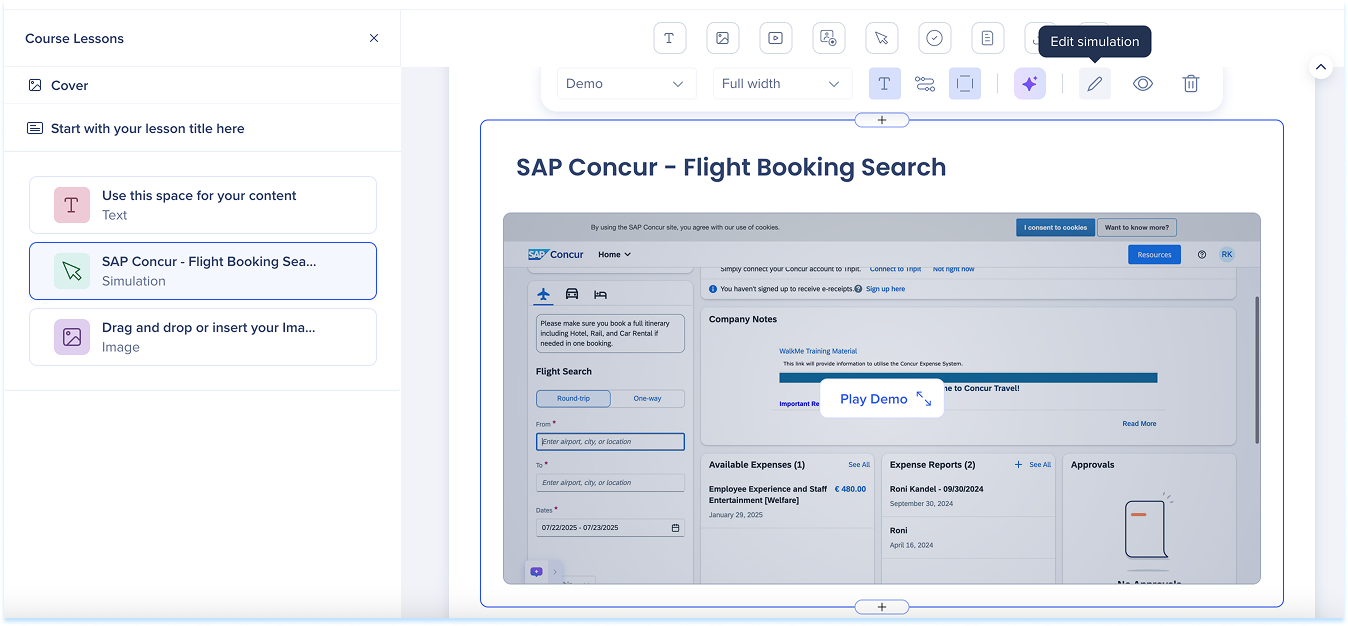
- Hover over the simulation element
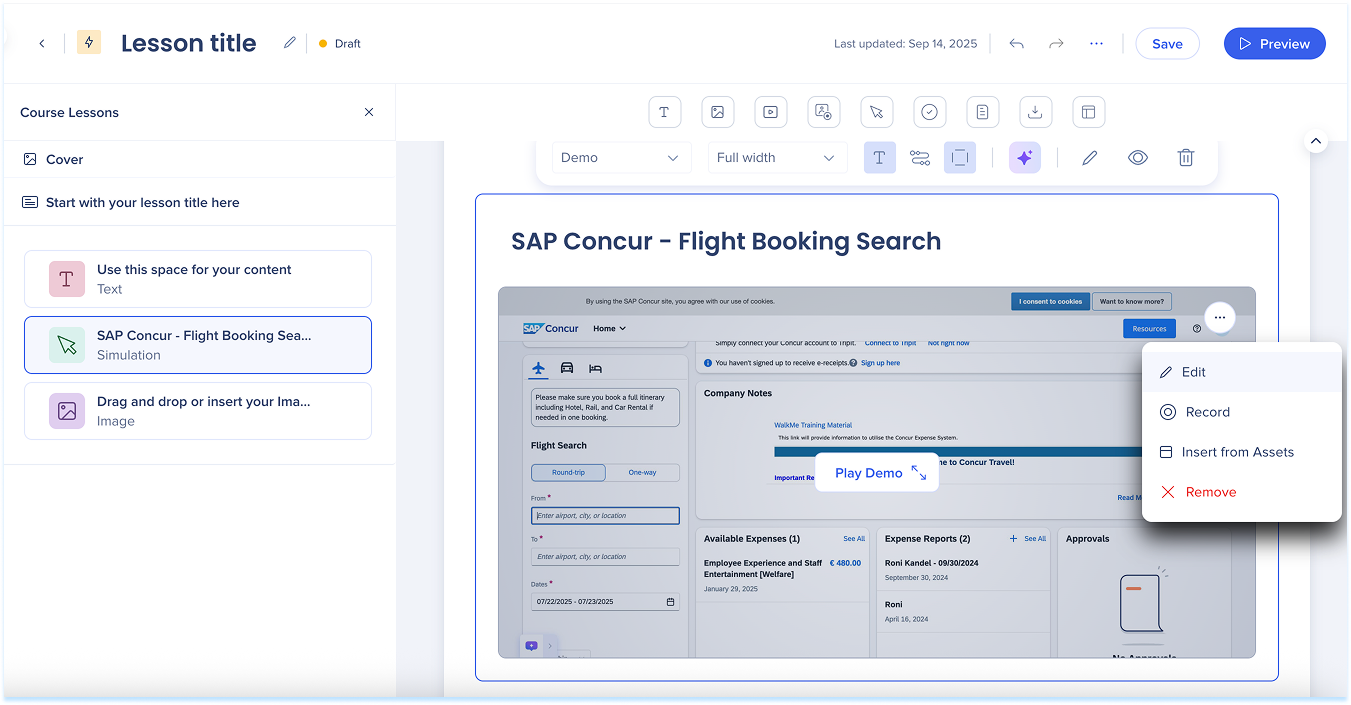
- Hover over the simulation element, open the Options menu, and select Edit
- Hover over the simulation element, open the Options menu, and select Edit
- Select the simulation element, then select Edit Simulation in the toolbar
- The simulation opens in edit mode on a new page
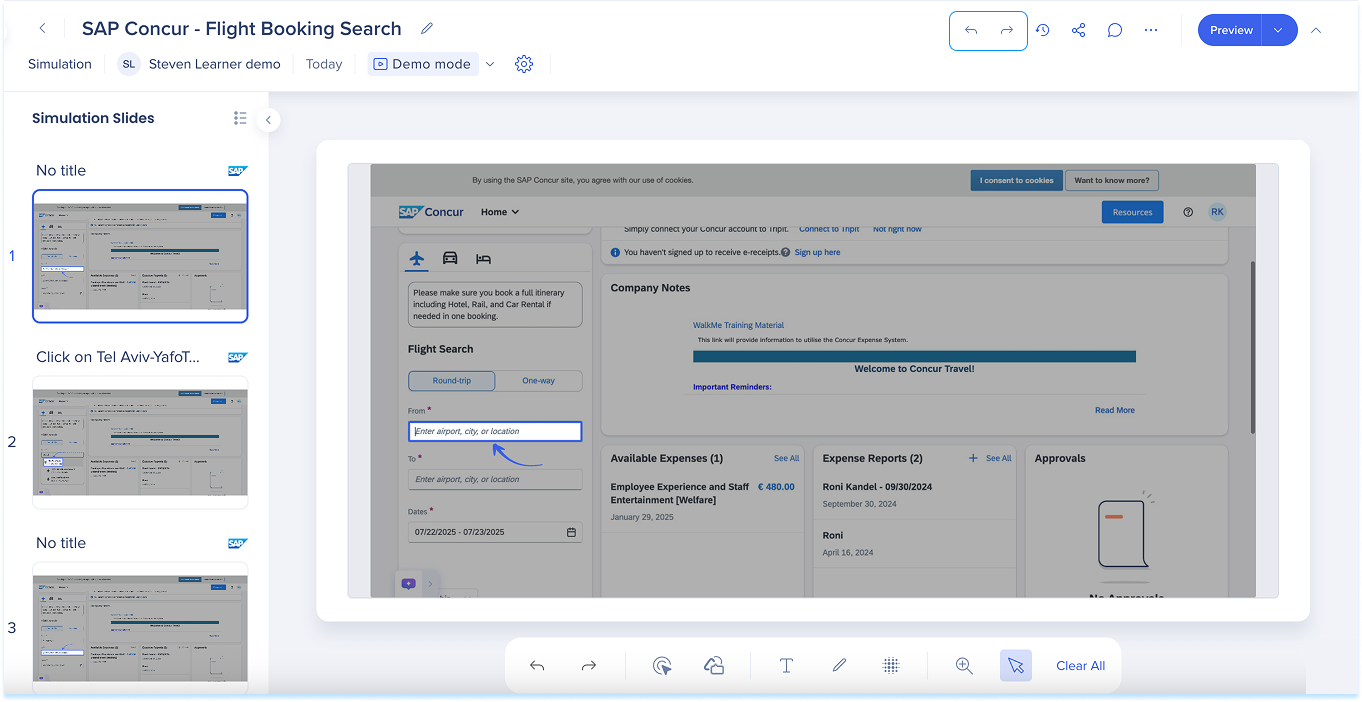
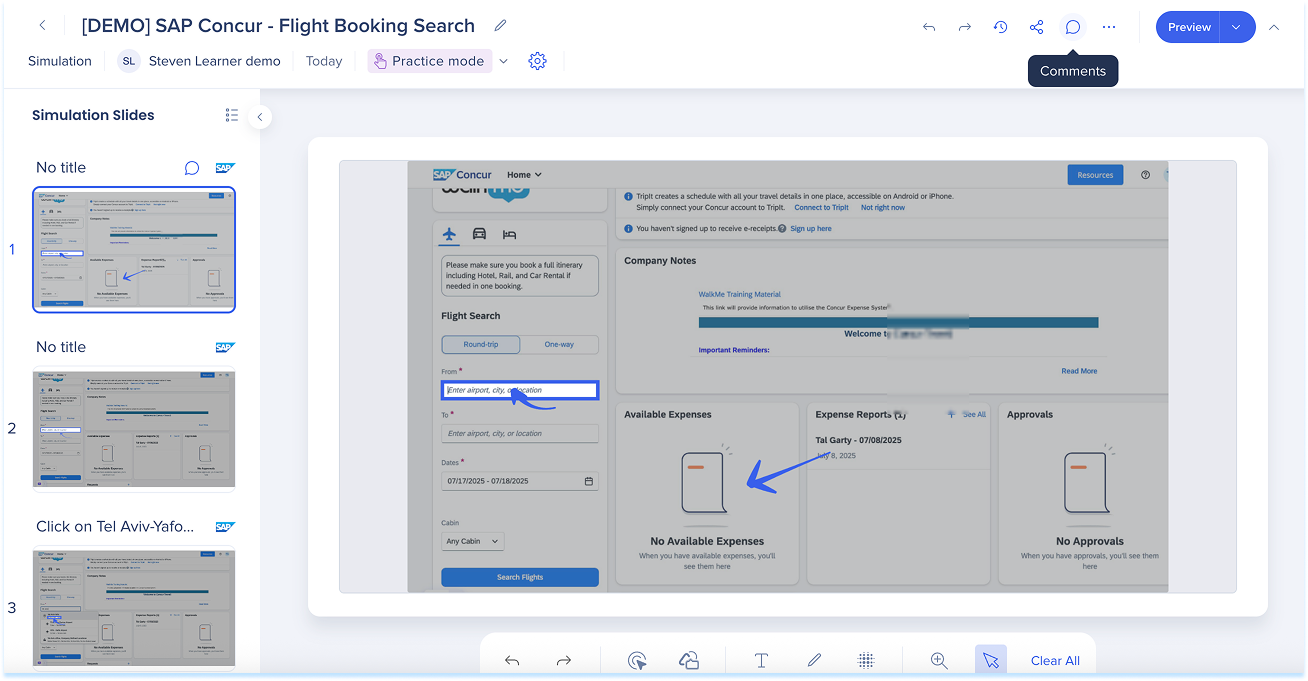
Simulation overview
The simulation editing page includes four main areas:
- Simulation slides panel
- Top panel
- Main canvas
- Annotation toolbar
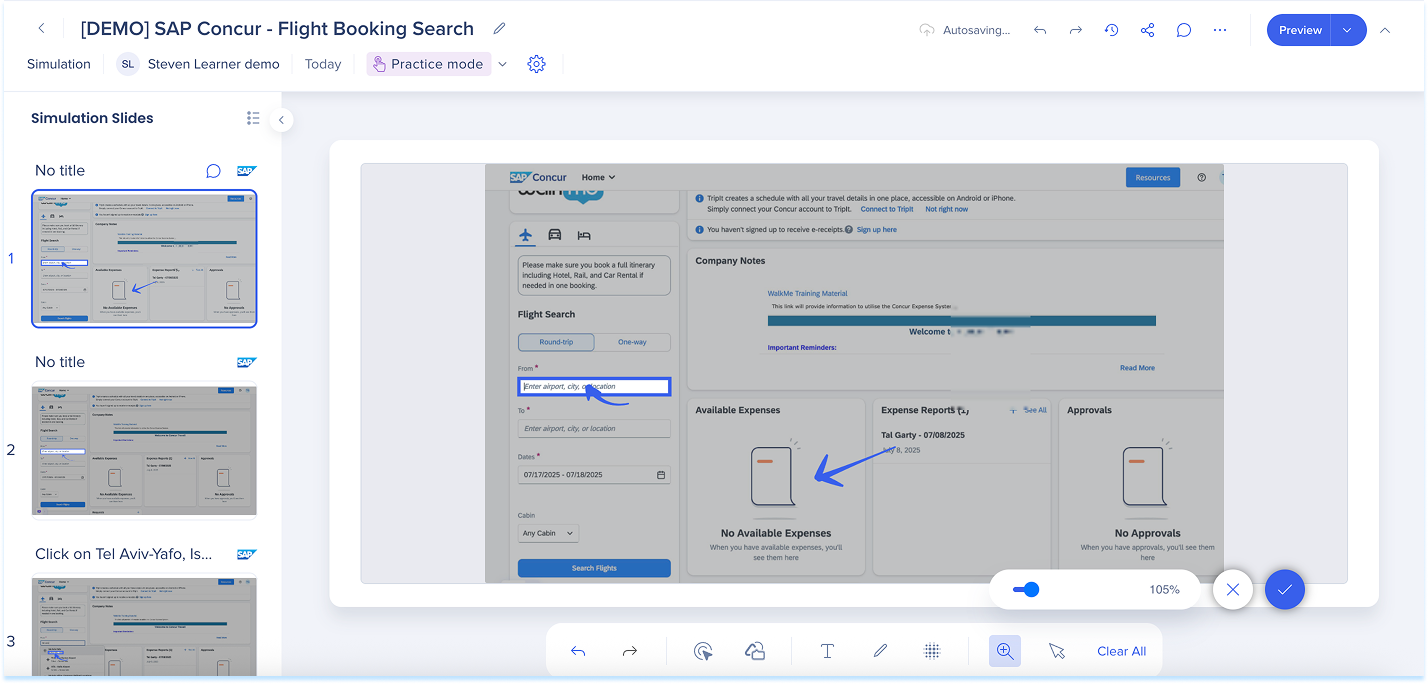
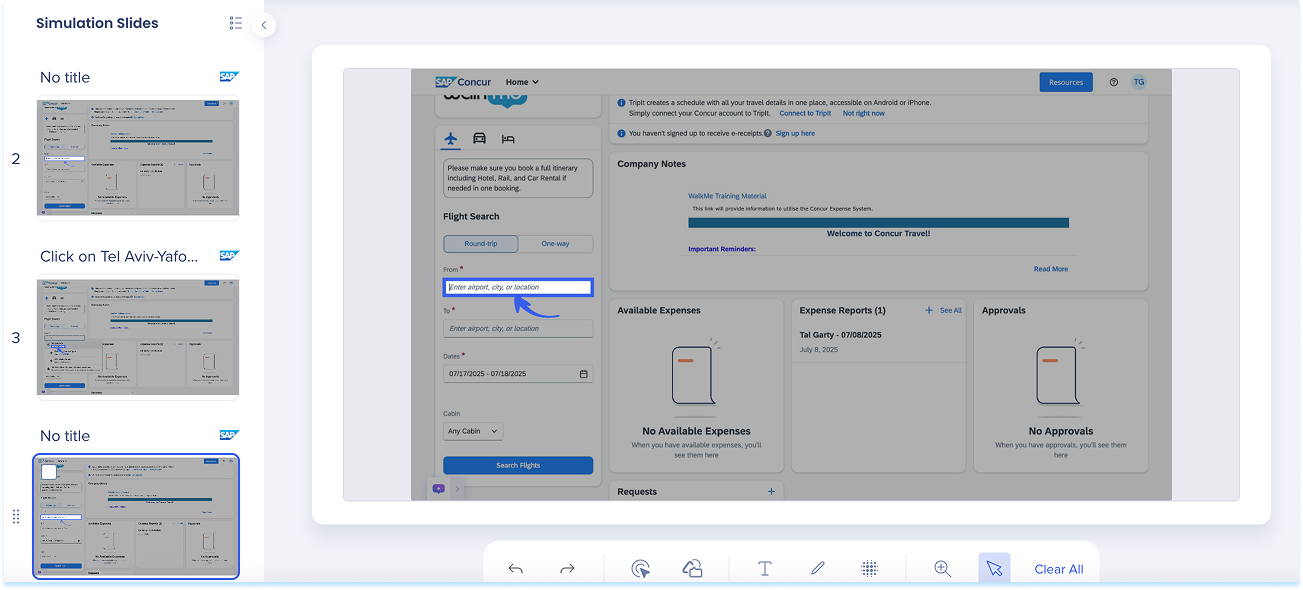
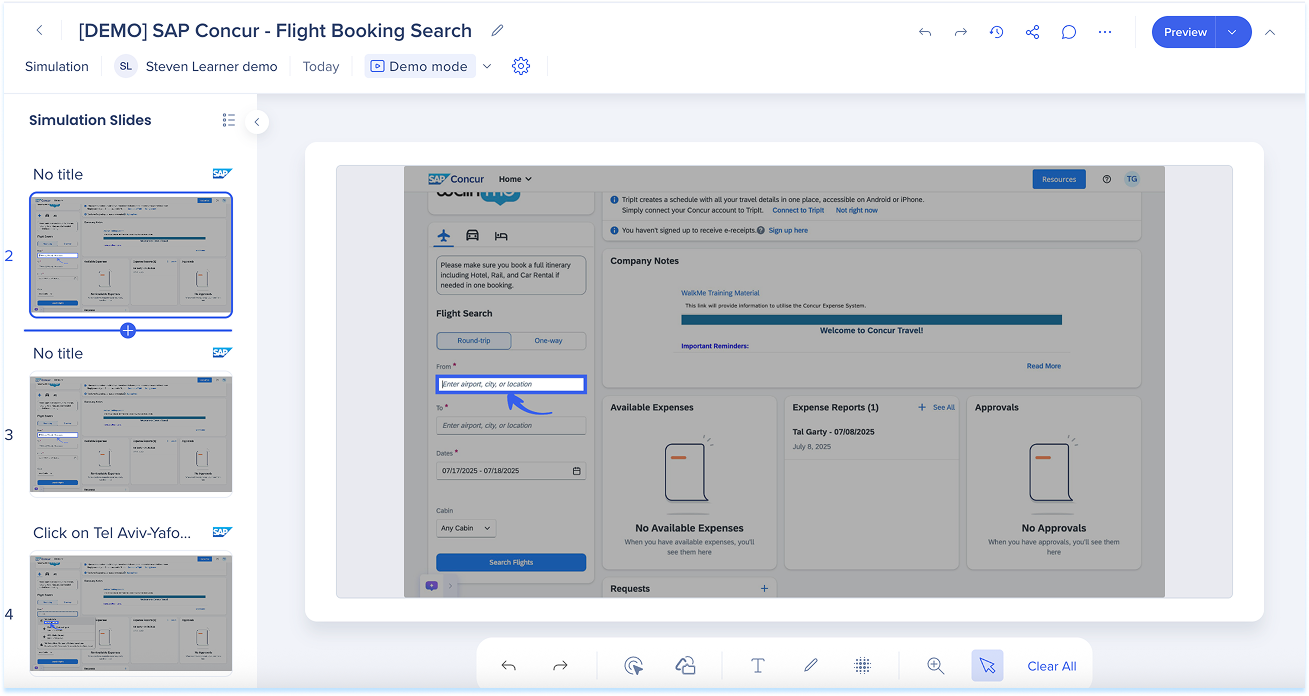
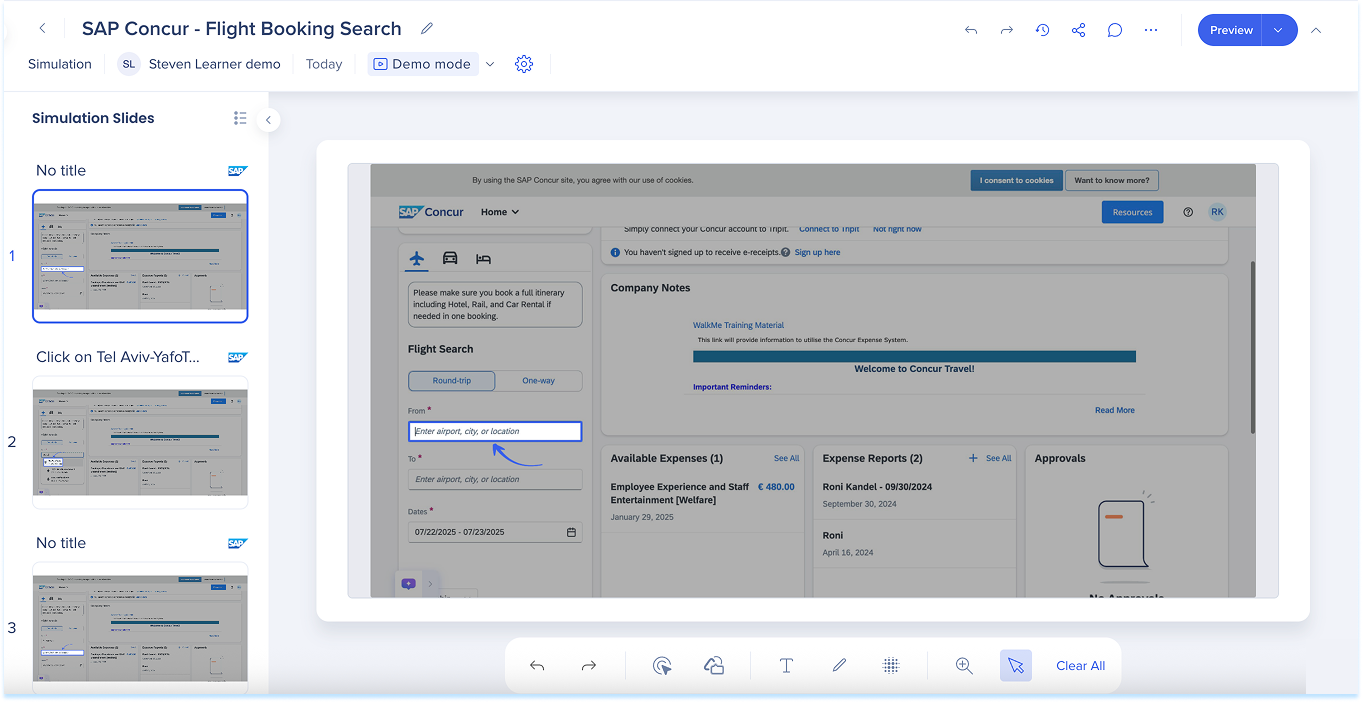
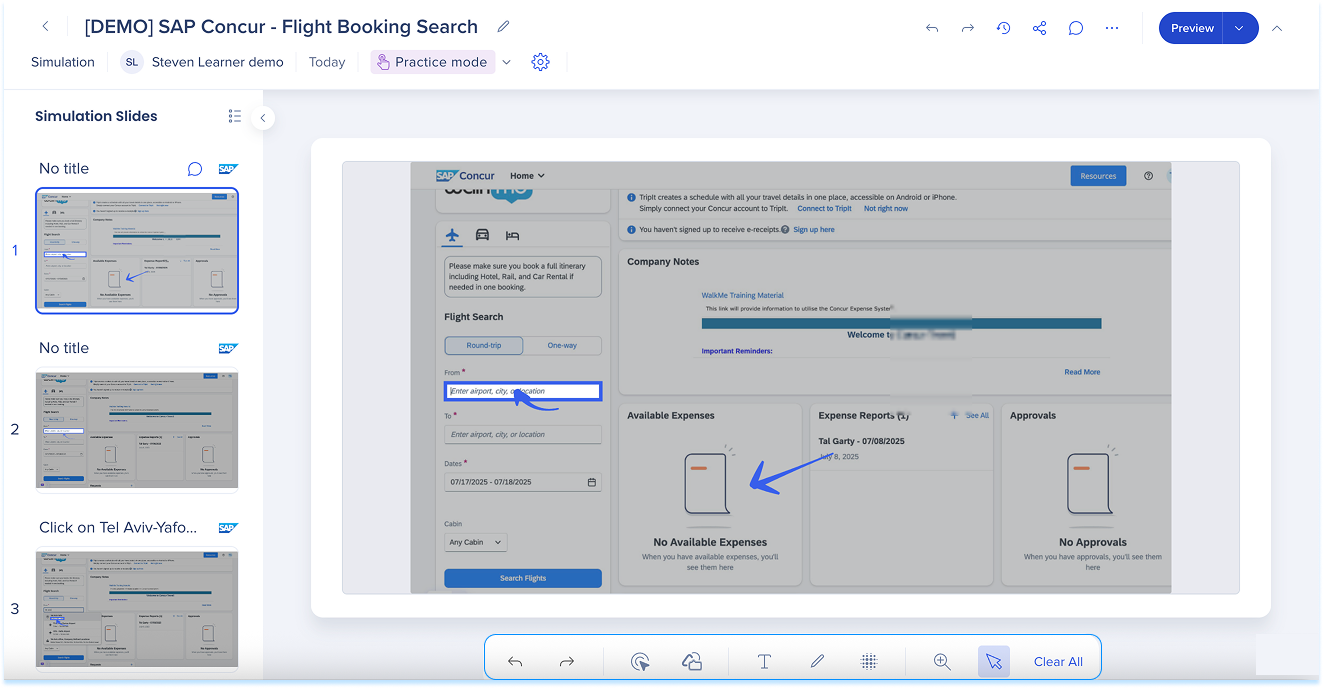
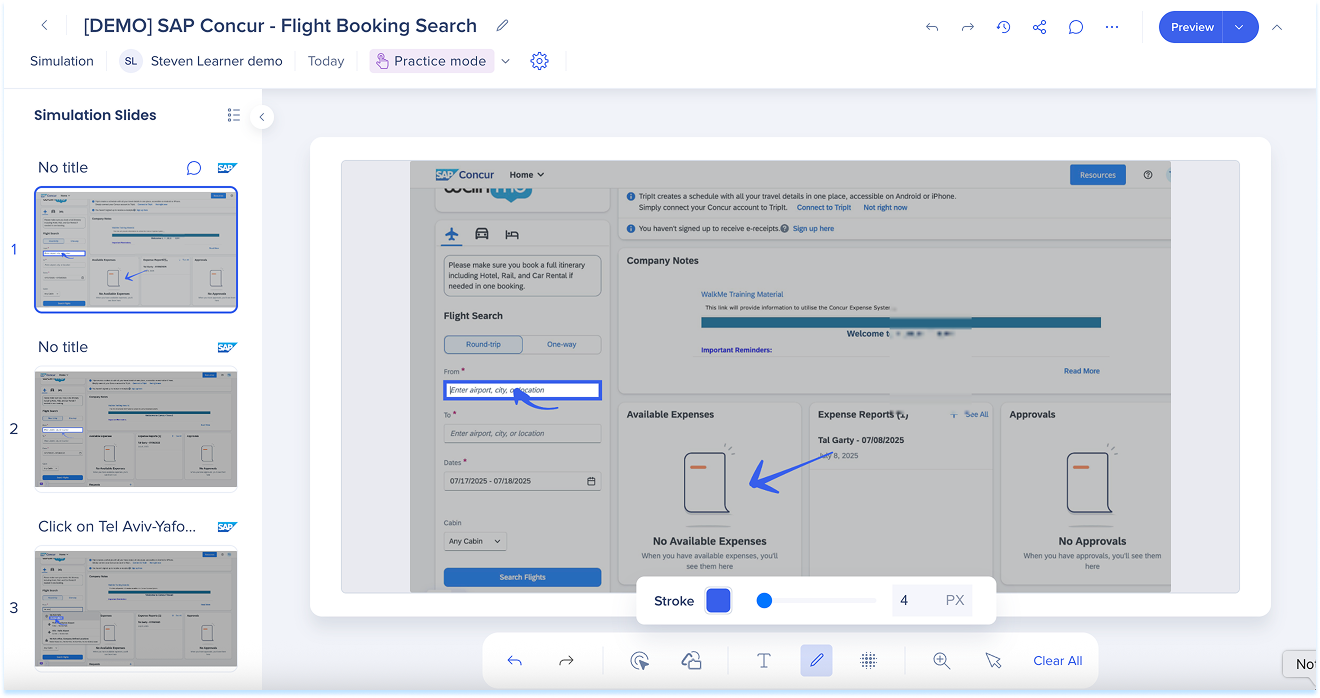
Simulation slides panel
The slides panel appears on the left and shows the simulation's steps in order.
Display mode
-
In the panel header, select the Display mode icon
-
Choose one of the following:
-
Thumbnail: Large image previews of each slide
-
List: Compact view showing step numbers and titles
-

Slide options
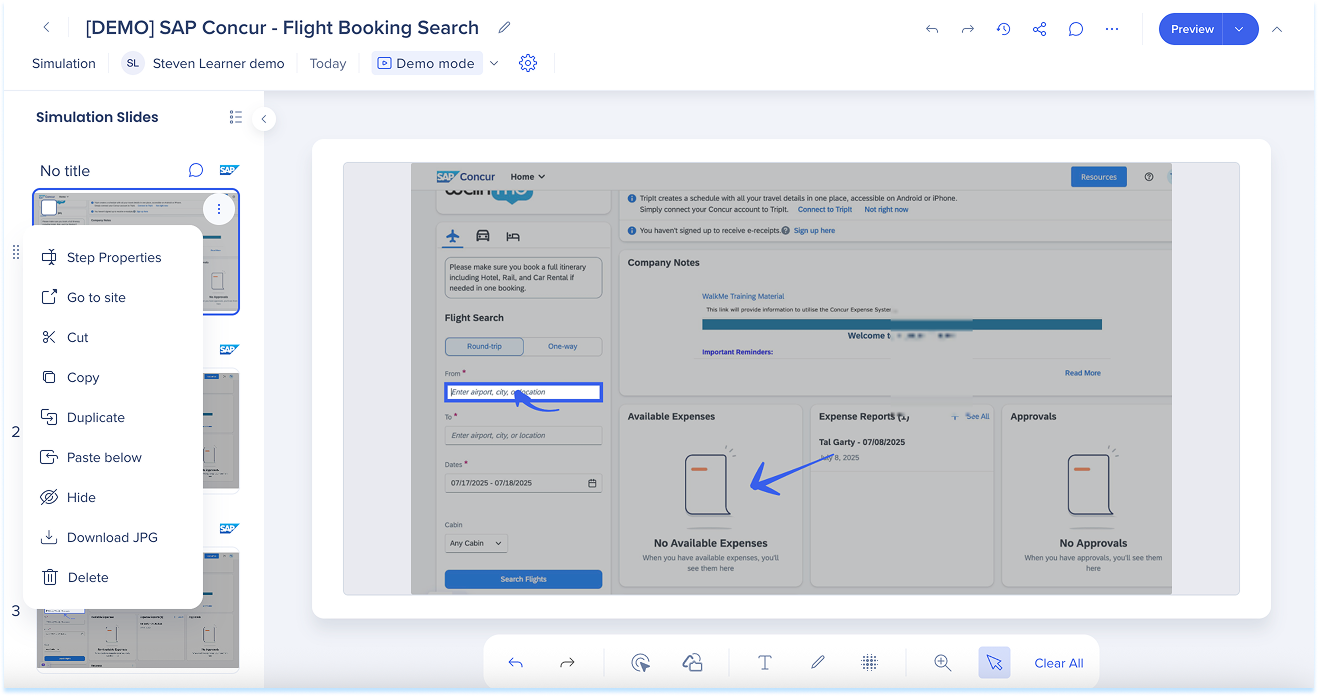
Each slide includes an Options menu with tools for managing steps.
Available actions:
- Step Properties: Edit the step title and description
- Go to site: Open the page where the simulation was captured
- Cut / Copy / Paste below: Move or duplicate slides
- Duplicate: Create a copy directly under the current slide
- Hide: Exclude the step from playback without deleting it
- Download JPG: Save the slide as an image
- Delete: Remove the slide completely
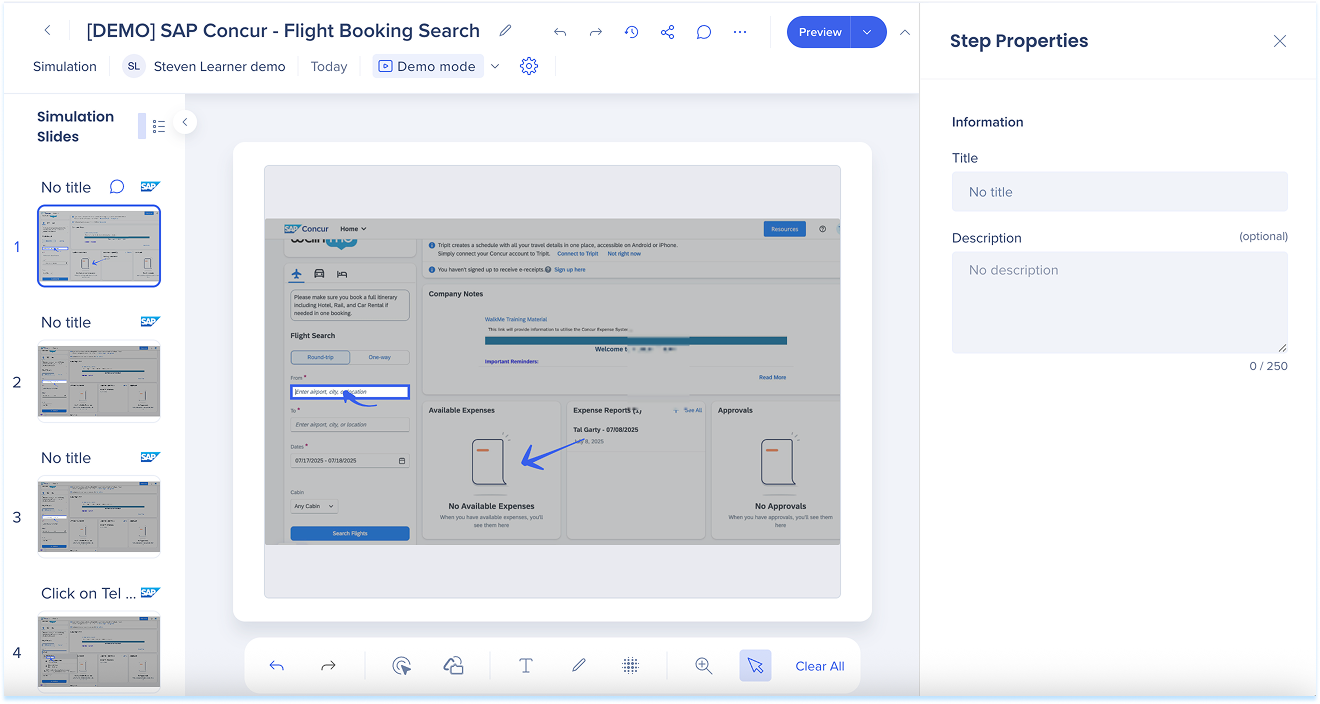
Step properties
Add details to help learners follow the simulation flow:
- Title: Name the step clearly and consistently
- Description: Add short context or instructions (optional)
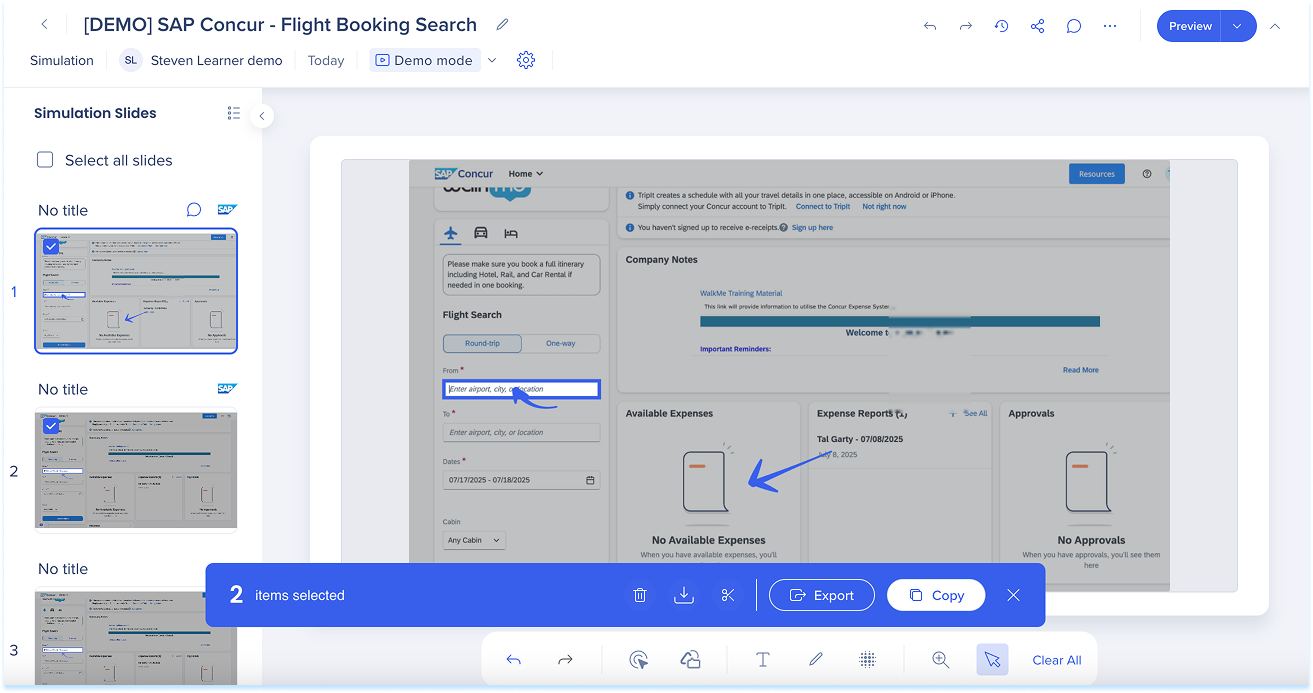
Bulk options
To manage multiple slides:
- Select slides using the checkboxes or select Select All Slides
- A blue toolbar appears with these actions:
- Delete
- Download
- Cut
- Export
- Copy
Reorder slides
- Drag a slide to a new position
Add new slide
You can insert new slides anywhere in the simulation.
-
Hover between slides to show the + Create divider
-
Select Add Recording
-
Follow the capture flow to record new steps
Top panel
The top panel contains controls for managing the entire simulation.
Includes:
- Simulation title
- Mode selection (Demo, Practice, Test)
- Mode settings
- Undo / Redo
- Version history
- Share
- Comments
- Export
- Preview
- Delete
Edit simulation title
-
Select the title field, type a new name, and press Enter
Select mode
-
In the top panel, click the Select mode dropdown
-
Choose one of the following:
-
Demo mode: Plays the simulation in a guided walkthrough format
-
No interaction required
-
Best to demonstrate a process before hands-on learning
-
-
Practice mode: Lets users try the steps themselves, with optional feedback for mistakes
-
Learners click through the flow
-
Highlights point to the right elements
-
Builds confidence before assessment
-
-

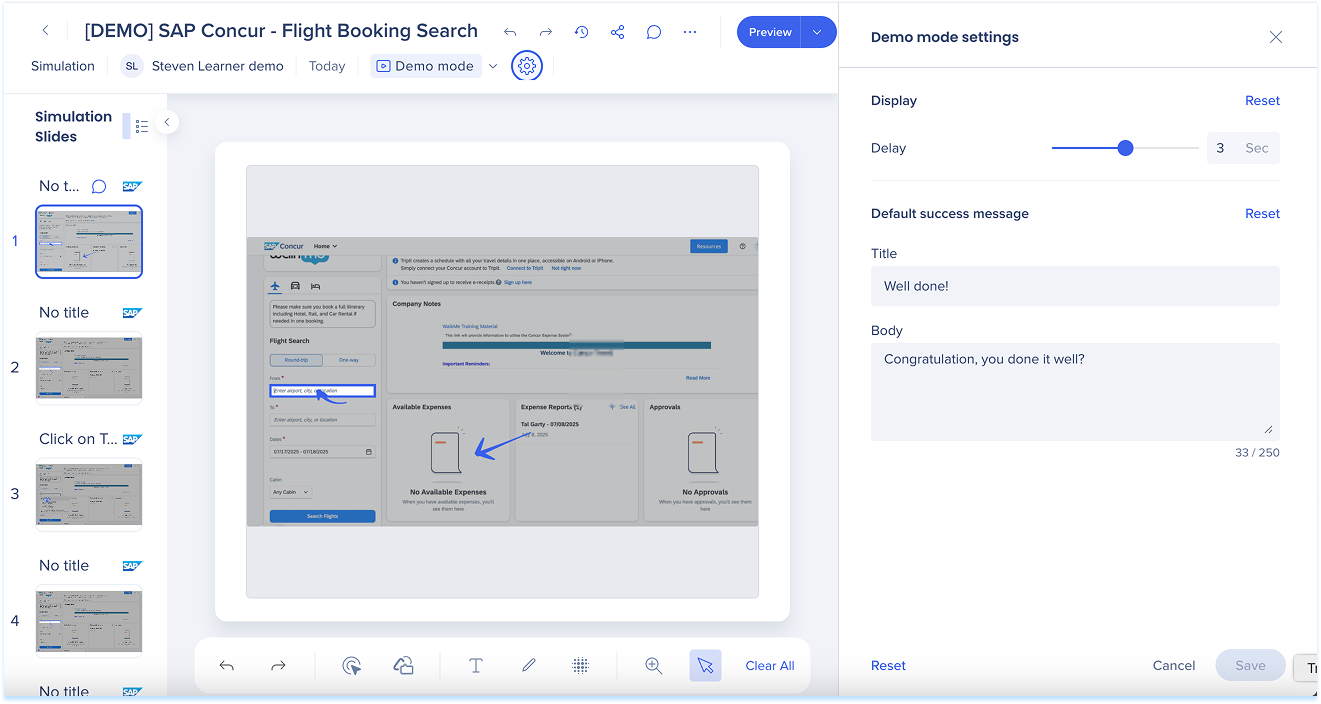
Mode settings
-
Select the Settings icon next to the mode
-
The settings panel opens on the right side
Demo mode settings
-
Display delay: Set how long each slide appears
-
Adjust the slider or enter a value
-
-
Default success message: Add a short title and message shown after the simulation is completed
-
Select Reset to restore defaults (optional)
-
Select Save to apply changes
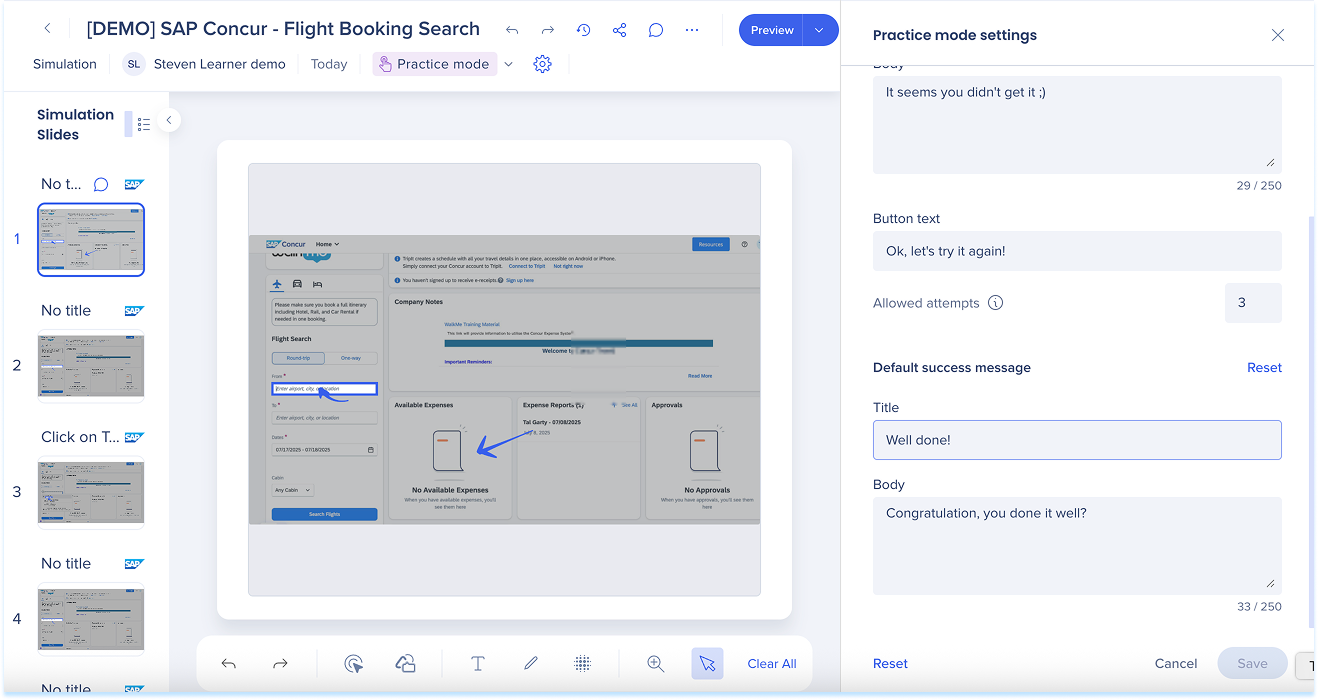
Practice mode settings
Error handling: Choose how the simulation responds to incorrect attempts
- Error Message: Show a custom message when a user clicks incorrectly
- None: No message (the user must select the correct element)
If Error Message is selected, configure:
- Title: Error heading
- Body: Short guidance or hint
- Button text: Label for the action button
- Allowed attempts: Number of retries
- Click Reset to revert to the default error handling (optional)

Default success messages: Message is shown after the simulation ends
-
Title: A short, encouraging line
-
Body: A follow-up message
-
Click Reset to restore to the default message (optional)
-
Click Save to apply changes
Undo/Redo
-
Select Undo to revert your last change
-
Select Redo to apply it again
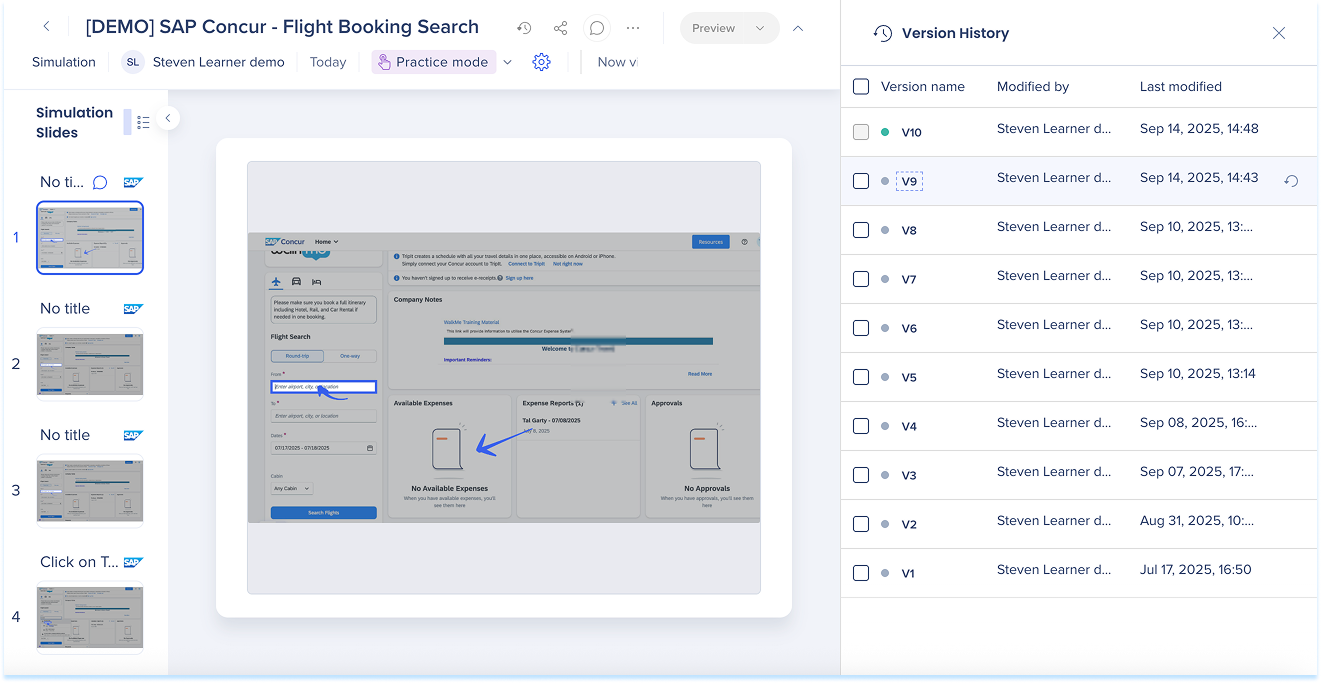
Version history
-
Select Version History to view previous versions
-
The side panel shows:
-
Version name
-
Modified by
-
Modified date
-
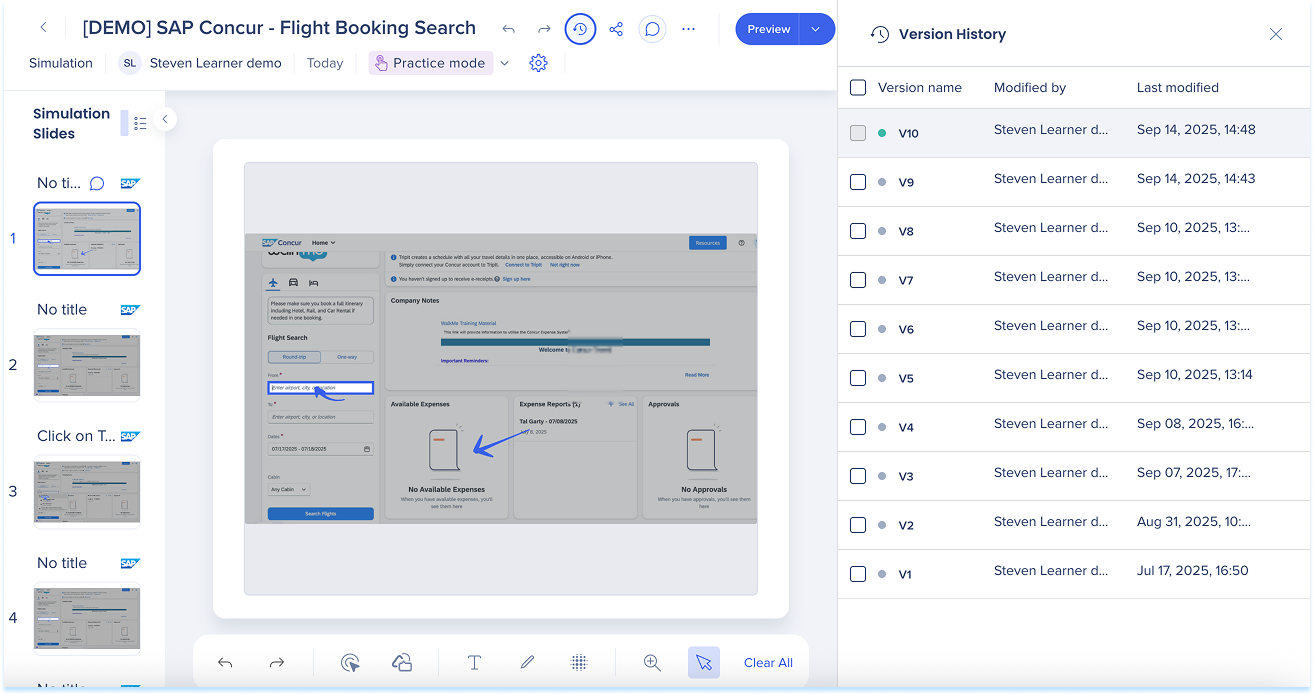
-
To restore, select a version and choose Restore

-
To rename, select the version name, type a new one, and press Enter
-
To delete, select versions and choose Delete in the floating toolbar

Share
You can share simulations with other users.
- Click the Share button near the top-right of the page
- A share simulation popup will open
- Add users:
- Enter one or more email addresses in the text field to share the simulation with specific users
- People with access:
- View the list of users the simulation is currently shared with
- Click the Delete icon next to the person's name to remove their access to the story
- Manage access:
- Choose an access level:
- Restricted: Only the simulation creator or users specifically shared with can access the simulation
- Everyone: All users within the account can view and access the simulation
- Choose an access level:
- Copy Link: Copy the simulation's link and share it manually
- Click Done
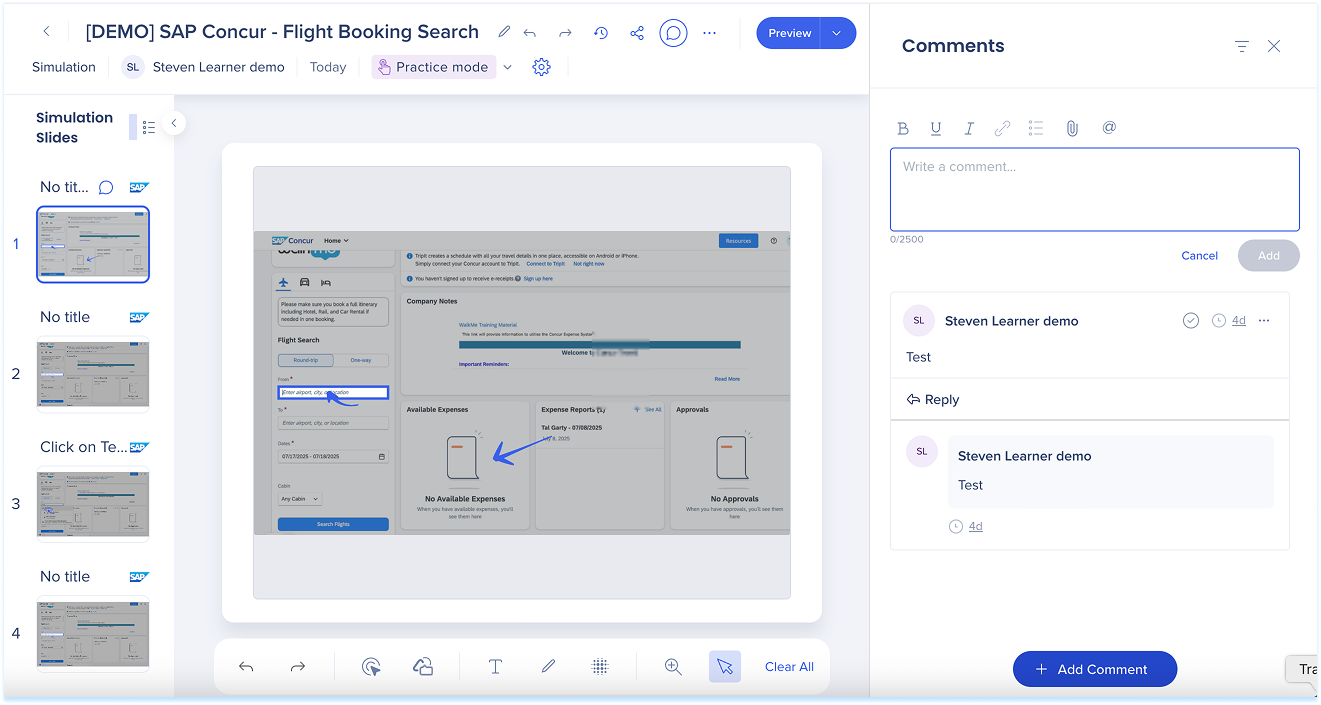
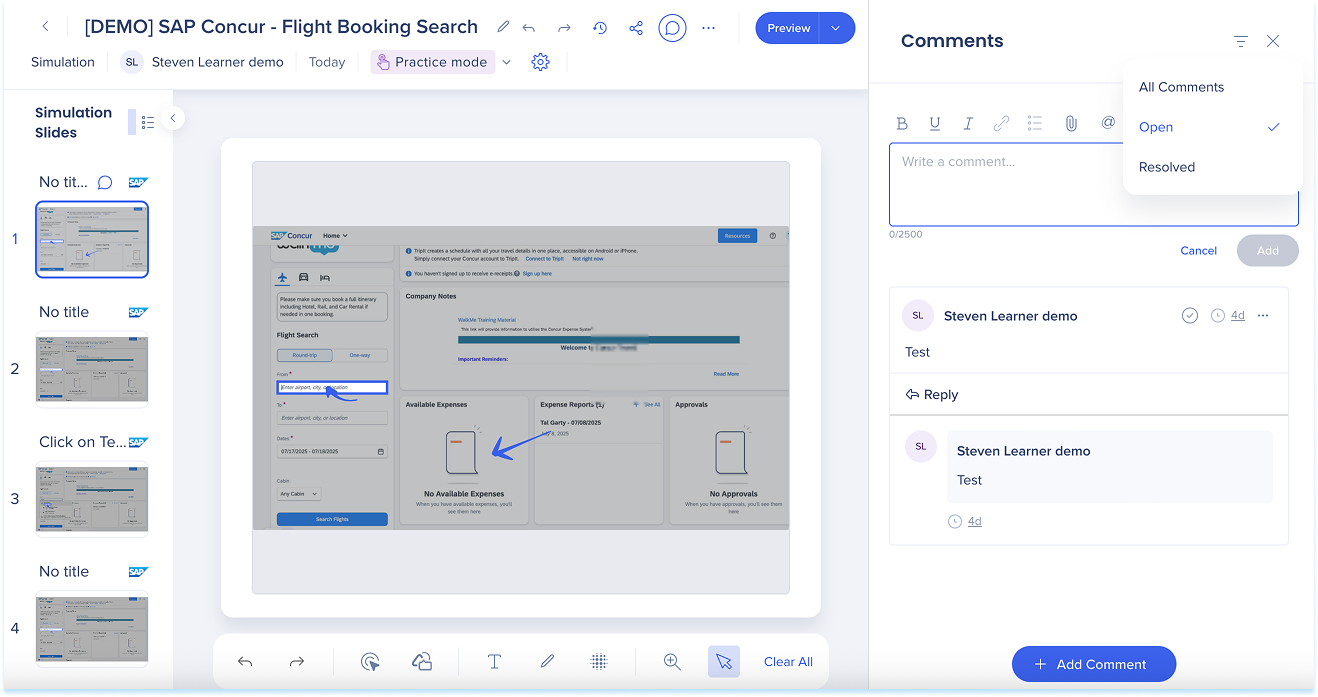
Comments
Use comments to collaborate on simulation slides.
View comments
- Click the Comments icon at the top of the page to open the comments panel
Add a comment
- Select + Add Comment
- Type your feedback, then select Add
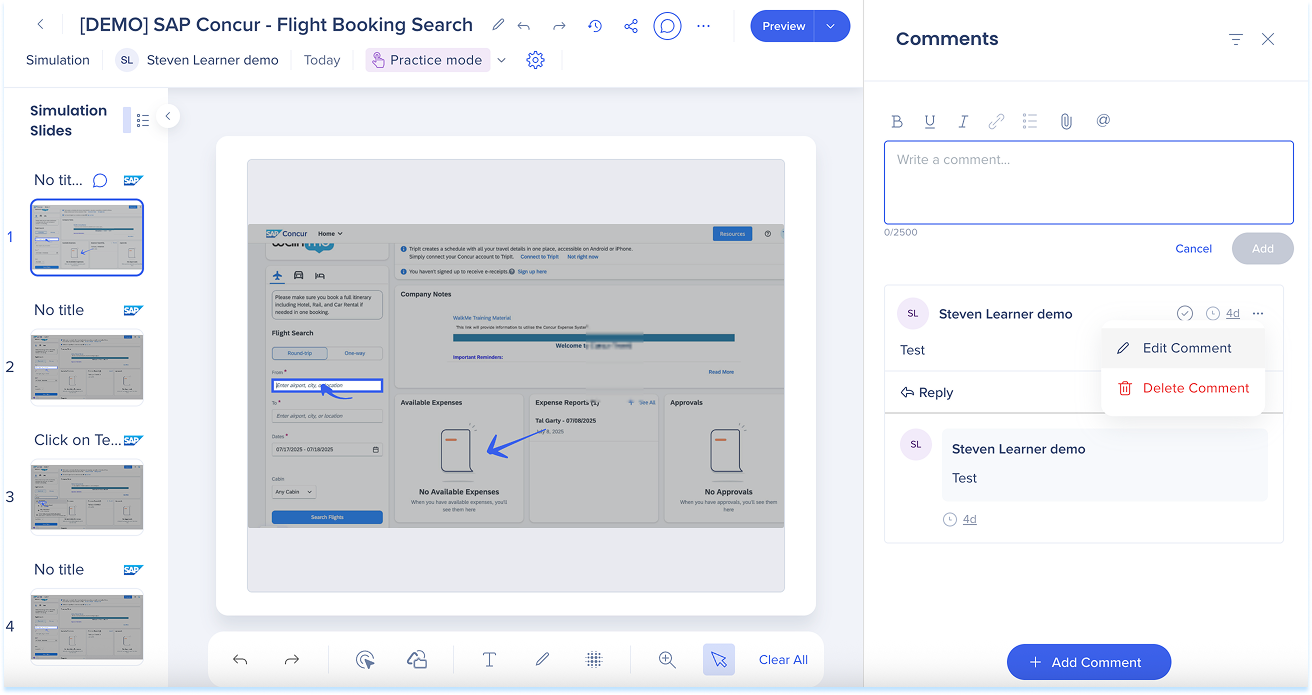
Manage comments
- In the comments panel, open the Options menu next to a comment
- Select Edit Comment or Delete Comment
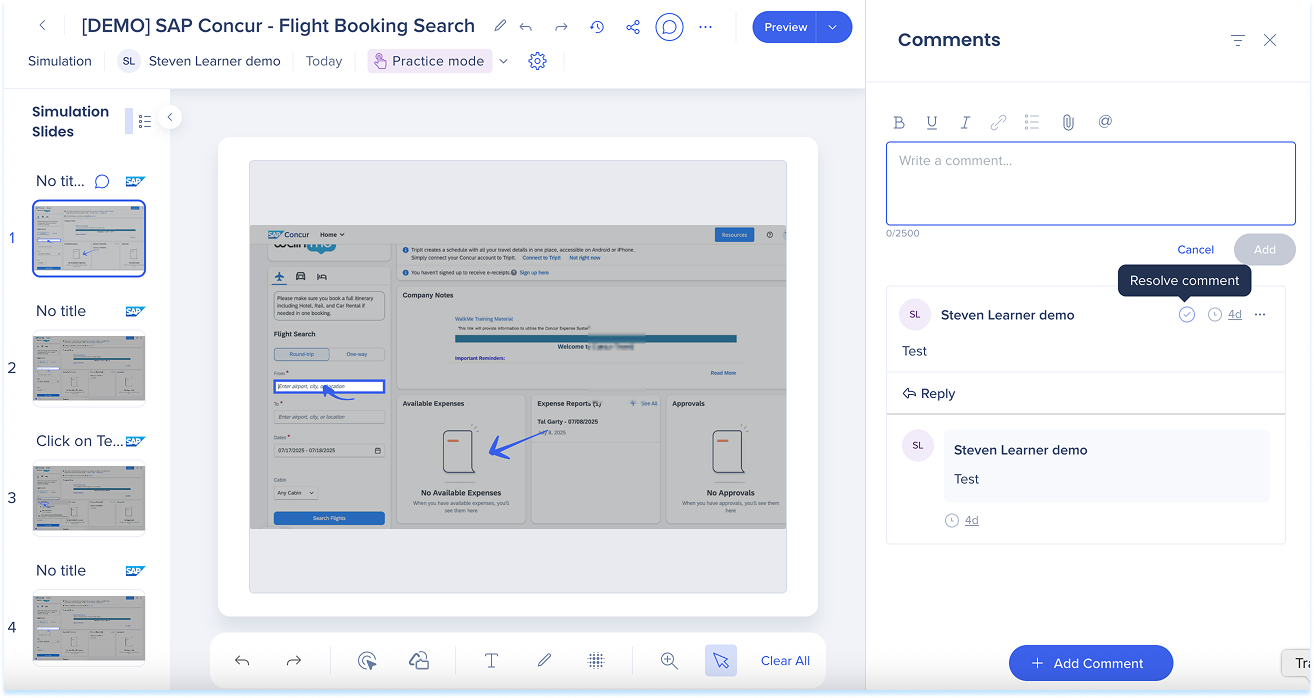
Resolve comments
- When feedback is addressed, select the Check icon to mark it as resolved
Filter comments
- Select the Filter icon to view:
- All comments
- Open
- Resolved
Filter comments
To filter comments on simulation slides:
- Click the Comments icon
- Click the Filter icon
- Select one of the following options:
- All comments
- Open
- Resolved
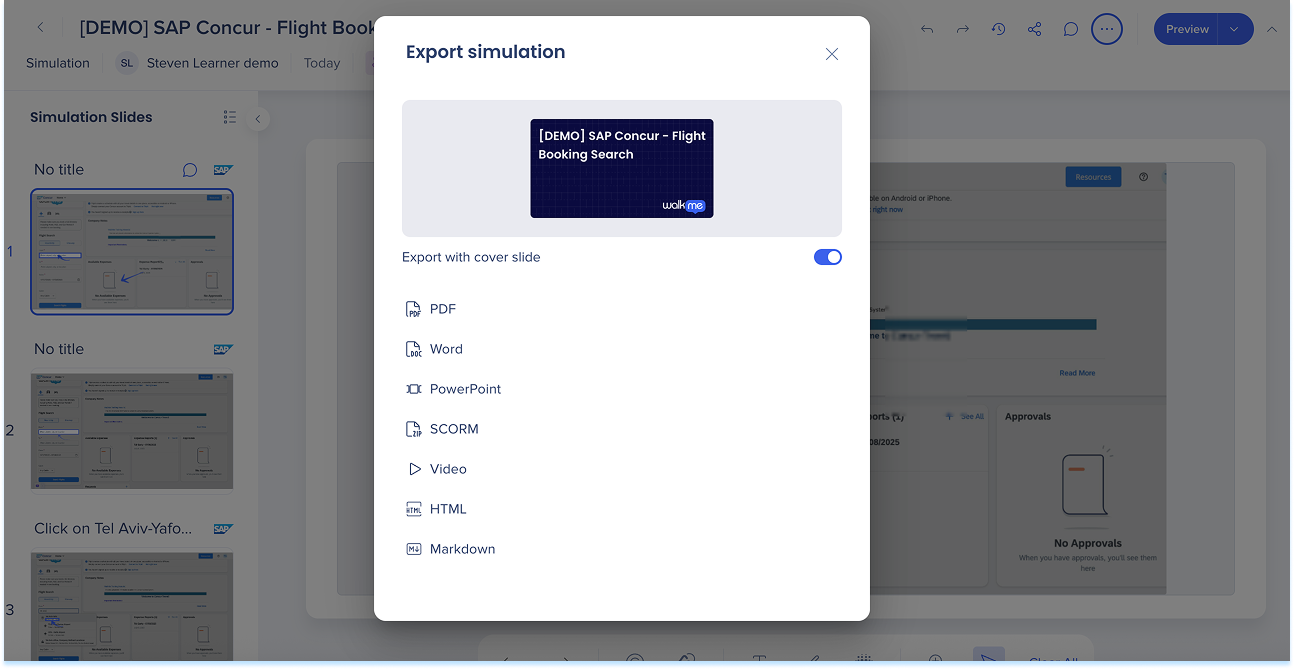
Export
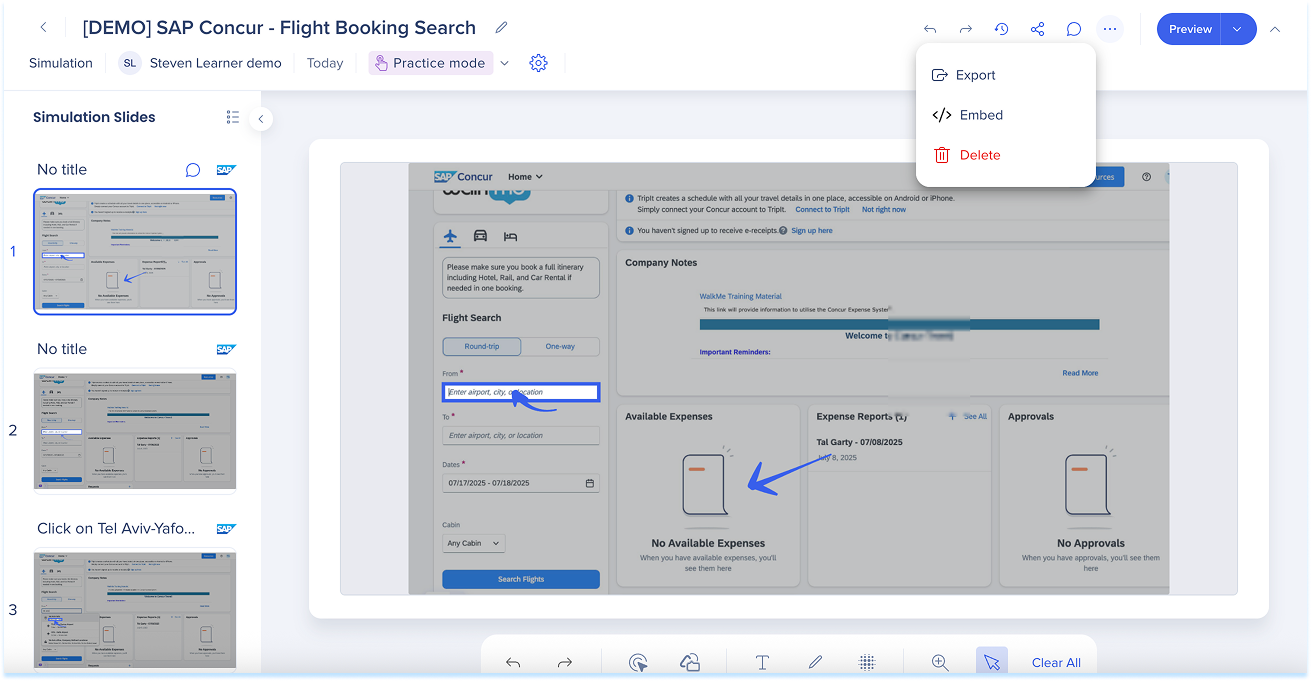
-
Select the Options menu at the top of the page and select Export
-
Turn on Export with cover slide (optional)
-
Choose a format:
-
PDF Document
-
Word Doc
-
PowerPoint
-
SCORM
-
Video
-
HTML: Embed simulation in sites which support HTML formatting
-
Markdown: Embed simulation in sites which support Markdown formatting (i.e. github, notion, sharepoint)
-
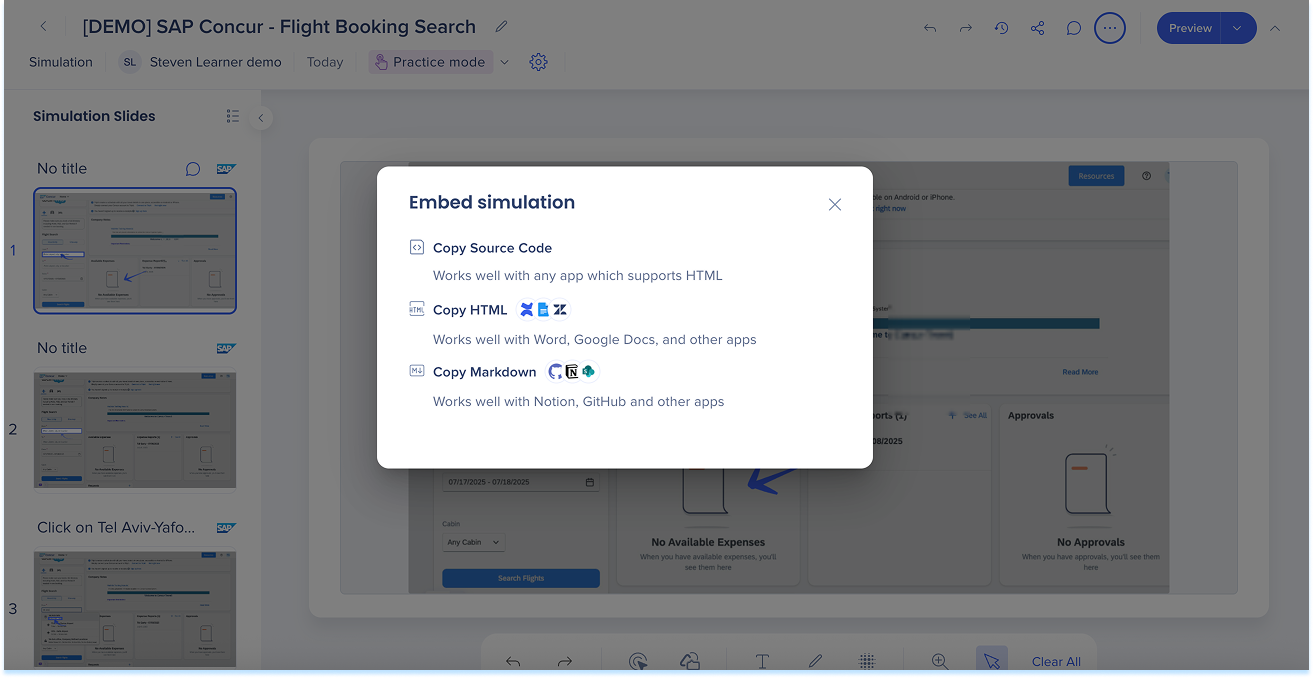
Embed
-
Select the Options menu at the top of the page and select Embed
-
Choose a format:
-
Copy to Source Code
-
Copy HTML
-
Copy Markdown
-
Delete
-
Select the Options menu at the top of the page and select Delete
Preview
-
Select Preview to open the simulation in the selected mode
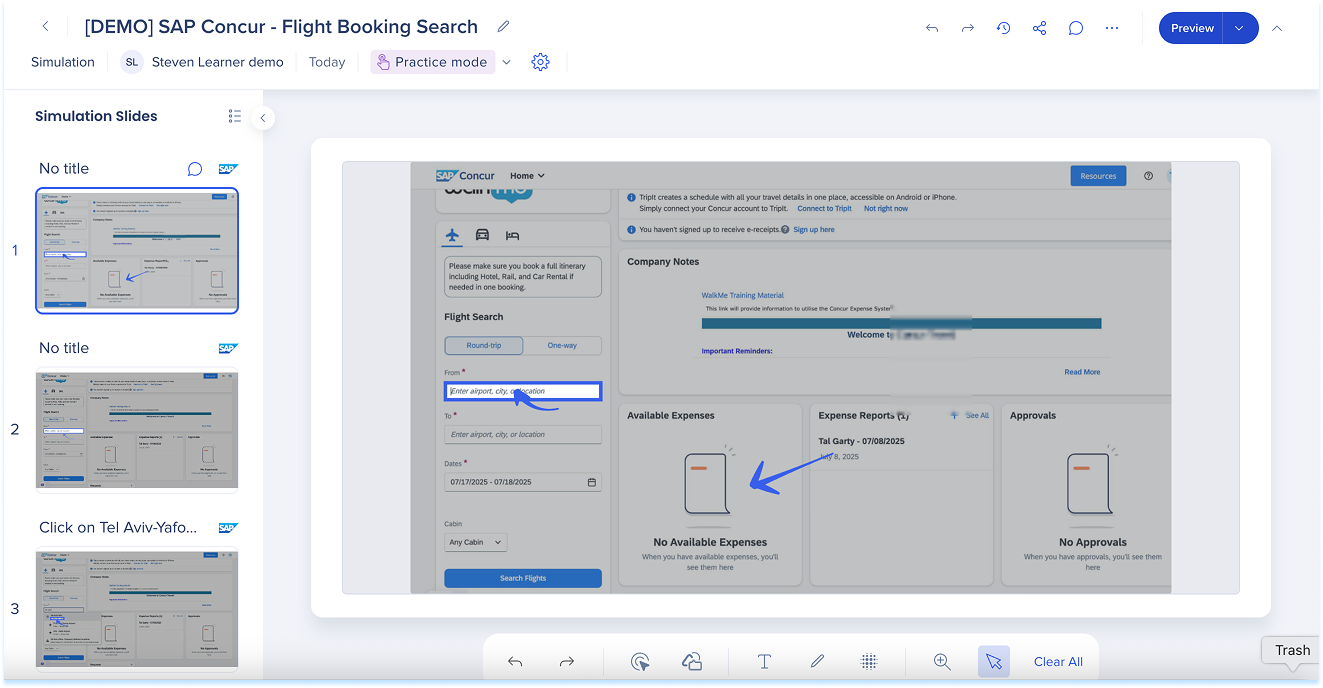
Main canvas
The main canvas displays the currently selected slide at full size for review and editing.
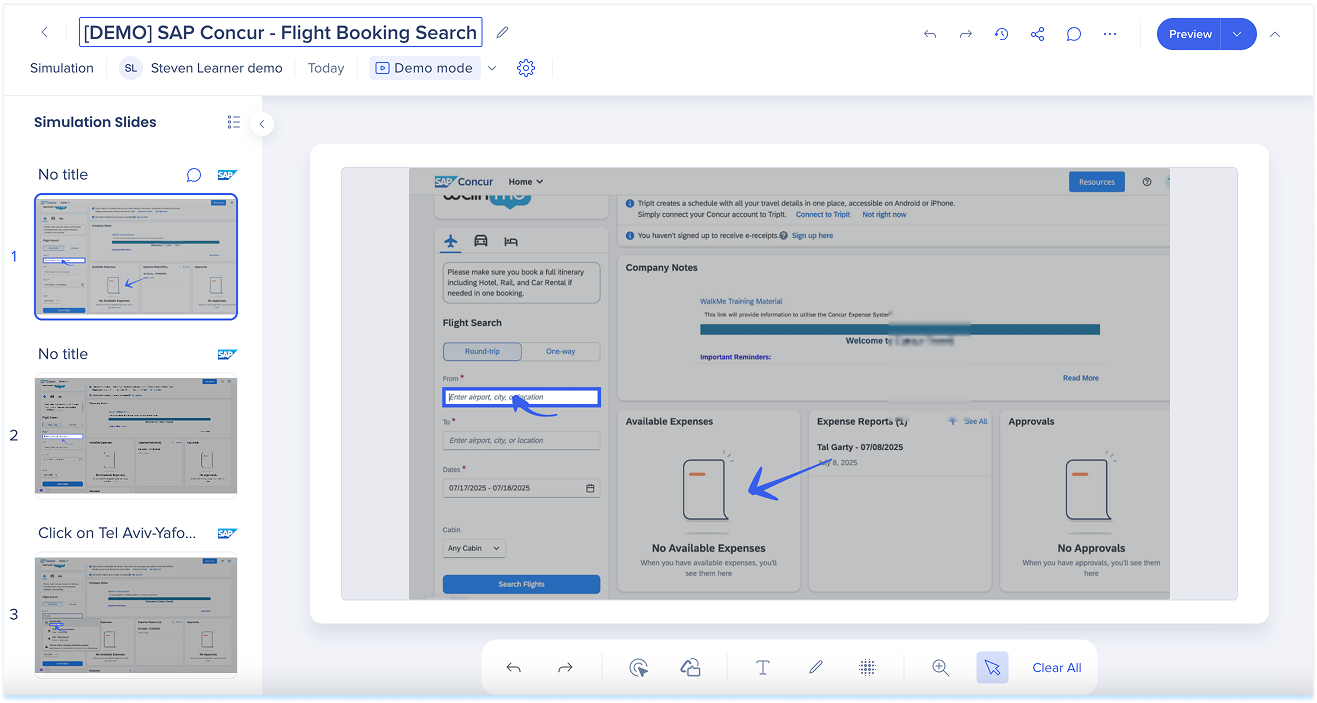
Annotations Toolbar
Use the annotations toolbar at the bottom of the page in demo mode to add visual guidance to a slide.
Available annotations:
- Captured element: Highlighted captured UI element to show where to click or type
- Shapes: Add boxes, arrows, or pointers
- Text: Add short instructions or labels
- Pencil: Draw freehand marks
- Blur: Hide sensitive content
- Zoom: Adjust your view
- Clear all: Remove all annotations
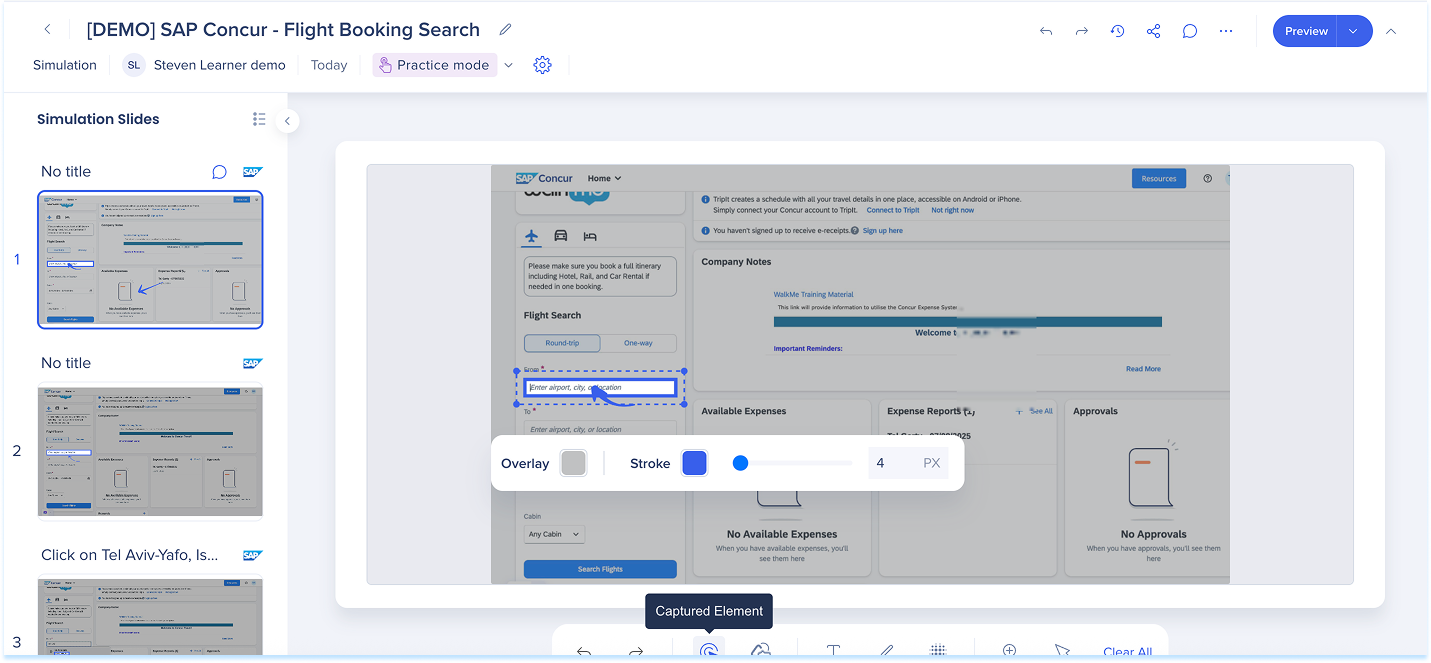
Captured element
-
Select Captured Element in the annotation toolbar
-
Use the inline toolbar to adjust:
-
Action: Go to slide or Next slide
-
Overlay: Dim everything except the highlighted element and choose a shade
-
Stroke: Set the outline color
-
Width: Set the border thickness
-
Shapes
-
Select Shapes in the annotation toolbar
-
Choose a shape:
-
Balloon
-
Straight arrow
-
Curved arrow
-
Rectangle
-
Circle
-
-
Use the inline toolbar to adjust:
-
Fill: Background color (balloon, rectangle, or circle)
-
Stroke: Border or line color
-
Width: Set the border thickness
-

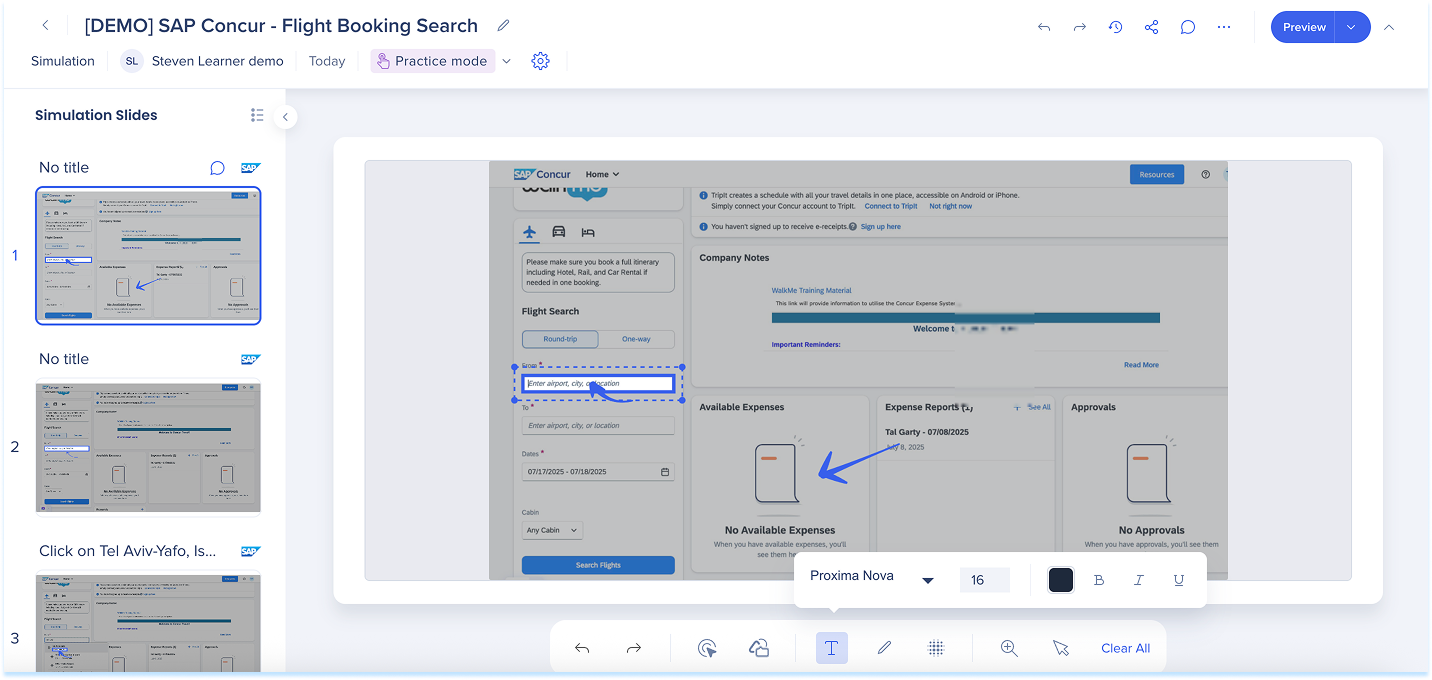
Text
-
Select Text in the annotation toolbar.
-
Click on the slide and type your instruction or label
-
Use the inline toolbar to apply the following formats:
-
Font
-
Font size
-
Color
-
Format text: Bold (B), Italic (I), Underline (U)
-
Lists: Bulleted list or numbered list
-
Link: Add a hyperlink
-
Alignment
-
Pencil
-
Select Pencil in the annotation toolbar to draw freehand on the slide
-
Use the inline toolbar to adjust:
-
Stroke: Line color
-
Width: Line thickness
-
Blur
-
Select Blur in the annotation toolbar
-
Drag to draw a blur box
-
Resize or move the box as needed (optional)

Zoom
- Click Zoom in the annotation toolbar
- Use the slider to zoom in or out