Brief Overview
The WalkMe integration with Google Cloud Storage (GCS) provides customers with incoming and outgoing data synchronization capabilities. This integration facilitates the seamless transfer of data between GCS and WalkMe, enabling users to effortlessly export data from WalkMe to GCS and import data from GCS back to WalkMe.
WalkMe leverages GCP IAM service accounts for secure access to customers' buckets.


Note
The GCS Outgoing Integration is only available for customers with Enterprise Analytics.
Use Cases
GCS Incoming Integration
The GCS incoming integration with WalkMe offers a way to share a CSV file from GCS to WalkMe's platform.
By extracting attributes, synchronizing data, and populating WalkMe, this integration facilitates targeted content segmentation, fostering a more personalized content experience, and streamlining the transfer of user data to the WalkMe platform.
GCS Outgoing Integration
The GCS outgoing integration with WalkMe provides a means to export a CSV file from WalkMe's platform to GCS.
This integration involves extracting attributes, synchronizing data, and transmitting information to GCS, enabling efficient data transfer and a streamlined exchange of user data from the WalkMe platform to GCS.
Set Up an Incoming Integration with GCS
Step 1: Define a Source
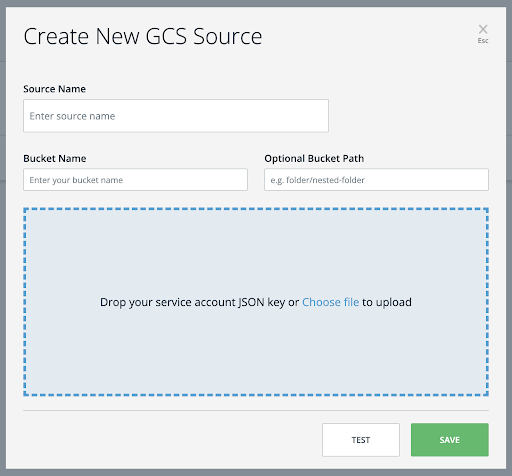
The first step is to create a GCS bucket where the file to share with WalkMe will be stored. This bucket will serve as the source for your integration with WalkMe.
This step can be also performed during Step 2 when adding a new integration.
Step 2: Add New Integration
Adding a new integration can be completed in 3 simple steps:
- Set Source → Define a new source or select a source from a list, and fill out the “Path and File Name” field at the bottom
- Selecting a Source from the list will auto populate the rest of the information (Source Name, Bucket Name, Bucket Path (optional), and Service Account json file)
- Map Columns → Choose a unique user identifier to establish data synchronization between GCS and WalkMe and select the properties you wish to import into WalkMe
- Tip: Ensure properties are correctly mapped to their respective property types (string, number, boolean, etc.). If necessary, you can also rename properties at this stage.
- Schedule and Save → Specify the integration's name and determine if you wish to schedule it to run at specified intervals

After clicking Save, a new integration will be generated. You can choose to execute it manually upon request or set it for automated execution at defined intervals.
Set Up an Outgoing Integration with GCS
Step 1: Create a Destination
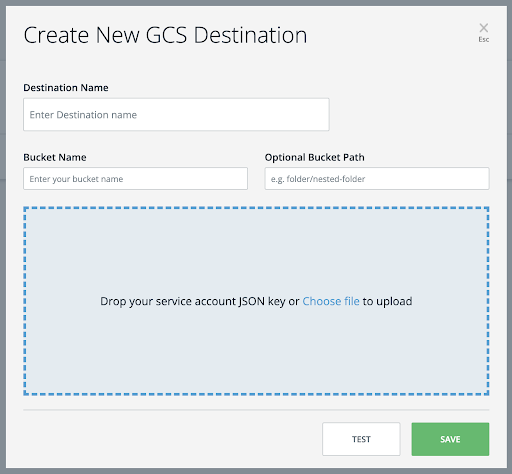
The first step is to create a destination in GCS, specifically a GCS bucket, where to store the file intended for sharing with WalkMe. This bucket will act as the destination for your integration with WalkMe.

Step 2: Add New Integration
Adding a new integration can be completed in 2 simple steps:
- Define Report → Choose the report's name and the origin environment from which you intend to export the data
- You should also select the desired reporting frequency and determine whether it should be set up as a recurring process
- Set Destination → Define a new destination or select a destination from a list.
- Selecting a destination from the list will auto populate the rest of the information (Destination Name, Bucket Name, Bucket Path (optional), and Service Account json file)
If you are not sure about the json file uploaded, you can click on it to download it to your computer.
The report will be sent in CSV format.

After clicking Save a new integration will be generated. You can choose to execute it manually upon request or set it for automated execution at defined intervals.
Technical Data to Set Up a GCS Bucket
For integrating Google Cloud Storage (GCS) with WalkMe, you need to set up the appropriate bucket permissions to ensure secure and effective access.
IAM Roles: Google Cloud Storage uses Identity and Access Management (IAM) roles to control access to resources. IAM roles provide more flexible and scalable access control compared to ACLs.
Here are the steps to set up bucket permissions for GCS integration:
- Create a Google Cloud Storage Bucket
- Log in to your Google Cloud Console
- Navigate to the Cloud Storage section
- Create a new bucket where you'll store the CSV files
- Configure IAM Roles
- IAM roles define the permissions users or service accounts have on resources. You'll assign these roles to users or groups.
- Common IAM roles for GCS are Storage Object Viewer, Storage Object Creator, and Storage Object Admin
- Assign these roles to the appropriate users or service accounts:
- Storage Object Viewer: Allows reading objects (CSV files) from the bucket
- Storage Object Creator: Allows creating new objects (CSV files) in the bucket
- Storage Object Admin: Allows full control over objects in the bucket
- Service Account Access
- If WalkMe is accessing the bucket, consider creating a service account
- Generate a JSON key for the service account and securely provide it to WalkMe
- Grant the necessary IAM roles to this service account
- Bucket-level Permissions
- Set bucket-level permissions to control access to the bucket itself
- Limit public access if not required. By default, new buckets are private
- If you need public access, consider using signed URLs or making objects public individually
- Testing and Monitoring
- After setting up permissions, thoroughly test the integration to ensure it's working as expected
- Regularly review and audit permissions to maintain security
Tip
Remember that the specific permissions you grant depend on your use case and security requirements. Always follow the principle of least privilege, granting only the permissions necessary for the integration to function correctly while maintaining data security.
Technical Notes
- No limit to the number of rows for the integrated file; however, file size is limited to 1GB


