Mobile: How To Use the New Visual Editor (Mobile SDK v1.13.1+ Only)
Brief Overview
You can create Walk-Thrus in your app's Power Mode or begin building ShoutOuts, Launchers, and Surveys by clicking on NEW in the Mobile Console's MY CAMPAIGNS tab.
Once you've either created a Walk-Thru, clicked NEW and selected your campaign-type and template in the MY CAMPAIGNS tab, or clicked on the edit icon of an already existing campaign, you can build it out or edit it using the Campaign Wizard's Visual Editor in the EDIT CAMPAIGN screen.
Here is the Visual Editor in all of its glory!
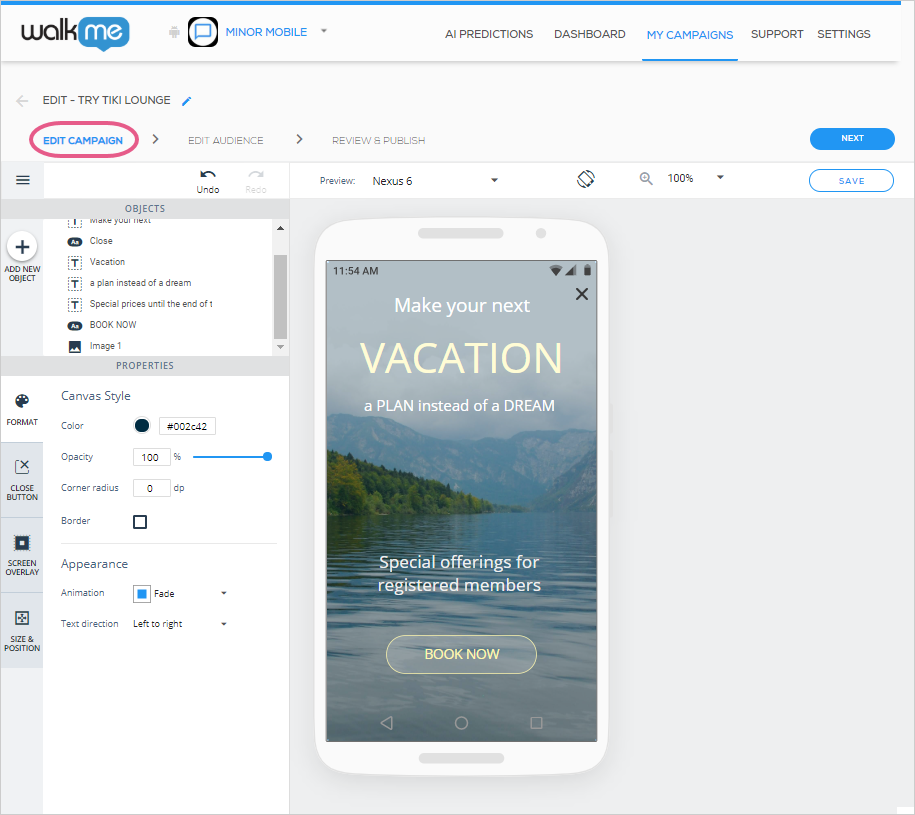
Pro-Tip: This is the Visual Editor UI you see when editing/designing a Launcher. The layout differs slightly per campaign type.
Understanding the OBJECTS Tree
Every item under OBJECTS tree corresponds to an object that currently sits on your preview device screen:
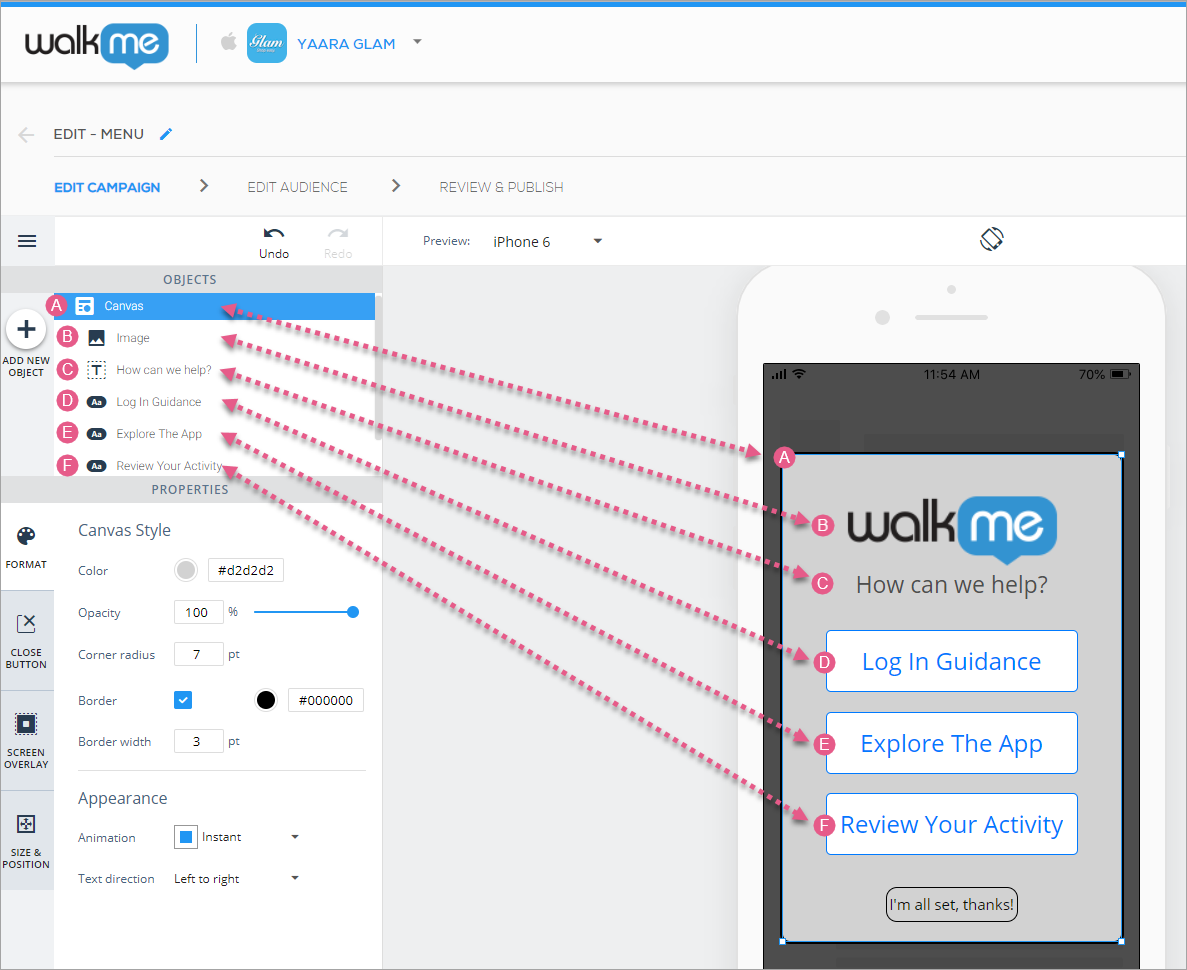
Customizing Your Campaign Canvas
The root object of every campaign is the Canvas object, on which all other objects of the campaign will sit. Customize the canvas itself per your plan for your campaign's appearance.
The Canvas object has four customization tabs:
- The FORMAT tab, for designing the canvas itself and assigning an animation to it;
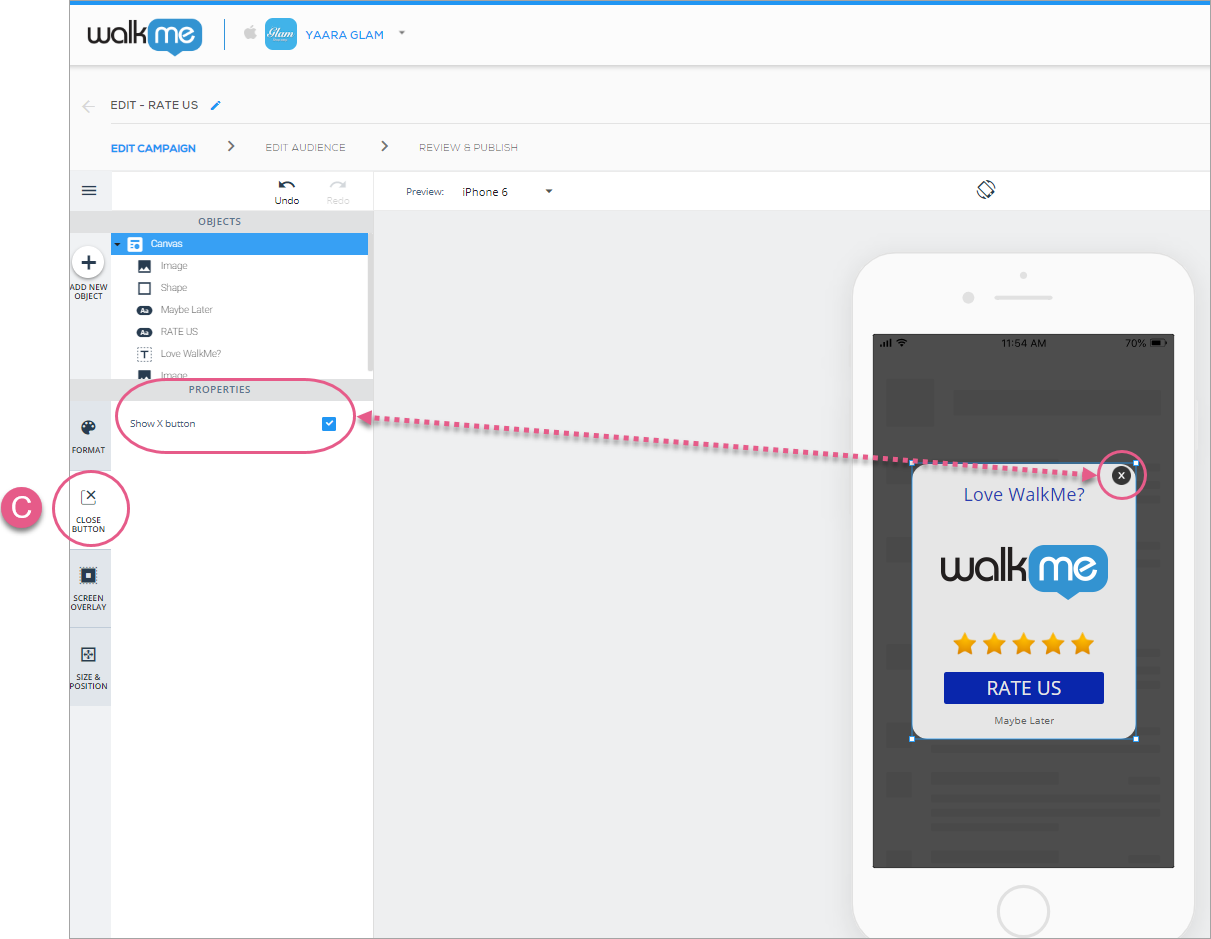
- The CLOSE BUTTON tab (only applies to ShoutOut and Walk-Thru-type campaigns), to enable the appearance of an "X" icon on the canvas;
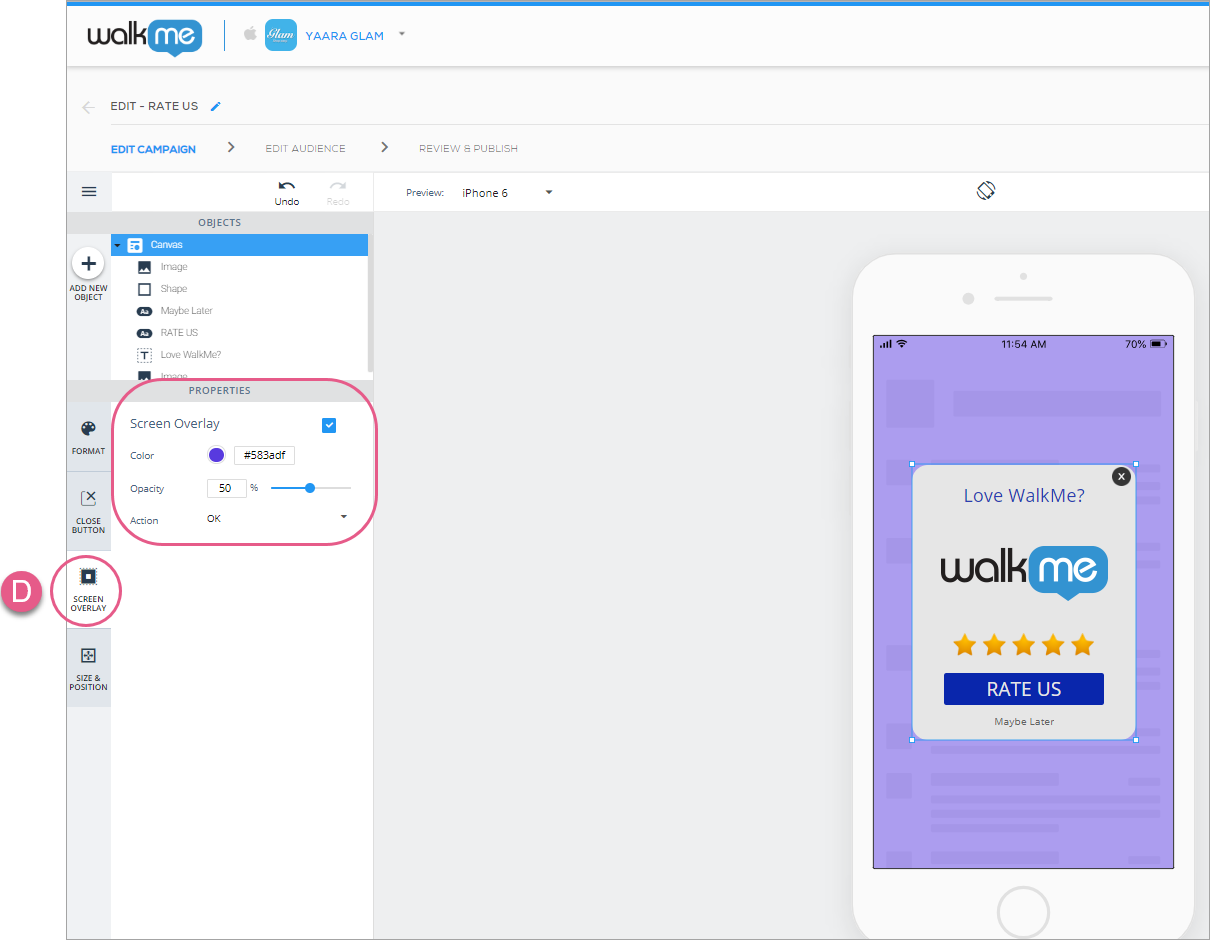
- The SCREEN OVERLAY tab, to decide whether you want a spotlight-like effect to be behind the canvas; and
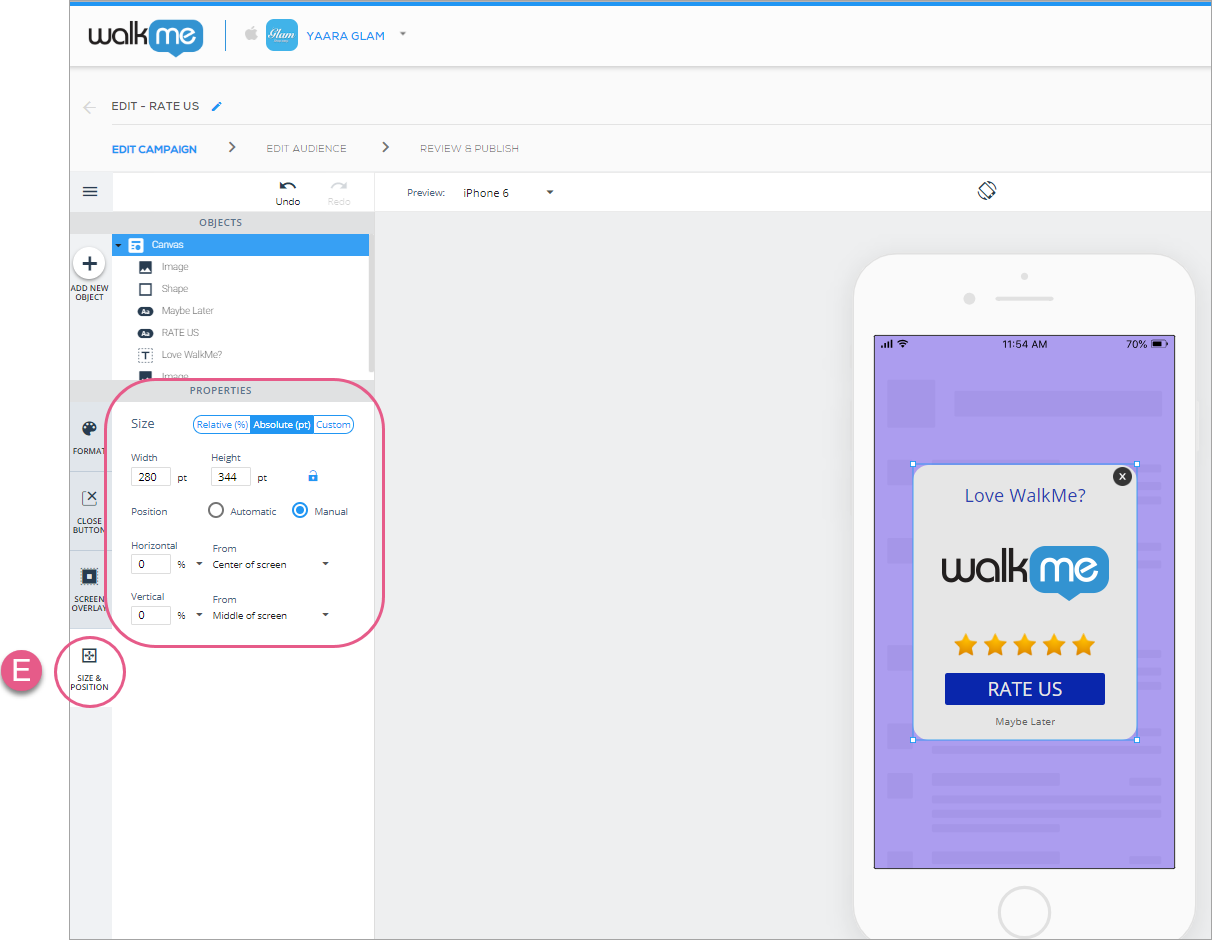
- The SIZE & POSITION tab, where you can configure the size and placement of the canvas in relation to the app screen;
Upon clicking a campaign's Canvas object (either on the device preview screen or on the OBJECTS tree), you will begin on the FORMAT tab by default, where you can configure the canvas':
- Color;
- Opacity (visibility; the lower the opacity percentage, the more you can see through the canvas to the app content in the background);
- Corner radius (the higher the radius, the more rounded the corners);
- Border settings;
- Animation settings. Animation options include:
- Instant (where the canvas will just appear instantaneously);
- Fade (where the canvas will fade in and out); and
- Fly In (where the campaign will fly into view from above, below, left, or right; the direction is configurable); and
- Text direction.
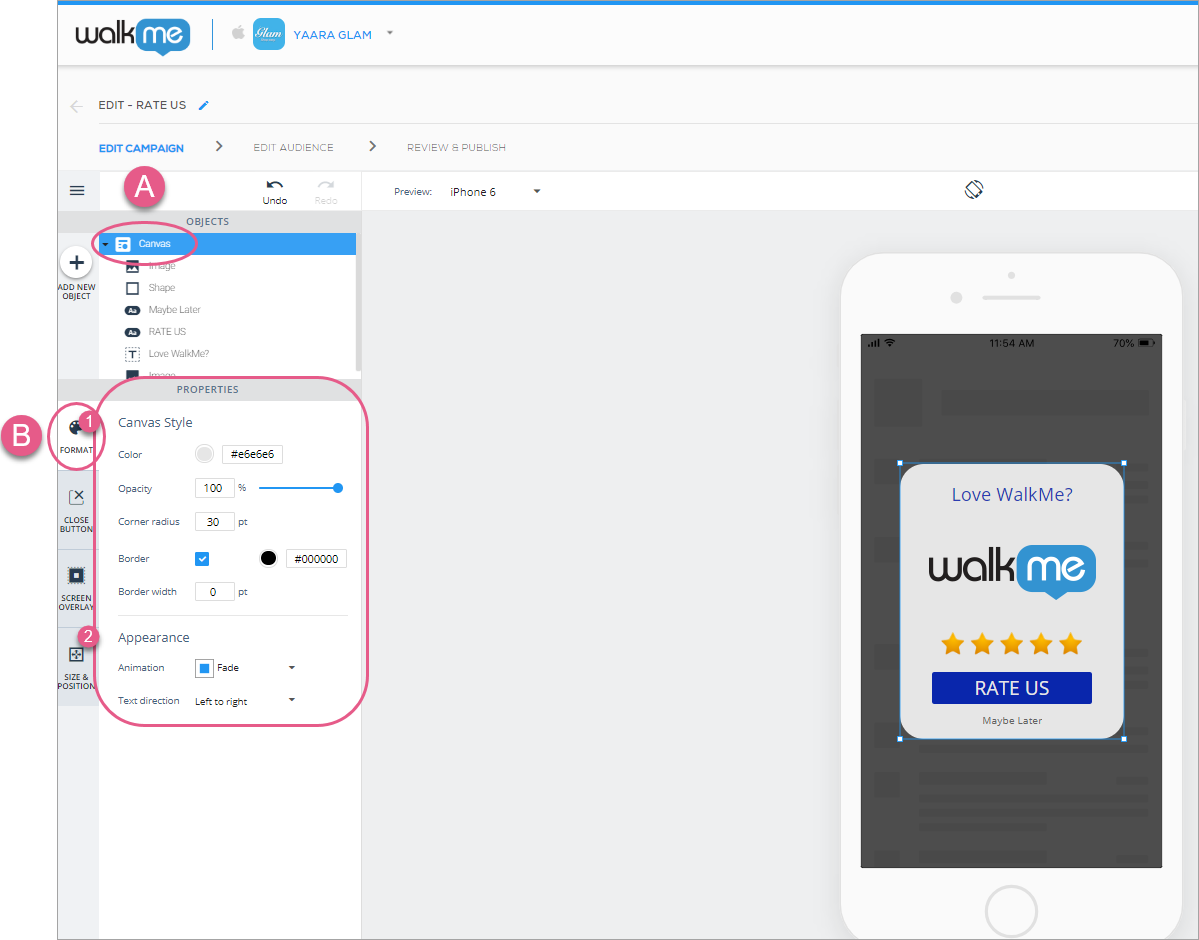
Steps 1-3: Click the Canvas object and configure the Canvas Style and Appearance to your liking.
Next, click the CLOSE BUTTON tab (if you're building a ShoutOut or Walk-Thru; otherwise, skip this step) and decide whether you want your end-users to be able to click an "X" to close the campaign:
Next, click the SCREEN OVERLAY tab and decide whether you want an overlay behind the campaign. If so, you can customize your overlay's:
- Color;
- Opacity (visibility); and
- Action (See the Available Actions for buttons, shapes, lists, and overlays section below).
Finally, click the SIZE & POSITION tab, where you can configure the canvas' size and units, and positioning relative to the app screen:
Understanding SIZE & POSITION
While the most intuitive way to edit an object's size and position is still directly from the device preview screen (i.e., stretching and dragging objects with your mouse), the SIZE & POSITION tab is ideal for fine-tuning when more exactitude is required.
Additionally, the SIZE & POSITION tab is meant to allow you to create your campaigns using responsive design (responsiveness to differences between devices with varying device sizes and orientations).
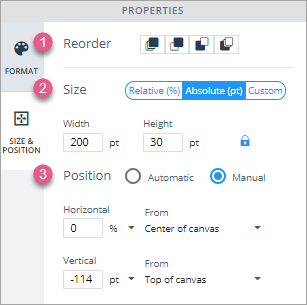
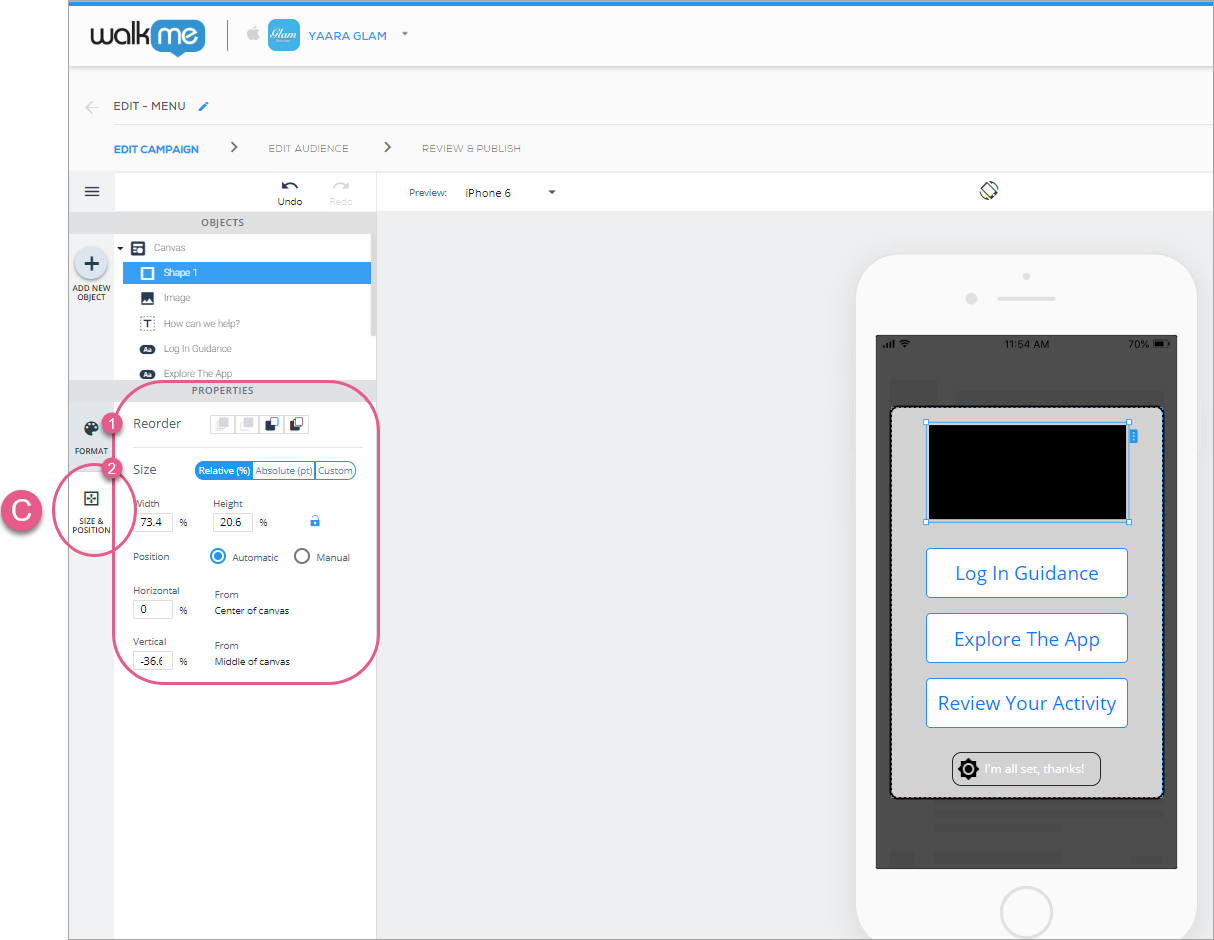
The tab is comprised of up to three sections: Reorder, Size, and Position:
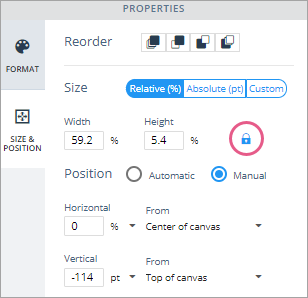
You can also lock an object's aspect ratio by clicking on the lock icon:
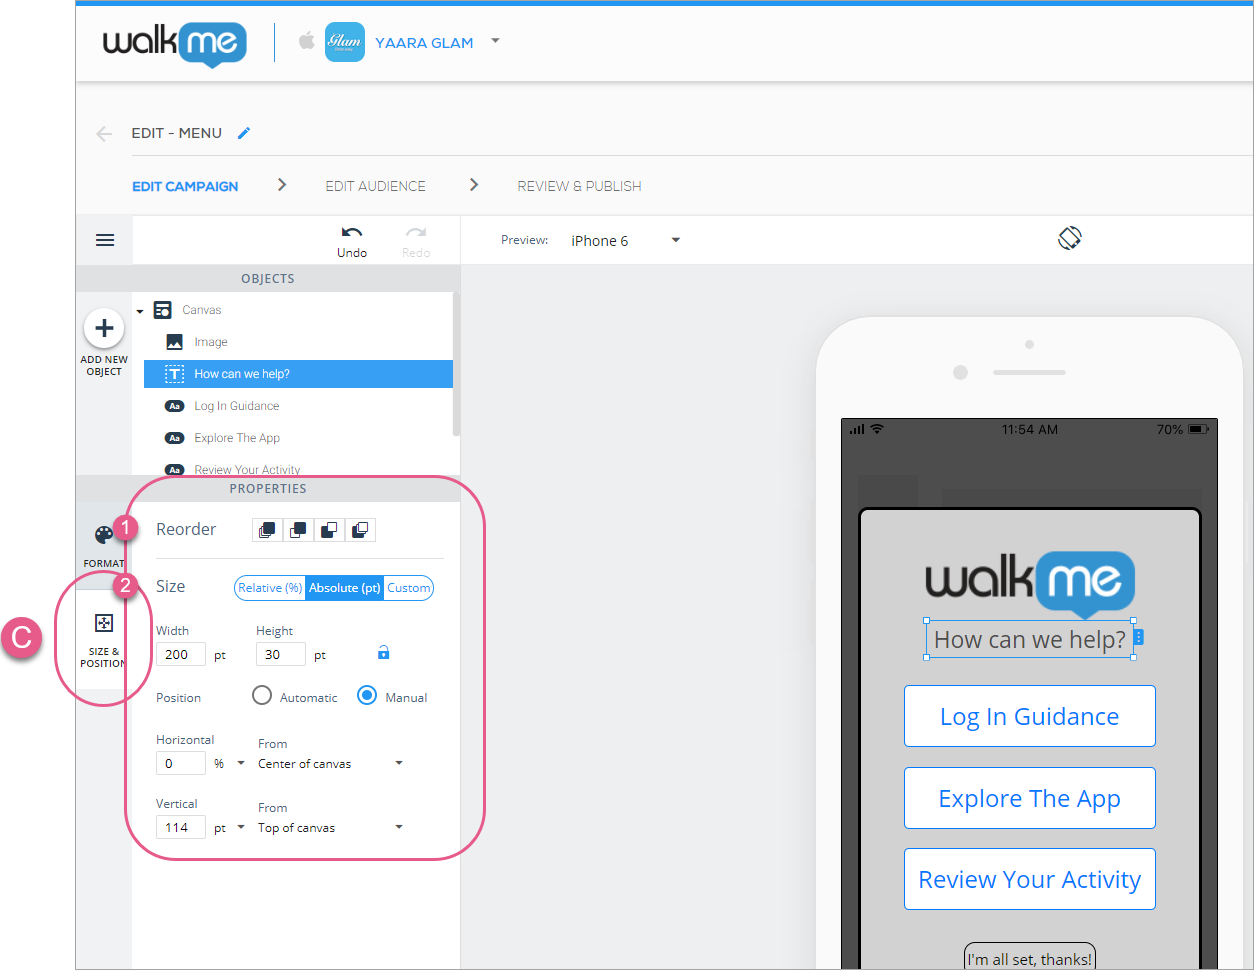
- Reorder: Here you can alter an object's layer order relative to other objects on the canvas;
- In order of appearance, the icons mean 1) move to the front-most layer, 2) move forward one layer, 3) move backward one layer, and 4) move to the back-most layer.
- Size: Here you can select the type of sizing, between Relative (%), Absolute (pt — iOS and dp — Android), and Custom (a combination of Relative and Absolute);
- Relative: Select a percentage value for Width and Height, and the object will remain this percentage of its canvas (parent) object (the app screen in the case of the Canvas, the Canvas in the case of a main object, and a main object in the case of a sub-object), whether the canvas (parent) object grows or shrinks;
- e.g., Button objects sitting inside of a Carousel slide are children objects of the slide in which they sit, since the slide acts as their canvas (parent) object.
- if you lock an item's aspect ratio in Relative mode, the height will become "Auto," because it will need to adjust in order to maintain the object's aspect ratio.
- Absolute: Select a pt or dp value and the object will remain this size regardless of the size of its canvas (parent) object;
- If you lock the aspect ratio in Absolute, whenever you change one of the Width or Height values, the other will automatically update to preserve the current aspect ratio.
- Custom: Select a pt / dp OR % value for Width and a pt / dp OR % value for Height;
- Useful if, e.g., you want a button to remain the same height but change it's width based on the width of its canvas.
- Pro-Tip: If the Canvas object isn't set to relative, then it doesn't matter which Size setting you choose for its child objects, since the Canvas object will never change size. This also applies to objects whose position is set in % when the Canvas is set to Absolute.
- Relative: Select a percentage value for Width and Height, and the object will remain this percentage of its canvas (parent) object (the app screen in the case of the Canvas, the Canvas in the case of a main object, and a main object in the case of a sub-object), whether the canvas (parent) object grows or shrinks;
- Position: Here you can set the position of your object in relation to its canvas (parent) object. You can select between Manual (where you must consider more factors, but you have more control over the object's exact position) and Automatic (where you have slightly less control, but must configure fewer settings).
- Manual:
- For Horizontal, set a % value of how far you want the object to appear from either the left, center (the vertical dividing line), or right-side of its canvas object:
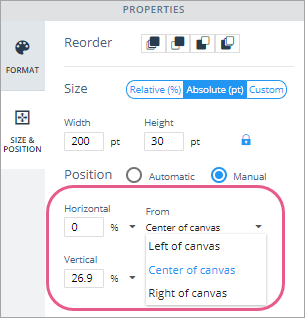
A Horizontal value of 0% from the Center of the canvas means the object will sit be horizontally centered on the canvas. - You can set a positive (to the right of the selected From value), or negative (to the left of the selected From value) % value.
- For Vertical, set a % value of how far you want the object to appear from either the top, center (the horizontal dividing line), or bottom of its canvas object:
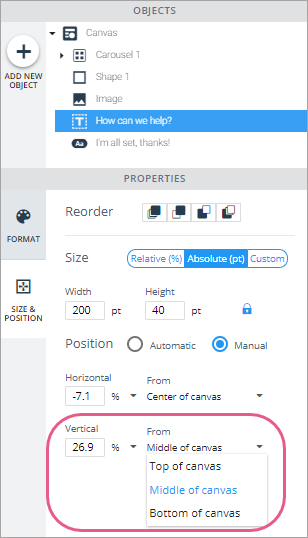
+26.9% from the Middle of the canvas means the object will sit 26.9% higher than the canvas' horizontal dividing line.
- For Horizontal, set a % value of how far you want the object to appear from either the left, center (the vertical dividing line), or right-side of its canvas object:
- Automatic:
- Automatic is similar to Manual, except that when you select Automatic, you will lose the ability to select a From value, and it will automatically default to Center of the Canvas and Middle of Canvas respectively, or to the edge of the screen if you dock the object.
- Simply place your object where you want it on the preview device screen and the WalkMe Mobile SDK will attempt to maintain this general positioning regardless of the device size or orientation.
- Automatic is similar to Manual, except that when you select Automatic, you will lose the ability to select a From value, and it will automatically default to Center of the Canvas and Middle of Canvas respectively, or to the edge of the screen if you dock the object.
- Manual:
Adding New OBJECTS to Your Campaign
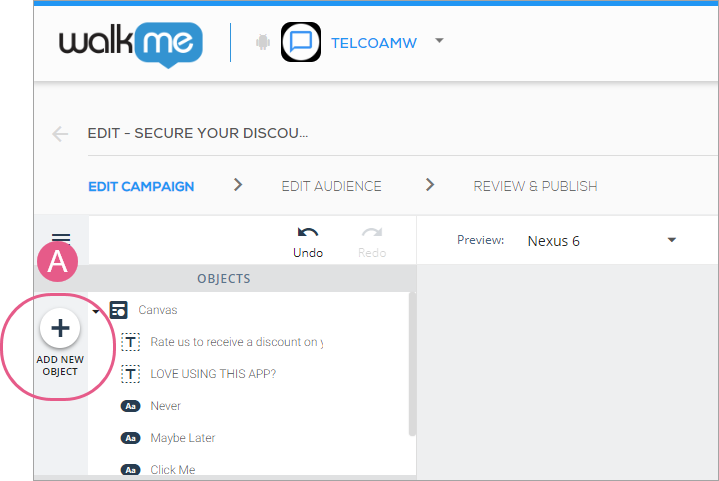
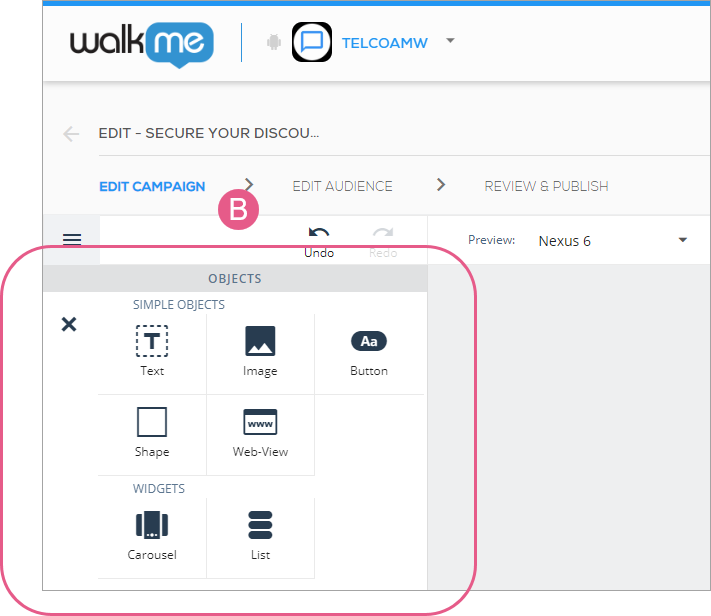
When you click the + icon above "ADD NEW OBJECT" on the left of the Visual Editor you will see an OBJECTS directory containing all the of the elements that can be added to that particular campaign:
Adding standard text to your campaign
Drag the Text icon from the OBJECTS directory to wherever you'd like text to appear on your app screen and type in your desired text on the preview device screen.
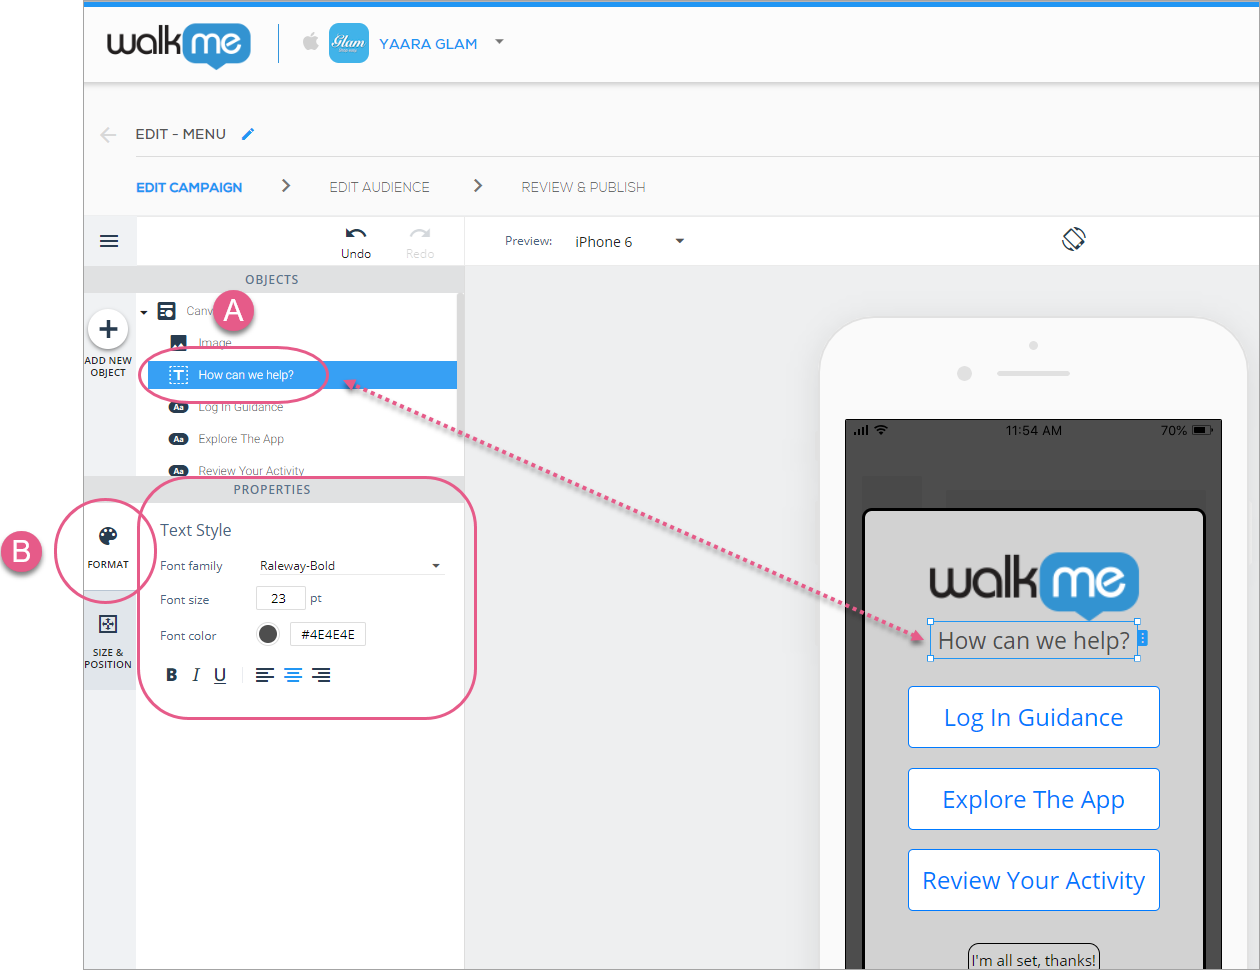
Upon adding or clicking a text object, you will begin on the FORMAT tab by default, where you can configure the text's font (pulled from the fonts available in your app), font size, font color, text alignment and style:
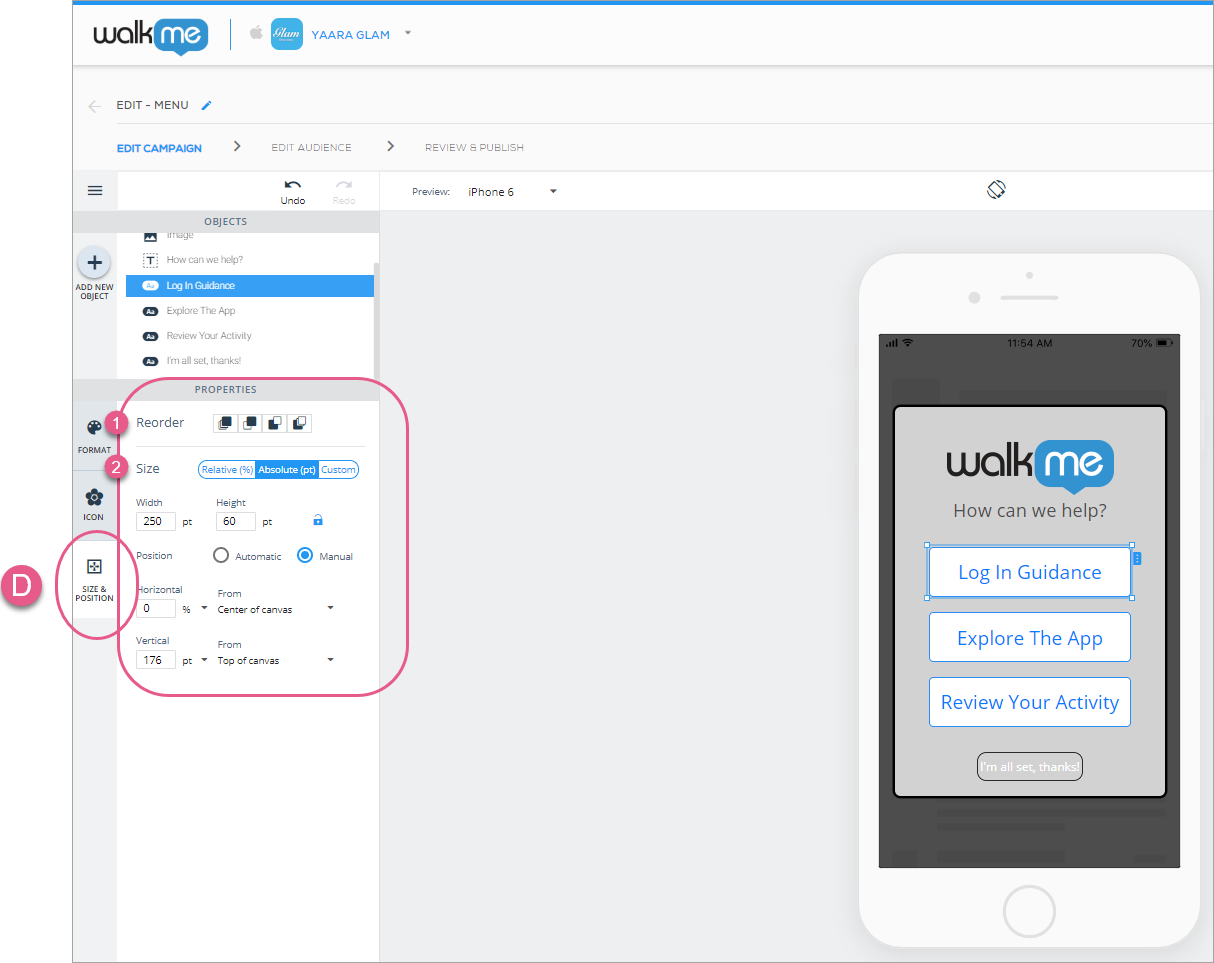
Next, click the SIZE & POSITION tab, where you can configure the text object's (the box in which the text itself sits) layer order (similar to z-index), size and units, and positioning relative to the Canvas object:
Editing standard text
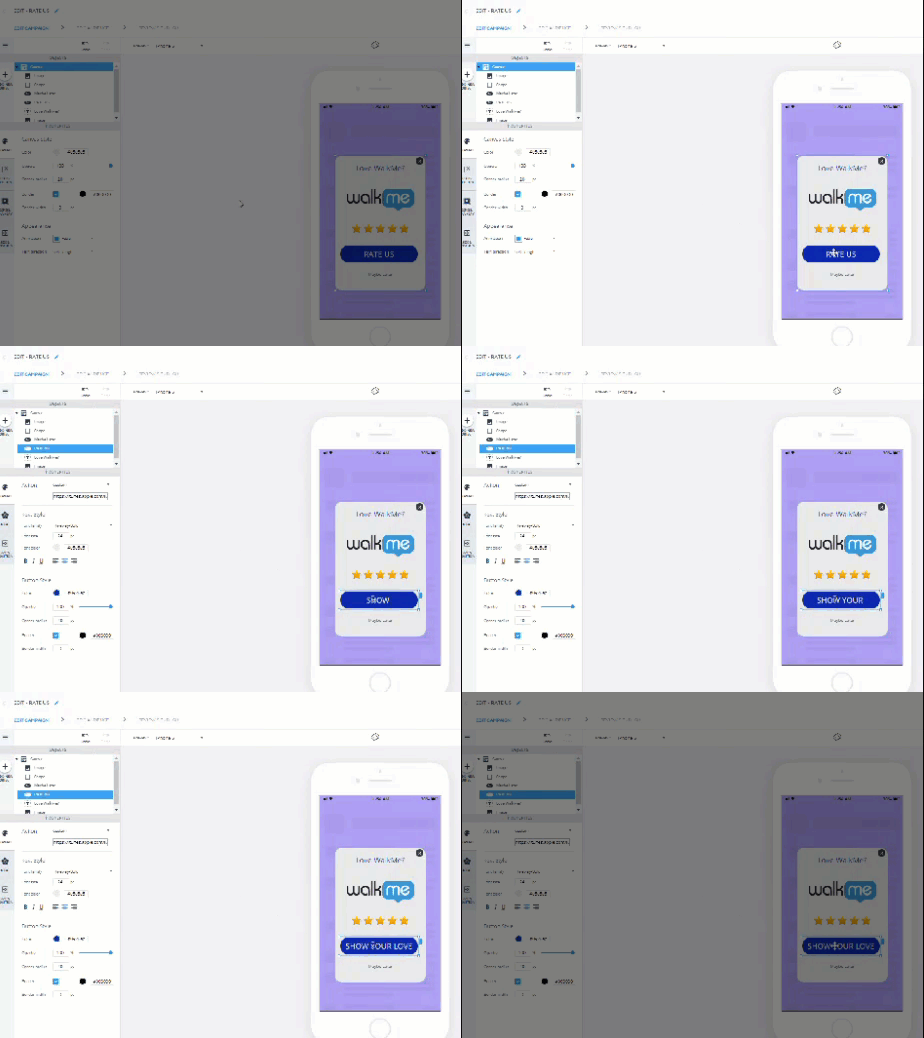
You can now edit your Text and Button object text inline, right inside your preview device screen. This will make it easier for you to see how the text you write fits inside the campaign:
Adding rich text to your campaign
With WalkMe Mobile SDK v1.14.0 and up, Text objects can be upgraded to the Advanced Text Format ("ATF") object type. To upgrade, click Advanced Formatting in the FORMAT tab.
Unlike simple text objects, where you can only set a single format to the entire object (i.e. if one word is bold, all words must be bold), ATF objects support setting a different format to every character in the object. That means that you can create text objects that look Like this (but only if you want to).
ATF also supports creating paragraphs, meaning you can create line breaks to tailor your texts to your designs.
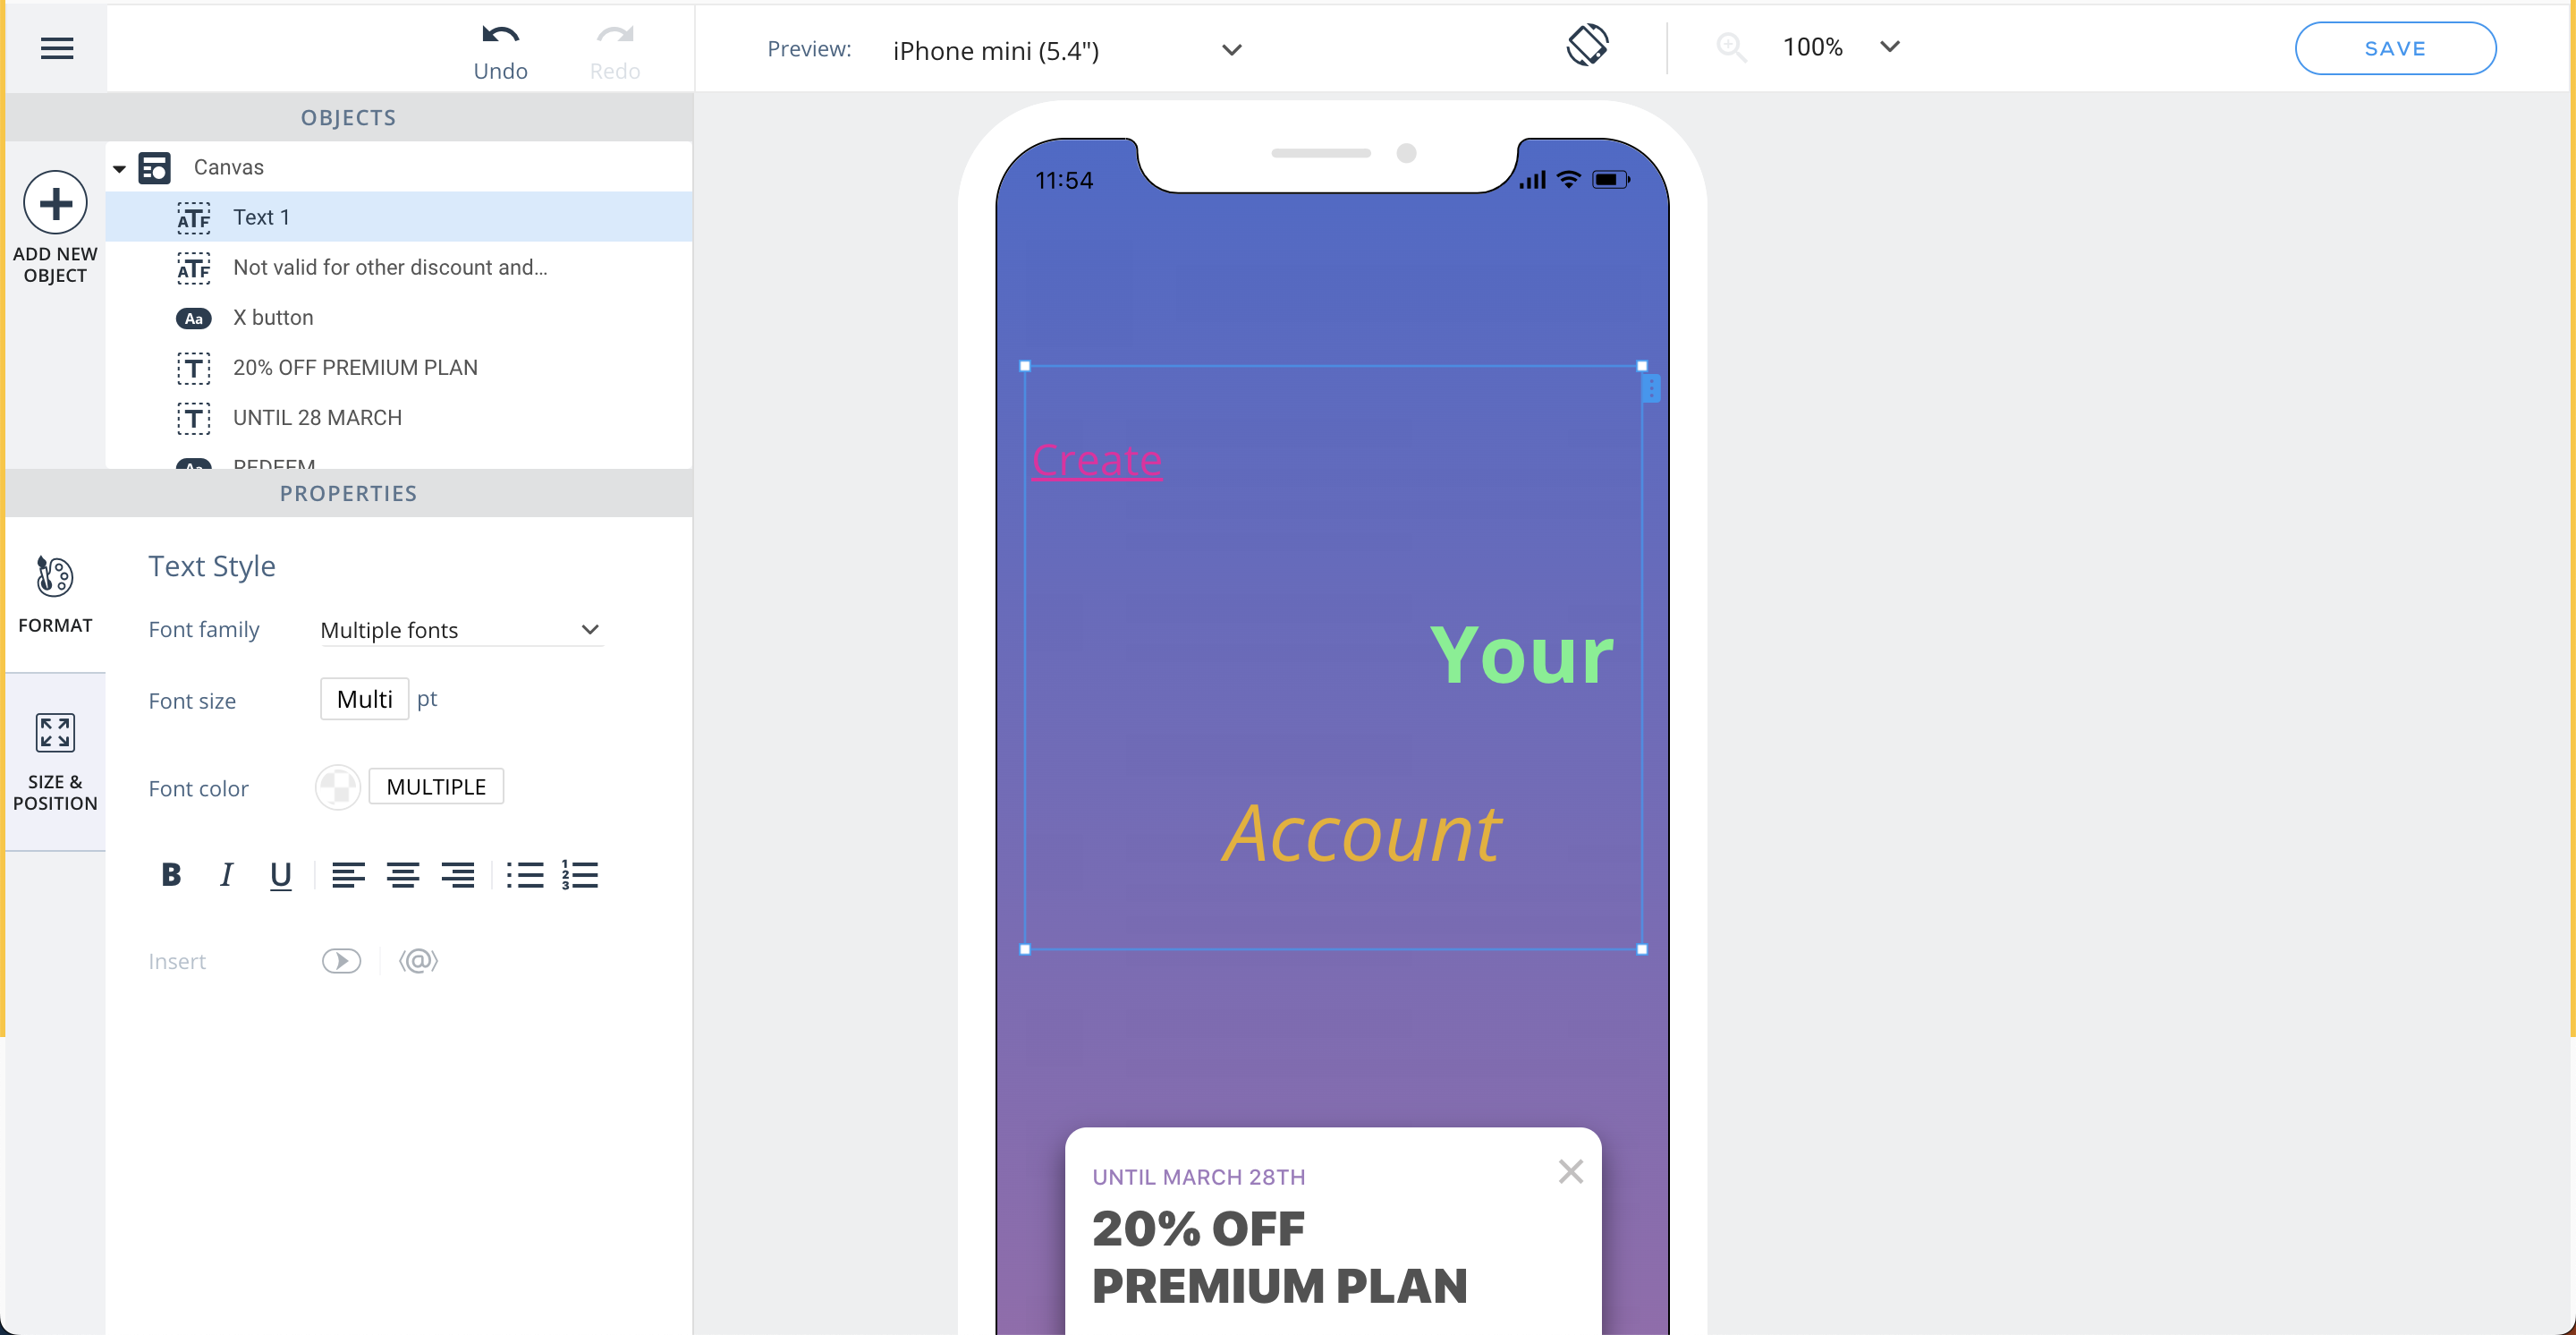
Formatting an ATF object is done from the toolbar that appears above the object. If the toolbar is positioned in an uncomfortable place, you can simply drag it in the Visual Editor area.
Since formatting is done per character, you must highlight the character(s) whose format you wish to edit inside the object, and only then set the desired formatting properties.
In case you want to reverse your upgrade to ATF (e.g., if you want to support lower SDK versions), click the Clear formatting button in the FORMAT tab on the left panel.
Adding dynamic text to your Campaign
With WalkMe Mobile SDK v1.16.0 and up, Campaigns can be customized even more with personalized content by adding dynamic text relevant to the end user.
Dynamic text is available in all Advanced Text Formatting objects ("upgraded" text object).
The available dynamic variables options can be seen by clicking on the <A> icon in the Advanced Formatting toolbar, or by simply typing in @ in an Advanced Text Formatting object.
The dynamic text can be based on out-of-the-box variables that exist on every app:
- App version
- OS version
- Device locale
- Connection type
Dynamic text can also be based on the information exposed to the SDK in User Attributes (every User Attribute added in the console will appear on the list), or the User Identifier API (that's what "User ID" refers to in the default dynamic options).
Fonts
Fonts available for use are inherited from the app out-of-the box and should show as options in the console when you click the font dropdown. If you are not seeing the options listed there, try entering power mode in the app and tapping blue icon > app info > sync app. Then refresh in the console and check again. Fonts are pulled from from info.plist in iOS and the fonts assets folder in Android.
Adding images to your campaign
Drag the Image icon from the OBJECTS directory to wherever you'd like the image to appear on your app screen.
Supported image formats include: png, jpg, jpeg, gif
Select your desired image from your ASSETS LIBRARY or click + UPLOAD NEW ASSET to upload a new photo into your library and include it in your campaign.
To customize your image's format, size, and position, click the relevant image object in the OBJECTS tree and click your desired customization tab on the left (either FORMAT or SIZE & POSITION).
Upon adding or clicking on an image, the default tab will be the FORMAT tab, where you can do the following:
- Change your image file;
- Set the image's opacity level (i.e., to what degree you can see through the image to the background);
- Set the image's corner radius (the higher this value, the more rounded the image's corners will be); and
- Set the image's border settings:
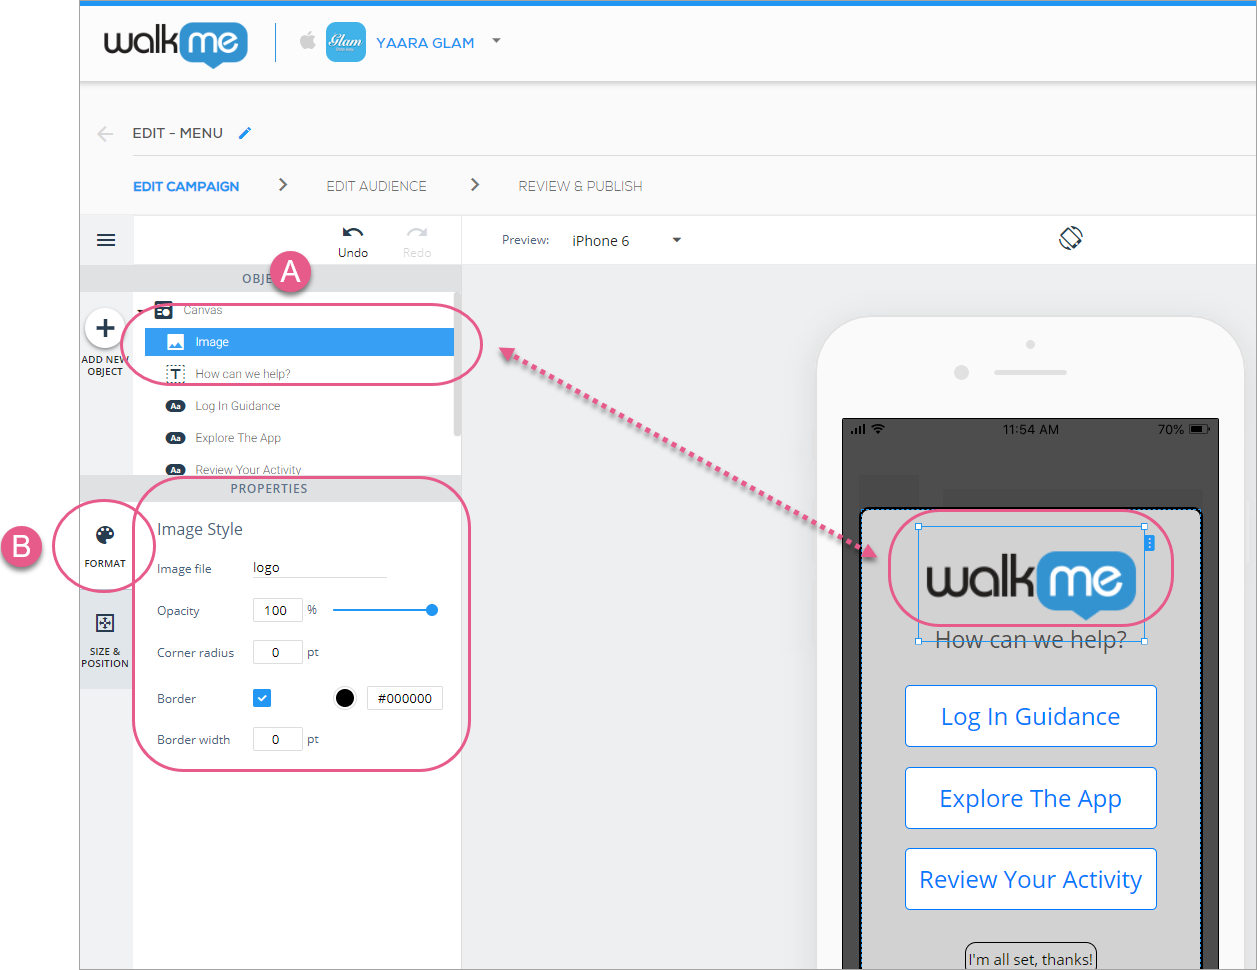
Next, click the SIZE & POSITION tab, where you can configure the image object's (the box in which the image sits) layer order (similar to z-index), size and units, and positioning relative to the Canvas object:
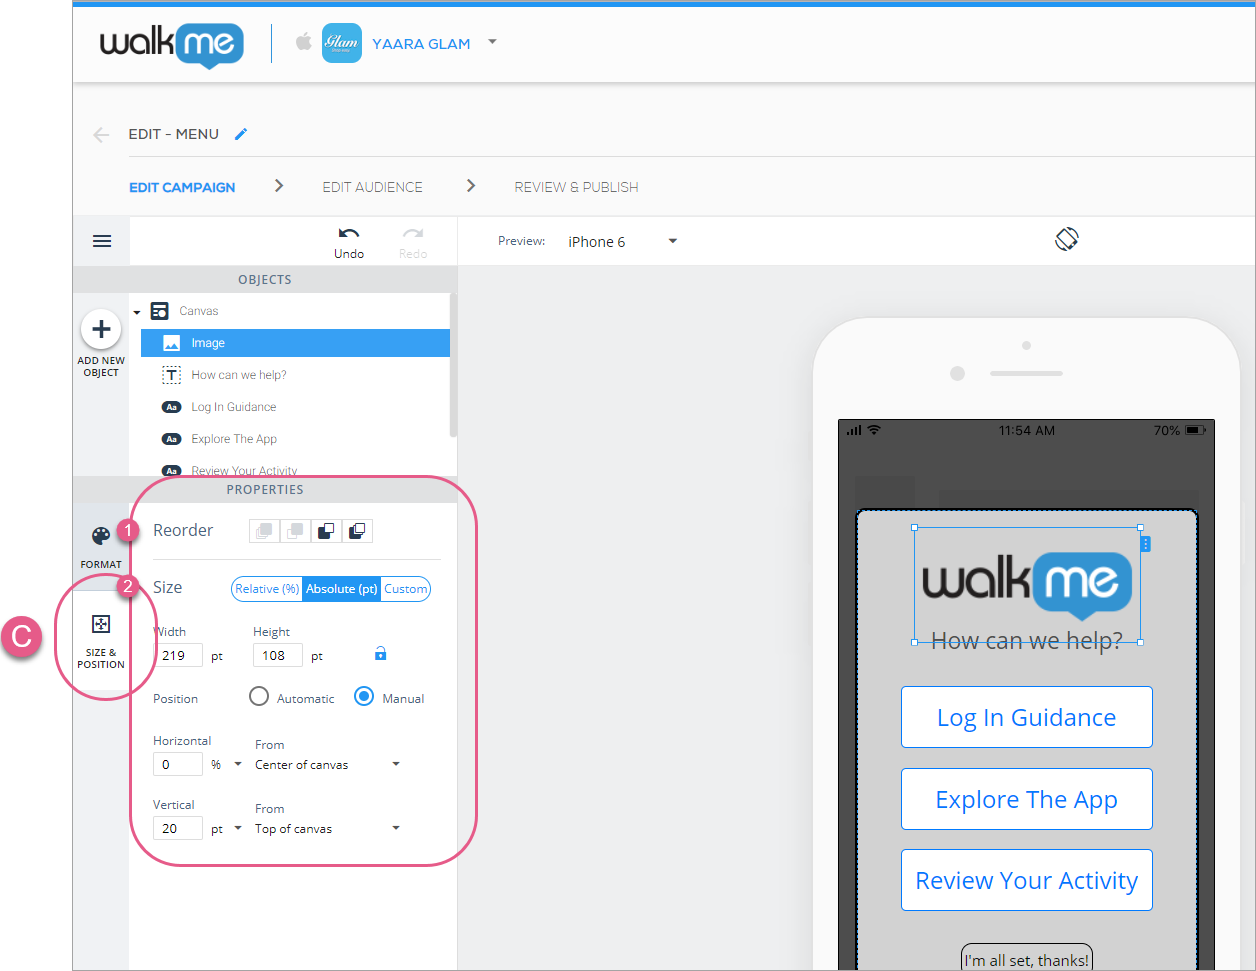
Adding buttons to your campaign
Drag the Button icon from the OBJECTS directory to wherever you'd like the button to appear on your app screen.
Upon adding or clicking a button, the default tab will be the FORMAT tab, where you can do the following:
- In the Action section, set an Action that will occur when an end-user clicks this button;
- See the Available Actions for buttons, shapes, lists, and overlays section below.
- In the Text Style section, set the text's font, font size, font color, text alignment and style;
- In the Button Style section, set the following:
- The button's opacity level (i.e., to what degree you can see through the button to the background);
- The button's corner radius (the higher this value, the more rounded the button's corners will be); and
- The button's border settings:
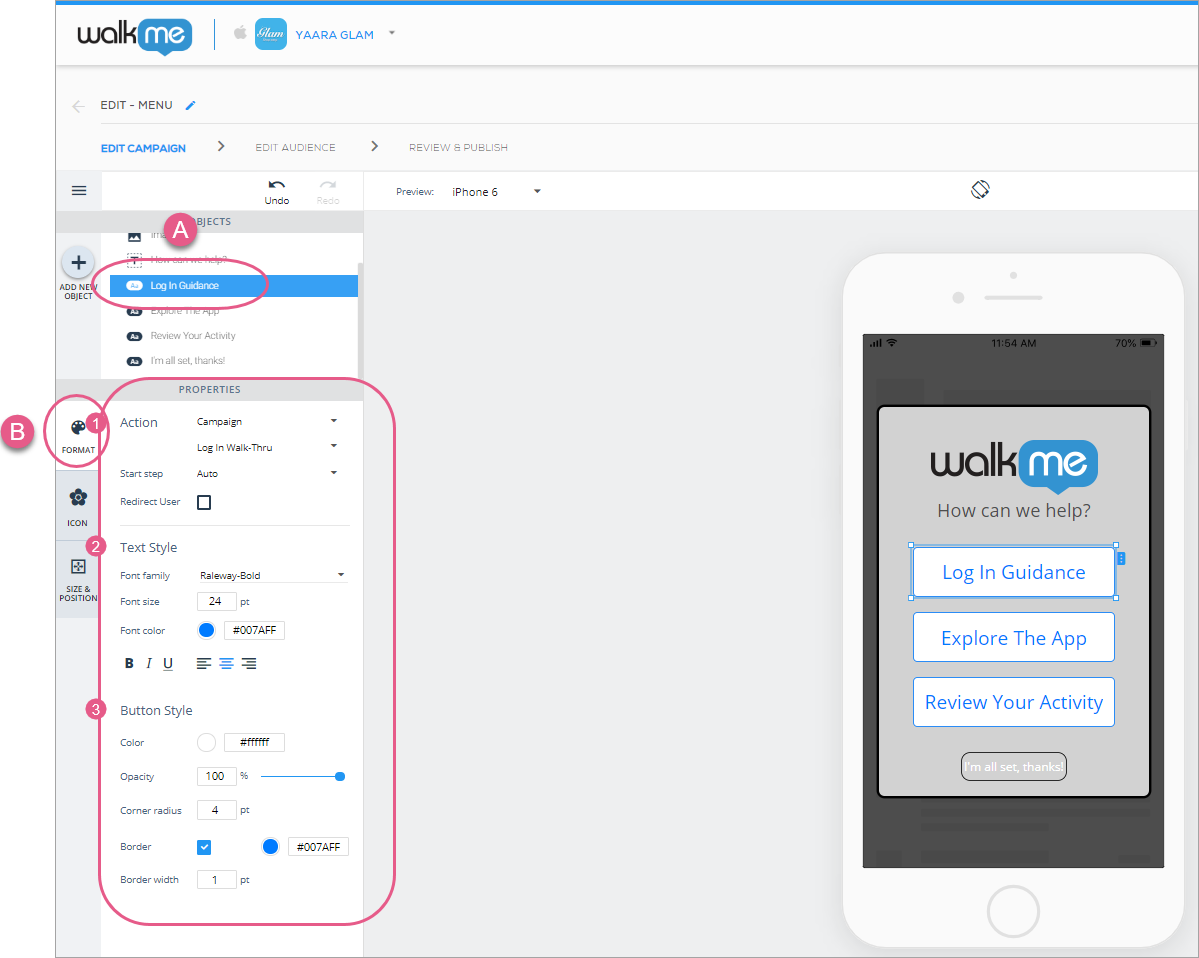
Steps 1-4: Click your button and configure your button's association action, text style, and button style.
Next, click the Icon tab and click the checkbox if you wish to add an icon to your button:
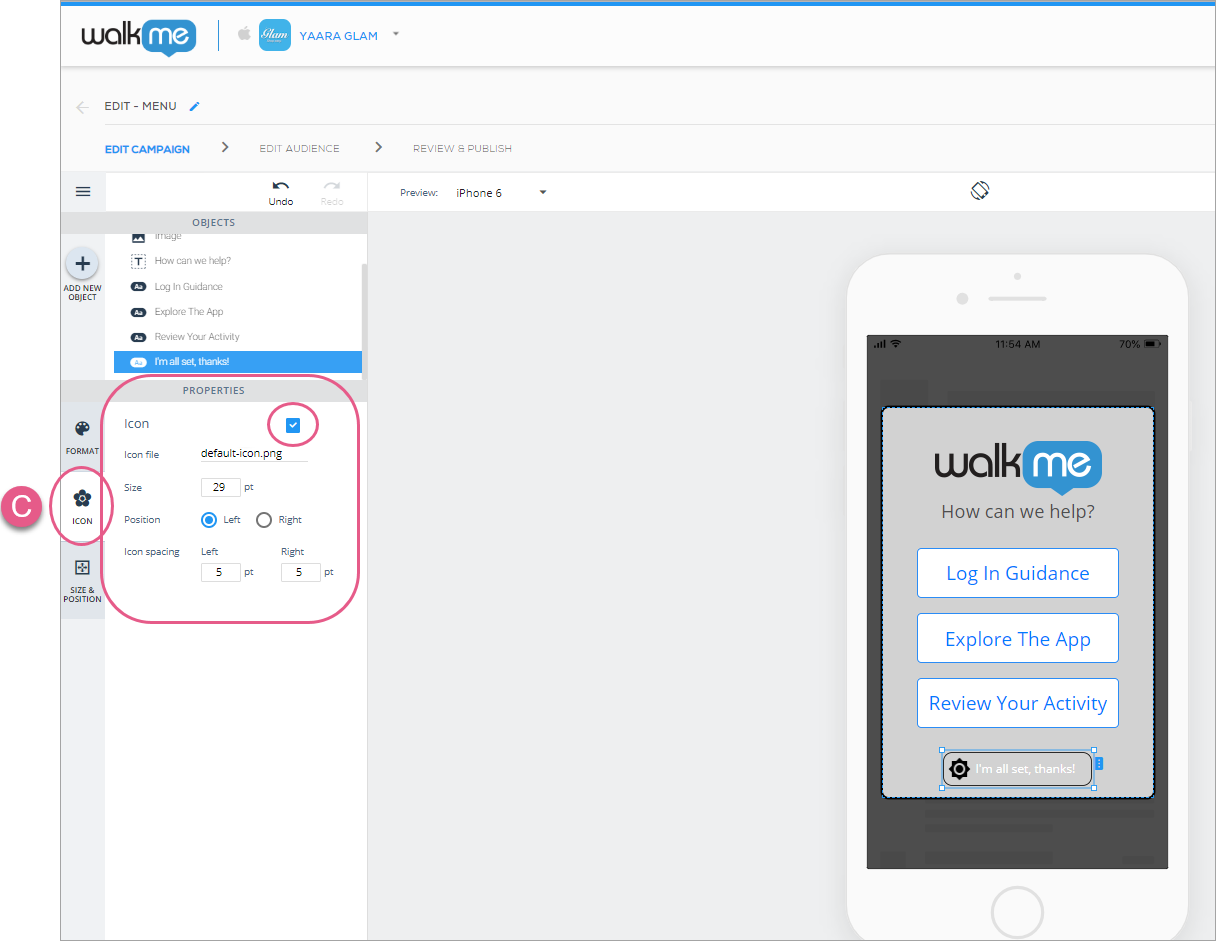
Finally, click the SIZE & POSITION tab, where you can configure the button object's (the box in which the button sits) layer order (similar to z-index), size and units, and positioning relative to the Canvas object:
Using a button to turn an image into a clickable area
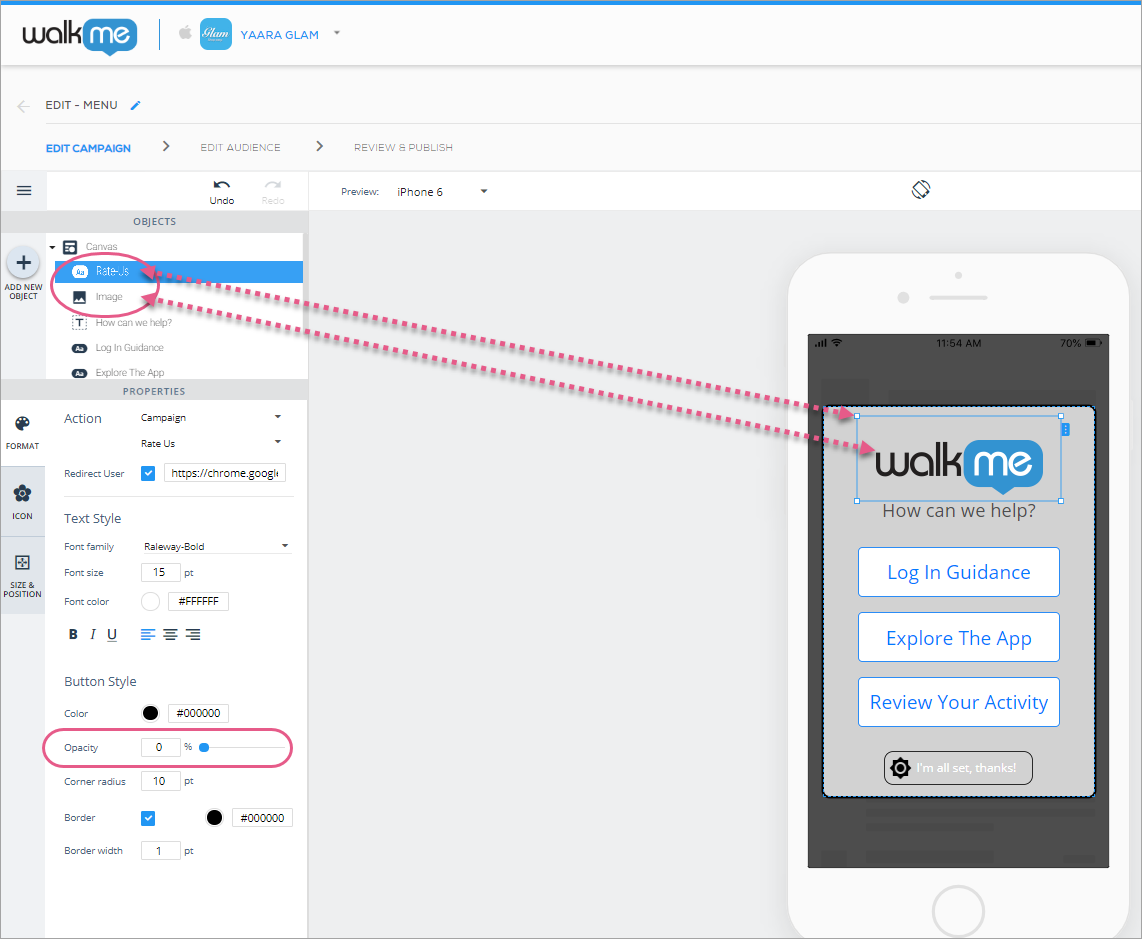
To turn a button into a clickable area, do the following:
- Drag the Button icon onto the preview device screen;
- Place it over an image;
- Resize it to the image's size (roughly);
- move the Opacity to 0% to make the button transparent;
- Assign an Action to the button, and this will create the illusion that the Action is tied to the underlying image:
Adding shapes to your campaign
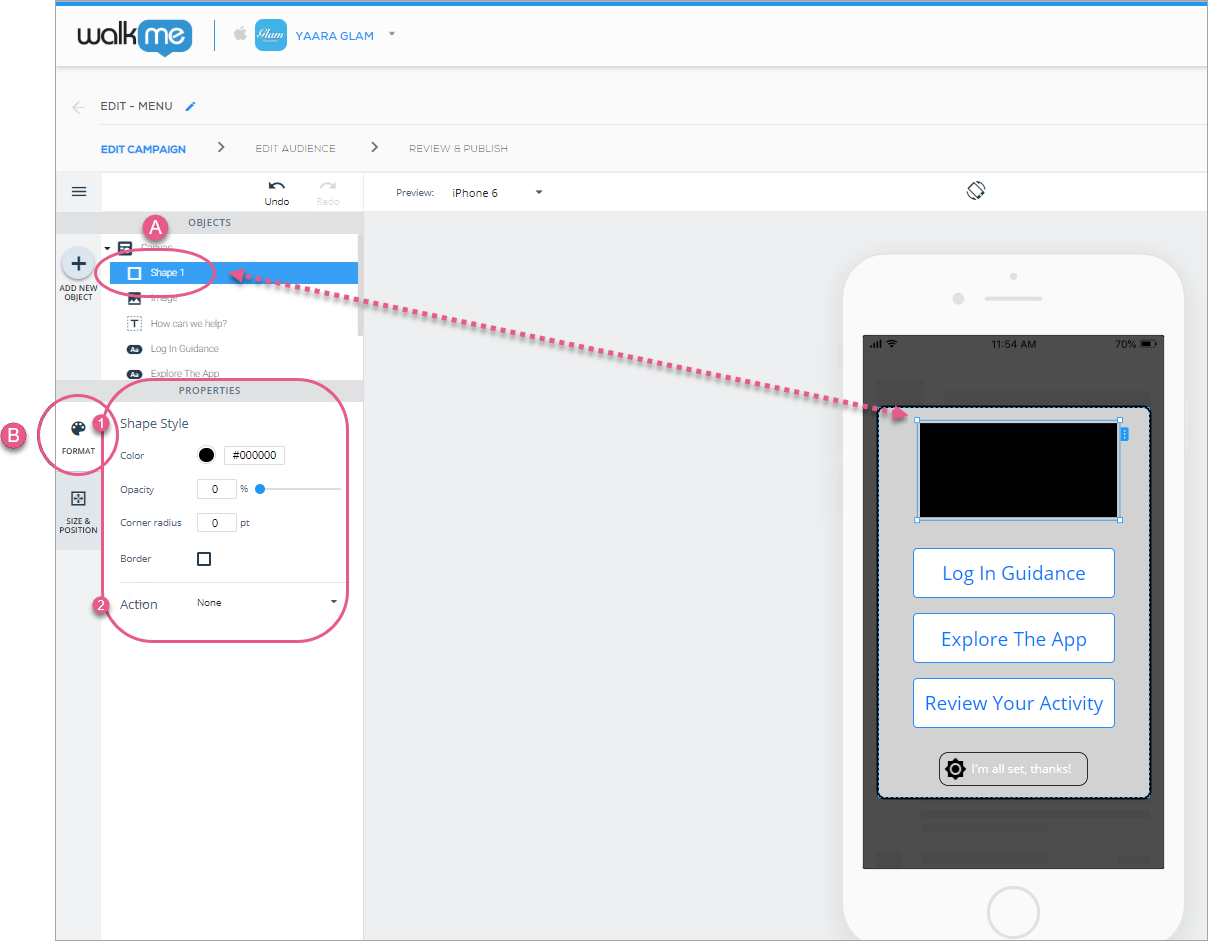
Drag the Shape icon from the OBJECTS directory to wherever you'd like the shape to appear on your app screen.
Upon adding or clicking a shape, the default tab will be the FORMAT tab, where you can do the following:
- In the Shape Style section, set the shape's color, opacity (visibility), corner radius (roundness of corners), and border settings;
- In the Action section, set an Action that will occur when an end-user clicks this shape;
- See the Available Actions for buttons, shapes, lists, and overlays section below.
Next, click the SIZE & POSITION tab, where you can configure the shape's layer order (similar to z-index), size and units, and positioning relative to the Canvas object:
Adding lists to your ShoutOuts
Lists are primarily used when building ShoutOuts. To learn more, see How To Build ShoutOuts.
Adding web-views to your campaign
Web-views are primarily used when building ShoutOuts. To learn more, see How To Build ShoutOuts.
Adding carousels to your campaign
Carousels are primarily used when building ShoutOuts. To learn more, see How To Build ShoutOuts.
Available Actions for buttons, shapes, list-items, and overlays
The button, shape, and list's available Actions are as follows:
- Custom: A positive CTA that will send the end-user to any URL or deeplink you enter in the CTA field;
- The Internal Redirect box should be checked if you are adding deeplinks into the currently selected app on Android, and prevents popups asking users to approve the navigation to the deeplink;
- Once the box is checked, you will see a field that should auto-populate with the package name of your current app, with the format com.company.app.XXX.
- OK: A positive CTA that counts toward the campaign's Click Through Rate;
- Maybe: A neutral (neither negative nor positive) CTA which, when clicked, will close the campaign, but will cause the campaign to reappear on the end-user's screen at a random time in the following 1-3 days;
- Campaigns that re-appear after clicking MAYBE CTAs don't count toward impressions limits.
- Never: One of two negative CTAs that will close the campaign and ensure that the end-user never sees this campaign again;
- Close: The second of two negative CTAs. Clicking it will close the campaign, but will not affect its future behavior vis a vis end-users (as opposed to NEVER CTAs' behavior);
- Show settings: A positive CTA that, once clicked, will redirect the end-user to the app's settings page on the OS level;
- iOS - Navigate to Settings > Choose App from list
- Android - Navigate to Settings > Apps > Choose App from list
- Campaign: A positive CTA that links one campaign to another.
- Select the campaign's name from the drop-down list;
- If the selected campaign is a Walk-Thru, you can decide which step the campaign should begin from, or choose Auto (default) to let the SDK decide;
- Check the Redirect User box and enter a URL if you want to redirect your end-user to a different app page to begin the campaign.
- Submit: A positive CTA that submits a survey;
- Only appears for buttons and shapes in the Survey-type campaign.
- Next slide/previous slide: Transfers the end-user between the different slides of a Carousel;
- Only appears for buttons and shapes in the Carousel widget.
- Next step/previous step: Moves you to the next or previous step of a Walk-Thru.
- Only appears for buttons and shapes in Walk-Thrus;
- Will only see this option if the step is not the final (for "next step") or first (for "previous step") one on a screen.
