Help Center
Welcome to the WalkMe Help Center

Please login in order to continue:

Work flows better with WalkMe
Work flows better with WalkMe.

Install WalkMe into Oracle Fusion Apps

Last Updated April 2, 2024

Brief Overview

Oracle Fusion applications have a feature that lets you add your own custom JavaScript code. With this feature, we can add the WalkMe Snippet directly into these platforms without needing to use a separate extension.

The WalkMe Snippet is a special piece of code written in JavaScript that lets WalkMe appear on your website. Every WalkMe Editor account has its own unique snippet code. This guide will show you step-by-step instructions on how to install the snippet into your Oracle Fusion application.

Setting/Deploy

Update the Oracle Content Security Policy Setting

Content Security Policy (CSP) is a security feature that protects websites from being attacked by malicious code. One way it does this is by limiting the resources that a website can load.

The ORACLE.ADF.VIEW.ALLOWED_ORIGINS profile in Oracle is used to specify which domains are allowed to interact with the website. Before installing your WalkMe Snippet, you will need to allow walkme.com domain resources to Oracle:
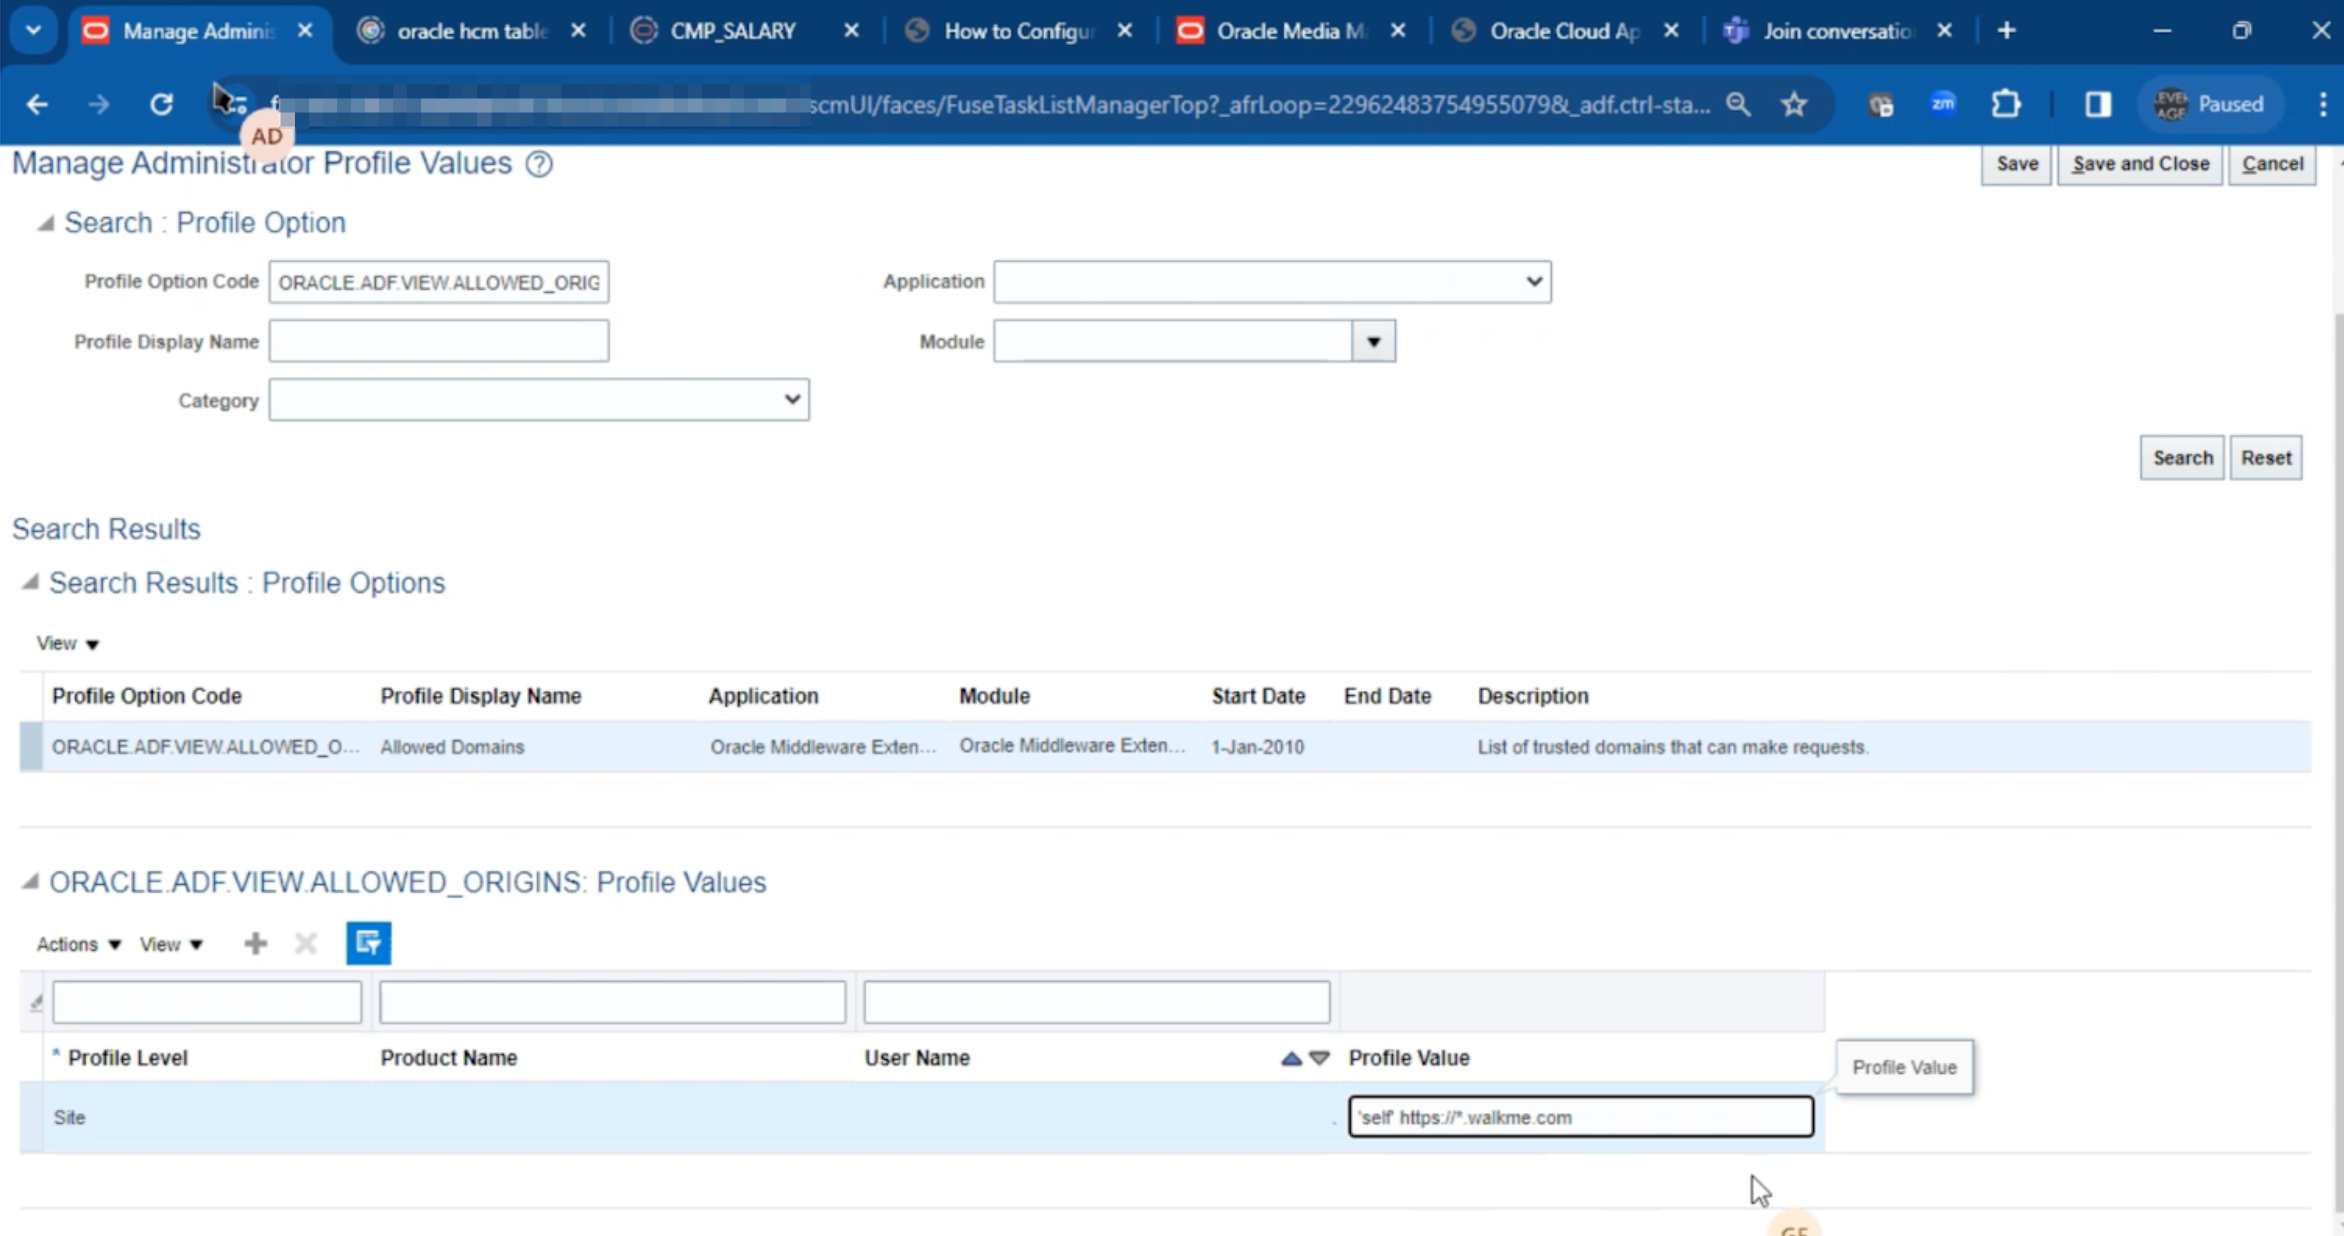
  1. Go to ORACLE.ADF.VIEW.ALLOWED_ORIGINS: Profile Values
  2. Add 'self' https://*.walkme.com to the Profile Value field
  3. Click Save

Find your snippet

The snippet code is available from the WalkMe Editor. You will need to copy this code to use later in the embedding process below.
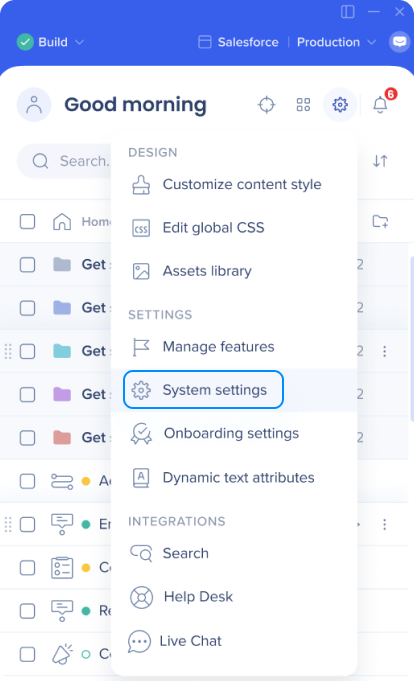
  1. Click the settings button (gear icon) in the WalkMe Editor
  2. Click System settings

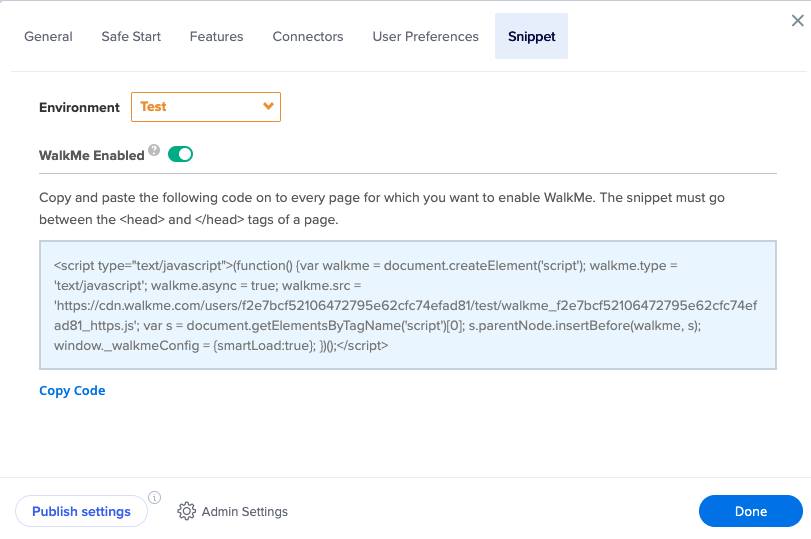
  3. Go to the Snippet tab
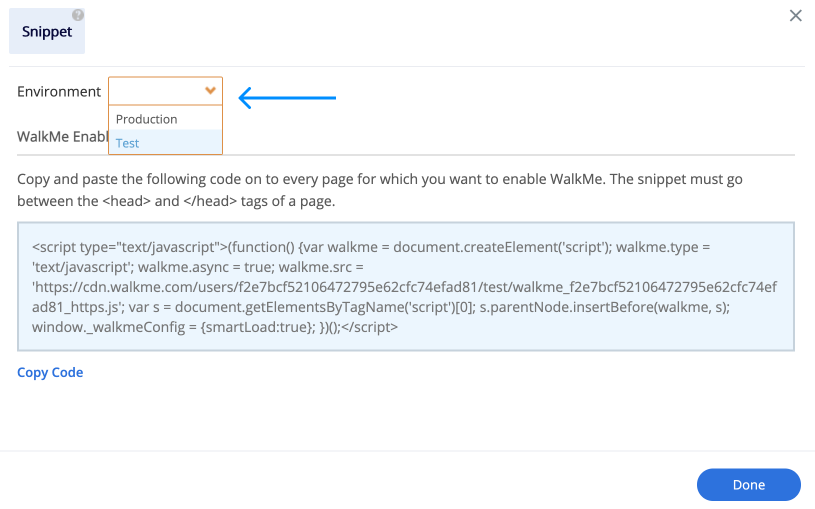
  4. Select the correct environment from the dropdown (Test/Production)
    • Each environment has a slightly different snippet code
    • If you have a test/sandbox/staging site, select the Test snippet
    • If you would like the snippet for publishing to your end-users, select the Production snippet
      Note

      The snippet environment will automatically select the environment open in the editor.

  5. Don't copy the whole snippet. Instead, copy the URL embedded in the snippet, and create a code snippet like the example below:
    • Example code snippet to embed:
<script src='https://cdn.walkme.com/users/90ffe6d14ea242c19e029b712cbbca83/test/walkme_90ffe6d14ea242c19e029b712cbbca83_https.js'></script>
Snippet Code Retrieval Issue

If you aren't able to retrieve the snippet code, please contact our support team.

Get to Know & Use

It's important to determine which type of Oracle application or page you want to add the WalkMe snippet to before proceeding with the embedding process. Choose the appropriate set of steps to embed the WalkMe Snippet from the options provided below:

Steps to Embed the Snippet into (legacy) Page Template
  1. Create a new sandbox and activate the sandbox
  2. Click on Edit Global Page Template from Settings and Actions

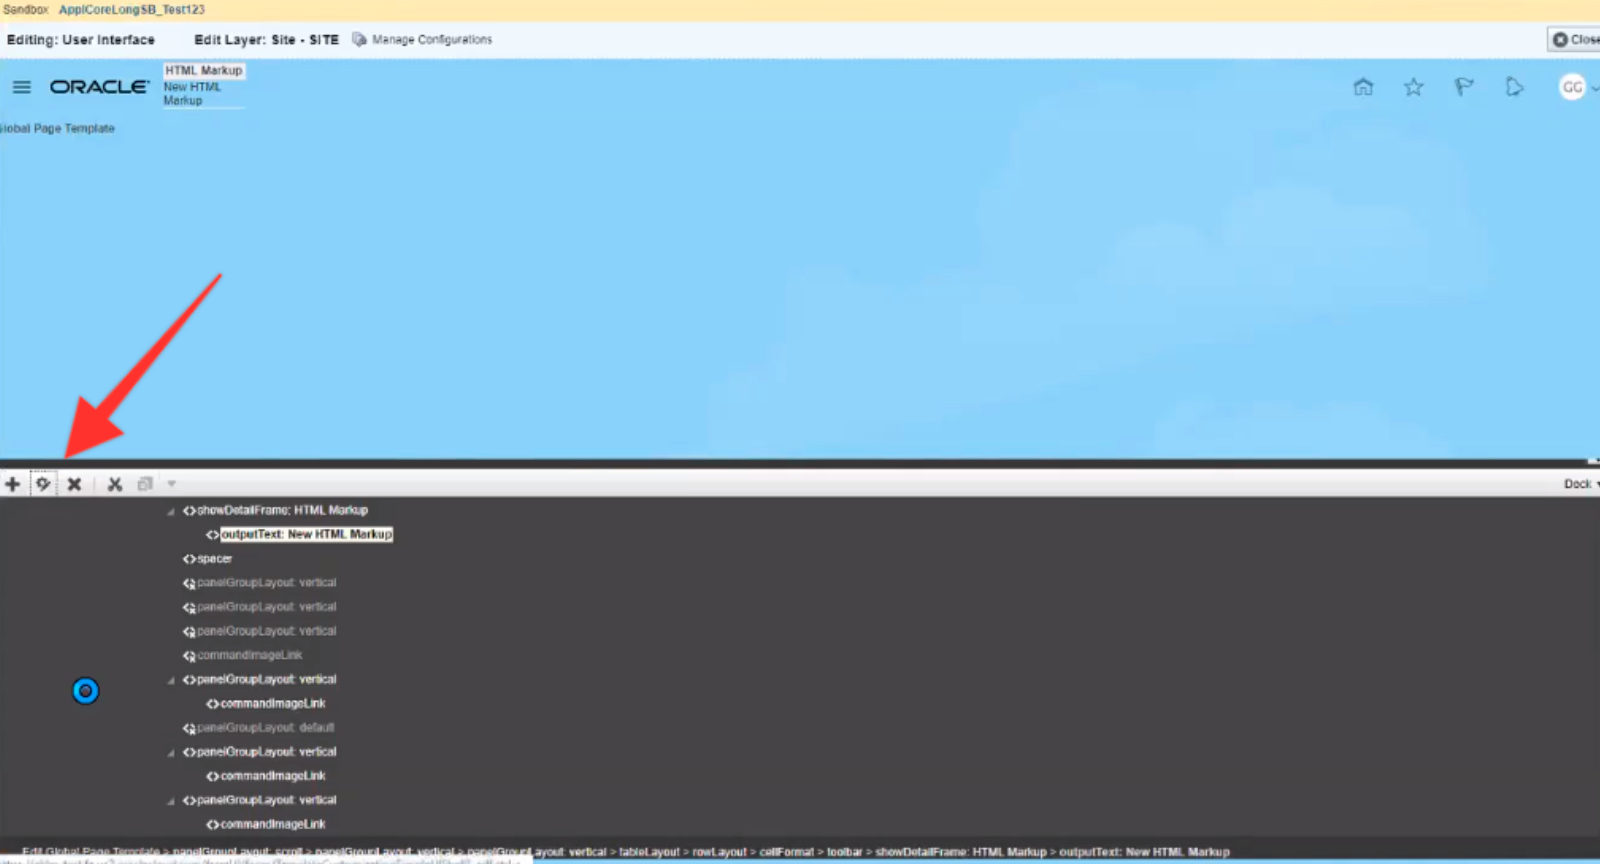
3. On the screen, select the center header element (see label 1 below)

    • This is the location on the page where the snippet element will be embedded

4. On the bottom of the page, a component editor will appear, you can use your mouse to expand it up about halfway through the page

5. Click on the + icon to add a new component (see label 2 below)
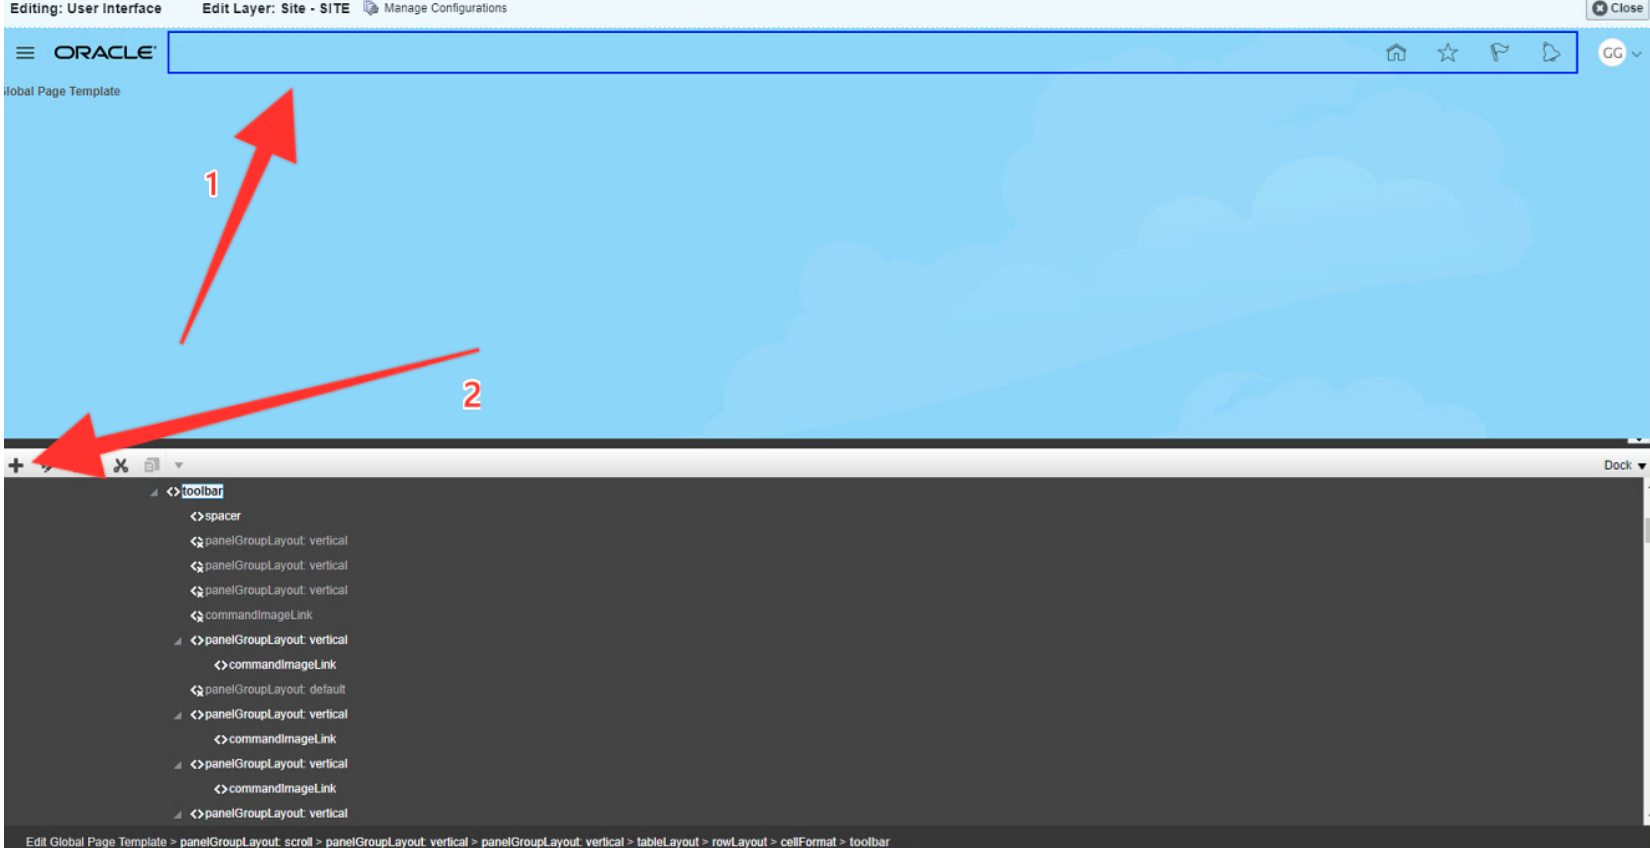
6. Select Components

7. Click + Add next to HTML Markup and then Close

8. Click your new HTML Markup component

    • In the Markup Editor on the bottom, you should see a line that says outputText: New HTML Markup
    • Select outputText: New HTML Markup

9. Click the Edit icon (Gear icon)

10. Click the arrow next to the Value field and select Expression Builder

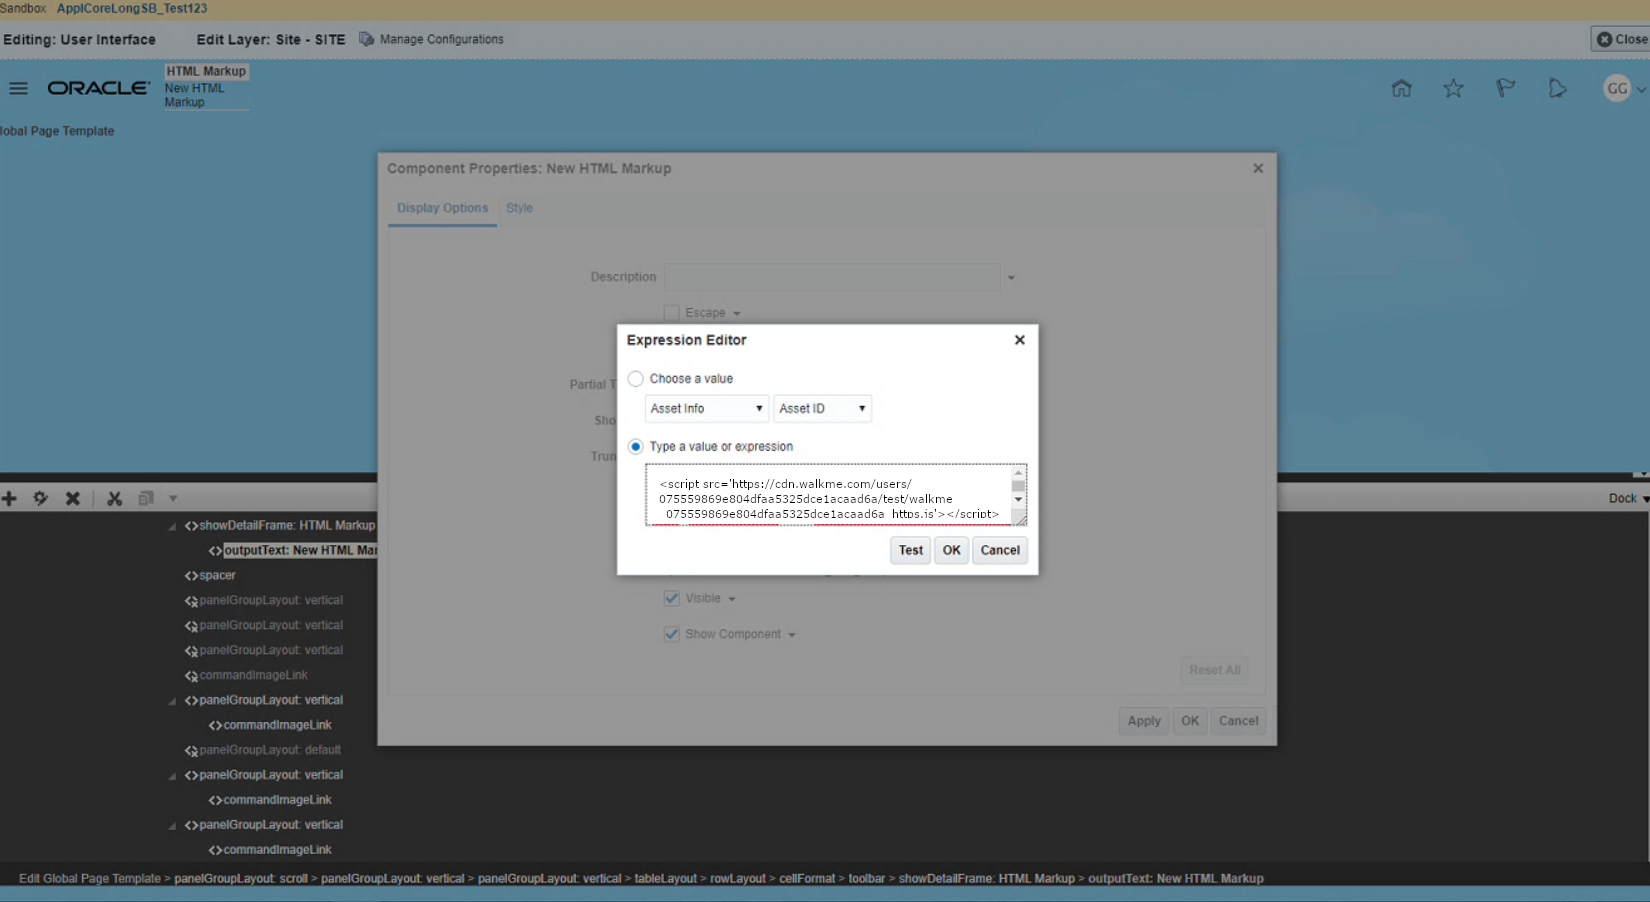
11. Remove the default value and paste the WalkMe snippet instead
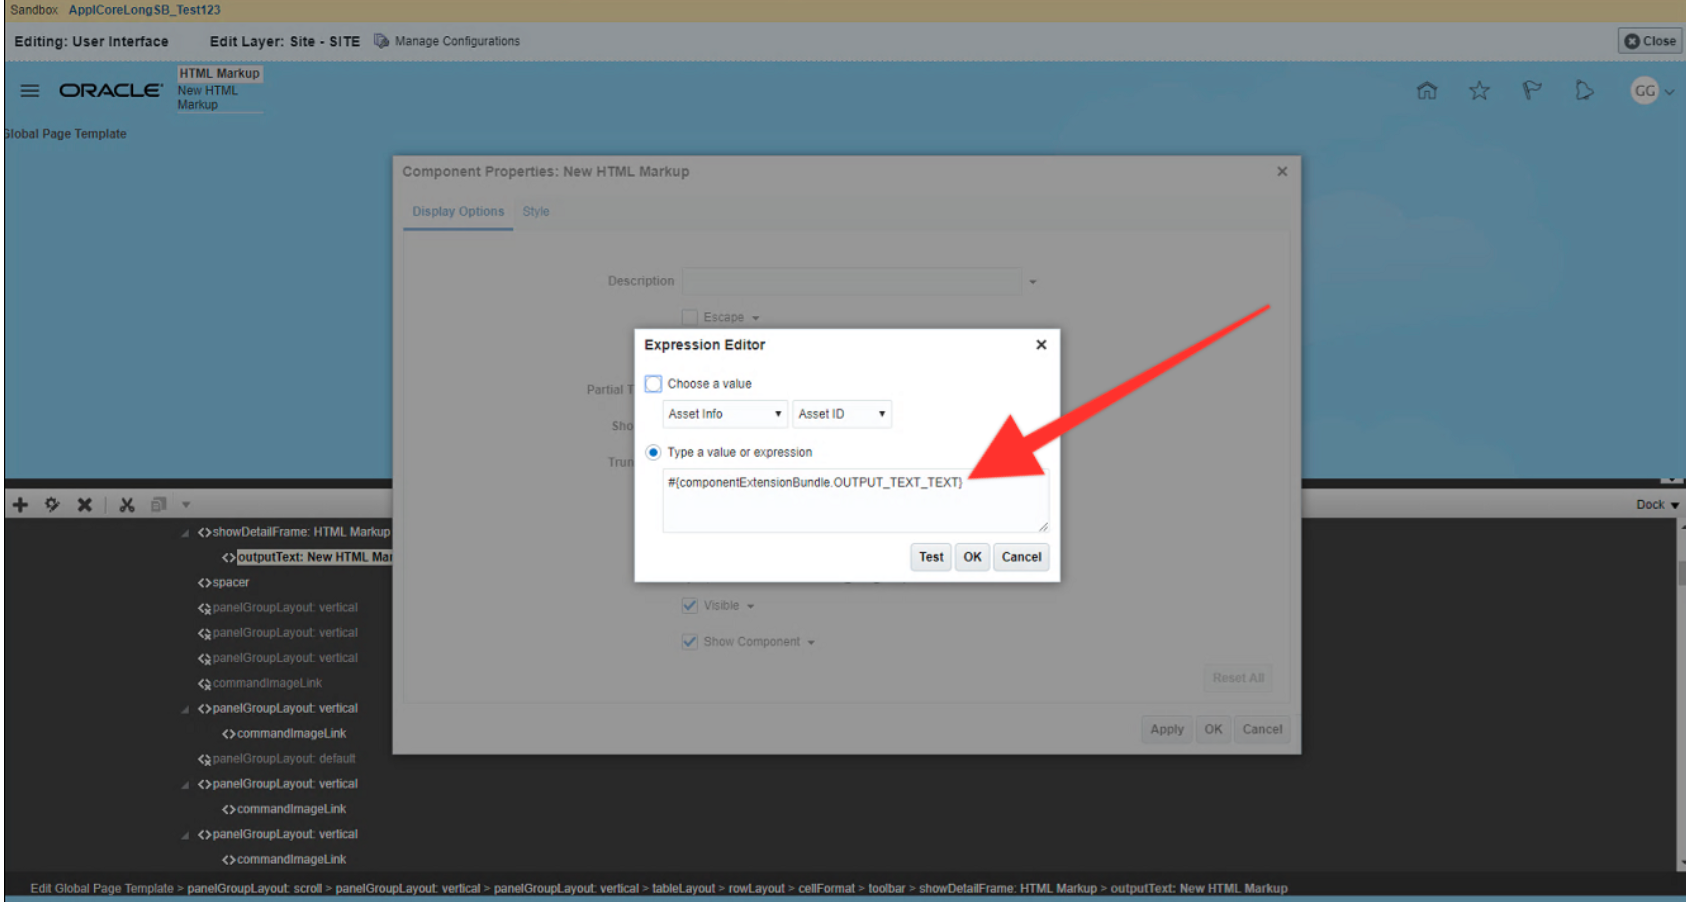
12. Click OK to close the Expression builder

13. Click OK to close the Component Properties

14. Click Close on the top right to exit the editing interface
Steps to Embed the Snippet into Redwood apps and pages

Pre-requisites

  • You must have Visual Builder Studio set up which includes the following:
    • Creating a Visual Builder Studio instance 
    • Assigning users to the correct roles
    • Visual Builder Studio configured correctly for building/deploying applications to your chosen environment

Create a project

Note: These instructions assume that you do not have an existing Project set up that you wish to make the modifications in.
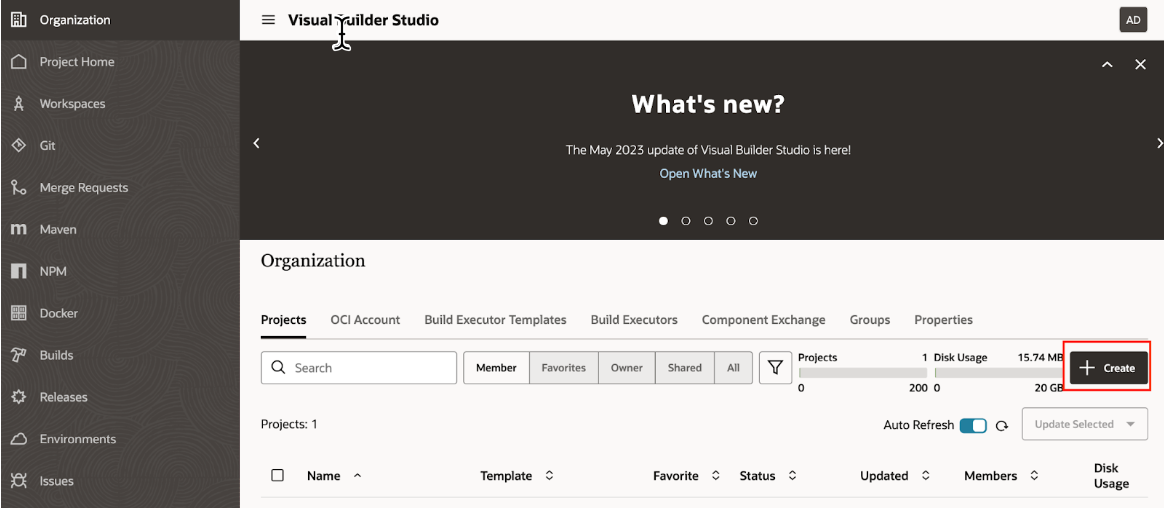
  1. In the VB Studio Console go to the Organization tab
  2. Click Create above the list of Projects
  3. Give your project a name ie “WalkMe Snippet”

4. Select Empty Project

5. Choose defaults for all others or as direct by your Oracle admin

6. Click Finish

Create an Environment

  1. In VB Studio Console, open your project and navigate to Environments tab
  2. Click Create Environment

3. Give your environment a name and (optional description)

4. Click Create

Note: This is a container for an actual Oracle environment, ie. DEV1, TEST, UAT etc

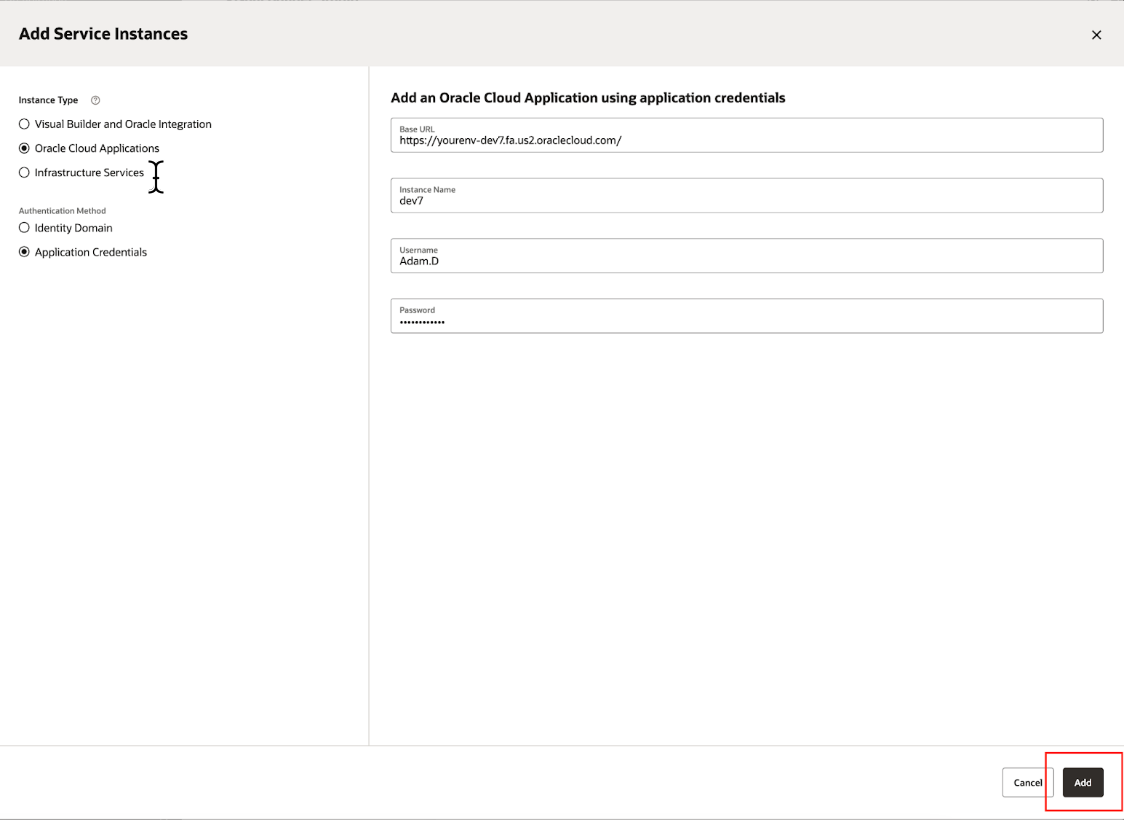
5. Open the environment and click Add Instance

6. Select the following:

  • Instance Type: Oracle Cloud Applications
  • Authentication Method: Application Credentials

7. Under Add an Oracle Cloud Application using application credentials enter the following:

  • Base URL: The URL users use to access the environment
  • Instance name: A descriptive name for this environment
  • Username: User credentials for an admin with sufficient permissions to develop applications
  • Password: password

8. Click Add

9. Now your instance should be available

Create an Application Extension

  1. In the VB Studio Console, open your project and go the Workspaces tab
  2. Click New
  3. Click New Application Extension
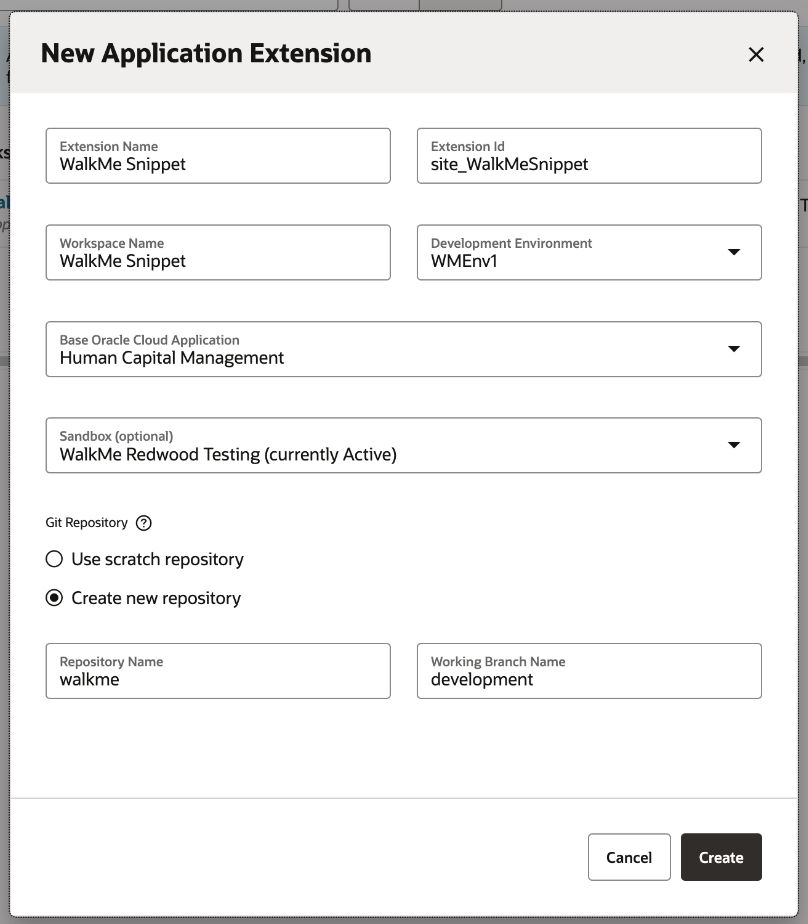
  4. Enter the following information in the New Application Extension popup
    1. Extension Name: WalkMe Snippet
    2. Workspace Name: Leave as default
    3. Development Environment: Select the Environment you created earlier, or as directed by your Oracle admin
    4. Base Oracle Cloud Application: Human Capital Management (for the main Oracle HCM Redwood pages)
    5. Sandbox: As directed by your Oracle Admin
    6. Git Repository: Create new repository
    7. Repository Name: walkme (or as directed)
    8. Working Branch Name: development (or as directed)
  5. Click Create

Note: Human Capital Management might not be the only application in use where you need WalkMe. If extending this application doesn't cover all areas, see the section at the end of this document: Finding the correct application to extend

Now the Workspace will be automatically opened.

Add the WalkMe Snippet and Deploy

  1. If you are not already in the Workspace, open the VB Studio Console and go to: Organization > Projects > Your project > Workspaces > Your workspace
  2. Left click on Application that's located under Application Extensions
  3. Click the JavaScript tab
  4. Paste the WalkMe Snippet (without the <script></script> tags) inside the define function call
  5. Click Publish
  6. Select Merge now or Merge After review (as directed by your Oracle admin)
  7. Add a comment for the Commit Message
  8. Click Publish Changes

Note: You may get a warning about the sandbox needing a refresh - we advise customers to do as instructed and refresh before publishing.

9. You should get a confirmation. Click Close

You can check the status of the deployment from VB Studio console > Builds > Job Queue

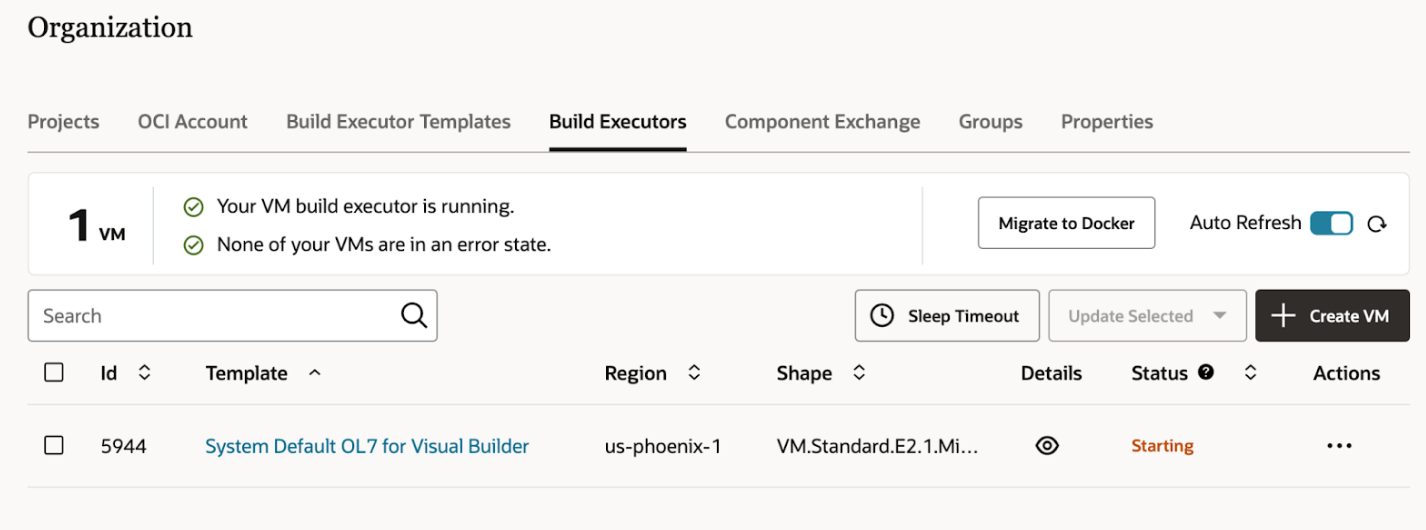
Note: If you see Waiting for Executor in the Progress column, make sure an Executor has been provisioned under VB Studio console > Organization > Build Executor.

You can create one here if directed by your admin, which may take up to 30 minutes to start up. The deploy job will continue automatically once the Executor is created/started.
Remove (back out) an Extension

  1. If you are not already in the Project, open your VB Studio Console and navigate to your project: Organization > Projects > Your project
  2. In the navigation menu, click Builds > Builds
  3. Enter a unique name under the Name field in the New job dialog box
  4. Enter the job's description in the Description field
  5. Select System Default OL7 for Visual Builder in Template
  6. Click Create
  7. On the Job Configuration page, click Configure > Configure
  8. Click the Steps tab
  9. Select Application from Add Step
  10. Select Delete
  11. Select the Oracle Cloud Applications instance where the application is deployed in Instance
  12. In Username and Password, enter the credentials of an IDCS user who is not only an Oracle Cloud Applications user, but one who can connect and undeploy from the Oracle Cloud Application's production instance
  13. In Base Application, Name, and Version, enter the extension's base application, name, and version
  14. You can find the details on the Deployments tab of the environment where the extension is deployed
  15. Click Save
  16. Click Build Now to run a build

Finding the Correct Application to Extend

Choosing the correct application to extend is key to the successful injection. If you extend the wrong application, nothing will happen (well, SOMEONE will get WalkMe, just not where you expect!)

If the pages the customer wants WalkMe on are not part of the Human Capital Management, you'll need to create an additional extension (or multiple) and perform the same process there.

To get started, navigate to the page where you want WalkMe to inject, and inspect the document:

Search the DOM for a script resource called app.json. On the script attribute data-requiremodule it will contain a URL, in the format …/applications/<application name>/app.json

The <application name> is the name of the application you will want to extend:

Technical Notes

  • Oracle is not supported on Mobile Web

Was this article helpful?

Thanks for your feedback!

Be part of something bigger.

Engage with peers, ask questions, share ideas

Ask the Community
×