Brief Overview
Insights Reports already give you access to all your WalkMe data, allowing you to examine your data in many different ways and variations. The Insights Report Builder takes this a step further and allows you to create custom reports tailored specifically for your needs with a self-service tool.
The Report Builder guides you through the process to create your own customized reports, beginning with choosing a template that best suits your needs, and then offering additional columns and filters for data enhancement. You can create custom reports for web, Desktop Menu, and Native Mobile systems. The templates available depend on the system type.
Once the report is created it can be used in WalkMe just as any other report: it can be exported and subscribed to.
How It Works
Create a Report
Step 1: Choose Report Template
To begin using the Report Builder, follow the steps below:
- Go to the Reports Gallery page in the WalkMe Console
-
Click the + Create Report button
-
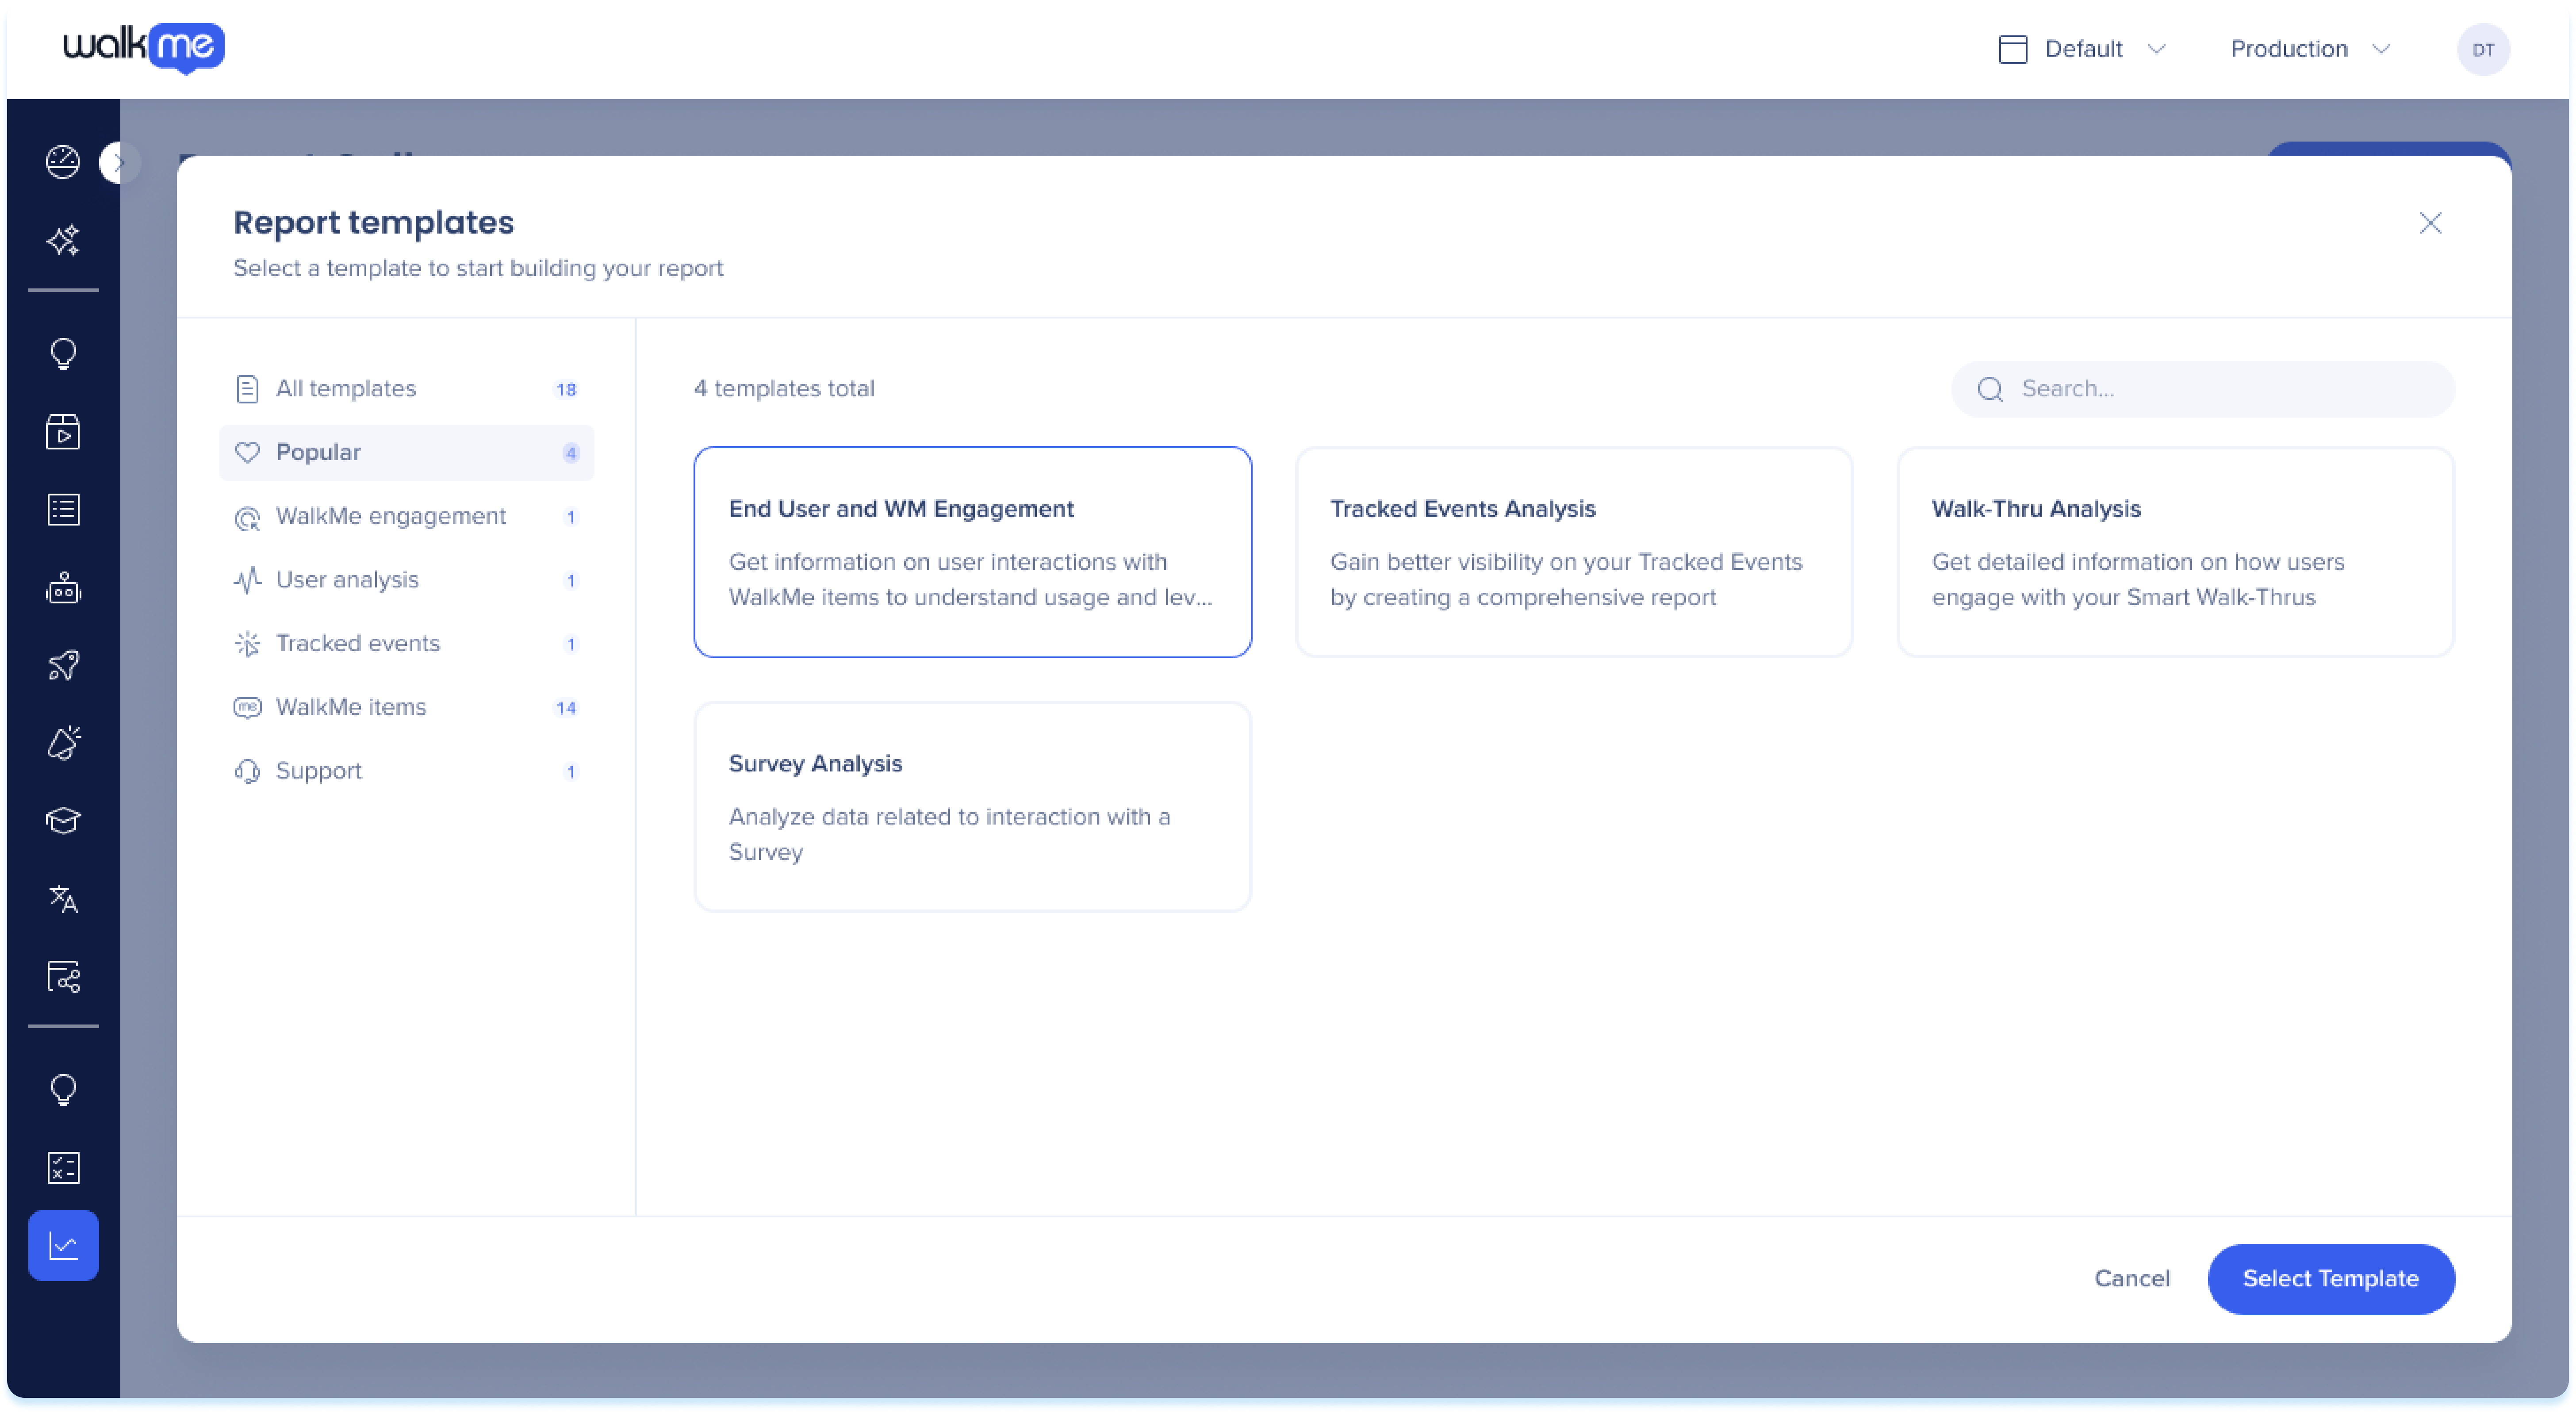
Choose from the available pre-defined templates to begin building your report
-
Click Select template
Nota
Not all templates are available for every system type. See Supported templates by system type below
When you build a report based on a web-only template — Learning, ActionBot, AI Features, Help Desk, Learning Apps, Resources, SmartTips, Shuttles, or TeachMe — Native Mobile systems aren't available in the system selector.
Step 2: Add Report Columns
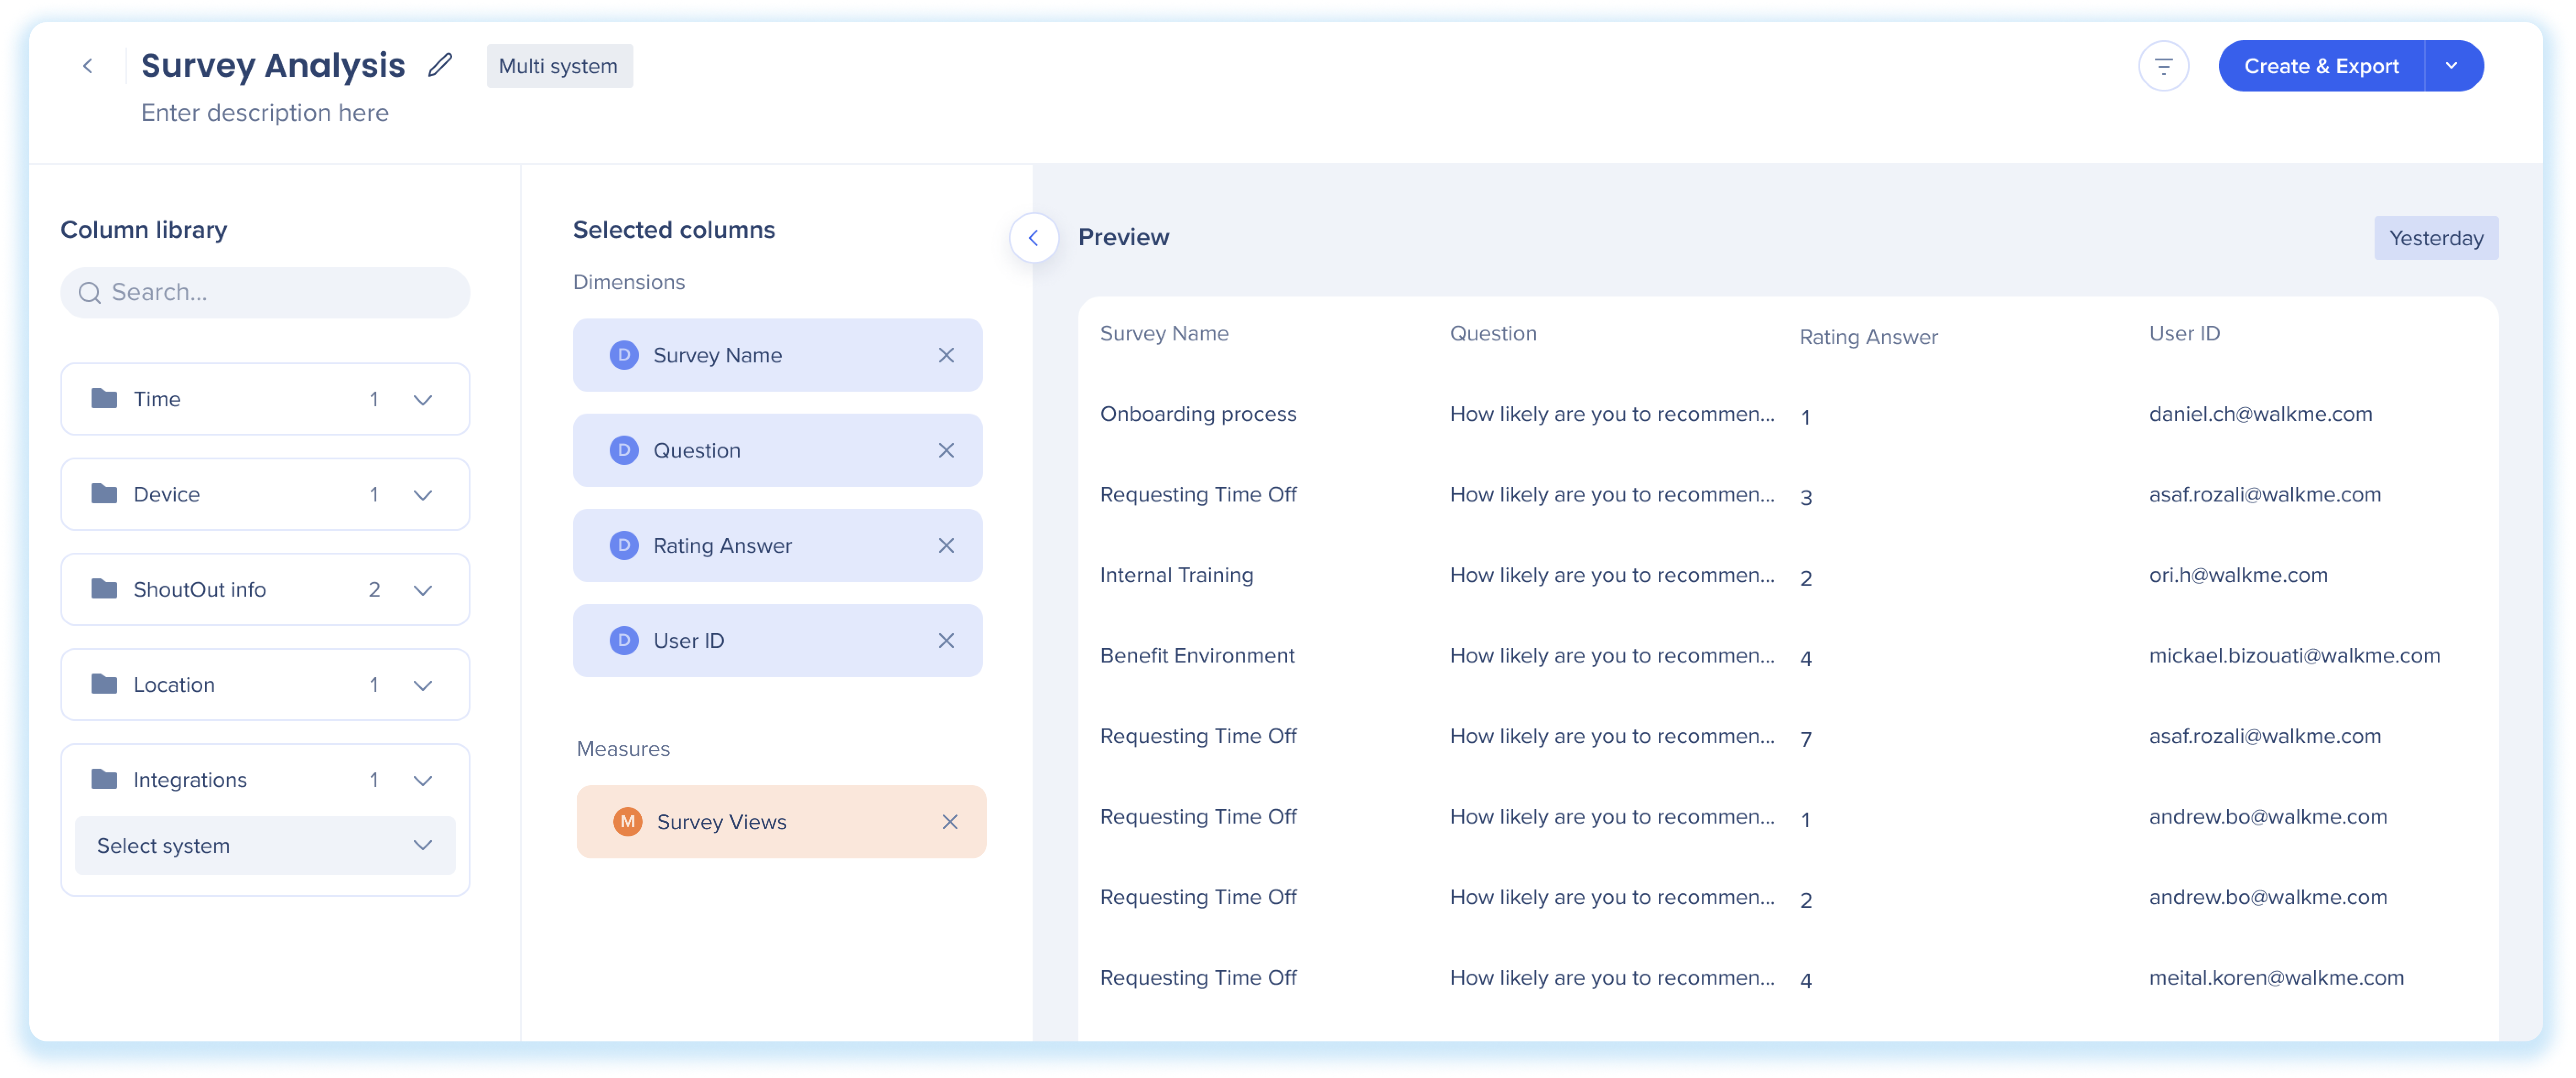
After selecting a template, the Report Builder will show the available columns in the Column library that can be added to the report.
-
Select columns to add to the report
-
Drag and drop (or double click) the dimensions and measures from the library into the Selected columns section to add them to the report
-
You can rearrange your columns in the order you would like them to appear in your report and use the X button to remove any undesired fields
-
Optional: Hover over a column name and click the pencil icon to rename a measure or dimension
Acerca de las dimensiones y medidas
Las dimensiones y las medidas son diferentes formas de mostrar las columnas de datos en la tabla.
-
Dimensiones: muestra los valores escritos que se pueden utilizar para categorizar y filtrar los datos, lo que afecta al nivel de detalle del informe
-
Ejemplos: país, identificación de usuario final, nombre de ShoutOut, idioma, versión del navegador
-
Medidas: muestra valores numéricos que puedes utilizar para medir, agregar, resumir y contar los datos
-
Ejemplos: vista de tareas, reproducciones de ShoutOut, eventos, objetivos completados, número de usuarios que hicieron clic en ShoutOut
Campos de segmentación basados en integración/comportamiento en la biblioteca de columna
Estos campos se basan en sistemas individuales. Selecciona un sistema y el estado del informe se actualizará consecuentemente. A continuación, elige el campo de integración para añadir ese sistema a las columnas seleccionadas.
Consejo
¿Buscas el elemento específico de WalkMe en tu informe? Asegúrate de incluir un campo identificable, como "Nombre de la encuesta" en el informe.
Vista preliminar
La vista previa da una muestra de los datos, lo que te permite ver una instantánea del contenido del informe y verificar que las columnas/filtros seleccionados funcionan según lo previsto. Ten en cuenta que la vista previa es para comprender el informe, no para realizar pruebas.
Los datos de muestra son del día anterior. Si no está disponible, muestra los datos de la última semana. La etiqueta de fecha en la esquina superior derecha indica el marco de tiempo como "Ayer" o "La semana pasada" y no se puede cambiar.
Modificar el informe
-
Filtros
-
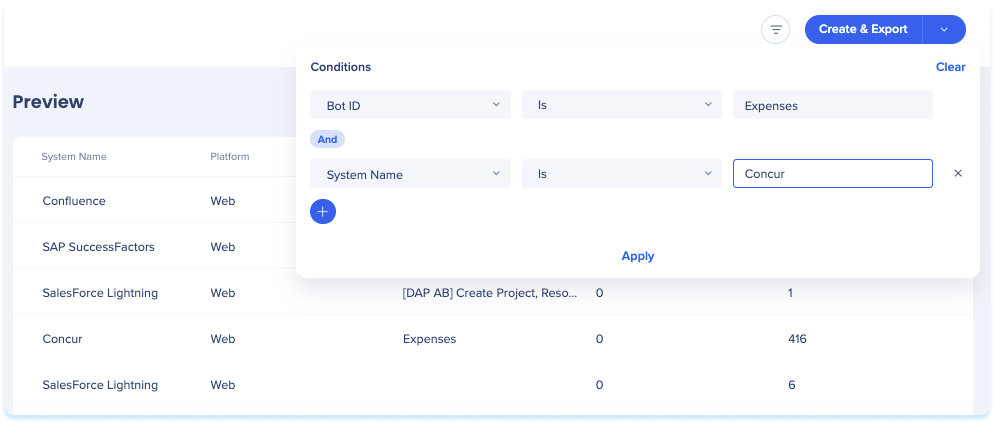
 Haz clic en el icono Filtros para filtrar el informe en función de condiciones específicas
-
Añade una regla con el campo, la condición y el valor deseados para filtrar el informe
-
Haz clic en Aplicar
Nota
-
More than 1 filter can be used together in an AND statement
-
Filters are only available for Dimension Columns
-
Default preview is set to the Production environment but can be changed with filters
- For Native Mobile systems, Site, URL Domain, Browser, and Platform filters, and segments defined in the Content Manager, aren't available
2. Menú desplegable del sistema
-
-
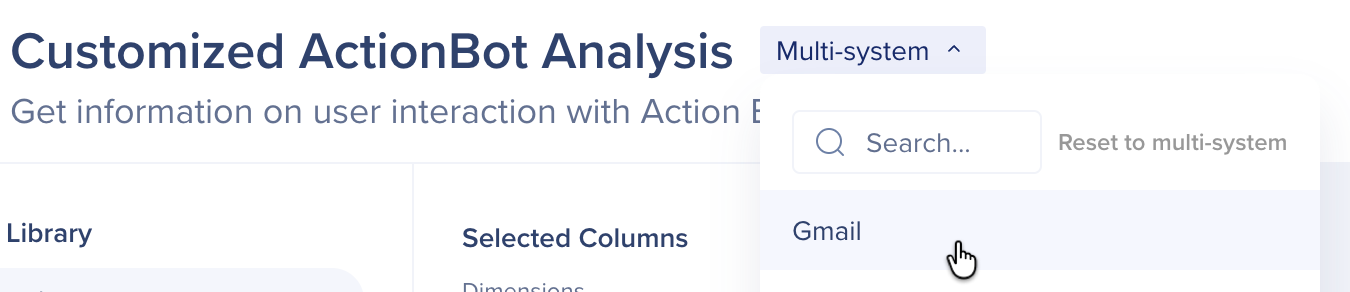
Múltiples sistemas: selecciona múltiples sistemas para incluir datos de todos los sistemas
-
Sistema único: al elegir un sistema único, el menú desplegable solo mostrará sistemas con integraciones activas o segmentos de comportamiento (por lo que es posible que no aparezcan todos los sistemas)
Restablecer a sistema múltiple: después de seleccionar un solo sistema, puedes volver al modo de sistema múltiple haciendo clic en el botón Restablecer a sistema múltiple en el menú desplegable.
Nota
- Ten en cuenta que las integraciones de IDP se comportan de manera diferente en comparación con otras integraciones
- Desasignar un sistema de un IDP no elimina el esquema o los atributos de IDP
Paso 4: establece el nombre y la Descripción
Una vez que estés satisfecho con el formato del informe:

Paso 5: Guardar y exportar
-
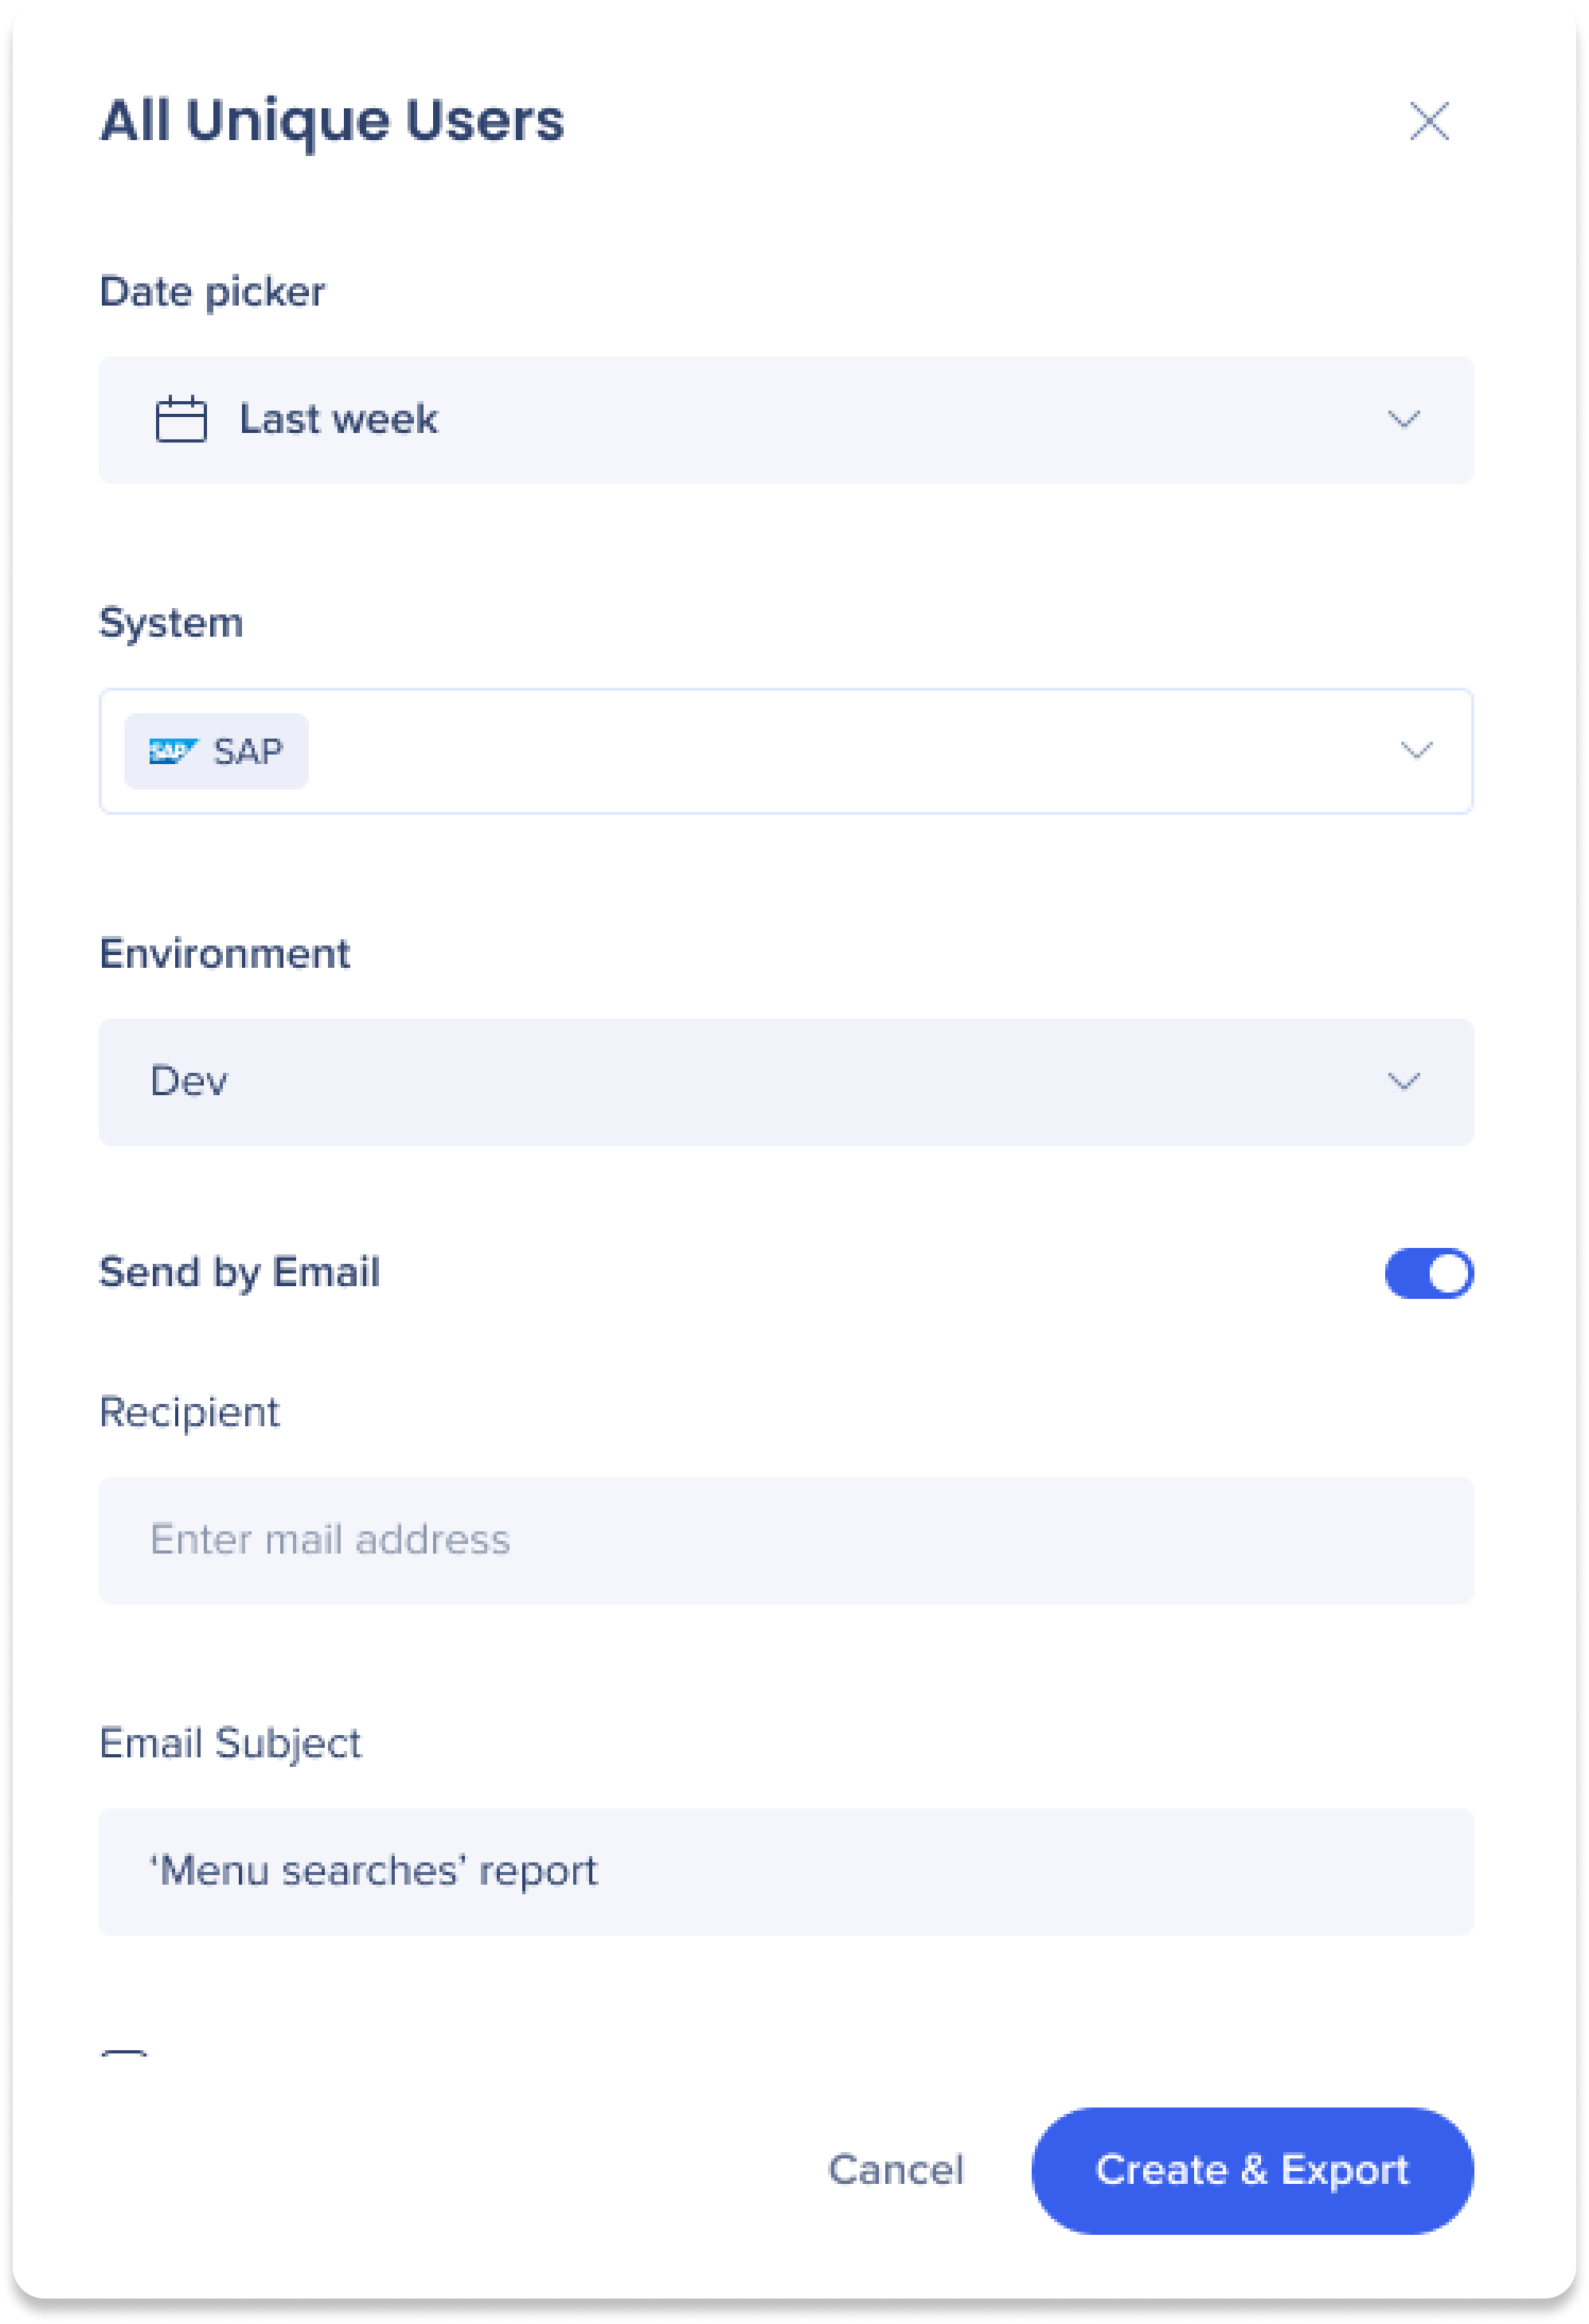
Haz clic en el botón Crear y exportar
-
Haz clic en el menú desplegable y selecciona Crear para crear sin exportar
-
Esto guardará el informe en la pestaña Mis informes de la Galería de informes, de donde se podrá exportar más tarde
-
Selecciona el rango de fechas en el menú desplegable Selector de fechas
-
Seleccione los sistemas de los que se extraerán los datos
-
Seleccione el entorno del que se extraerán los datos
-
Opcional: haz clic en el botón Enviar por correo para enviar el informe a una lista de destinatarios
-
Introduce los correos electrónicos de los destinatarios en el campo Destinatarios
-
Escribe un asunto de correo electrónico personalizado en el campo Asunto del correo electrónico
-
Selecciona si deseas exportar y suscribirte a informes
-
Haz clic en Crear y exportar
Nota
-
Se generará el informe y se añadirá a la pestaña Informes generados dentro de Informes y Suscripciones. Desde allí, el informe se puede descargar.
-
El informe también se mostrará en la pestaña Mis informes en la Galería de informes.
Supported templates by system type
Native Mobile
-
-
General Event Template
-
Goal Completions
-
Launcher Analysis
-
Menu Searches
-
Resource Analysis
-
ShoutOut Analysis
-
Shuttle Analysis
-
Survey Analysis
-
Task Analysis
-
Tracked Events Analysis
-
Users Analysis
-
Walk-Thru Analysis
-
WalkMe Item List
If a template isn't supported for a system type, systems of that type don't appear in the system selector.
Choose a General Event template
If your account has at least one Desktop Menu system, you'll see two General Event templates:
- General Event Template: Web data only. Use it for reports on web systems
- General Event Template with Desktop Menu: Every General Event Template field, plus the Desktop Menu Info & Metrics fields. Use it for reports that include Desktop Menu systems, on their own or together with web systems
If your account doesn't have a Desktop Menu system, you'll see only the General Event Template.
Common Report Builder Fields
See a list of commonly used measures and dimensions that are available as fields in the Report Builder.
Common Report Builder Fields
Technical Notes
- Keyword fields may not show all keywords
- Keyword fields in Report Builder (such as Item Keywords, Survey Keywords and Shuttle Keywords) may not show every keyword assigned to an item in the Editor:
- Keywords you enter manually are reported as soon as you save the item
- Keywords generated automatically after you save the item may be missing until you save it again
- Keywords added or refined automatically over time, based on search activity, may also be missing until you save the item again
- This affects reports built from Report Builder templates that include a keyword field, including filters on keyword fields. Insights Pre-Built Reports don't include keyword fields and aren't affected.
- Workaround: Save the item, wait about 1 minute, and then save it again. The second save sends the full keyword list to Insights.
-
Account level reports cannot be created with the Report Builder
-
Using OR condition between different columns is not supported; we found a very small number of use-cases so we decided to invest in other areas and wait for more customer feedback
-
Requests for additional fields are welcome - They should be treated as new feature requests
-
An option to have one template to include all fields has been investigated and rejected due to feasibility issues
- Workstation templates are now available in the Report Builder
- The relevant template is called General Event Template with Desktop Menu. It has every General Event Template field plus the Desktop Menu Info & Metrics folder (19 fields)
- It only shows for accounts with at least one Desktop Menu system. Accounts without one see only the General Event Template, which is unchanged
- Desktop Menu custom reports include only data collected with Enhanced Analytics, from Q2 2026 onward. Earlier Desktop Menu data isn't included. For historical data, use the legacy Desktop Menu reports in the Reports Gallery
- Desktop Menu custom reports only include devices running WalkMe Menu version 4.20 or later
- Native Mobile systems don't appear in the system selector for templates that aren't supported for mobile. See Supported templates by system type
-
See a blank for Item Name?
-
If you see a blank for Item Name in your preview or exported report, it means that the event is an internal process and not related to any WalkMe item types (for example: "WalkMe" or "Player")
-
To view only interactions with specific WalkMe items, it's best to filter out these irrelevant events. We recommend using the filter "Item Name is not null" to remove them from your report
-
Any user with Insights Access permissions can view, create, and modify reports
Roles and Permissions