Upcoming End of Life (EOL)
The WalkMe Menu for Desktop NetSuite Integration will reach EOL and be removed in the Winter '26 release on Feb 23, 2026.
Brief Overview
NetSuite is an ERP system (Enterprise Resource Planning). This product exists around 20 years and was acquired by Oracle. It is a native cloud solution.
The NetSuite app on the menu allows to search for the following NetSuite objects:
- Employee
- Customer
- Vendor
- Contact
- Vendor Bill
- Purchase Order
- Sales Order
- Invoice
Transactions Status
The status which appears on the transactions search results is the Posting Approval Status.
- Sign in into NetSuite using an admin account
- Go to Setup -> Company -> Enable Features
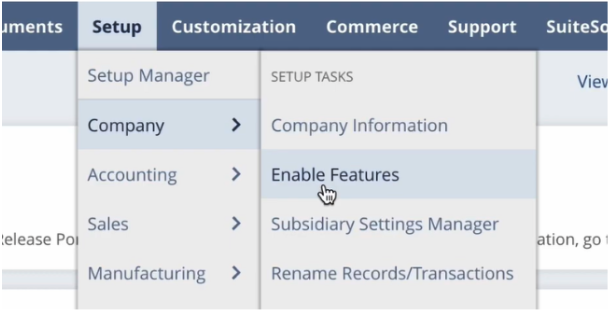
3. Go to the SuiteCloud tab-
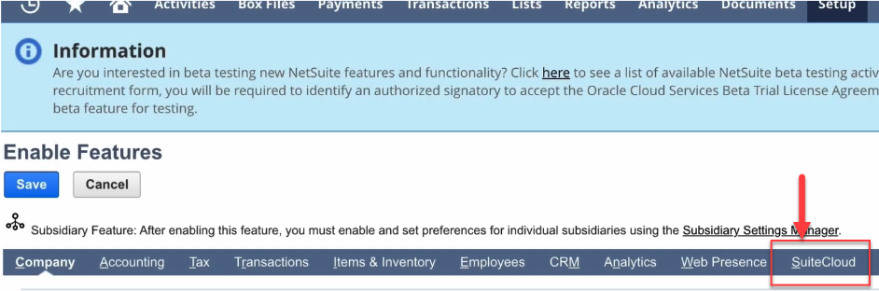
4. Scroll down and make sure these 3 checkboxes are checked -

5. Scroll down and make sure these 2 checkboxes are checked -

6. Scroll down and make sure these 2 checkboxes are checked -

7. Go to Setup -> Integration -> Manage Integrations -> New

8. Fill the integration form with these details-
-
- Name - Workstation
- State - Enabled
- Token-Based Authentication - check

- Callback URL- choose one of these URL's:
- If US- https://workstation.walkme.com/netsuite/connected
- If EU- https://eu-workstation.walkme.com/netsuite/connected
- Authorization Code Grant- check

- Redirect URL - choose one of these URL's:
- If US- https://workstation.walkme.com/netsuite/connected
- If EU- https://eu-workstation.walkme.com/netsuite/connected
- Make sure that these 2 boxes are NOT checked:
- TBA: Authorization Flow

- Authorization code grant

- Click Save to create the new integration

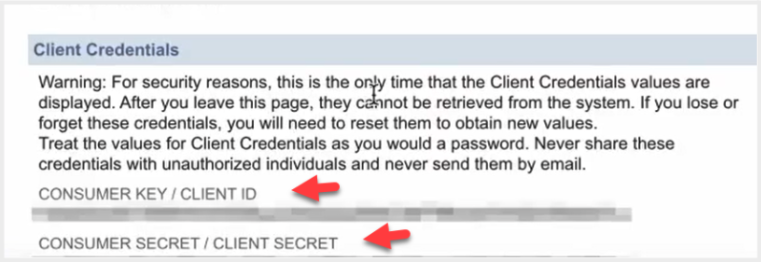
- 9. In the same screen, on the bottom, you will now have a Client Credentials section. Copy the Consumer Key and Consumer Secret, it will be required later on and there will be no access to them again.
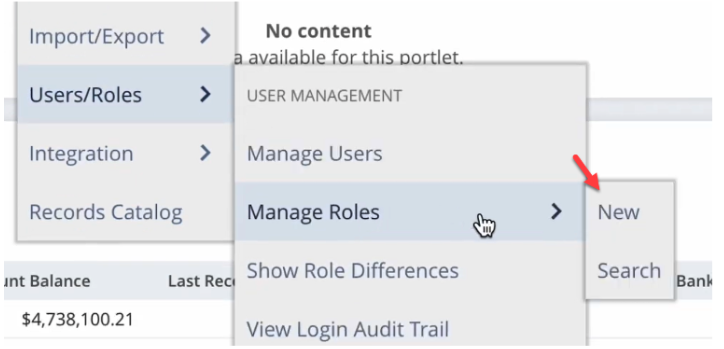
10. Go back to the home screen, go to Setup -> User/Roles -> Manage Roles -> New
11. Fill the role form with these details-
-
- Name- Workstation Integration Role
- Subsidiary Restrictions- Choose ALL and check the last box

Permissions
Transactions
- Access Payment Audit Log View
- Bill Purchase Orders View
- Bills View
- Cash Sale View
- Check View
- Create Allocation Schedules View
- Credit Card View
- Credit Card Refund View
- Credit Memo View
- Credit Returns View
- Currency Revaluation View
- Customer Deposit View
- Customer Payment View
- Deposit View
- Deposit Application View
- Enter Opening Balances View
- Enter Vendor Credits View
- Find Transaction View
- Fulfill Orders View
- Generate Price Lists View
- Generate Statements View
- Invoice View
- Invoice Approval View
- Invoice Sales Orders View
- Item Fulfillment View
- Item Receipt View
- Journal Approval View
- Make Journal Entry View
- Pay Bills View
- Pay Sales Tax View
- Pay Tax Liability View
- Post Vendor Bill Variances View
- Posting Period on Transactions View
- Purchase Order View
- Reconcile View
- Return Authorization View
- Revenue Arrangement View
- Revenue Arrangement Approval View
- Sales Order View
- Set Up Budgets View
- Transfer Funds View
- Vendor Bill Approval View
- Vendor Return Auth. Approval View
- Vendor Return Authorization View
- Vendor Returns View
- View Gateway Asynchronous Notifications View
- View Payment Events View
Reports
- Account Detail View
- Accounts Payable View
- Accounts Payable Graphing View
- Accounts Receivable View
- Accounts Receivable Graphing View
- Amortization Reports View
- Balance Sheet View
- Deferred Expense Reports View
- Employee Reminders View
- Expenses View
- Financial Statements View
- General Ledger View
- Income View
- Income Statement View
- Lead Snapshot/Reminders View
- Net Worth View
- Purchase Order Reports View
- Purchases View
- Reconcile Reporting View
- Report Customization View
- Report Scheduling View
- Revenue Recognition Reports View
- Sales View
- Sales Order Fulfillment Reports View
- Sales Order Reports View
- Sales Order Transaction Report View
- SuiteAnalytics Workbook View
- Tax View
- Transaction Detail View
- Trial Balance View
List
-
- Accounts View
- Accounts Payable Register View
- Accounts Receivable Register View
- Amortization Schedules View
- Bank Account Registers View
- Billing Schedules View
- CRM Groups View
- Calendar View
- Commit Orders View
- Contacts View
- Credit Card Registers View
- Currency View
- Custom Recognition Event Type View
- Custom Record Entries View
- Customers View
- Deferred Revenue Registers View
- Departments View
- Documents and Files View
- Email Template View
- Employee Record View
- Employees View
- Equity Registers View
- Events View
- Export Lists View
- Fair Value Formula View
- Fair Value Price View
- Fixed Asset Registers View
- Item Revenue Category View
- Items View
- Locations View
- Long Term Liability Registers View
- Mass Updates View
- Memorized Transactions View
- Non Posting Registers View
- Notes Tab View
- Other Asset Registers View
- Other Current Asset Registers View
- Other Current Liability Registers View
- Other Names View
- Perform Search View
- Phone Calls View
- Platforms View
- Publish Search View
- Record Custom Field View
- Related Items View
- Resource Create
- Revenue Element View
- Revenue Recognition Field Mapping View
- Revenue Recognition Plan View
- Revenue Recognition Rule View
- Revenue Recognition Schedules View
- Statistical Account Registers View
- Subsidiaries View
- Tasks View
- Track Messages View
- Unbilled Receivable Registers View
- Units View
- Vendors View
- Work Calendar View
Setup
- Accounting Book View
- Accounting Lists View
- Accounting Management View
- Allow Non G/L Changes View
- Auto-Generated Numbers View
- Custom Body Fields View
- Custom Column Fields View
- Custom Entity Fields View
- Custom Item Fields View
- Custom Lists View
- Custom Record Types View
- Deleted Records View
- Log in using Access Tokens View
- Log in using OAuth 2.0 Access Tokens View
- Manage Accounting Periods View
- Mobile Device Access View
- OAuth 2.0 Authorized Applications Management View
- Other Custom Fields View
- Other Lists View
- REST Web Services View
- SOAP Web Services View
- Set Up Company View
- SuiteAnalytics Connect View
- SuiteAnalytics Connect - Read All View
- Vicarious emails View
- View SOAP Web Services Logs View
Custom Records
- If you have custom records that are required for processes, it might be a blocker for this integration. We recommend providing permissions to all custom records
- Click Save to create the new integration
-
-
-
12. Now you will need to assign the new integration role to a new integration user. Go to Setup -> Users/Roles -> Manage Users

13. Create a new user, make sure the user is of type Employee. Fill the role form with these details-
-
- Name- Workstation Integration User
- Email- any email
- Subsidiary- your organization subsidiary
- Access - check the box-

- Roles- assign the integration role you had previously created (“Workstation Integration Role”)-

- Click Save to create the new Employee user
14. Go to Setup -> Users/Roles -> Access Tokens -> New

15. Create an access token. Fill the role form with these details-
-
- Application Name- choose in the dropdown the Workstation Integration-

- User (from List)- Workstation Integration User
- Role- Workstation Integration Role
- Token Name- will be populated automatically
- Click Save to create the new Access Token
- In the same screen, on the bottom of the access token page, you will now have a Token ID and Token Secret

16. Go to Console to the Menu -> Integrations page
17. On the NetSuite integration, click on Setup, and configure the following-

- Sub Domains- the domain of your NetSuite URL. For example, if your URL is https://testname.app.netsuite.com/ so your domain is “testname”.
- Client ID and Client Secret- the values created previously in the process (also known as Consumer Key and Consumer Secret).
- Click Save. NetSuite integration should now work on your desktop menu App.
Segmentation
Integrations can be segmented to a sub-set of users and audiences, rather than being enabled for all end-users. This feature streamlines the integration process and helps to ensure that users are only using the integrations that are relevant to their work.
To segment a menu integration:
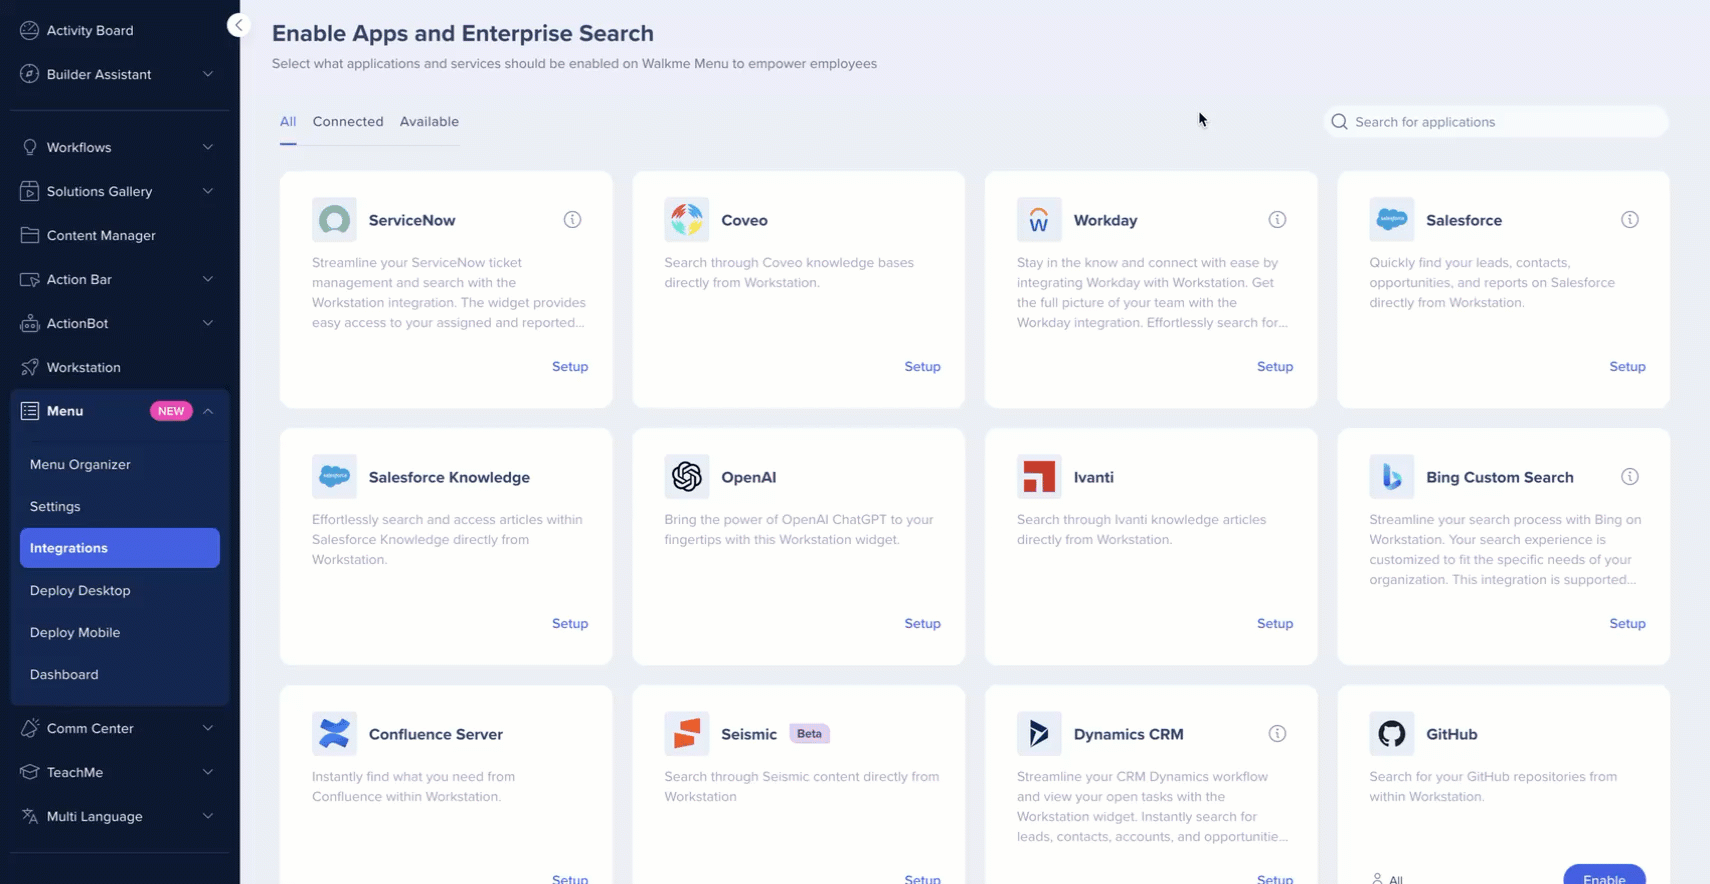
- Navigate to the menu Integrations page in the console
- Click the All button on the integration you would like to segment

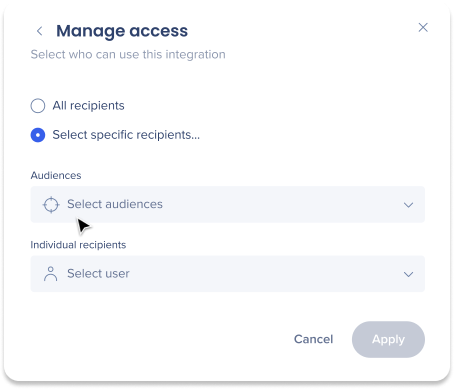
- Click Select specific recipients in the Manage Access popup
- Select the audiences or individual users from the dropdowns to handpick who can use the integration
- Click Apply
- Open the desktop menu Menu by clicking the widget (on Windows) / the WalkMe icon on the Mac Menu bar, or by hitting ctrl/cmd+shift+E
- Go to Settings -> Integrations, and click Connect on the NetSuite card

If the NetSuite card is not available, contact your WalkMe Owner in your organization and ask to enable NetSuite on the desktop menu
Integration Security
Read more about menu's integration security and the Enterprise Search.


