デスクトップとモバイルメニュー通知API

Last Updated 8月 30, 2026

概要

デスクトップとモバイルメニュー通知APIでは、任意のシステム(WalkMeスニペットがない場合でも)のイベントを使用して、WalkMeで通知をトリガーし、自動的にユーザーを最新状態に保つことができます。 WalkMe通知WebhookにRESTコールでメニュー通知をトリガーします。

この記事では、認証トークンとJSONペイロードの両方を必要とするRESTコールを実行するために必要な情報を提供します。

ユースケース

  • システムがダウンまたは問題が発生したときにアラートを表示します(AWSまたはSlackサーバーがダウンした場合)。
  • 新しいServiceNowチケットが審査を必要としたときに承認者に通知します
  • Oktaパスワードが期限切れになったときにユーザーに通知します
  • オープンエンロールメントを完了したユーザーにリマインダーを送ります
  • 膨大なハウツー記事が用意されています!

REST APIを呼び出すことができるシステムはどれでもデスクトップ/モバイルメニューで通知をトリガーするために使用できます。

始める前に

APIを呼び出すには、いくつかの権限と技術的な設定が必要です。 アクセス権があり、以下の操作が可能であることを確認してください:

  • デスクトップ/モバイルシステムで管理センターにアクセスして、APIアクセストークンを取得します
    • :組織に複数のデスクトップ/モバイルシステムがある場合は、各システムについて個別にAPIコールを実行する必要があります。
  • 通知APIへの呼び出し(例:ZapierまたはPostman)を設定および実行するためのアプリケーション
    • 認証されたアウトバウンドREST APIコールを実行できるアプリケーションが必要です。 組織にそのようなアプリケーションがあるかどうか不明な場合は、ITチームに連絡してオプションについて話し合ってください。

使用方法

APIをトリガーするためにWalkMeに必要なものは以下の通りです。 すべてを収集する方法は以下の通りです。

  1. 認証とアクセストークンの作成
  2. Communication Center通知とターゲットオーディエンスの特定
  3. JSONペイロードの作成
  4. コールを実行する

具体的には、以下の情報を含む通知JSONを使用するために必要な情報があります:

  • システムID
  • 通知テンプレートID
  • エンドユーザーIDまたはオーディエンスID
  • 通知タイプ:ポップアップまたはプッシュ
  • 通知タイトル
  • 説明
  • 情報を上書きする

認証とアクセストークンの作成

アクセストークンとは何ですか?

アクセストークンは、アプリケーションがAPIにアクセスするために使用できる資格情報です。 彼らは、トークンのベアラが特定のアクションにアクセスすることが許可されたことをAPIに通知します。

アクセストークンがAPIコールを認証し、システムからメニューにデータを渡す権限をアプリケーションに付与します。

アクセストークンの作成

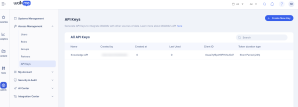
  1. コンソールに移動します

  2. 管理センターカテゴリを選択します

  3. アクセス管理」を選択します

  4. APIキーページを選択します

  5. [新しいキーの作成]をクリックします

新しいキーの作成パネルから:

  1. キーに名前を付けます
    • ヒント:名前でキーの目的を示すと、後で覚えるのを助けます
  2. 通知APIをオンにする
  3. ドロップダウンから「書き込み」を選択します
  4. 作成をクリック

キーの詳細パネルから:

  1. クライアントIDクライアントシークレットをコピーします
クライアントシークレットを保存

シークレットが再び表示されないために、アクセス可能な場所に保存します。

認証トークン

追加サポート認証トークンを取得するために:開発者ページ

ComCenter通知とオーディエンスID

通知テンプレートを作成する

コミュニケーションセンターに移動し、カスタムテンプレートを作成します(通知の作成方法をご覧ください)。 API用に作成する通知には、以下の点に留意してください。

  • 通知には、ボタンが1つしか設定できません
  • ボタンアクションでは、リンクアクションのみが使用できます
    • ダイナミックリンクまたはWalkMeパーマリンクを使用できます

APIを設定した後は通知を編集することはできませんので、通知に満足していることを確認してください

オプション:テンプレートにオーバーライドルールを追加します

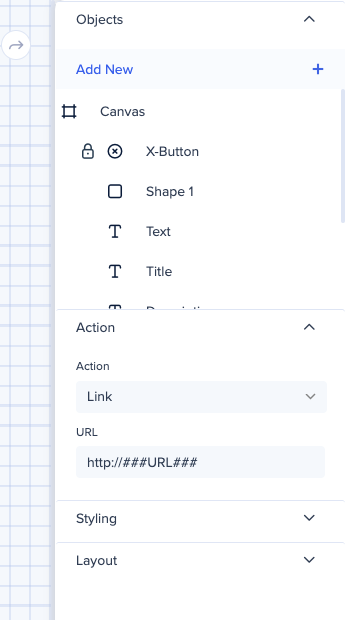
通知をユーザーまたはトリガーされたイベントに合わせてパーソナライズしたい場合、APIが自動的に入力する動的な値を追加できます。

画像では、APIトリガーによって置換される動的テキストで値が上書きされる2つの例を確認できると思います。

これは、新しいリードが割り当てられたときにトリガーされるSalesforceのAPI通知の例です。 セールスパーソンに機会名とSalesforceのリードへのリンクが通知されます。

  1. ###OPP_NAME_ATTRIBUTE###はSalesforceのオポチュニティ名に置き換えられます
  2. ###URL###は実際のURLに置き換えられ、APIがトリガーされるたびに、すべてのユーザーに対してカスタムアクションを実行できます。

  • 値名(例:OPP_NAME_ATTRIBUTE)は、置換できるようにJSONに正確にコピーされている必要があります。
  • URLは、次のいずれかで始まる必要があります:

    • http://

    • https://

    • walkme-workstation://

    • mailto:

必要な値をコピーする

以下のステップでは、通知をAPIに接続します。

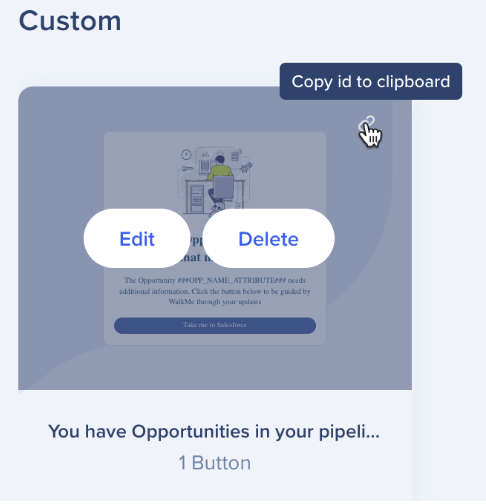
作成したカスタムテンプレートIDをコピーします

  1. CommCenterに移動します
  2. 「新しい通知」をクリックします
  3. カスタムテンプレート>で、通知のにカーソルを合わせます
  4. コピーアイコンをクリックして、IDをクリップボードにコピーします
    • 例:75cfcba6-c320-42cb-938e-4c2bd08a43a3

ターゲットオーディエンスIDをコピーする

エンドユーザーIDとオーディエンスの比較

オーディエンスを使用する方が効率的ですが、エンドユーザーIDに基づいて最大100人のユーザーをターゲットにすることもできます。 10を超えるエンドユーザーIDを使用する予定がある場合は、オーディエンスを作成することをお勧めします

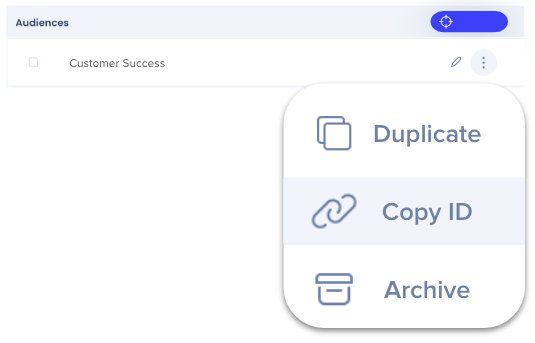
  1. Go to Audiences
  2. Hover over the audience > click the 3-dot menu on the right > click Copy ID
    • You can add multiple audiences to the JSON
    • Example ID: cf0bd4c1-86fd-4c79-a46a-c730d6789e63

Add information to the API connection application

For extra support  Developer page.

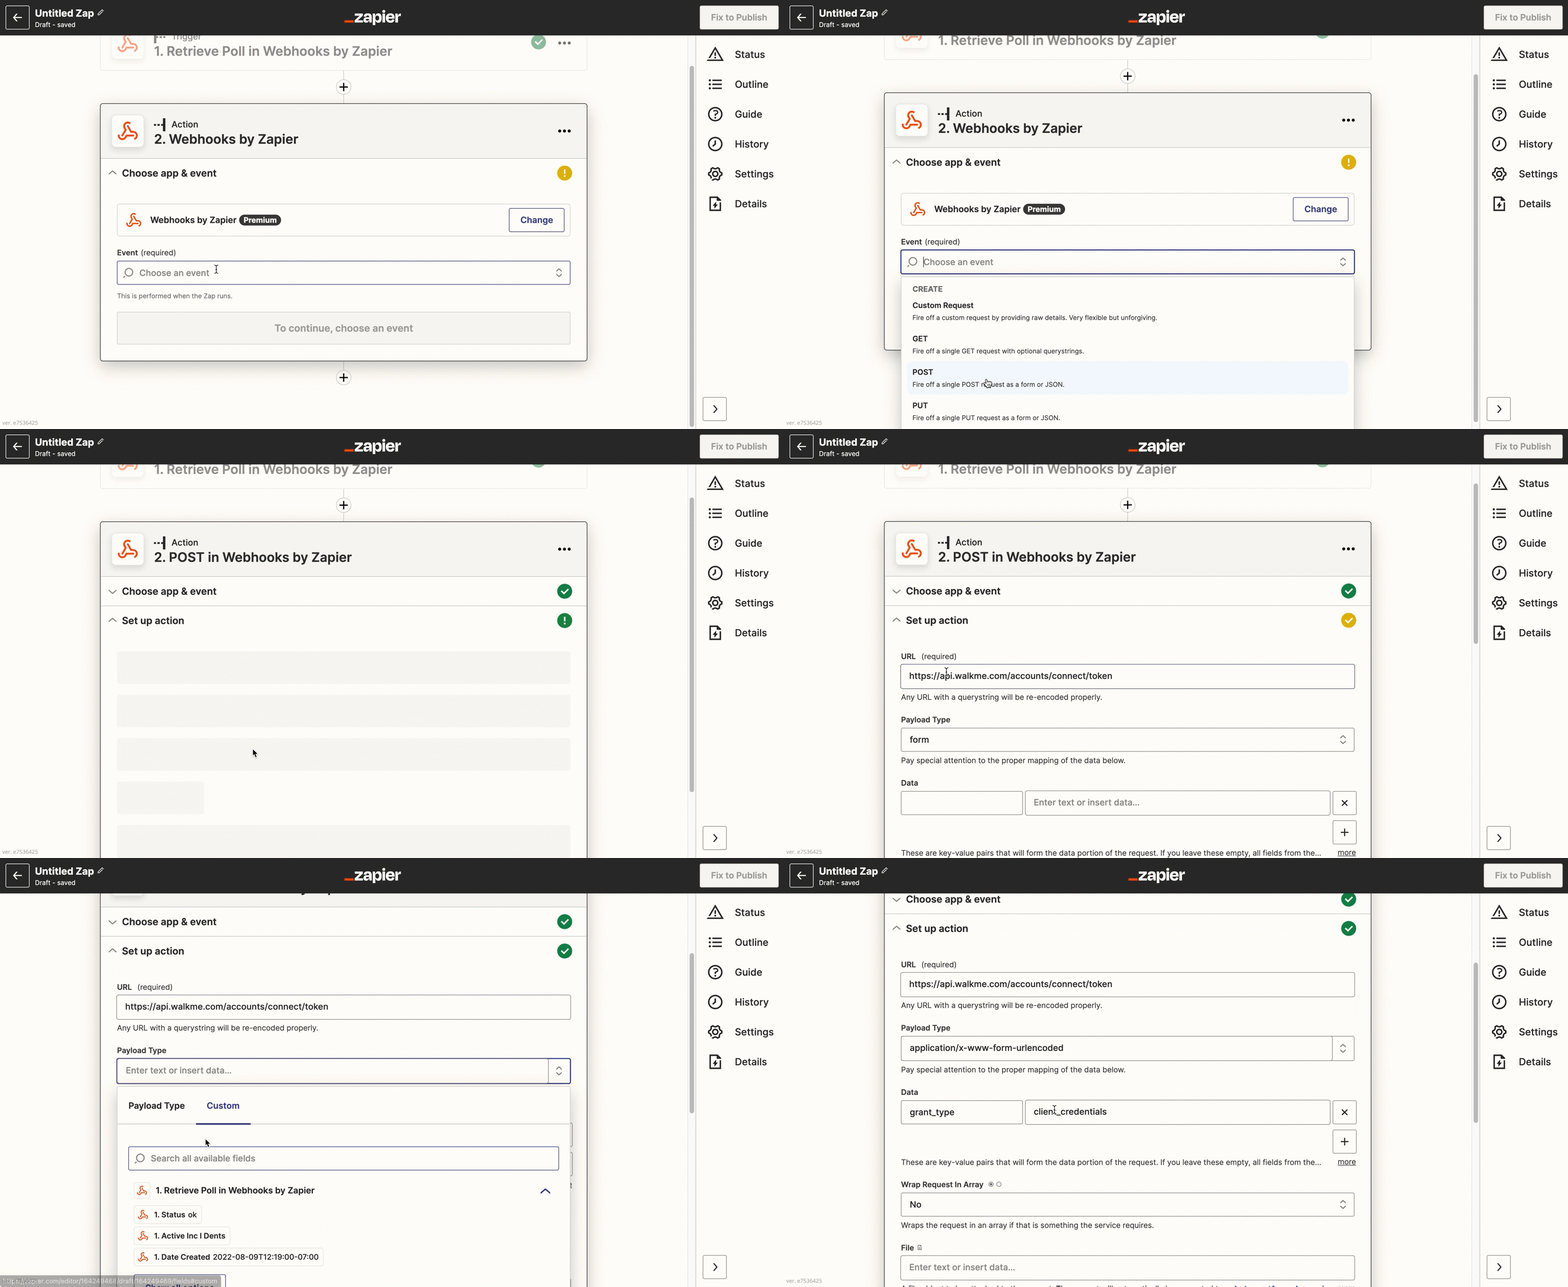
Now it's time to fill in some information on your API connection application. For clarity, we use Zapier to explain, but we are not endorsing this application over any other. Any similar app will work.

The information used below is universally necessary on all applications:

  1. URL = https://api.walkme.com/accounts/connect/token
  2. Payload Type = (Content-Type) application/x-www-form-urlencoded
  3. Data = grant_type → client_credentials

Add Basic Authentication 

When using basic Auth, the clientID is the username and the client secret is used as the password.

  1. Client ID | Client Secret (copied from Admin Center)
    • Example
      0o234234234UqD5d7 | JVnD346346346436345asfgasgbPt_4T7h2_

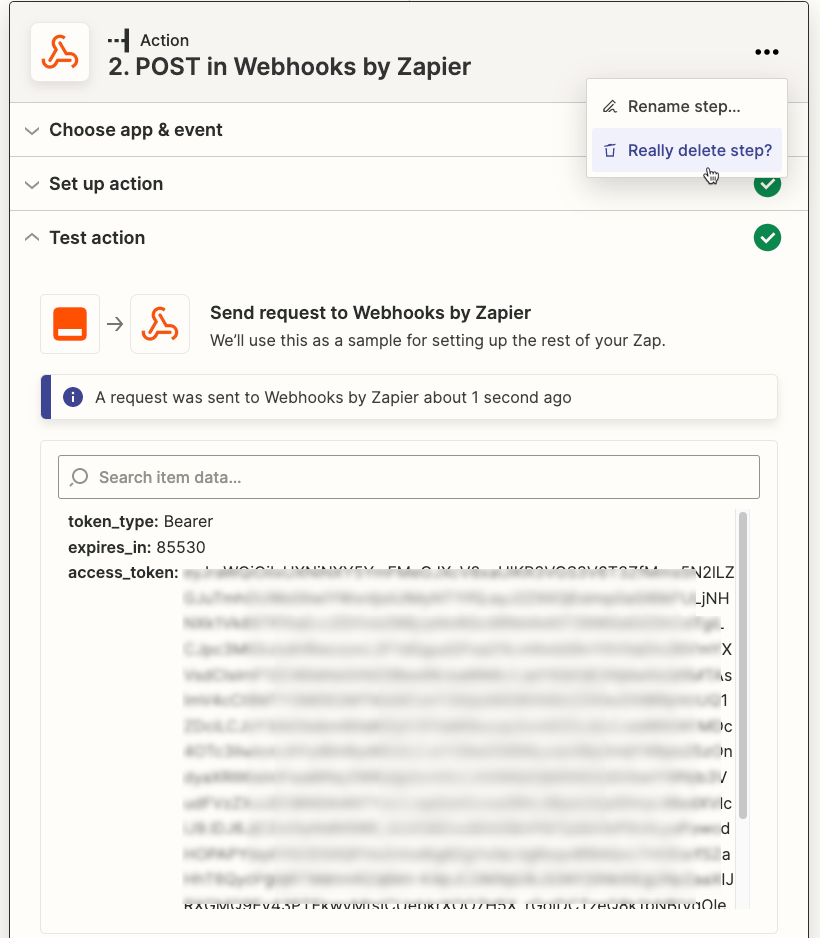
Once you've added this information, you will be given an access token.

  1. Copy your Access Token
If you're using Zapier, you can delete this step after you've copied the token.

Update the JSON code

Now it's time to fill in the blanks and use the JSON code that will call the notification.

{

"notification": {

"systemId": "<the workstation system id>", //Required if you have more than one workstation system

"templateId": "<template id>", //Required

"endUsersIds": ["<end user id 1>","<end user id 2>","<...>"], //You need either end-user ID or audience ID (you can use both), remove the one you aren't using

"audiencesIds": ["<audience id 1>","<audience id 2>","<...>"], //You need either end-user ID or audience ID (you can use both), remove the one you aren't using

"notificationType": "<how notification will display, push v popup>", //Optional, default push, remove if not using

"title": "<notification title as appears in the ComCenter notification table>", //Optional, remove if not using

"runtimeTitle": "<what will appear to end-users in the Workstation list and in the push notification>", //Optional, remove if not using

"runtimeDescription": "<what will appear to end-users i in the Workstation list and in the push message>", //Optional, remove if not using

"startAt": "<start date YYYY-MM-DD hh:mm>", // Optional, default right now, timezone is UTC, you can add a date and no time, default time is 00:00 UTC, remove whatever you are not using

"endAt": "<end date YYYY-MM-DD hh:mm>", // Optional, default 30 days from now, you can add a date and no time, default time is 00:00, remove whatever you are not using

"override": [

{
"key" : "<the placeholder string to replace in the notification template>",
"value" : "<the value to put into the notification instead of the placeholder>"
}

// More comma separated {key:value} pairs can follow

// For example, the value could be a URL that is passed from ServiceNow to open a ticket

]

}

}

使用していない行を削除してください

入力しないオプション行がある場合は、エラーを防ぐために最終的なコードから削除してください

エンドユーザーとオーディエンスID

endUsersIdsとaudiencesIdsは配列であり、括弧[]で記述する必要があります。各文字列はカンマ["","<id1>","<...>"]で区<id2>切る必要があります。

デフォルトのタイムゾーンは UTC

デフォルトのタイムゾーンはUTCですが、別のタイムゾーンで通知を送信したい場合は、UTCを加減できます。 例えば「2023-05-10T11:30:00+03:00」はUTC+3で送信され、UTCでの対応する時間は「08:30:00」(指定された時間から3時間を減算した時間)となります。

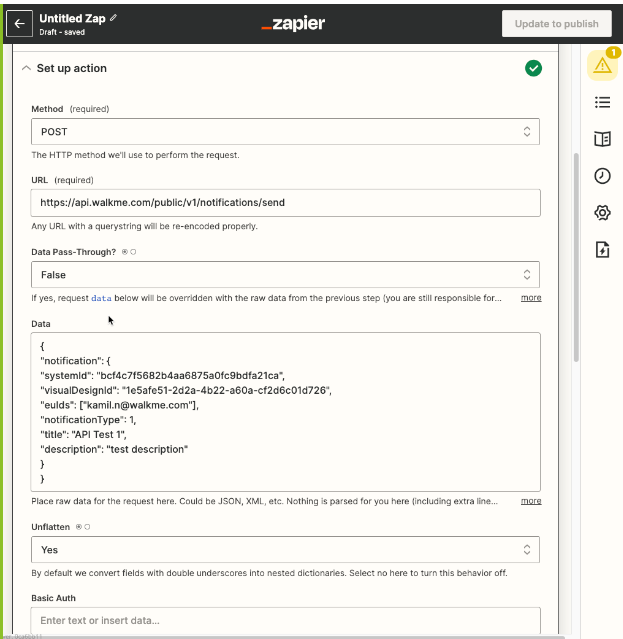
Here is an example of the JSON code with real data with few lines removed to make it simpler.

{
"notification": {
"systemId": "bcf4c7f5682b4aa6875a0fc9bdfa21ca",
"templateId": "1e5afe51-2d2a-4b22-a60a-cf2d6c01d726",
"endUsersIds": ["name@email.com"],
"runtimeTitle": "API Test 3",
"notificationType": "Push",
“override”: [
{“key”: “URL”,
“value”: “www.someurl.com”}
]
}
}

Make the call

Now that we have the information we need, let's connect the dots. To make the call (connect the systems to create and publish new notifications in your organization's desktop/mobile menu), you'll need your JSON plus:

Technical Notes

  • We only support dispatch of 1 notification per 20 secs
  • A single call supports up to 50,000 recipients

この記事は役に立ちましたか?

ご意見ありがとうございます!

Be part of something bigger.

Engage with peers, ask questions, share ideas

Ask the Community
×
×