Early access
Data Alerts is in early access and available to select accounts. To request access, contact your Customer Success Manager or WalkMe representative. Subscribe to WalkMe Release Notes to find out when it becomes generally available.
Brief Overview
Data Alerts watches your Insights data and alerts you when a condition you set is met. It checks once a day, so you find out the same day something crosses your threshold: a Smart Walk-Thru step that silently breaks after a UI change, a page whose engagement drops, a flow whose failures spike. You don't have to wait until you next open Insights and look.
When an alert triggers, it appears as a notification in the console, and anyone you've added as a recipient also gets an email. Each time an alert triggers, you can open the incident to see exactly which items met the condition.
Use Cases
- Catch a broken Smart Walk-Thru step early. A UI change can break one step partway through a walk-thru while the walk-thru's overall numbers still look fine. An alert on that step's failures catches it the day it starts, not weeks later
- Watch for a drop in engagement on a piece of content, or a whole folder of content, compared with the period before it
- Watch a Tracked Event or Engaged Element for a drop in interactions
- Keep an eye on content you've built and moved on from, without checking a dashboard for it
Access
- Open the WalkMe Console
- Go to Insights
- Select Data Alerts
How it Works
The Data Alerts page
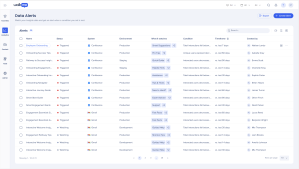
The Data Alerts page lists every alert in your account. For each alert, the table shows Name, Status, System, Environment, What it watches, Condition, Timeframe, and Created by. Use the search bar to find an alert by name, and select Export to download the list.
Hover over an alert to see its row actions:
- View incidents: open the alert's incidents page. This is unavailable until the alert has triggered at least once
- Options (⋯): Edit, Pause or Resume, and Delete
Select an alert's name to open its details. See Viewing an alert's details below.
If you haven't created any alerts yet, the page shows No alerts created yet with a Create Alert button.
Creating a data alert
Select Create Alert. A four-step wizard walks you through setting it up.
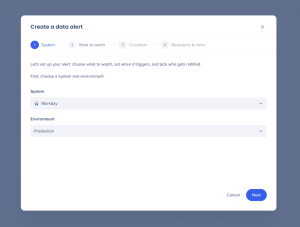
Step 1: System
Choose the system and environment the alert watches.
Step 2: What to watch
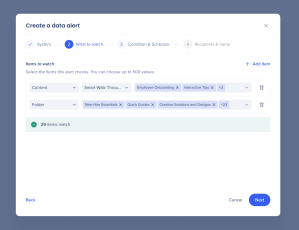
Under Items to watch, choose the items this alert checks. In each row, pick what kind of item it is (for example, content or folder), narrow it down if needed (for example, Smart Walk-Thrus), and then select the values. Select Add item to add another row. You can choose up to 500 values. As you build your selection, the wizard shows how many items match.
The list of items is fixed the moment you save the alert. An item that starts matching your selection later isn't added, and the alert keeps watching the items it had at save time. To pick up new items, edit the alert and save it again.
Step 3: Condition
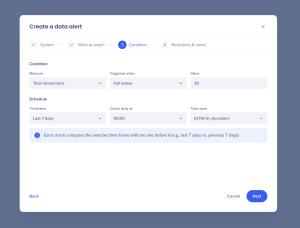
Set what triggers the alert and when it's checked.
- Measure: what's being counted. Unique exposed users and unique interacted users count each person once in the time frame, no matter how many times they showed up. Total exposures, total interactions, and total failures add up every occurrence. Which measures are available depends on what you're watching. Tracked Events and Engaged Elements, for example, have no exposures, so only interaction-based measures apply to them
- Triggered when and Value: how the measure is compared. Choose a fixed number (for example, Fall below 30) when the alert watches exactly one item, or a percentage change (for example, Increases by 20%) for any number of items. A percentage change compares the selected time frame with the one before it, for example the last 7 days vs. the previous 7 days
- Timeframe: a rolling window, counted in days (for example, Last 7 days), up to 180 days
- Check daily at and Time zone: when the daily check runs. The default is 09:00 in your account's time zone
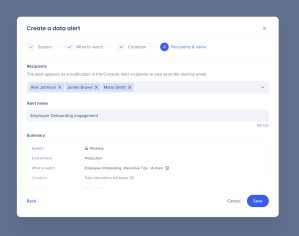
Step 4: Recipients & name
- Recipients: the alert always appears as a notification in the console. Add recipients to also send it by email. You can only add people who already have access to the system and environment the alert watches
- Alert name: up to 120 characters. Each alert's name has to be unique in your account
- Summary: review what you've set up, then select Save
Once you save, you'll see a confirmation message and the alert appears in your alerts list. Its first check runs at the next scheduled time.
Understanding alert status
- Watching: the alert is running and hasn't found a breach
- Triggered: a check found a breach. The alert stays Triggered until it's marked as not triggered, even if later checks don't find a breach
- Paused: the alert isn't checked at all and doesn't send emails. Nothing is recorded while it's paused
Managing alerts
- Edit
- Hover over an alert, select Options (⋯), then Edit, and change any of its settings in the same four steps you used to create it. Select Save to apply your changes. If you change your mind, select Undo in the confirmation message
- Pause and Resume
- Select Options (⋯), then Pause to stop the daily check. Paused alerts aren't checked and don't send emails. Select Resume to start it again; checks restart at the next scheduled time, and the days it missed aren't checked
- Delete
- Select Options (⋯), then Delete to permanently remove an alert and its history. This can't be undone
- Bulk actions
- Select several alerts in the table to resume, pause, or delete them in one go from the bar that appears at the bottom of the page. If some of the selected alerts are already in the state you chose, the confirmation message tells you how many will change
Viewing an alert's details
Select an alert's name to open a details panel. The header shows the alert's status and condition, and three tabs give you more:
- History: everything that's happened to the alert, newest first: when it was created, edited, paused, resumed, triggered, or marked as not triggered, and by whom. Select View Incident next to a triggered entry to open that incident
- Content: every item the alert watches, with its type and name. Use the search bar to find an item
- Definition: the alert's settings: the condition, timeframe, and check time; the system, environment, and items it watches; and its recipients, who created it, and when
Viewing incidents
An incident is a check where the alert's condition was met. To see an alert's incidents, hover over it in the alerts table and select View incidents. You can also open an incident from the History tab of the alert's details, or from the View Incidents button in an alert email.
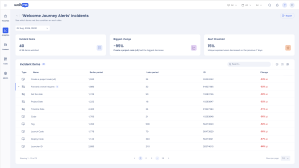
The incidents page shows which items met the condition on each date. Use the date dropdown at the top of the page to choose which check to look at.
Three summary cards give you the highlights:
- Incident items: how many items met the condition, out of all the items the alert watches
- Biggest change: the item that changed the most, and by how much
- Alert threshold: the condition the alert checks, for example "15%: Unique exposed users decreased vs. the previous 7 days."
The Incident items table lists every item that met the condition, with its type, name, ID, its value in the earlier and later periods, and the change between them. For a Smart Walk-Thru, expand the row to see the individual steps. Use the search bar to find an item, and select Export to download the list.
Getting alert emails
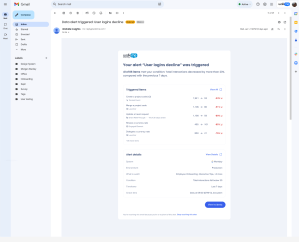
When an alert triggers, everyone added as a recipient gets an email from WalkMe Insights. The email shows:
- How many items met the condition, out of all the items the alert watches, and the condition itself
- Triggered items: the items that changed the most, each with its type, its value before and after, and the change. For a Smart Walk-Thru, it also shows how many steps broke. Select View All to see the full list
- Alert details: the system, environment, what the alert watches, the condition, the timeframe, and the check time. Select View Details to open the alert
- A View Incidents button that opens the alert's incidents page
You one email per incident for each content type. If an alert watches more than one content type, like Launchers and ShoutOuts, recipients get a separate email for each type. No more emails are sent while an alert stays triggered, and no “back to normal” email is sent when the condition stops being met.
Stop receiving an alert
To stop getting emails for an alert, select Stop receiving this alert at the bottom of the email, then confirm. This only affects you: other recipients keep getting the alert.
Troubleshooting
- Create Alert is unavailable. Hover over the button to see why:
-
- Your account has reached its alert limit. Delete an alert to create a new one
- There's no content to watch in this system yet. Add content to create an alert
- You don't have access to any systems. You need access to at least one system to create alerts
- View incidents is unavailable. The alert hasn't been triggered yet, so there are no incidents to show
- No alerts found after a search: clear your search or try a different search term
- Something went wrong when the page loads: your alerts couldn't be loaded. Refresh the page or try again in a few minutes
Technical Notes
Limitations
- An alert's list of items is fixed when you save it. It won't automatically pick up items that start matching your selection afterward. Edit and save the alert again to refresh it
- Up to 500 values per alert
- Up to 50 alerts per account. When your account gets close to the limit, a warning appears on the Data Alerts page. Once it reaches the limit, Create Alert is unavailable until you delete an alert
- Checks run once a day
- Data Alerts doesn't do anomaly detection, root-cause analysis, or auto-fix in this release. It checks the condition you set and tells you when it's met
Permissions
Alerts belong to the account, not to the person who created them. Anyone with access to the system an alert watches can see it, edit it, pause it, and delete it. The only thing that controls access to an alert is access to the system it watches.
- If you don't have access to a system, its alerts don't appear for you in the Data Alerts table. They keep running and still appear for users who have access to that system
- If an alert's creator is no longer active, the alert keeps running and still shows them as its creator. Anyone can still edit it