Brief Overview
Using the Data Integration Center, data from WalkMe Insights can be pushed into Gainsight and can be used in workflows, reports, and activities. This data is synced every 24 hours at 8:00 am UTC.
Use Cases
Outgoing Integration
Push data from WalkMe Insights into Gainsight, synced automatically on a daily basis, to create more advanced workflows, reports, and activities.
- Enhance your understanding of end-user behavior
- Provide contextually-intelligent survey responses
- Monitor and determine pre-churn warning signs and trigger alerts pointing out likely-to-churn end users
How does it work?
Gainsight integration is based on the Salesforce integration. Using the Salesforce integration, you can push Insights data into Salesforce objects that Gainsight can then use to enhance your understanding of end-user behavior.

During the setup process, you'll choose the Salesforce object to push the data into and which data you want pushed into Salesforce according to an Insights custom report.
If a match is found between the custom report's unique identifier (usually email or GUI) and the Salesforce object's unique identifier (usually email), then you can push the data found in the insights report to this object.
- You can sync any Salesforce object
- You can sync to both Salesforce environments: Sandbox and Production
Authentication Method
We use the Salesforce OAuth 2.0 authorization method to obtain a token (that we store) for the end-user. This access can be revoked at any time by the Salesforce Admin or within the system by disconnecting the account.
Requirements
- You must be a Salesforce admin or contact your Salesforce admin in order to add custom fields to your targeted Salesforce object(s)
- You must have a Salesforce user that either has Salesforce admin access or ModifyAllData permissions to grant WalkMe access to OAuth 2.0 authorization to read and update the metadata of Salesforce objects (this access can be revoked by the Salesforce Admin at any time)
The Data Integration Center UI is in the Insights console under Integrations > Salesforce. From here, the integration wizard will walk you through the process of setting up an integration.
The explicit URL of the module is https://insights.walkme.com/index.html#/salesforceIntegration
Preparing for Integration
Step 1: Set Goals
Decide which business goal(s) you wish to achieve. Some examples of possible real-life use-cases include the following:
- Keep track of end-user onboarding
- End-users who fail to complete onboarding or fall behind in training usually adopt software more slowly and use it less effectively. Using the Data Integration Center, valuable onboarding insights will be shown directly in the CRM, triggering weekly discussions to share best practices and streamline the onboarding experience
- Provide contextually intelligent survey reactions
- Identify end-users who respond favorably to NPS surveys and are likely to recommend the product. Identify end-users who respond negatively to timely customer-service intervention, or have Gainsight automatically send an email inviting them to share their experiences
- Preventing churn / Likely to convert leads
- Customer retention is the main success determinant of Customer Success (CS) teams. WalkMe's Insights and predictive AI determines and monitors pre-churn warning signs (e.g., no software use in 30+ days, abnormally long time-to-value, failure to complete onboarding, etc.), and automatically trigger alerts pointing out likely-to-churn end-users. Using the Data Integration Center, CS managers can now see these WalkMe alerts and data-points directly in the integrated platform, giving them a better chance to save an at-risk account
- Use data for intelligent upselling
- Highly engaged end-users enjoying significant value from a software often signal upselling opportunities. The Data Integration Center can tell customers' CS teams when end-users frequently use features subject to usage-caps or with available upgrades. CS teams can also see if end-users have been reading about upgrade plans on the customer's website. Using this data, CS can generate reports highlighting users who the customer's Sales team should contact to drive upsell opportunities
Step 2: Identify the Pertinent Data
Determine which WalkMe Insights data must be pushed to Salesforce in order to achieve your chosen goal(s).
Step 3: In Salesforce, Add Custom Fields to the Salesforce Object
This can only be done by your Salesforce Admin.
Note: We highly recommend using the prefix WalkMe_ to preface each of the Salesforce custom fields.
Step 4: Prepare a WalkMe Custom Report
We will have the following reports out of the box for all customers:
- Logins: Increase adoption / Find Upsell Opportunities—By identifying the last login date, the first login date and the number of logins in the past 30 days
- NPS: The net promoter score (NPS) per end-user indicates how likely end-users are to recommend your product
- Onboarding Completion Rate: Ensure successful onboarding by measuring your end-users' onboarding completion rate and how likely your customers are to adopt your product
- TeachMe (if enabled for the account): See who completes your courses and track their progress
If you need additional reports, please contact your Account Manager. The additional report should have the tag integrations_salesforce.
Integration
Step 1: Select your Integration
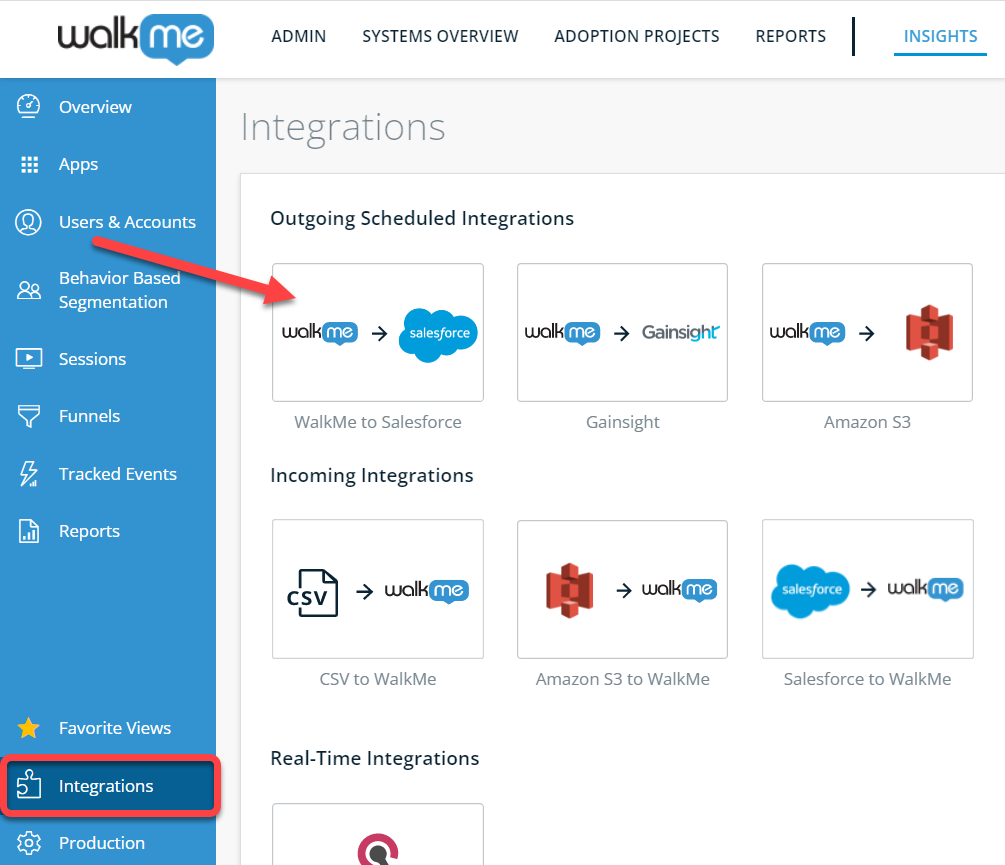
In the Insights console (insights.walkme.com), click on WalkMe to Salesforce under the Integrations header in the left sidebar.
Step 2: Connect the Environment
Connect your first Salesforce environment:

Click the + Add Account button next to the environment in which you wish to connect.
You will be transferred to the Salesforce authentication screen, where you will give WalkMe permission to push data to this account using the OAuth 2.0 authorization process.
Note: Make sure to log in with a Salesforce user that is a Salesforce Admin or has ModifyAllData permissions. Otherwise, WalkMe will not be granted permission to push data to Salesforce.
Once you insert the email & password of your account, you'll be redirected back to the Salesforce integration section of the Insights console.
Step 3: Create the Integration
Start your first integration:

Click the CREATE NEW INTEGRATION button to start the integration wizard.
Note: if you wish to add another account, (e.g., to also connect your Sandbox or Production environment), click the ACCOUNTS button at the top-right of the screen.
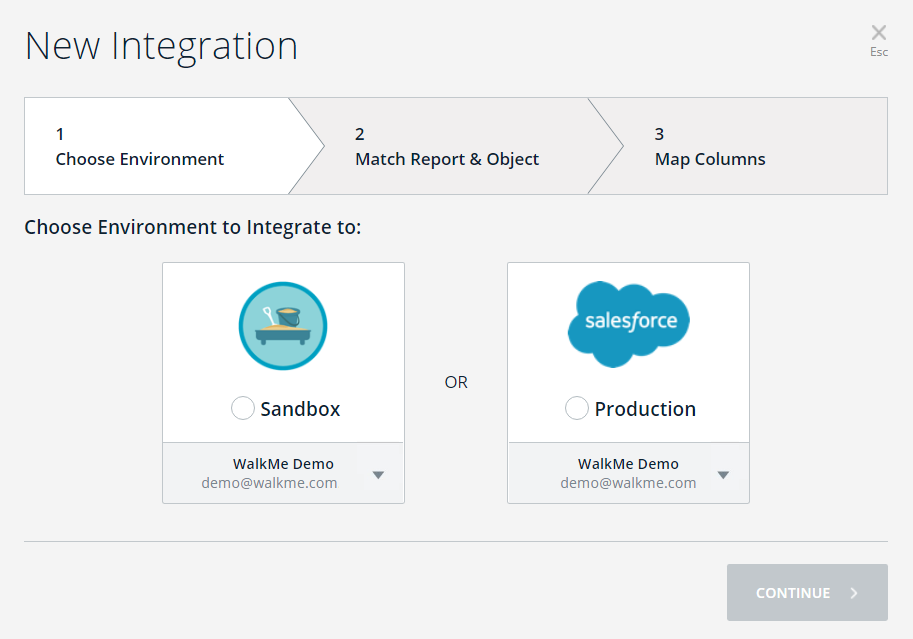
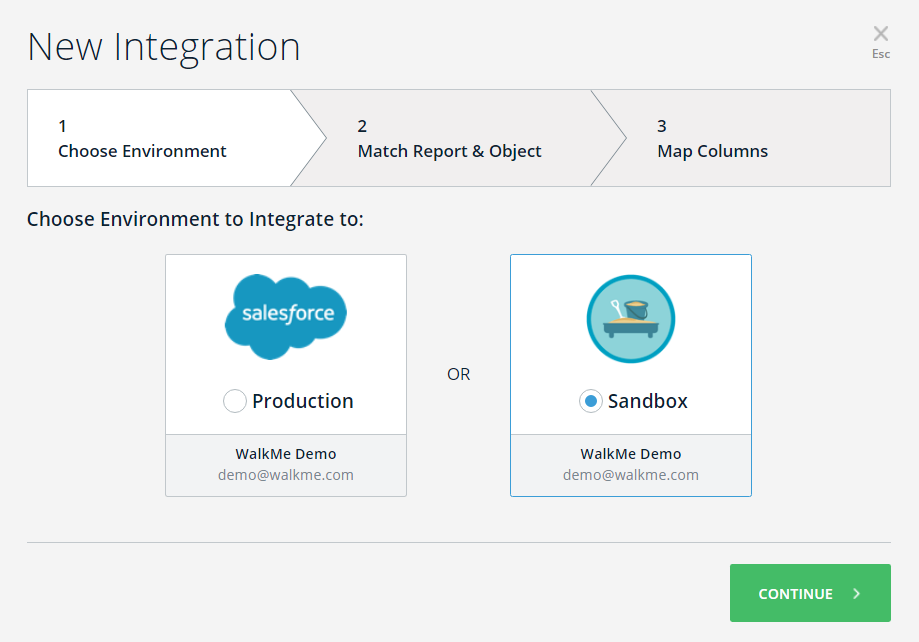
Step 4: Select an Environment in Integration Wizard
Here you will choose between the different Salesforce environments connected to WalkMe.
You can view the Salesforce account details and can choose between Sandbox and Production (if both are connected).
Note: You may select only from among the connected environments (if only one environment is connected, only that one will appear).
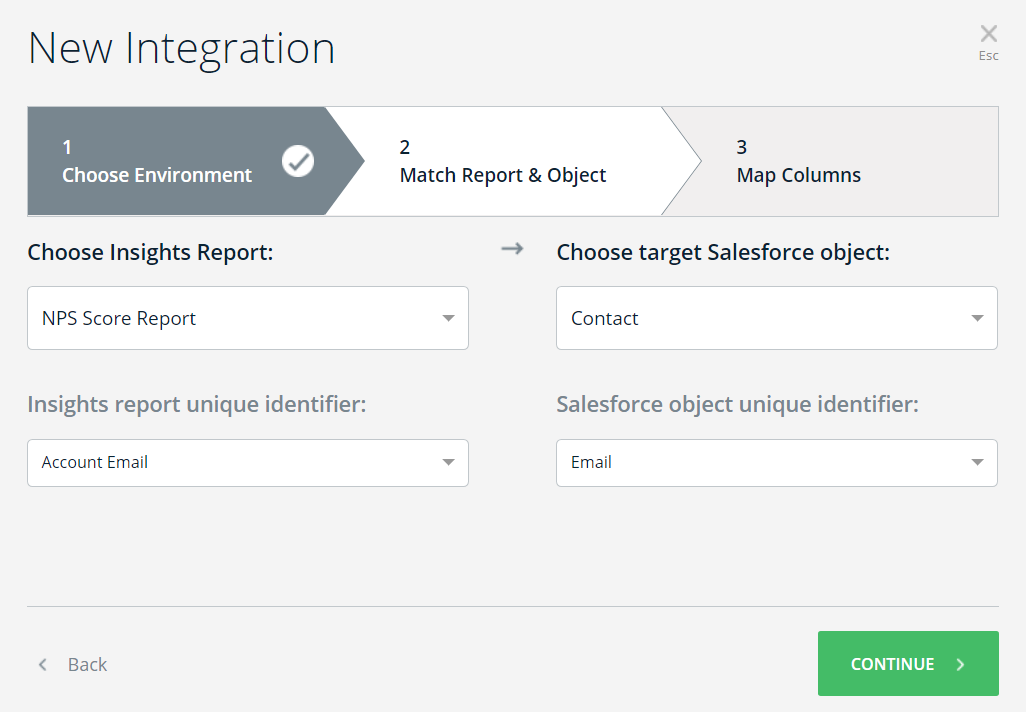
Step 5: Select the Insights Report & the Matching Salesforce Object in Integration Wizard
Here you will choose an Insights report and select the Salesforce object with which it should be synced.
-
- Choose Insights Report column: you will see a dropdown list containing your available Insights reports
- Note: only reports with the tag integration_salesforce are visible here
- Choose target Salesforce object column: you will see a dropdown containing the available Salesforce objects pulled from Salesforce (per the environment accessing the Salesforce metadata)
- Once you selected items from both dropdown menus, select the unique identifiers (keys) of each report and match them up with a Salesforce object identifier (usually email or GUI)
- Note: Each Salesforce identifier may only be matched with one unique report Identifier per integration
-
- Insight report unique identifier column: this is the report's key to match to a Salesforce object
- Salesforce object unique identifier column: this is the field of the Salesforce object with which to match the report key
- Click the Continue Button in order to proceed
- Click the Back button if you wish to return to screen 1
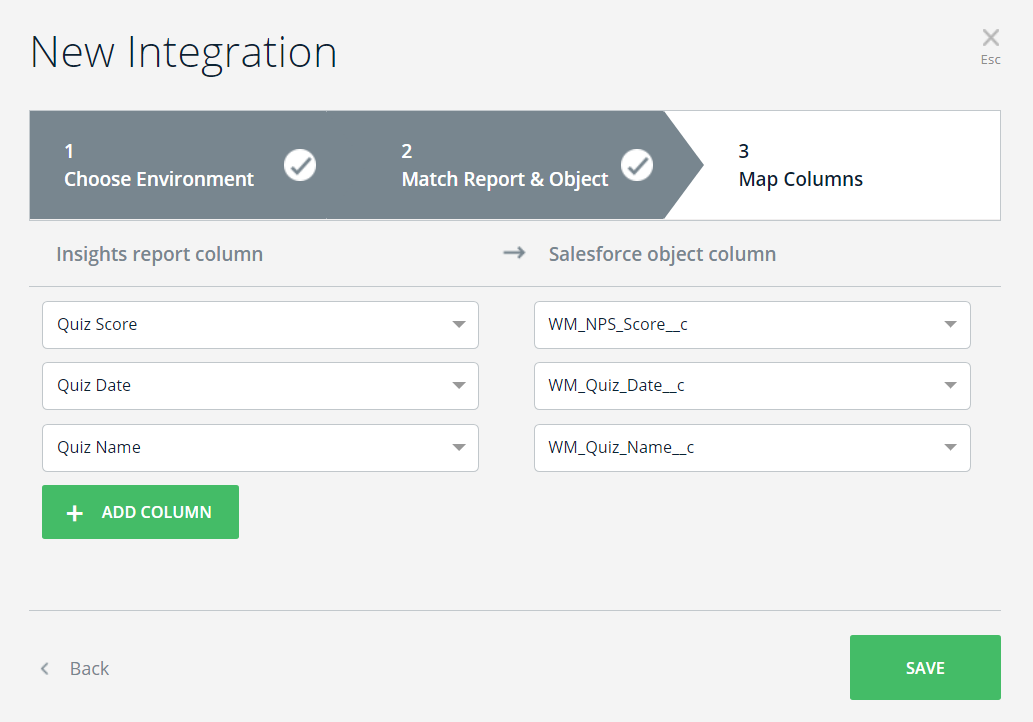
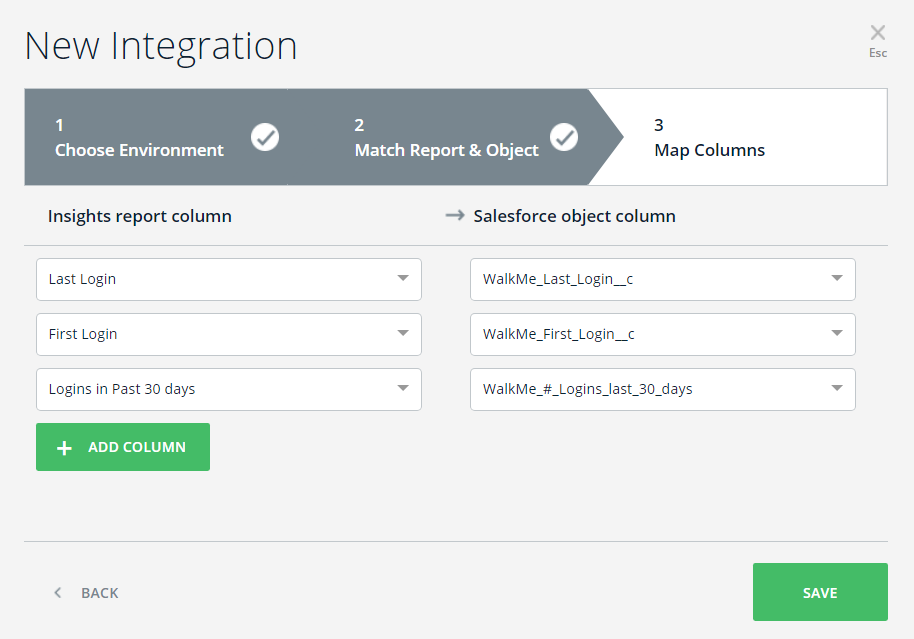
Step 6: Map Fields to Update in Integration Wizard
Here you will decide what data will be updated in Salesforce.
This mapping provides the end-user with a UI showing what data from the source report is updated in the Salesforce object:
- The Insights report column consists of all the fields found in the report, including the key field selected on screen 2
- The Salesforce object column consists of all the fields of the selected object that:
- Are not already in use in screen 2
- Correspond to the keys selected on screen 2
- You can click ADD COLUMN to add another mapping of fields to objects
- When hovering over a row, you can click the X button to delete that row
- Upon completing one or more mapping rows, the SAVE button is enabled
- Click the Back button if you wish to return to the screen 2
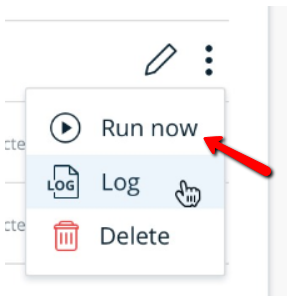
Step 7: Execute your integration
Hover over the integration you just created and click the three dots on the right:

A menu will open. Click the Run Now button.

This will execute the integration and will attempt to push any relevant data to the assigned account. If all executed properly, both the log and grid will indicate the integration completed successfully.
Editing an Existing Integration
When you hover over a specific integration in the Insights console, the Edit button appears.
When the Edit button is clicked, the integration wizard opens, allowing you to edit the integration. The wizard will open to screen 3 to allow you to easily edit the mapping.
You can navigate backward and forward between the screens using the headers and buttons.
Logs
Whenever a sync occurs, a log is produced. The log can be found by clicking on the three dots next to the pencil icon that appears when you hover over an integration in Insights' Integrations section:
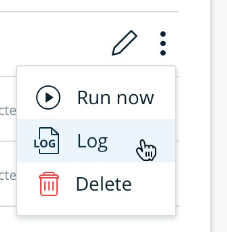
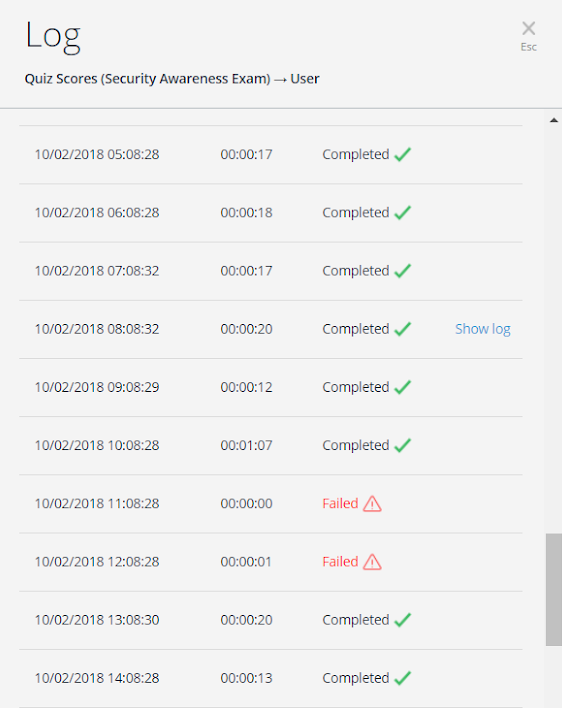
- When you click Log, an overlay window appears and you can view the history of the data pushes made from WalkMe to Salesforce
- The log contains the report name, the Salesforce object of the integration, and the following information:
- Start date:The dateTime of the run in UTC hours
- Runtime: The run's duration (End Time minus Start Time)
- Status: the run's status: Completed or Failed
You can perform these actions:
- Show log link: On hover, you can view the original log with all details by clicking the Show log link
- Click the X button to close the overlay window
End-To-End Example
Preparing for Integration
Step 1: Choose a business goal
My goal is to identify leads that are more likely than average to convert from free customers to paying customers. To identify such leads, I want to monitor my leads' use of my software over the course of a 30-day period.
Step 2: Determine which WalkMe Insights data to push to Salesforce
I need the number of logins in the last 30 days.
I'd also like to know the time of leads' first and last logins to get a better idea of my leads' usage of my system.
Step 3: Add Custom Fields to the Salesforce Object
I'll send my Salesforce Admin the following email:
Dear Salesforce Admin,
I have a business goal to identify leads that are more likely than average to convert from free customers to paying customers. To this end, I want to monitor my leads' use of my software over the course of a 30-day period.
In order to do so, we use a system called WalkMe that allows me to get insights on my users and get predictive signs for likely-to-convert leads.
I need your assistance in adding the following custom fields to the Lead Object, both in the Sandbox and Production Environments:
| Field |
Field Label |
| WalkMe_First_Login |
First Login |
| WalkMe_Last_Login |
Last Login |
| WalkMe_#_Logins_last_30_days |
# Logins Last 30 Days |
Kind regards,
Name
Step 4: Prepare a WalkMe Custom Report:
I have an out-of-the box report for that called Logins Review (no extra work is needed)
All done, and the fields were added to the Salesforce Object. Now I'm ready to start my integration!
Integration
Step 1: I'll go to https://insights.walkme.com/index.html#/salesforceIntegration)
Step 2: I'll connect my Sandbox account
- Note: I'll connect with a user that has ModifyAllData permissions
I can connect my Production account now or later, whichever I prefer. Usually, I'll connect the Production account after I've tested the integration in my Sandbox account and the results meet my expectations.
Step 3: I'll Create the Integration
- To do this, I'll click the + New Integration button
Step 4: I'll choose Environment and Account
- To do this, I'll choose my Sandbox account and click CONTINUE
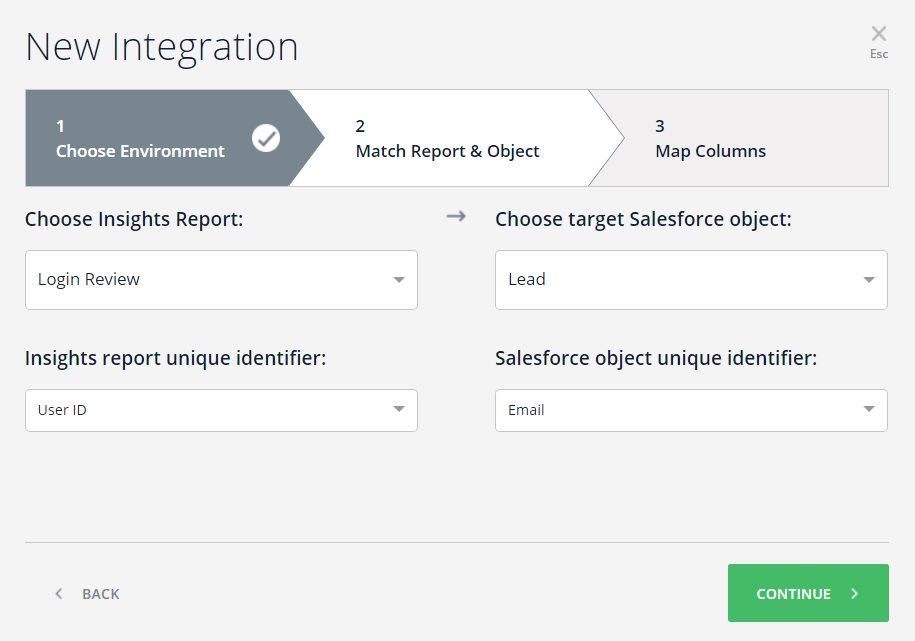
Step 5: I'll Select the Insights Report and the matching Salesforce Object in the integration wizard
- For Insights Report: I'll choose my out-of-the-box report called Logins review
- I can see what columns exists in the report by opening the list under Insights report unique identifier
- The unique Identifier of a user for this report is the User ID (chosen by default)
- For target Salesforce object: I'll choose Lead, as I want to push my data to this object
- I can see which fields exists on this Object by opening the list under Salesforce object unique identifier
- The unique identifier of a lead in this case is its Email (chosen manually):
Step 6: I'll Map the fields I want updated into the Lead Object
- To do this, I match the report columns to the custom fields I've requested to add to the Lead Object (added by the Salesforce Admin), and click SAVE:
A new integration will be added to my list of integrations:

Step 7: Now I'll execute my integration!
- I'll do this by clicking the Run Now button to execute the integration and push the data into my Sandbox
- Once the integration finishes its execution, the Last Run column will appear and indicate whether it succeeded or failed
- If it is successful, I'll expect to see these fields in Salesforce Sandbox:

From here on out, the integration will be updated every 24 hours and will push the most updated data to my Lead Objects!


