We recommend using jQuery as little as possible. Web applications are constantly changing and small updates to the UI and page structure can break any jQuery used.
WalkMe's out of the box element selection adapts to changes in the underlying application without the use of jQuery.
What is a jQuery Selector?
A jQuery selector is a string that targets an HTML element when WalkMe's default element selection cannot. Every page is made of HTML, and each visible element—buttons, headers, forms, images—is represented in that HTML structure. jQuery selectors allow WalkMe to locate elements using classes, IDs, or other attributes.
You may need jQuery if:
WalkMe cannot capture the element when clicked
A step points to the wrong element
A Launcher or SmartTip does not appear
A step plays only sometimes
Precision tab options fail to return the correct element
Before building a jQuery selector, check the Precision tab to confirm whether native selection can be improved.
HTML: The markup language that structures webpages
Element: A piece of HTML, such as div, input, h2, p
jQuery: A JavaScript library used to search for and describe HTML elements
Selector: The code that identifies an element for jQuery
Creating a jQuery Selector
Step 1: Identify the element
Right-click on the element you need to target and select Inspect (Chrome/Safari) or Inspect Element (Firefox/IE).
This opens the browser's Developer Console, allowing you to view the page's HTML and locate the exact element WalkMe must target.
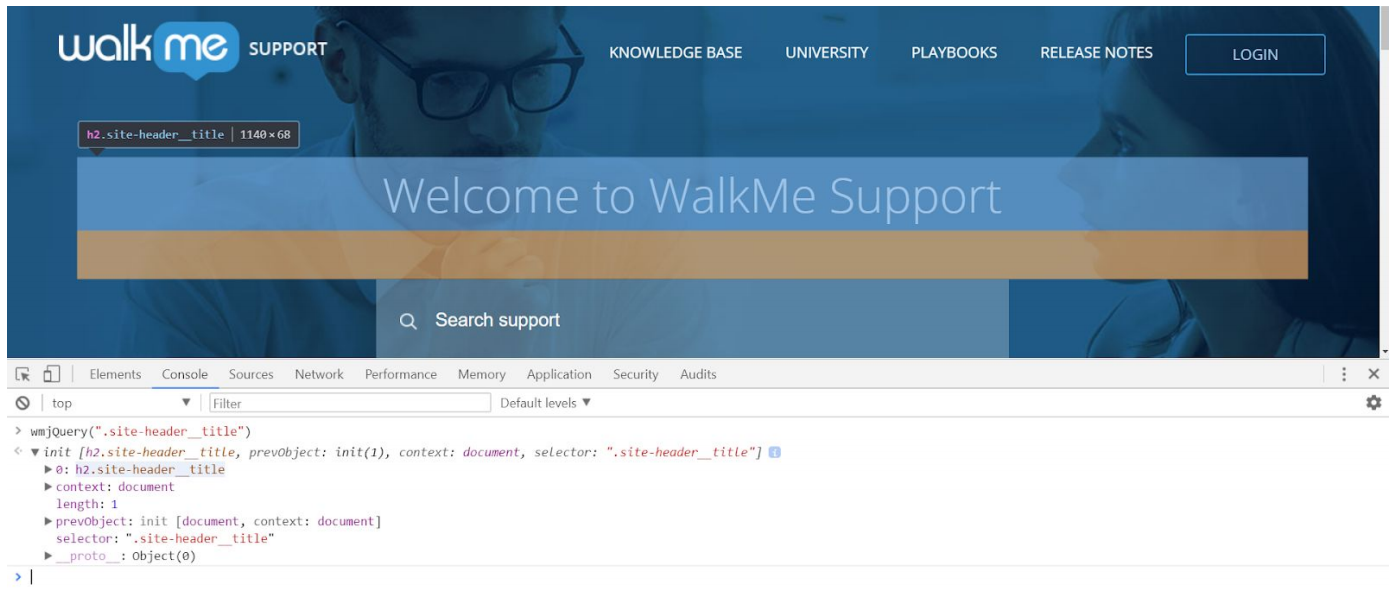
Inspecting the “Welcome to WalkMe Support” text highlights the HTML line:
<h2 class="site-header__title">
You can also click the cursor icon in the DevTools header to hover over elements and jump directly to their HTML representation. Hovering highlights the corresponding HTML line in blue. Clicking anchors the inspector to that element.
Step 2: Build the selector
HTML Elements
Common HTML elements include div, a (link), h2, p, form, input, img. Elements often contain classes, IDs, or attributes that describe them and can be used in your selector. Element types are helpful for orientation, but are not always required in the final selector.
Descriptors like classes, ID's, and attributes determine what those elements look like and how they behave on a page. When writing jQuery, the elements should always precede any descriptors. This means that you should never place a symbol of any sort before an element.
Common types of elements
div: short for divider, this is the building block of a website
a: a link to another site
h2: a reasonably large header, smaller than h1 but larger than h3.
p: a paragraph. These break up large chunks of HTML and make it easier to read and navigate.
form: like a div, this is a site building block. However, forms typically contain editable elements like inputs
input: an piece of the site that a user can interact with or alter, like a textfield or checkbox
img: an image
Using classes
Classes are the most common descriptors. In HTML they appear as class="example". In jQuery, classes use the dot notation:
.site-header__title
Using IDs
If an element has an ID, prefer it over a class because IDs are more specific. IDs appear in HTML as id="name" and use # in jQuery.
From the example below, the search bar <input id="hkb-search" class="…"> can be targeted with the selector: #hkb-search
Selecting elements in an iFrame
Elements inside iFrames require a context object. Use this template:
Make sure WalkMe Editor is connected to your browser
Open DevTools
Select Console
Type:
wmjQuery('yourSelector')
Press Enter
From the earlier example, we can enter:
wmjQuery('.site-header__title')
The console returns an object containing: length — how many elements matched your selector
0 = no match
1 = correct
Returns with a length of more than 1, mean multiple elements were found that match the selector. With any result over 1, we'd want to make the selector more
specific.
From our earlier example, testing .site-header__title returns length: 1 and highlights the selected element.
You can hover over any returned element in the DevTools results to confirm it highlights the correct element on the page.
Hovering over 0: h2:site-header__title highlights the Welcome to WalkMe Support text.
Troubleshooting long or failing selectors
If a long selector returns a red exclamation mark in the Rule Engine, you can isolate the problem by breaking the selector into smaller pieces and testing each part.
For example, consider the incorrect selector:
div.ht-container form.hkb-site-serch
To troubleshoot it, begin with the first element and build the selector step-by-step:
Type div into the Rule Engine. If it returns a checkmark, the element exists and is written correctly.
Add .ht-container, creating div.ht-container. The checkmark remains, so this portion is valid.
Add form, creating div.ht-container form. The form is a child of div.ht-container, so this is still valid.
At this point, each part of the selector is working.
Now add the final part: .hkb-site-serch. As soon as you add it, the Rule Engine changes from a green checkmark to a red exclamation mark. When you inspect the HTML, you'll see the issue: the class name is misspelled. It should be .hkb-site-search.
Once you correct the typo, the full selector
div.ht-container form.hkb-site-search
returns a checkmark again. That means the selector is now valid.
This method helps you quickly pinpoint which part of a selector is written incorrectly or no longer matches the page.
Step 4: Implement the selector in WalkMe
Open the Smart Walk-Thru containing the step
Select the step
Open the Advanced Settings tab
Choose jQuery selector as your Recognition method
Paste the selector in the Value field
Select Done
Play the step to confirm it attaches correctly
The same method works for Launchers, SmartTips, and any rule that supports jQuery selection.
Tip
WalkMe's Rule Engine also displays real-time checks with a green checkmark (found) or red exclamation mark (not found).
Advanced Techniques
Using other attributes
If an element does not have a class or ID, you can target it using any of its attributes.
The basic format is:
[attribute="value"]
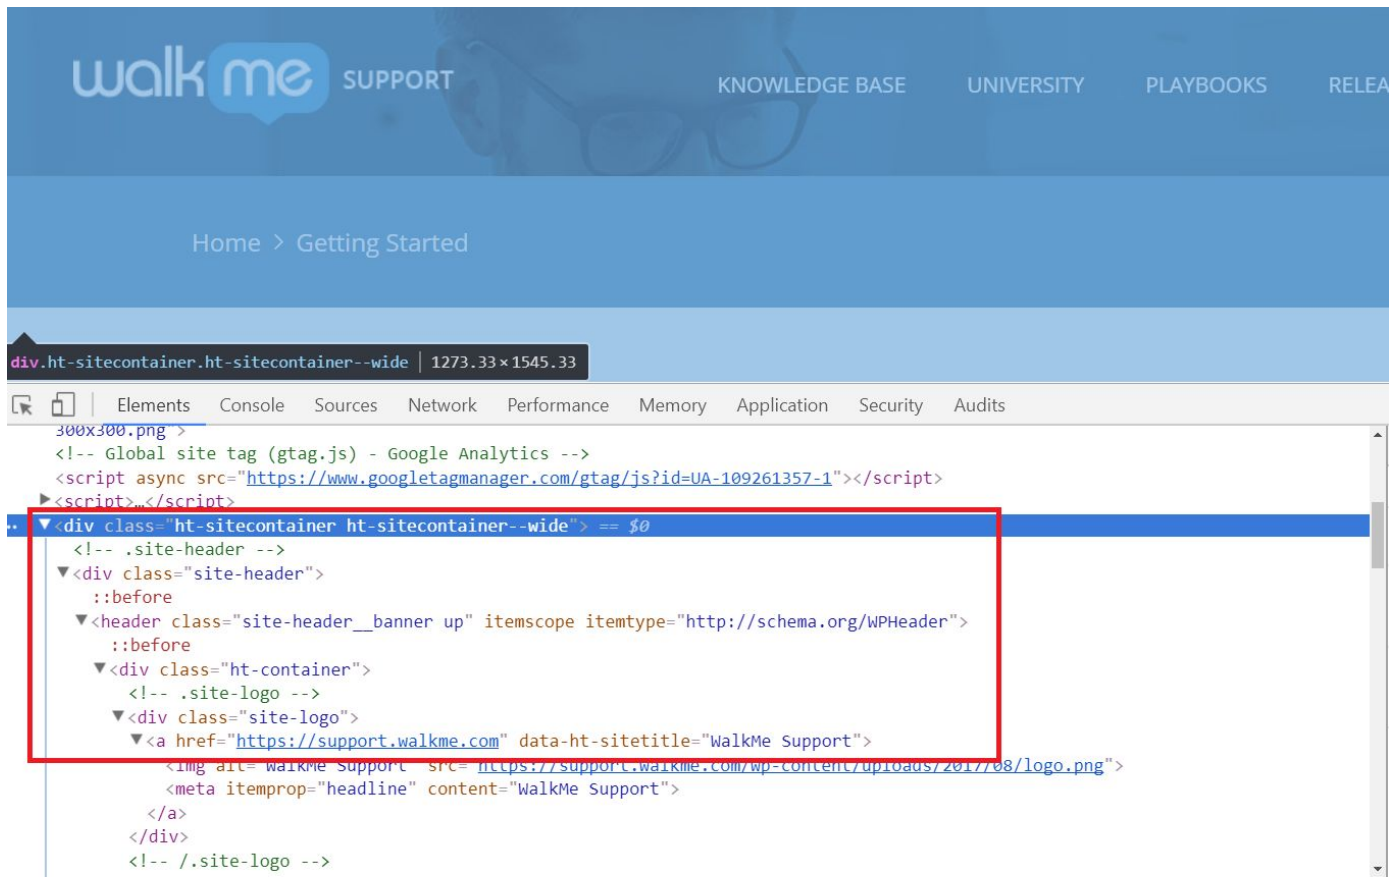
For example, the WalkMe Support logo does not have a class or ID, but its HTML includes the attribute:
href="https://support.walkme.com"
You can use this attribute to target the logo:
[href="https://support.walkme.com"]
The same element also contains another attribute:
data-ht-sitetitle="WalkMe Support"
You could target this using:
[data-ht-sitetitle="WalkMe Support"]
When targeting an attribute that is not a class or ID, always include the element type before the attribute. This helps WalkMe narrow the search and improves performance. For the Support logo, the correct selector is:
a[href="https://support.walkme.com"]
In HTML, a identifies a link, and href identifies the link destination. In this case, the logo is a link to the WalkMe Support page.
Although attributes like class and id can be targeted using the same [attribute="value"] format, it is more efficient to use the shortcuts .className and #idName whenever possible.
Using Parent–Child Relationships
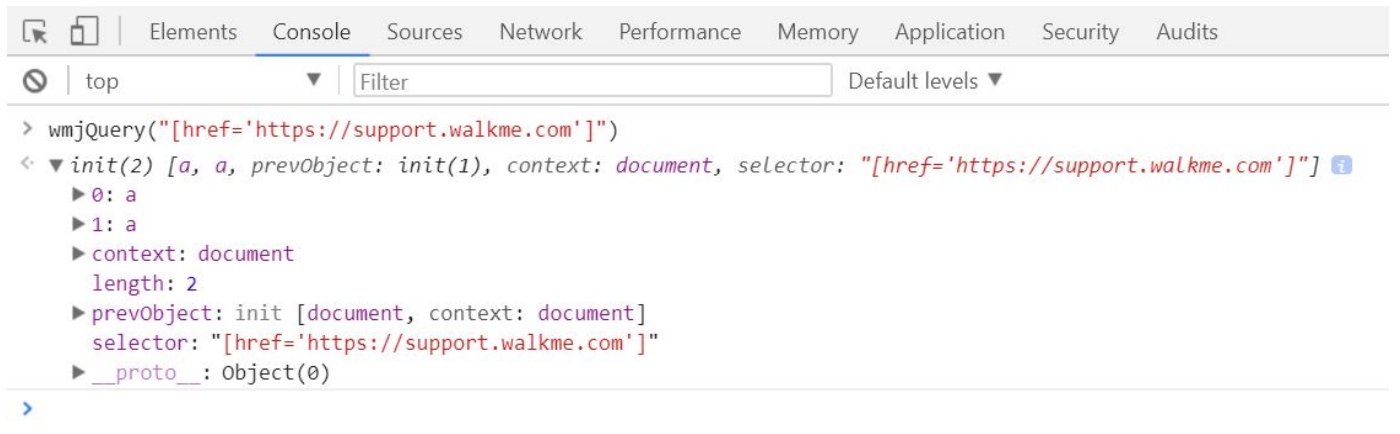
Targeting by attribute alone may return more than one result. For example, testing:
wmjQuery('[href="https://support.walkme.com"]')
on support.walkme.com returns length: 2.
This is because both the WalkMe Logo and the “Home” link share the same href attribute.
You might try adding the element type, a, but both elements are links, so:
a[href="https://support.walkme.com"]
still returns two matches.
To make the selector more specific, use parent–child structure found in the HTML. In DevTools, you can expand lines of HTML to see which elements contain others. The containing element is the parent, and the nested element is the child.
For example, the WalkMe Logo's parent is:
div.site-logo
The “Home” link's parent is a different element: li with additional attributes
Because the parents differ, you can make your selector more specific by including both parent and child. Parent–child selectors are written with a space between them.
To target the “Home” link:
li [href="https://support.walkme.com"]
Testing this selector returns a single match, correctly identifying the “Home” text.
To target only the logo instead, use its known parent:
Understanding the parent–child hierarchy is one of the most reliable ways to refine selectors when multiple elements share similar attributes.
Tip
As you move down the HTML tree, elements tend to get more specific. As you move up, they become broader. Navigate down to refine your selector; navigate up to understand the surrounding structure.
Modifiers
Modifiers allow you to further narrow a jQuery selector by adding rules at the end of the selector. Although multiple modifiers can be combined, avoid using more than two to keep selectors maintainable.
Examples:
h2:contains(Welcome to WalkMe):visible
Selects an h2 element that contains the text “Welcome to WalkMe” and is visible on the screen.
.hkb-site-search:has([type="text"])
Selects the element with class hkb-site-search that contains a nested element with attribute type="text".
form.hkb-site-search input:eq(0)
:eq(n) selects the nth element in a zero-indexed list. eq(0) is the first matching input within the form.
form.hkb-site-search input:last
:last selects the last matching input element. Use :first to select the first.
Dynamic IDs are IDs that change each time the page loads. They typically look like long alphanumeric strings, for example:
id="00N00000067211_ilecell"
Because this value changes on refresh, any selector using the full ID will break. Avoid using fully dynamic IDs whenever possible.
If you must target an element with a dynamic ID, identify the stable portion of the ID—something readable or consistent, such as “ilecell” in the example above. Then use a partial attribute selector:
[id*="ilecell"]
The *= symbol means “contains”. This tells WalkMe to look for any ID that contains ilecell, even if the rest of the ID changes.
Partial selectors may match multiple elements. To prevent unintended matches, combine your partial ID selector with another part of the element's structure or attributes. For example:
[id*="ilecell"].inlineEditWrite
or
.dataCol.inlineEditWrite[id*="ilecell"]
This approach keeps your selector stable while ensuring it matches the correct element.


 The “Home” link's parent is a different element: li with additional attributes
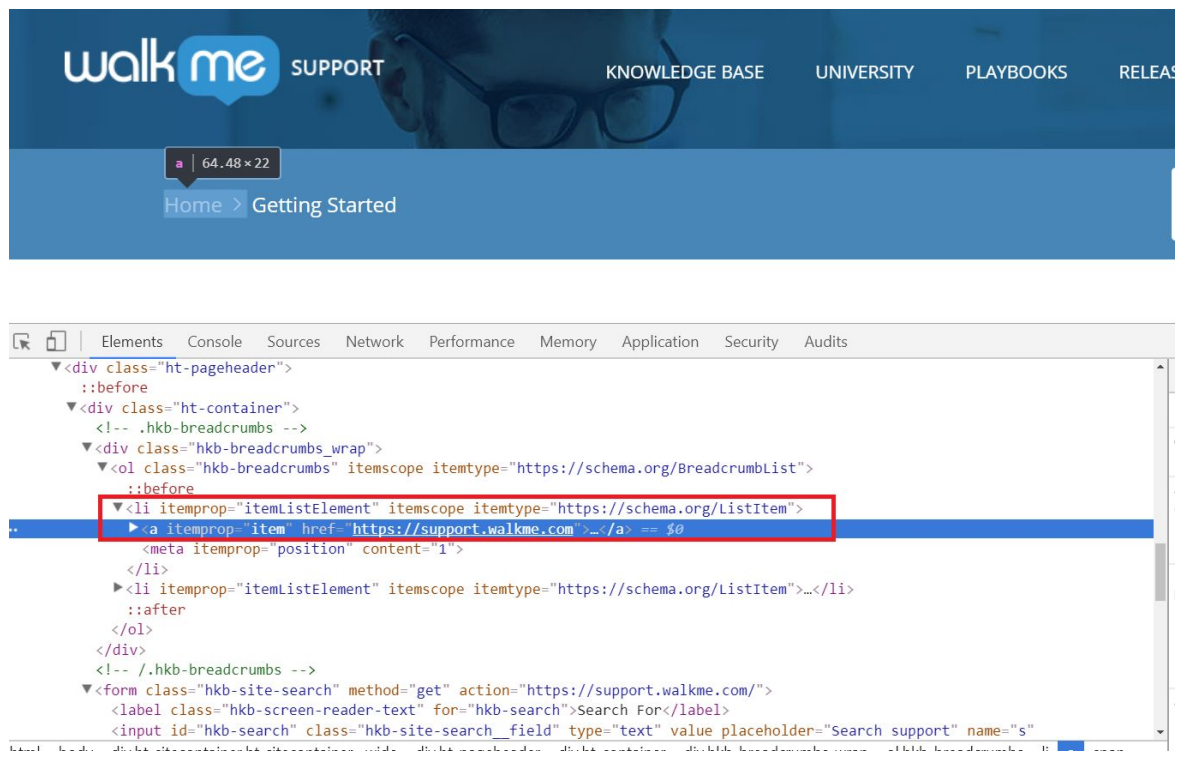 Testing this selector returns a single match, correctly identifying the “Home” text.
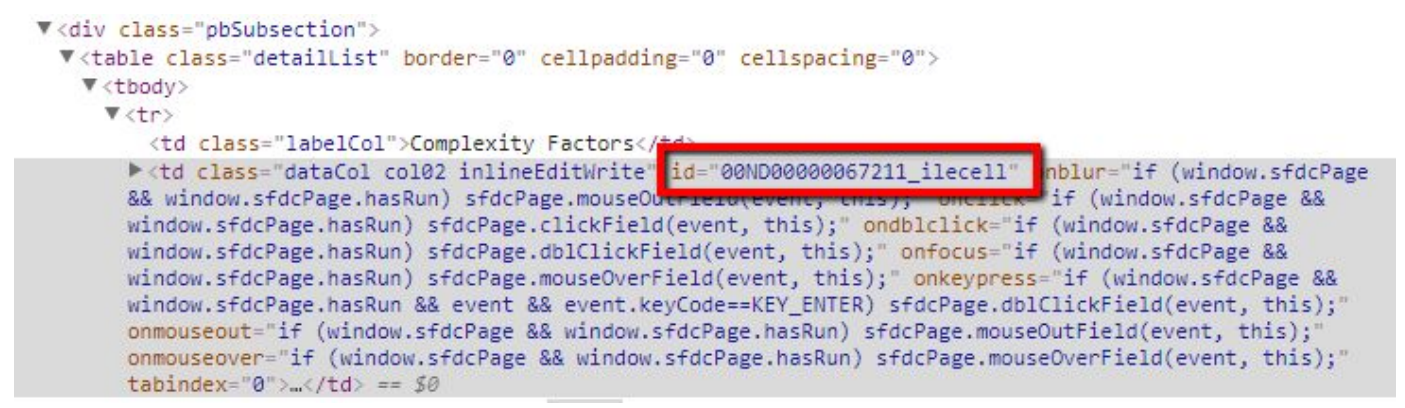 Because this value changes on refresh, any selector using the full ID will break. Avoid using fully dynamic IDs whenever possible.