Text & Multi-Language
Brief Overview
The Text & Multi-Language feature lets you translate any WalkMe content you have created in different languages without having to rebuild it. This enables you to engage your users in their preferred language and support a global audience.
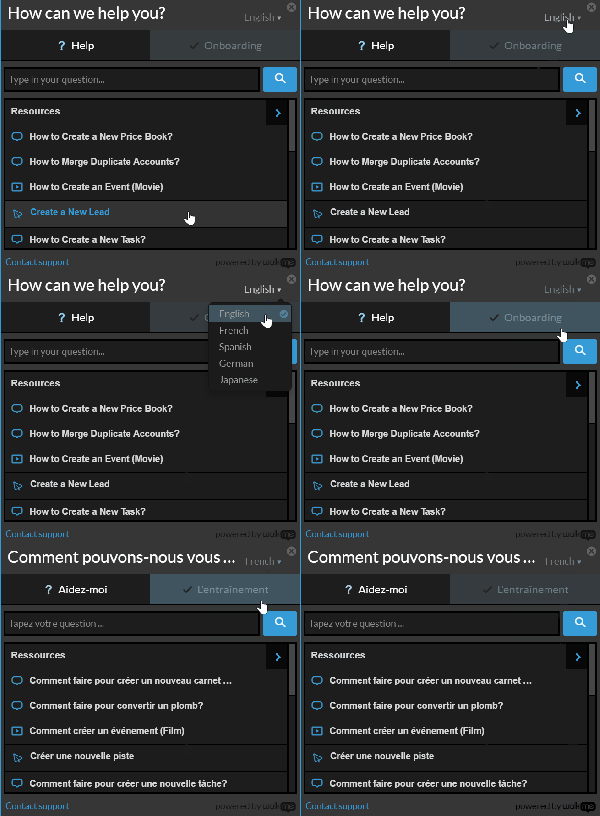
Users either select the language from a toggle in the Player Menu, or you can configure WalkMe to change the language automatically. Translations are done from the Text & Multi-Language page which is accessed from the WalkMe Console at console.walkme.com/multi-language.
WalkMe offers integrations with translation vendors to translate the text you create, as well as the ability to export either an .XLIFF file, which is used by popular localization services, or an .XLSX Excel file, which is better suited to human translation.
Additionally, you can translate text manually inside the WalkMe Console, and should you desire to only translate a portion of a WalkMe item's text, you have the option to export and import specific items' text, as opposed to all text at once.
WalkMe content can be translated into any language.
Use Cases
- Translate Smart Walk-Thrus, Shuttles, ShoutOuts, and all WalkMe content
- Help non-English speaking users complete processes without changing the native language of your application
How It Works
After building a Smart Walk-Thru, ShoutOut, survey, launcher, etc., you can use the Text & Multi-Language feature to create translations for the app text. The first language used in the editor will become the source language for all your WalkMe items, the WalkMe Menu, and your general settings.
The source language will always show as the first line on My Languages page.
If you click on this line, the edit mode will open where you can set the language you used in the editor.
It is recommended to change the source language here to represent the language you used in the editor in cases when that language is other than English (US) - for example, French - AND you have English (US) among your other languages.
Once WalkMe items have been created in the Editor, sign into console.walkme.com and go to the Text & Multi-Language page. From here, you can access the Multi-Language feature to manage your translations.
Once the translations are complete, your users will then have the option to select a language from the toggle menu in the Player Menu, or you can configure WalkMe to automatically change the language in the Player Menu based on a language variable in your website's JavaScript.
Toggle
The Toggle is the default Multi-Language language-selection method for your end-users, allowing them to select a language from a drop-down menu within the Player Menu. Once an end-user switches the language, WalkMe remembers this information using a cookie. When the Player Menu is re-opened, text will appear in the language previously selected by the end-user.
Auto-Toggle (*Recommended)
Auto-Toggle is our recommended (and the most widely used) method of implementing Multi-Language. Auto-Toggle will automatically change the language in the Player Menu based on the current language variable on your website. This method is best for performance optimization, and is strongly recommended for WalkMe solutions for Salesforce, Workday® and SuccessFactors. Click here to learn how to enable Auto-Toggle.
When Auto-Toggle is enabled, WalkMe looks for a function called walkme_get_language, which your dev team needs to implement on your website. This function should return the Language Short Name you specified in the ACCOUNT tab's Text & Multi language section in console.walkme.com during your initial language setup (see the Adding a Language section below).
Auto-Toggle is not available on pages in which changing the language does not trigger a page refresh, such as Single-Page Applications. If you have a Single-Page Application, use the Toggle or Language Push (API) method. If you are using WalkMe on a platform on which you cannot implement a function, such as Salesforce, contact your Customer Success Manager or contact support.
Language Push (API)
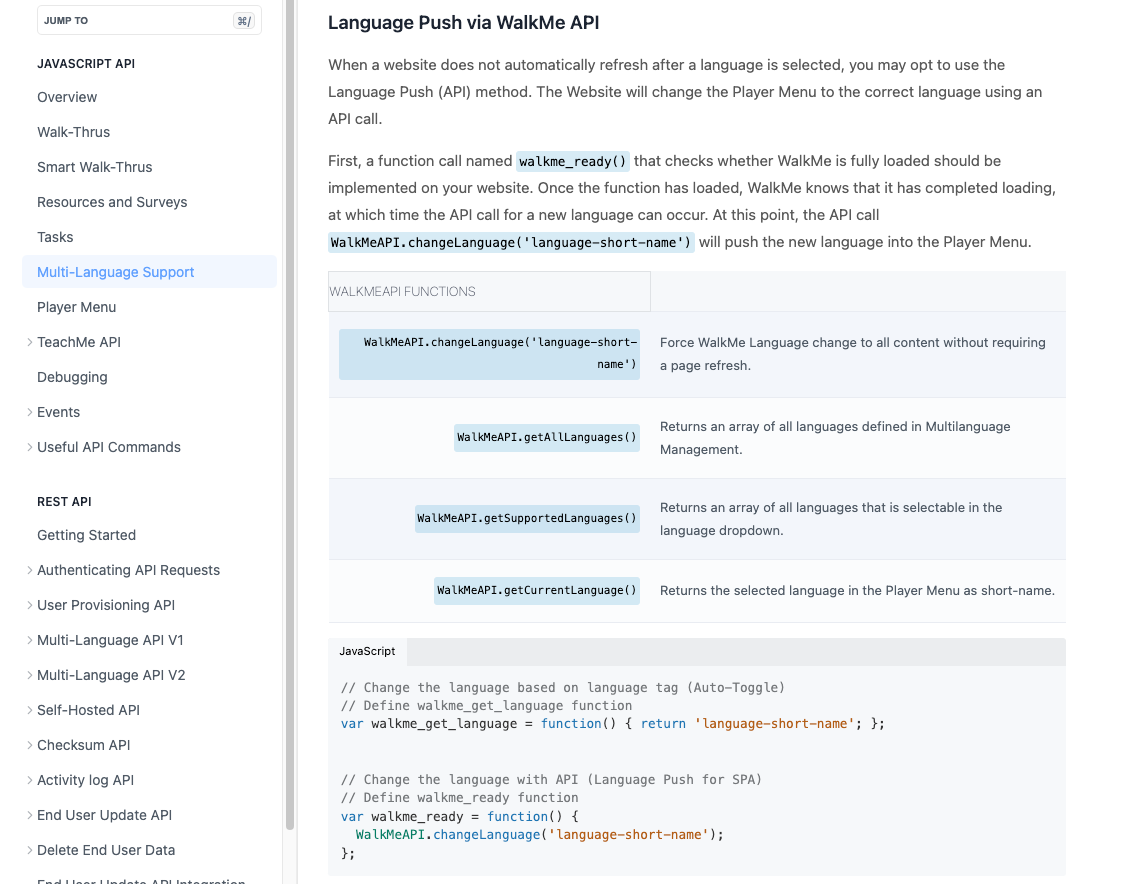
When a website does not automatically refresh after a language is selected, you may opt to use the Language Push (API) method. The Website will change the Player Menu to the correct language using an API call.
First, a function call named walkme_ready() that checks whether WalkMe is fully loaded should be implemented on your website. Once the function has loaded, WalkMe knows that it has completed loading, at which time the API call for a new language can occur. At this point, the API call WalkMeAPI.changeLanguage ('language-short-name') will push the new language into the Player Menu.
Adding a Language
- Go to the "Language List" page on console.walkme.com
- Important Note: Use the upper right dropdown to make sure you are working on the correct System
- Click the + New language button to add a Language
- Configure the new language details
- The Display Name is what appears to the end-user in the Player Menu
- The Short Name is used in the Auto-Toggle and Language Push (API) methods
- Show in Player gives the option to either show or hide a translation from the end-user in the Player Menu
- Copy From allows you to copy a translation from another language
- Add button - Click to add the language
- Enable Machine Translation (for supported languages only) - Allows you to translate content via the AWS auto translate service
- Click Add
Edit / Delete a Language
To edit or delete a language, click on it from the main "My Languages" page.
- You can then edit any information you wish to and click "Save"
- Or, you can delete the language using the "Delete" button
BBcode and Rich Text
BBCode
-
Copy all, Paste, Paste without formatting, and Edit options are available
-
Paste will paste all the copied content including the code tags
-
Paste without formatting will paste only the text without the code
-
Edit allows you to edit BBcode tags (in case the BBcode is typed incorrectly, a red indication will appear)
-
-
Machine translation of a specific field is available (if machine translation is enabled) under an Auto-translate icon
Rich Text (for Visual Designer content)
-
Only regular Paste option is available
-
When translating rich text textbox, a <p> will be automatically added (a paragraph so it will be shown on the ShoutOut)
Translation Methods
Translation Services
WalkMe's translation integration allows you to manage your translations directly inside the product. WalkMe has partnered with several service providers, including Lilt to make the translation process seamless.
These services can be managed from the WalkMe Console at console.walkme.com in the "Translation Services" and "Integrations" pages.
Learn more about the Lilt translation integration.
Add a Manual Translation
- Go to the "Translations" page in the WalkMe Console
- Select the WalkMe item you wish to translate from the left side panel
- Enter translated text in right columns
Translating Text of the Items (Launchers, SmartTips, etc.)
WalkMe General folder in the Translations page contains all the default texts of the items templates - for example, "WalkMe Through" for a Launcher. Those texts cannot be changed from the items settings in the Editor and can only be translated via the WalkMe General folder.
To change and/or translate the default text of your item and the general WalkMe text (for example, text used in buttons by default), open the WalkMe General folder and select the item.
In WalkMe General, you can also set your language direction:
- LTR = Left-to-right
- RTL = Right-to-left
Export Files to be Translated
The export your file(s):
- Go to the Translations page
- Select the item(s) you'd like to export from your items list
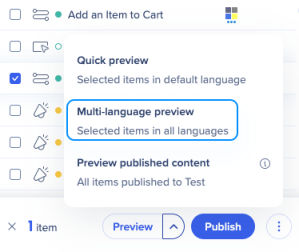
- Click Export
-
Select:
-
Target language (optional)
-
Environment - Test or Production
-
Status - Published, Published and Modified, Draft, Archived
-
File type - XLIFF, Strict XLIFF, EXCEL, RESJSON
-
- Click Export
Import Translated Files
The import your file(s):
- Go to the Translations page
- Click the Import button in the upper right corner of the page
-
Either drag&drop your files, or click Upload to select files on your computer
Translation Activities
Similar to what is available with the WalkMe Activity Log, you can now view Activities that have taken place related to Text & Multi-Language.
- Go to the WalkMe Console at console.walkme.com
- Click "Activities" from the side menu
- Select the Activity you wish to take a closer look at
To understand more about to read the Translation details, please refer to the following guide:
Best Practices
General Best Practices
- Make sure that that you / your translating company does not translate BBcode (anything between the brackets [...]).
- For Excel files, keep the exported file in the exact same format vis a vis name, tabs, columns, etc. Work only on the language column.
- We recommend only exporting files once the solution is final and that no changes be made prior to importing the files back in.
- Avoid using text images in WalkMe items and the Zembezi Widget, since these cannot be translated by Multi-Language.
- During text translation, we recommend against making additional changes in the Editor. If additional items are created, a new .XLIFF or .XLSX file should be exported to include all updates. When an .XLIFF or Excel .XLSX file is imported, an import log file is generated and may be downloaded to obtain details about the translation status.
Multi-Language For Walk-Thrus
- Your Walk-Thru should be built to ignore text, and within the Rule engine avoid using “Text is” since this will change depending on the language selected. Ask your Account Manager to enable a feature that will make all steps “ignore text' by default;
- Check the balloon size and position in different languages. The positioning may need to be adjusted because the length of the text will vary from language to language;
- If one of your translations include a Right to Left language change, be sure to test this translation thoroughly.
Multi-Language For Launchers
- Text within a Launcher image is not translated. If a Launcher is meant to work in two languages, it is recommended to use a Launcher with no text;
- Use the Customize Launcher Tab to create your Launcher. No Launchers with images, or Launcher from the Gallery.
Technical Notes
- Only XLIFF 1.2 is supported - please refer to the Text & Multi-Language XLIFF XML Files article to learn more about XLIFF files
- BBCode and Rich Text that are exported with content must be kept untouched during translations
- Shared elements like the next/done/submit button, etc. are located in the General Settings folder
- A maximum of 4,000 characters can be used in a translated field (for example: Title or description of SWT)
- Applying CSS to WalkMe content with text may override any translations in the Text & Multi-language settings