Build ActionBot Conversations in Editor(Old UI)
Brief Overview
This article explains how to build a Conversation which can be assigned to one or more ActionBots.
Conversations are built without any coding and allow you to answer the end-user's question and/or collect information that later can be used to automate a process using a Smart Walk-Thru. Conversations can be used to complete common tasks, triage a support topic, navigate the end-user to a section of your application, or even provide a personalized search experience, all by using a simple chat interface.
To learn more about what the WalkMe ActionBot is, visit our article What Is the WalkMe ActionBot?
Want a quick video overview? Check out our Tip Tuesday:
Steps For Building a Conversation
Step 1: Sign into your WalkMe Editor account
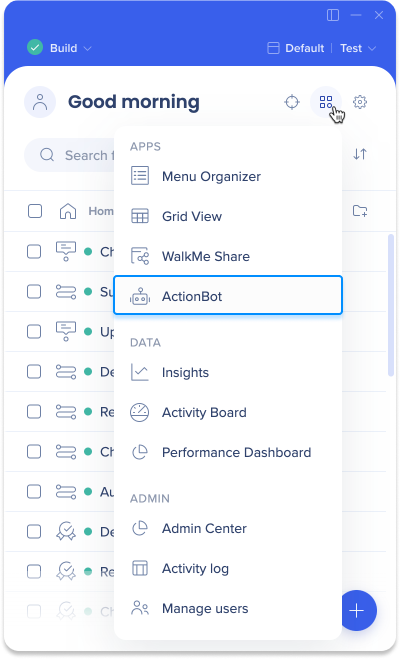
Step 2: Click the WalkMe apps icon and select the ActionBot app
Step 3: Add a new Conversation
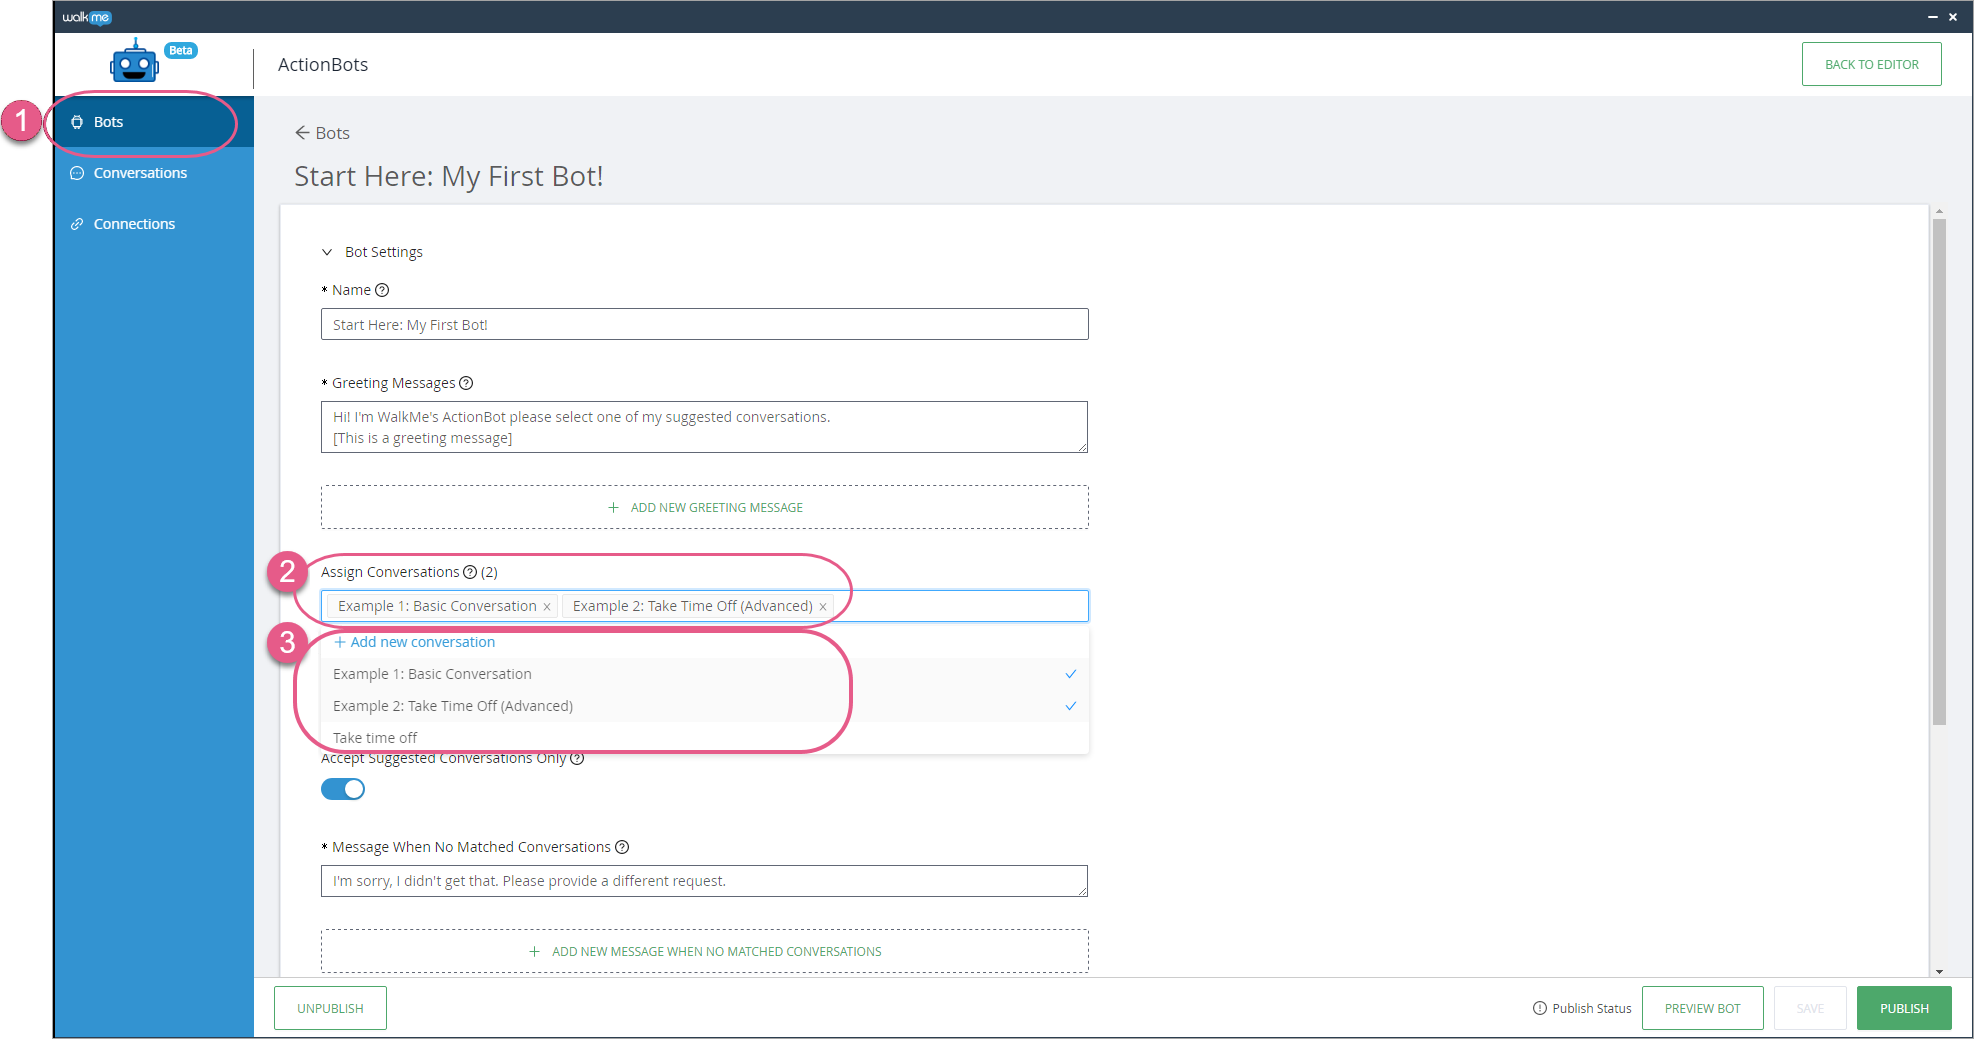
Recommended method, from within an already-existing Bot
- In the Bots tab, select an already-existing Bot;
- Click the Assign Conversations field to open a drowndown menu;
- Click + Add new conversation:
Alternative method, from scratch
- Click on Conversations in the left sidebar;
- Click + ADD NEW CONVERSATION in the upper-right corner:

Step 4: Configure the question settings
- On the New conversation page, fill in the following mandatory fields:
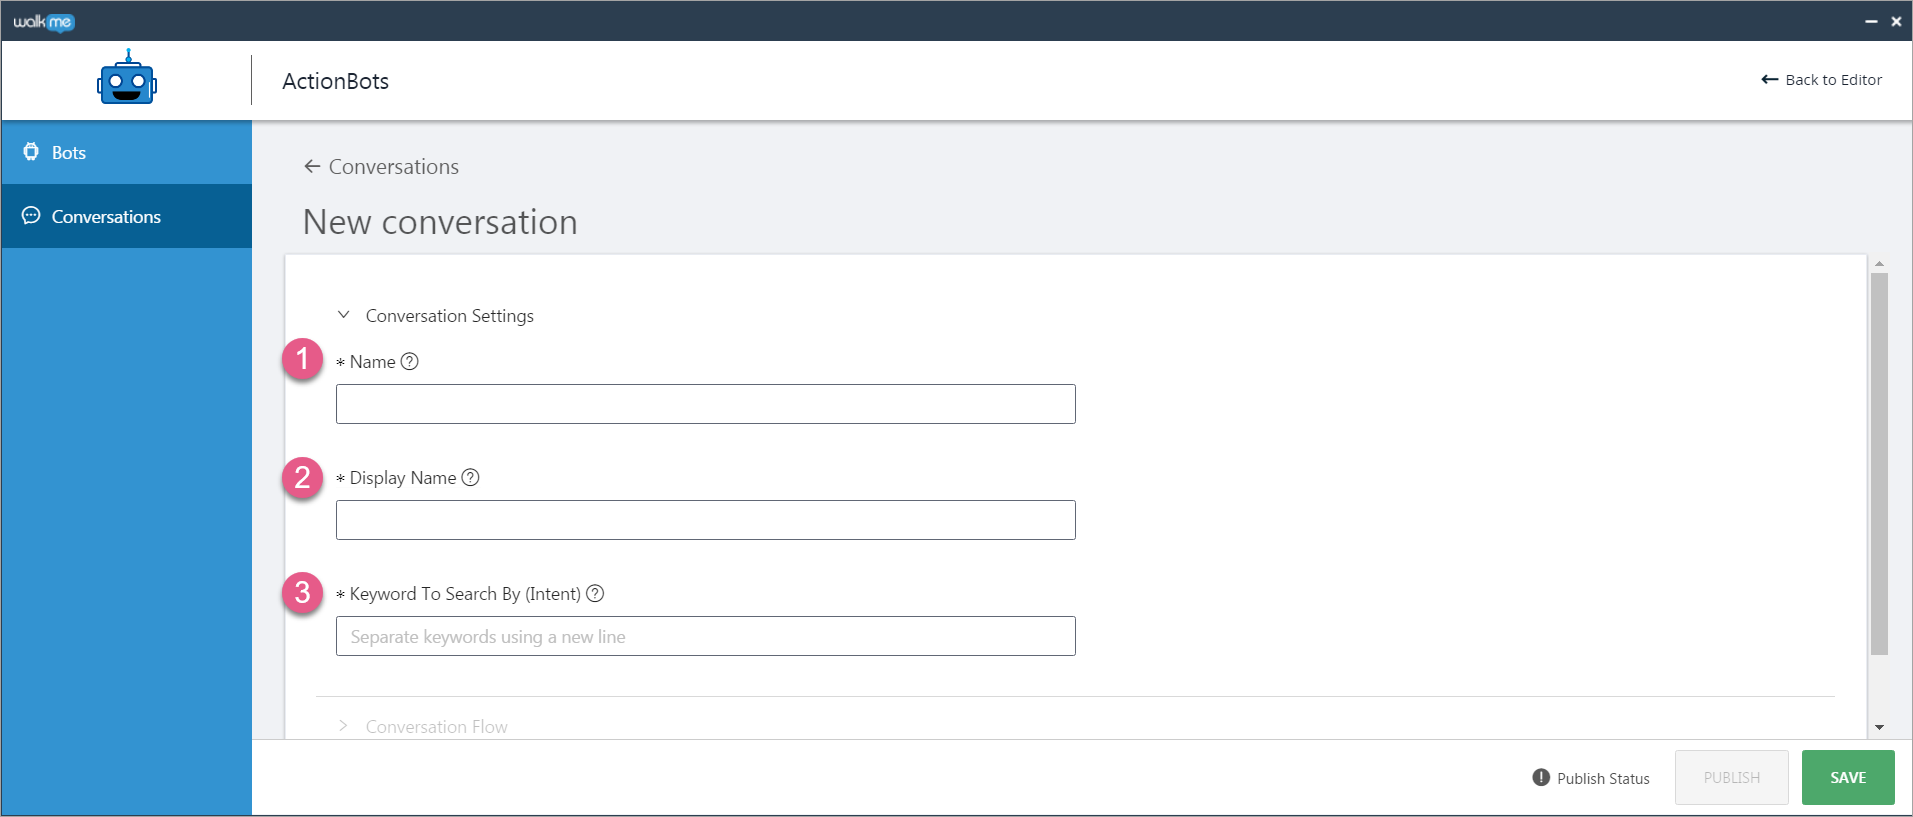
- Name:
- This is the private name (for identification purposes) that only you (and your fellow Conversation-builders) will see. The end-user will not see it.
- Display Name:
- This is the name your end-user will see if this Conversation is assigned to a Bot and appears in the chat dialogue box under the “Suggestions:” header text:
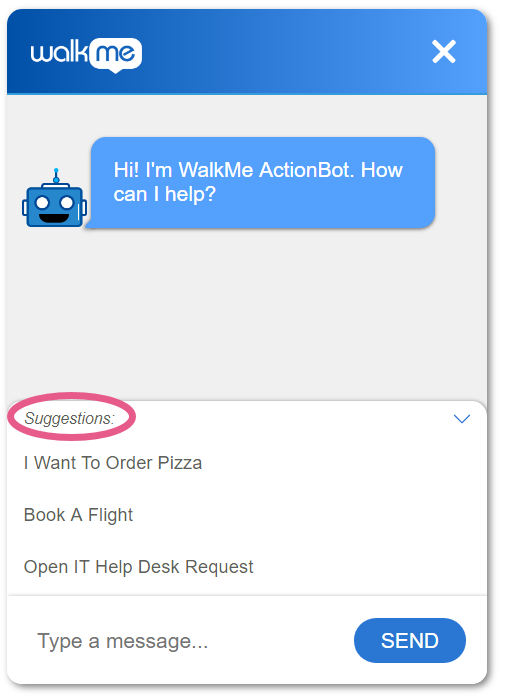
- This is the name your end-user will see if this Conversation is assigned to a Bot and appears in the chat dialogue box under the “Suggestions:” header text:
- Keyword To Search By (Intent):
- If the end-user types any of these keywords into the chat dialogue box of a Bot containing this Conversation, this Conversation will be triggered;
- Enter as many keywords as you want. Simply type one, hit Enter, type another, hit Enter, etc.;
- Pro-Tips:
- Keywords are not case sensitive;
- WalkMe recommends using analytics to see what end-users search for and updating your keywords accordingly.
- Name:
- Click SAVE.
Step 5: Create your Conversation's flow
Create your Conversation flow using one or more of the Conversation building blocks. You must use at least one building block type, but it can be any one. None is mandatory per se.
-
MESSAGE
- Messages consist of text you write that a Bot may present to the end-user in the course of the Conversation;
- Common uses of messages include providing end-users with useful links, explanations, and answers to questions.
-
QUESTION
- Questions consist of text you write that a Bot may present to the end-user in the form of a question in the course of the Conversation;
- The Bot will await the end user's response to the question before continuing to the next step (which may be dependent on the end user's answer);
- You must select a type for each question. the options include Text, Boolean, Number, Regex, Phone, Date, Choice, and Choice - Salesforce:
-
Text Type Questions
- No natural language processing (NLP) is used;
- The ActionBot will log the end user's entire input as the answer to the question and may re-use answers in follow-up questions.
-
Date Type Questions
- This question type uses NLP. This means the ActionBot can interpret numerous date responses, e.g., “Tomorrow,” “Next week,” “1.2,” and “1-9-1990”;
- You must select your preferred date format (DD/MM/YYYY or MM/DD/YYYY). This will determine the format used for the extracted answer;
- The ActionBot can also extract date-time responses;
- Advanced: You can configure the extracted date to a different format in a Smart Walk-Thru by using specialized values in the Smart Walk-Thru:
Current Format Requested Format Value to Use in the Smart Walk-Thru MM/DD/YYYY (12/03/2018) DD-MMM
(03-Dec)
${startDate@DD-MMM} MM/DD/YYYY (12/03/2018) Quarter
(4)
${startDate@Q} MM/DD/YYYY (12/03/2018) D/M/YY
(3/12/18)
${startDate@D/M/YY} -
-
Boolean Type Questions
- This question type uses NLP. The ActionBot will extract a positive or negative intent from the end-user and assign a true or false value as the extracted answer;
- E.g., “Sure” would be extracted as true, and “Nope” would be extracted as false.
- Boolean type questions are great for condition questions, as they're easy to branch based on the value extracted.
- This question type uses NLP. The ActionBot will extract a positive or negative intent from the end-user and assign a true or false value as the extracted answer;
-
Number Type Questions
- This question type uses NLP. E.g., an end-user input of “five hundred dollars” will be extracted as 500.
-
Choice Type Questions
- This question type doesn't use NLP, but it uses a keyword search.
- It will validate that only a value set in the Suggestions section can be selected by the end-user;
- Additionally, you can assign keywords to each suggestion so that those keywords will select the suggestion as well.
- This question type doesn't use NLP, but it uses a keyword search.
-
Phone Type Questions
- This question type uses NLP to extract any end-user input that could match a phone-number (using NLP models).
-
Regex Type Questions
- This question type doesn't use NLP.
You can configure any question-type you could by using RegEx; - Insert the RegEx expression into the Pattern field;
- You may also insert RegEx flags using any combination of the following:
- g: Global match; find all matches rather than stopping after the first match;
- i: Ignore case; if the u flag is also enabled, use Unicode case folding;
- m: Multiline; treat beginning and end characters (^ and $) as working over multiple lines (i.e., match the beginning or end of each line, delimited by n or r, not only the very beginning or end of the whole input string);
- u: Unicode; treat patterns as sequences of Unicode code points;
- y: Sticky; matches only from the index indicated by the lastIndex property of this regular expression in the target string (and does not attempt to match from any later indexes).
- Example:
- Use Case: Build a question that validates that the end-user's input is a valid email;
- Solution: Using a Regex type question will allow you to validate that the input matches an email pattern;
- Regex Value: ^(([^<>()[].,;:s@"]+(.[^<>()[].,;:s@"]+)*)|(".+"))@(([[0-9]{1,3}.[0-9]{1,3}.[0-9]{1,3}.[0-9]{1,3}])|(([a-zA-Z-0-9]+.)+[a-zA-Z]{2,}))$
- This question type doesn't use NLP.
-
Choice - Salesforce Type Questions
- This question-type pulls information from the destination system using APIs;
- This question type has many facets, and therefore has its own article.
- Read the ActionBot Connections — Choice - Salesforce Type Question to learn more!
-
Once the question is saved, you can add the question's validations. Click the Validation button from within the question:
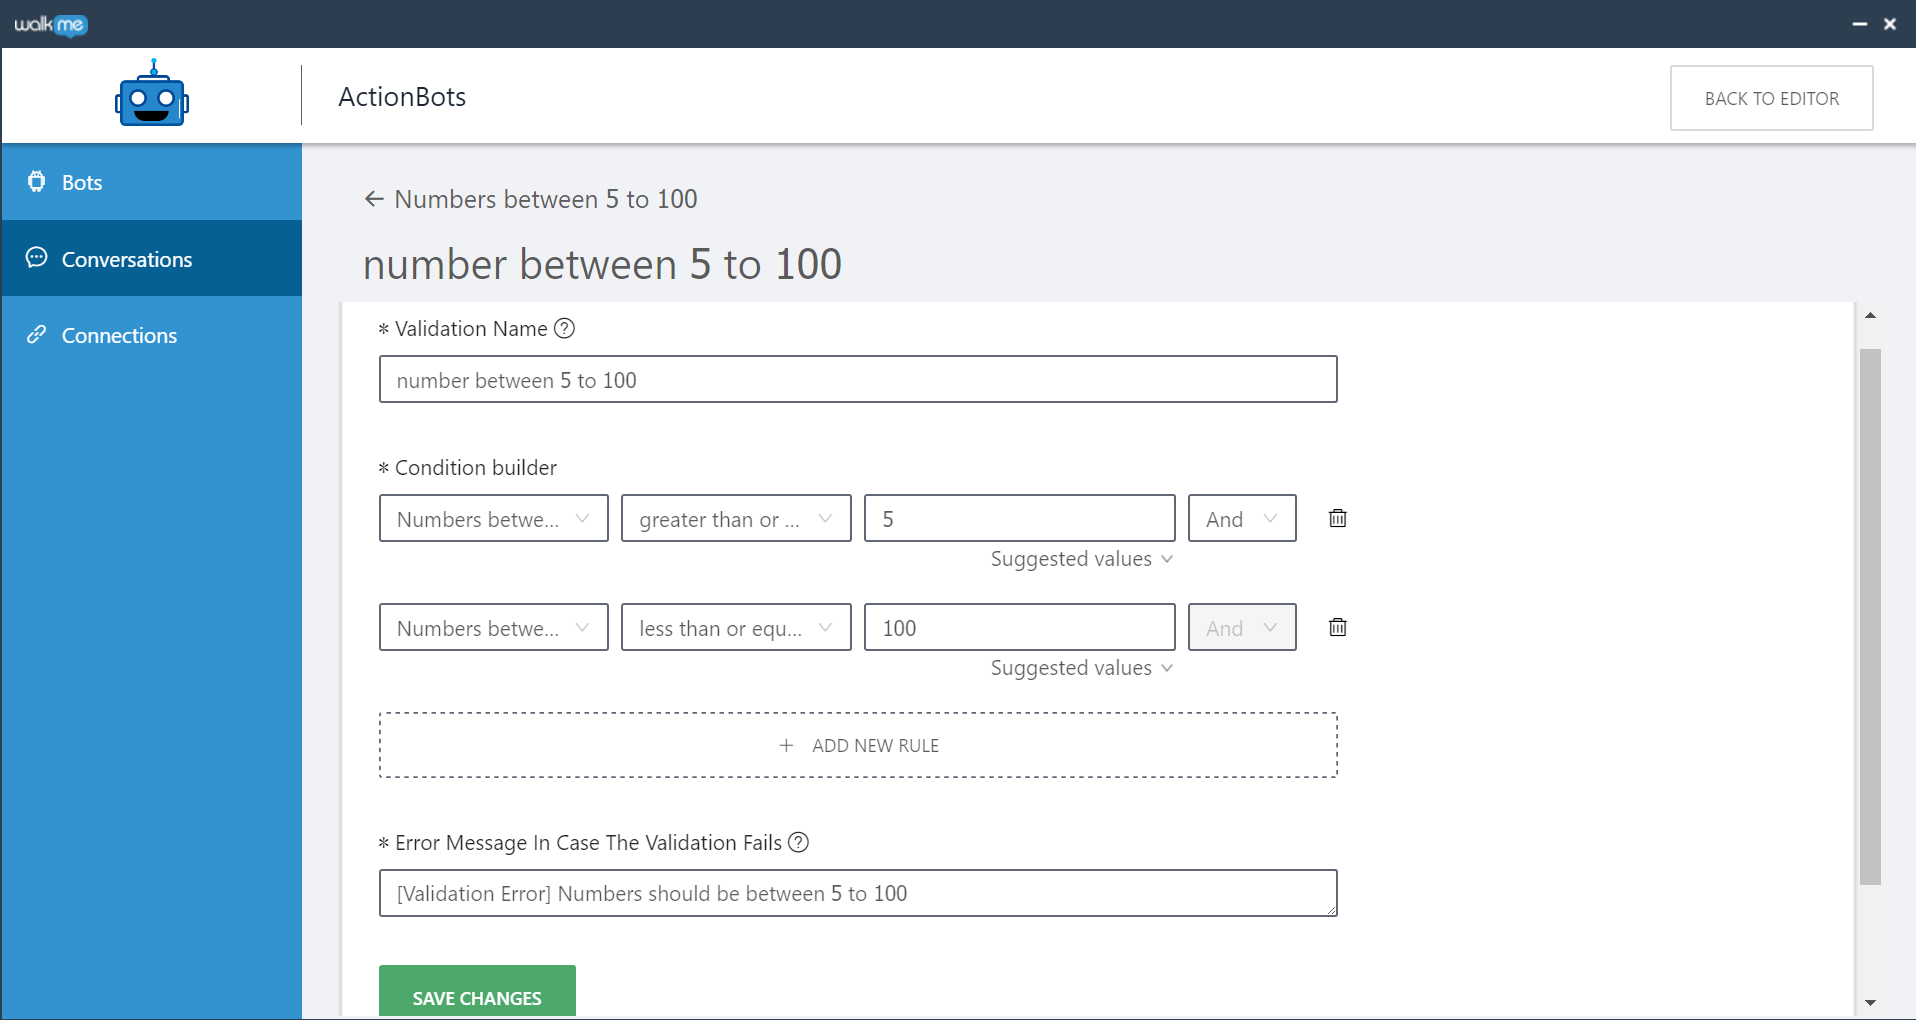
- Condition builder -
- Build the condition the extracted answer should check.
- The structure of the validation is:
- Choose from the list of questions the current specific question name
- Choose the logical condition (like equals to / greater than... )
- Enter the value it should be validate against
- You can add as many conditions as you see fit
- Error Message In Case The Validation Fails - If the validation didn't meet the conditions, this error message will be presented as error message to the user.
- It is recommended to use a meaningful error message so that the error message would help your end-users to correct their answer or better understand what is the expected answer.
-
CONDITION
- Conditions are used to branch the Conversation according to an end user's answers to questions.
-
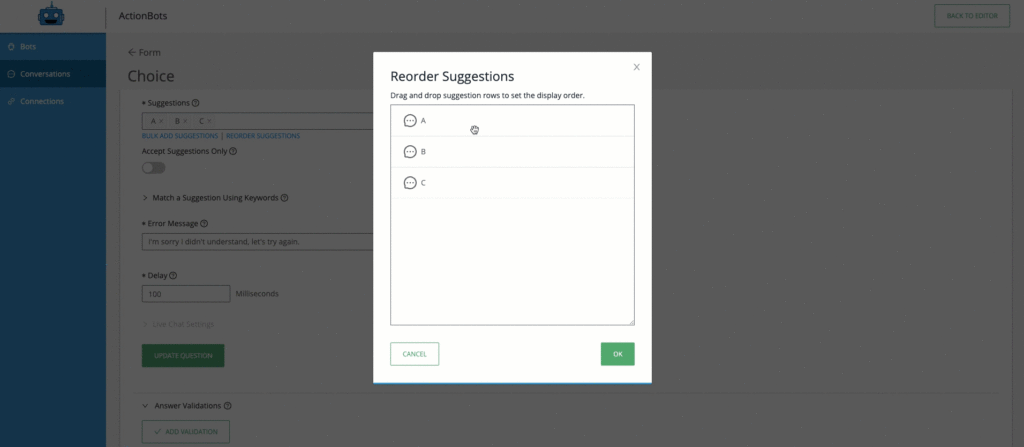
Reorder Suggestions/Keywords
- Users can control the order in which Suggestions and Keywords appear in the Bot and within specific Conversations with the 'Reorder Suggestions/Keywords' drag and drop modal.
- Click the 'Reorder Suggestions/Keywords' link to open the Reorder Suggestions drag and drop modal.
- Reordering the Suggestions/Keywords is the order in which the end-user will see the displayed Suggestions.
- Note: Reordering WalkMe Menu items at the Bots level is not supported.
- Users can control the order in which Suggestions and Keywords appear in the Bot and within specific Conversations with the 'Reorder Suggestions/Keywords' drag and drop modal.
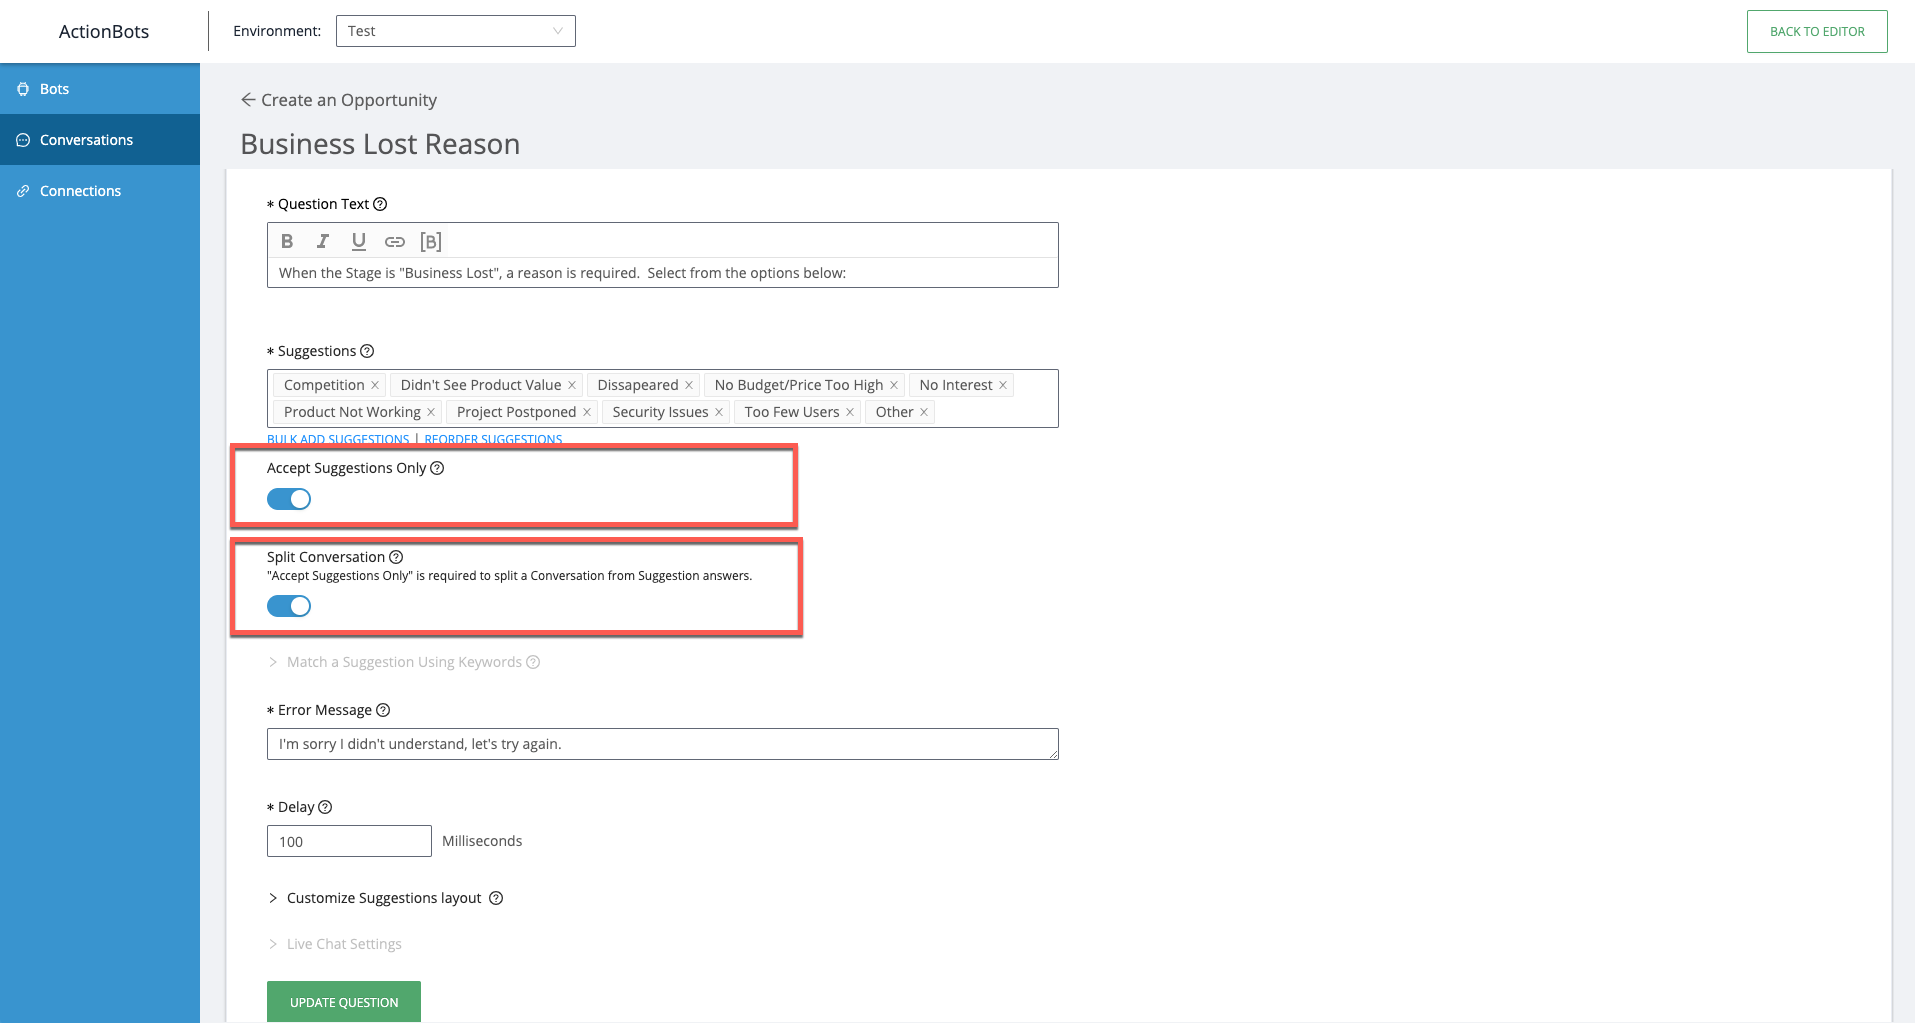
- Accept Suggestions Only - If you prefer your end-user to avoid making mistakes or input answers you can't expect, you can disable the users' ability to write to the bot and force them to choose one of the suggested conversations by enabling this.
- Make sure you have at least one suggestion set up to answer the bot's question.
-
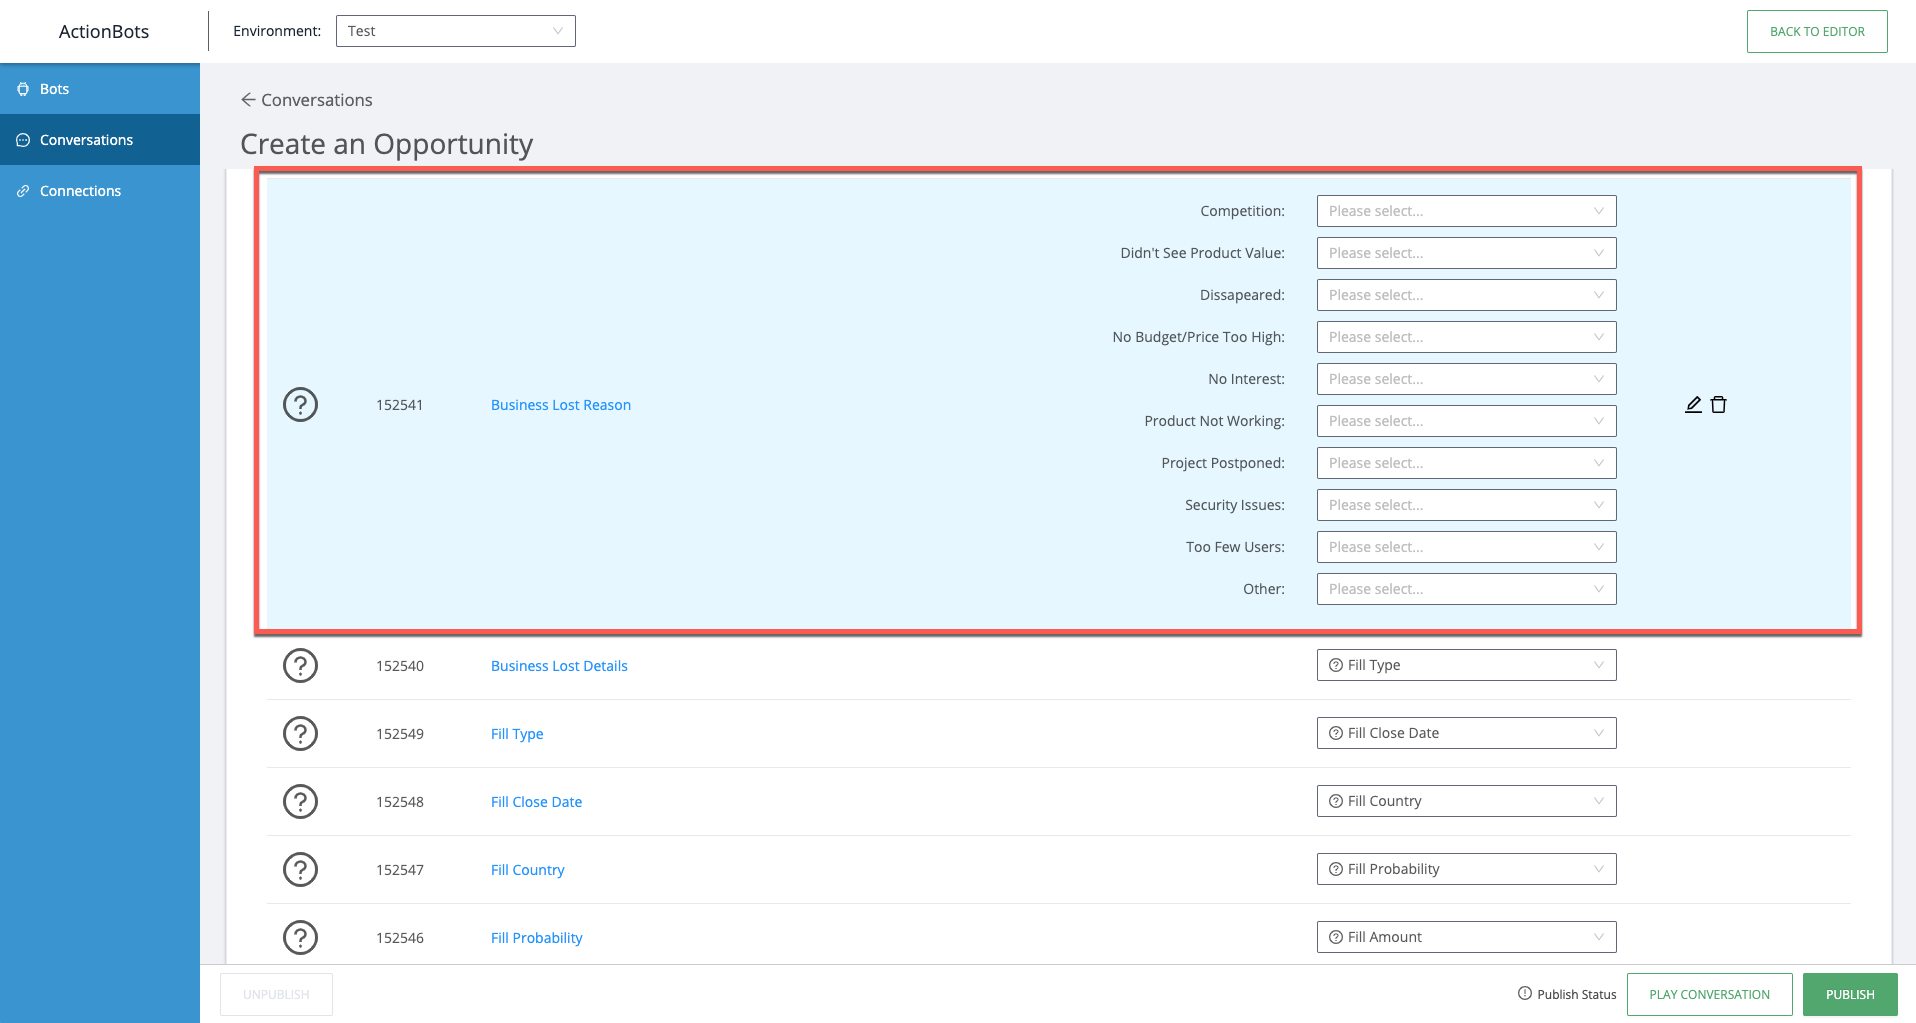
- Split Conversation - Toggle Accept Suggestion Only on, and toggle Split Conversation on to assign each Choice suggestion answer to a new dialog branch/action within your Bot Conversation from the Conversation list view.
- Error Message - This message will only appear when the bot tried to extract an answer from the user according to the the selected question type but wasn't able to.
- It is recommended to use meaningful error messages that would help your end-users to correct their answer or better understand what is the expected answer.
- Example: When choosing question type= number , the bot will try to extract a number form the end-user's answer.
- If the end user will answer "I go to the park to play" - the bot will not be able to extract a number from this answer and present the error message. If the end-user would write "there are three hundred sixty five days in a year" it will extract 365 as the end- user's answer and will not show the error message.
- Delay - The bot will appear to be typing for this amount of time, after which the bot will respond, i.e. display the question's text itself.
-
Customize Suggestions Layout
- You can adjust and customize how each list of suggested answers should appear, pre-question, to end-users. Builders can choose between:
- Classic ActionBot layout supports:
- Single Column - a single left-aligned column reading top to bottom
- Two Columns - reading left to right top to bottom
- Three Columns - reading left to right top to bottom
- Four Columns - reading left to right top to bottom
- Modern ActionBot layout supports:
- Single Column - a single center-aligned column reading top to bottom
- Two Columns - reading left to right top to bottom
- Three Columns - reading left to right top to bottom
- Four Columns - reading left to right top to bottom
- Classic ActionBot layout supports:
- You can adjust and customize how each list of suggested answers should appear, pre-question, to end-users. Builders can choose between:
-
Conversation Segmentation + Split by Segment
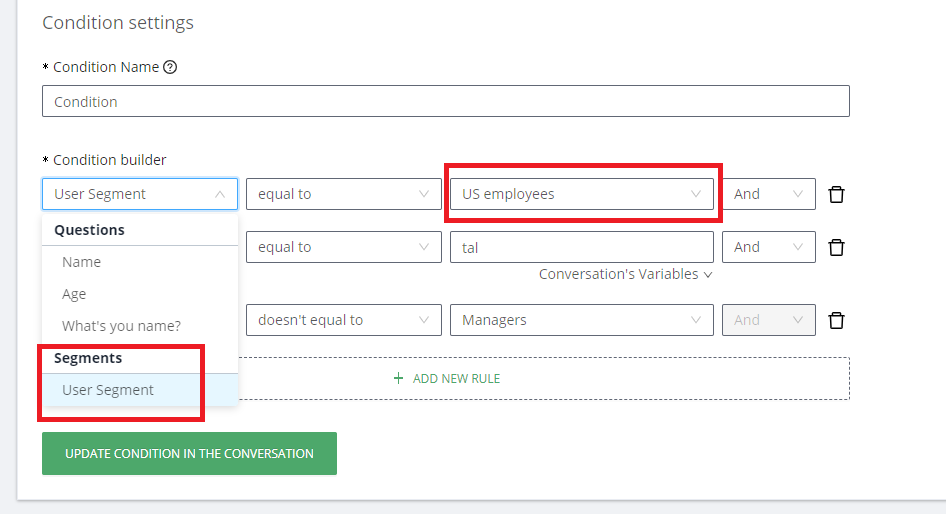
- You can segment an ActionBot conversation for specific users or groups using existing Segments from the Editor.
- First, create a Segment with the desired condition in the Editor (Segments Management)
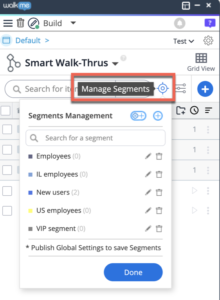
- Create a conversation → open settings → assign the relevant tags to the conversation

- Define a condition with segment rule:
- Split Conversation - Toggle Accept Suggestion Only on, and toggle Split Conversation on to assign each Choice suggestion answer to a new dialog branch/action within your Bot Conversation from the Conversation list view.
-
ACTION
- Actions enable you to trigger a WalkMe app or make a connection call during the course of the Conversation. Learn more about available Action Types.
-
Selected WalkMe Items:
- You can configure specific WalkMe items (of type Smart Walk-Thrus, Surveys, ShoutOuts, Shuttles, Resources, Live Chat, Open Menu or Connections) to be triggered during particular Conversations;
- See examples using Smart Walk-Thrus and Connections below; the other Action types are the same, except for Open Menu, which just requires selecting the Action type.
-
Smart Walk-Thrus
- The Smart Walk-Thru can be used to automate or guide the end-user through a process, redirect the end-user to a different location, or trigger an alternative resource for the end-user.
- Connect a Conversation to a Smart Walk-Thru as follows:
- Select a Smart Walk-Thru from the dropdown menu:
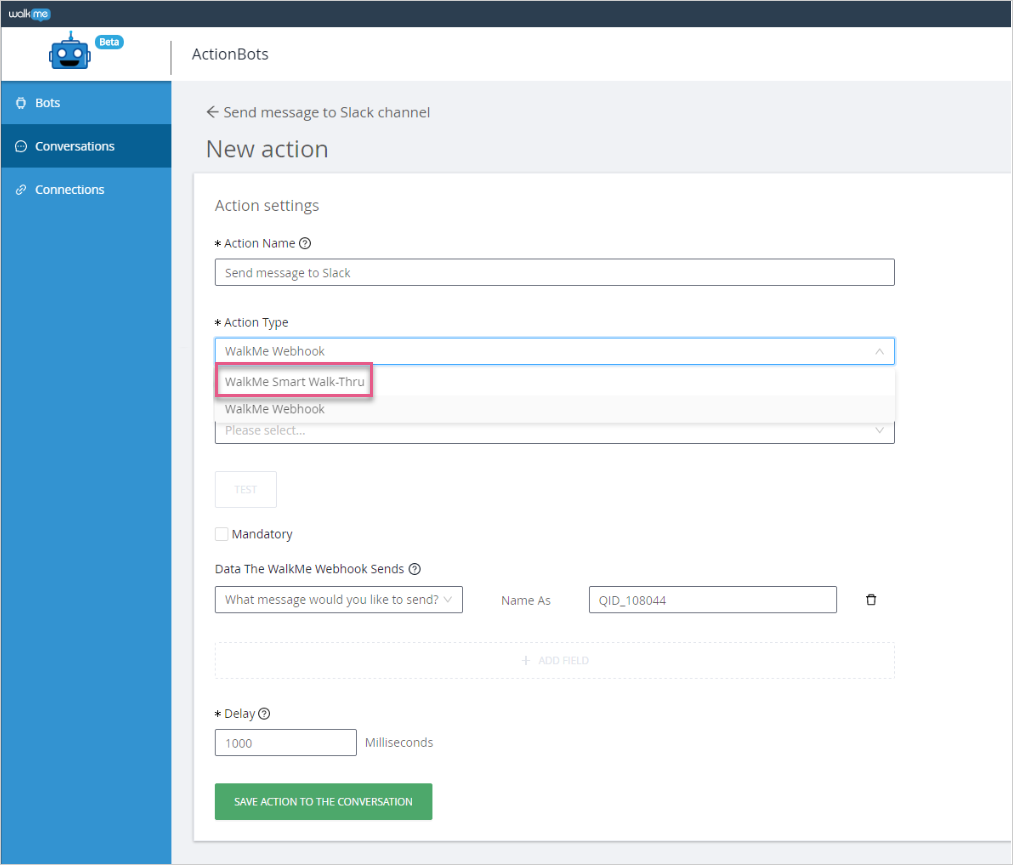
- Click the + ADD FIELD button;
- Select a question from the Data The Smart Walk-Thru Requires dropdown menu:
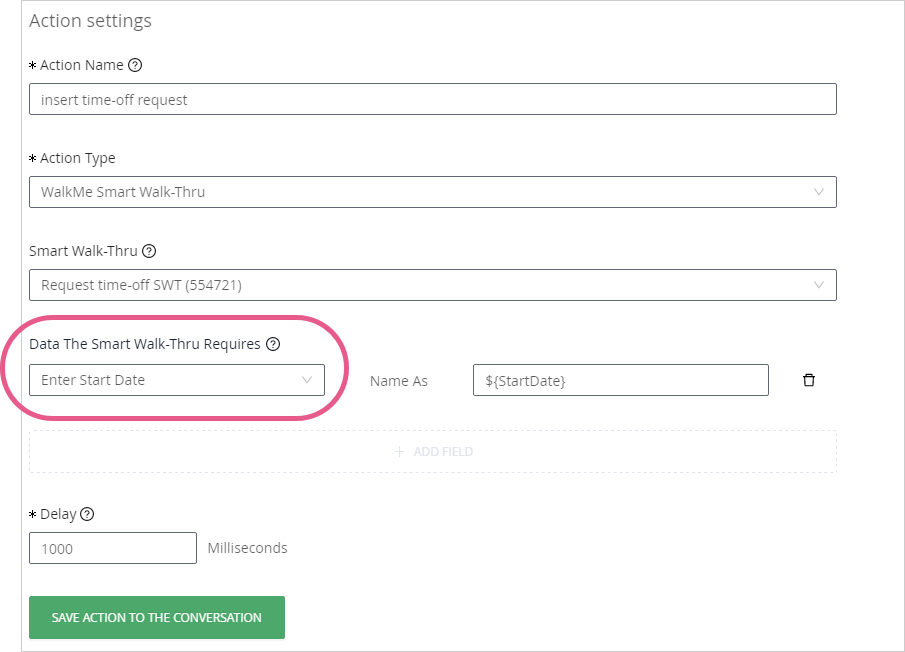
- Create a variable name in the Name As field to the right of each question you select. Start each variable name with “${“ and end each variable name with “}”;
- The final result should look like this: “${nameOfVariable},” with no spaces
- Use these variable names and format in the Smart Walk-Thru to which you want to connect this Conversation
- Select a Smart Walk-Thru from the dropdown menu:
-
-
-
-
-
Connections
- You can also configure specific connections to activate during the course of particular conversations. So besides the Smart Walk-Thru 'attended' automation you are now able to use 'unattended' automation via an API to save the user's time and perform actions immediately in the background;
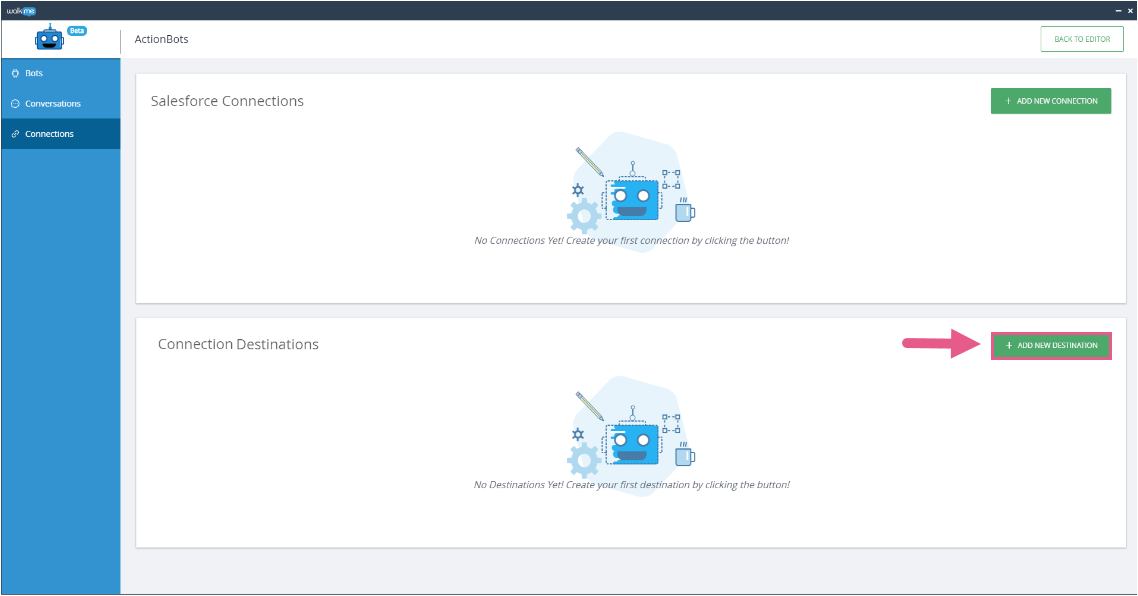
- Move to the Connections tab;
- Click ADD NEW DESTINATION:
- Fill details according to your desired connection destination:
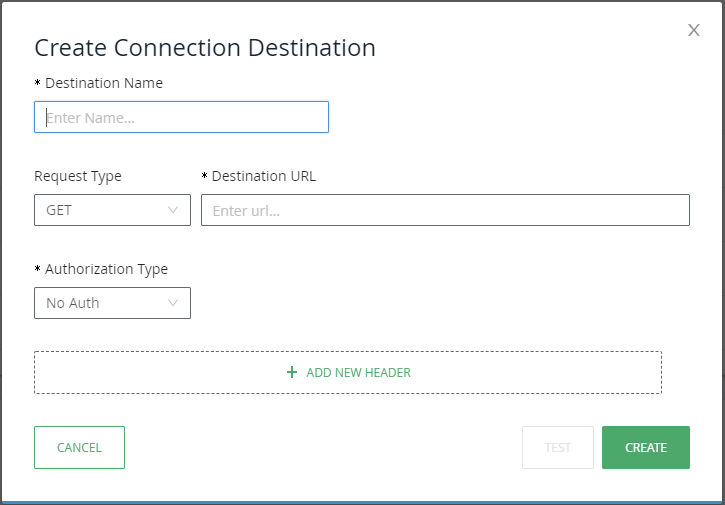
- You have the ability to TEST your Connection destination before you create it;
- Click CREATE
- Your new Connection destination should appear:

- Your new Connection destination should appear:
- Connect a conversation to a Connection destination as follows:
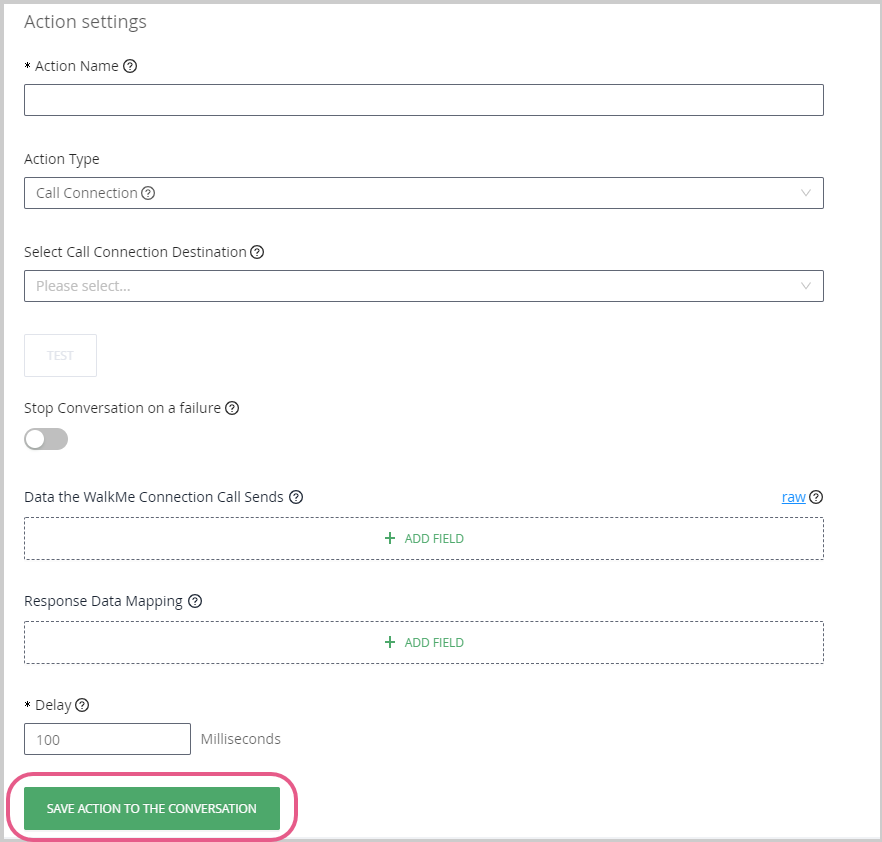
- Select action type Call Connection from drop-down:
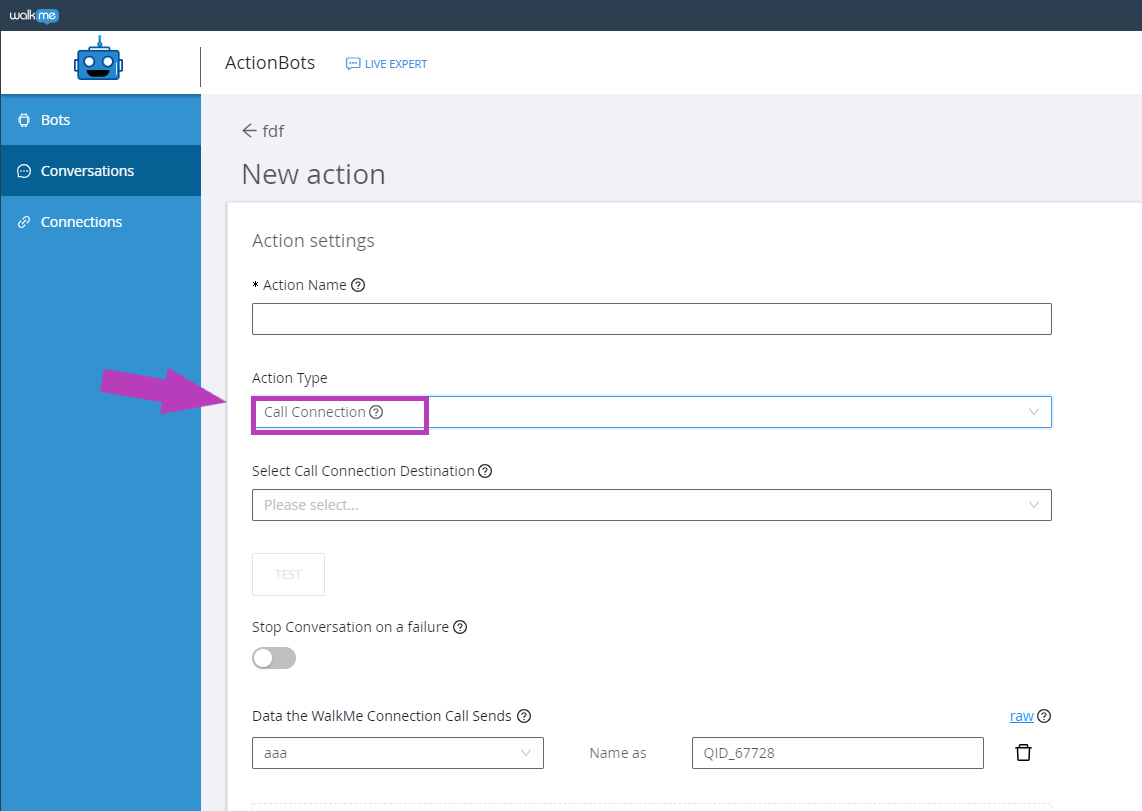
- Select your existing Connection destination;
- Important to make sure that all necessary properties have been added (the NameAs property should be automatically filled, make sure it is the same as your destination platform).
- Data the WalkMe Connection Call Sends- The data you select will be sent to the Destination that was chosen under Action Type. If needed, rename the parameters to fit the destination system names.
- Response Data Mapping- Define how to extract data from the JSON file received by the API and assign it to new variables. The variables will be saved and could be used later in the Conversation. It is important that the proper path is defined so that the correct data will be extracted and assigned to the variable.
- Click SAVE ACTION TO THE CONVERSATION:
- Select action type Call Connection from drop-down:
- You can also configure specific connections to activate during the course of particular conversations. So besides the Smart Walk-Thru 'attended' automation you are now able to use 'unattended' automation via an API to save the user's time and perform actions immediately in the background;
-
-
-
-
-
Mentions
- You can use mentions (using the "@" symbol), or the value pulled from user responses, in both Questions and Messages. See the following example:
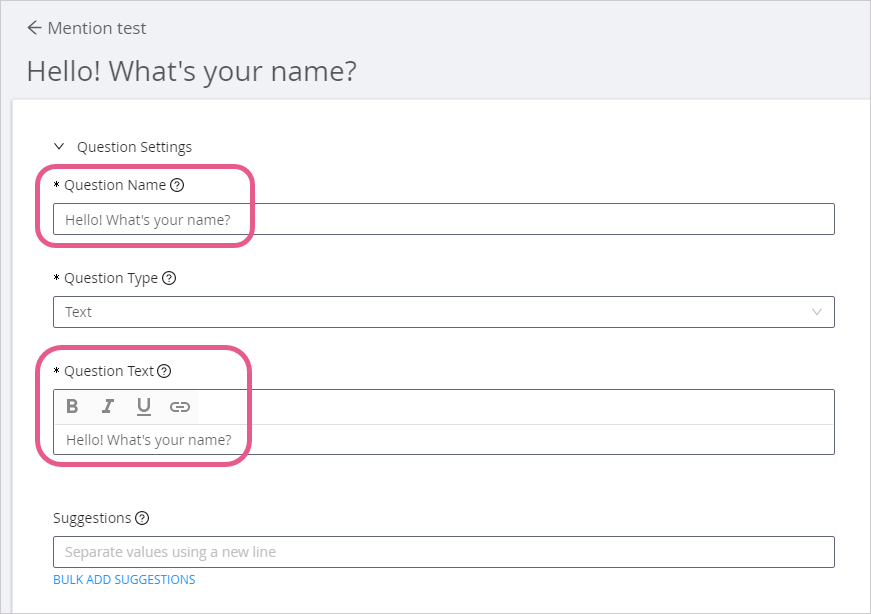
- Add a new question, e.g., "Hello! What's your name?":
- Add a new Message within the Message Text field and mention (using the "@" symbol) the previously created question at the point you want the end user's answer to appear in the message:
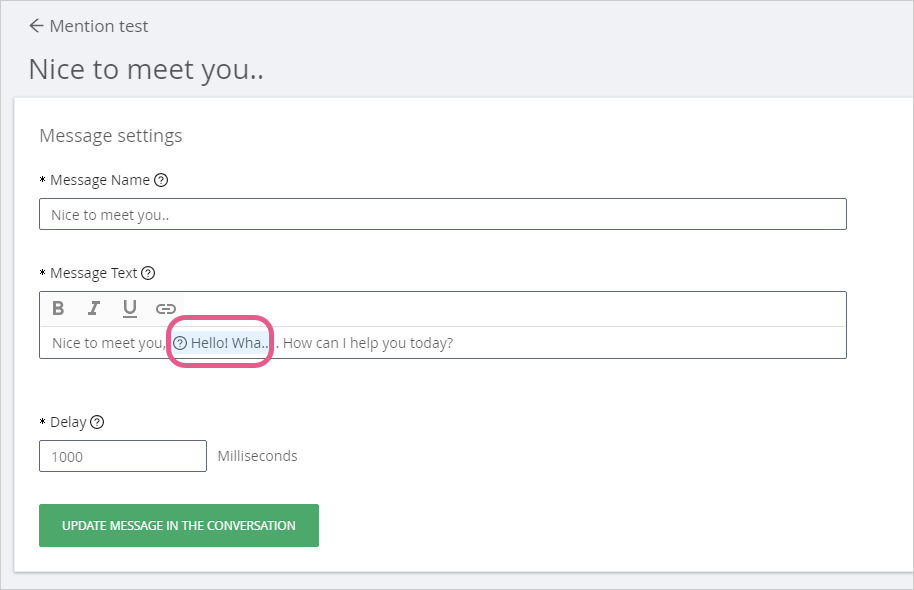
In this case, the value of the end user's name will be pulled from his response to the question and inserted at this point in the Bot's response.
- To mention a question, just type "@" and you will be presented with a dropdown list containing all of the available options:

- To mention a question, just type "@" and you will be presented with a dropdown list containing all of the available options:
- Add a new question, e.g., "Hello! What's your name?":
- You can use mentions (using the "@" symbol), or the value pulled from user responses, in both Questions and Messages. See the following example:
How to remove a suggestion that is connected to a split conversation
If you try to remove a suggestion when the conversation has a split. You may see this error after you save:
"The suggestion is bound to a Conversation Next Step and cannot be modified. Please add it back to the Suggestions."
This normally occurs when you use a suggestions and the "use suggestions only" on a split conversation and then connect the suggestion to a question.
If you want to remove the suggestion:
- Leave the question page and return to the main Conversation flow.
- Go to the question that you connected the suggestion to.
- Click the small X on the suggestion within the conversation flow.
- You can now remove the suggestion from the original question.

Step 6: Connect your Conversation blocks together
- Review the conversation you've built and determine what would be the conversation's next steps and end points.
- In the conversation flow for each of the conversation items set what would be its "Next Step".
- There are 2 ways to end your Conversation:
- Assign the Action as the next step. When the action start, it ends the Conversation and triggers the Smart Walk-Thru.
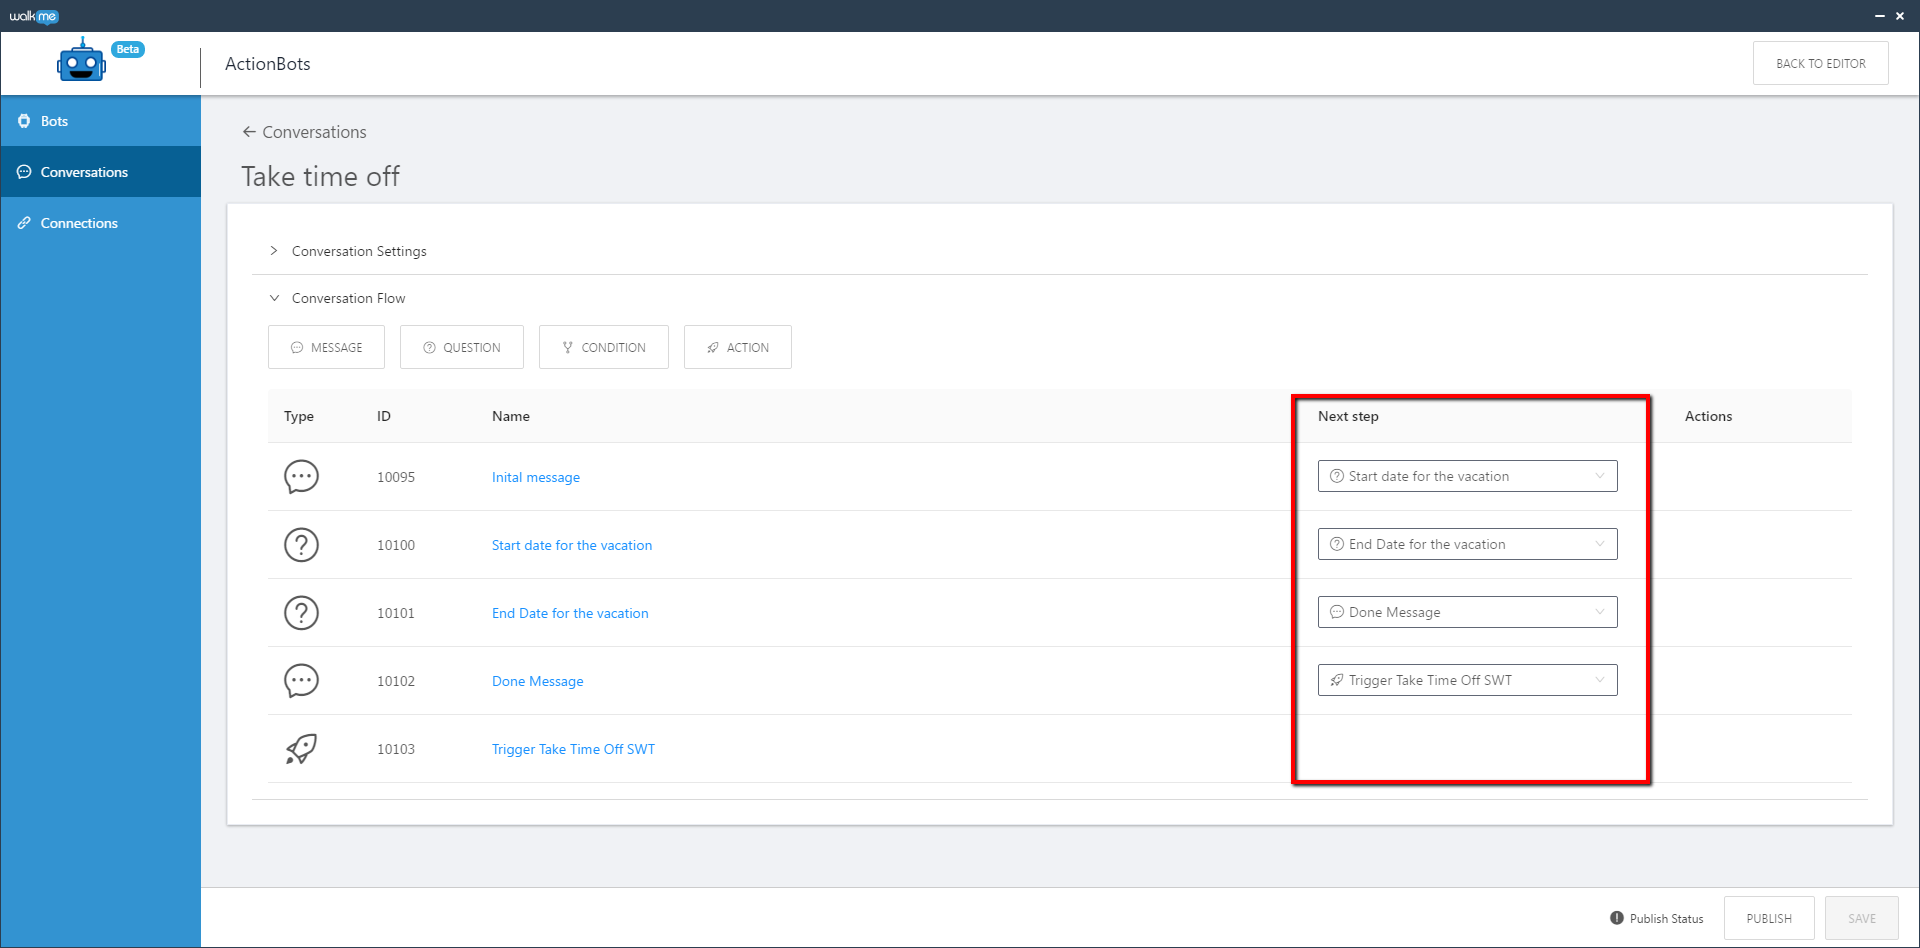
- If you want to end the conversation without triggering an Action, assign it the "End conversation" option.
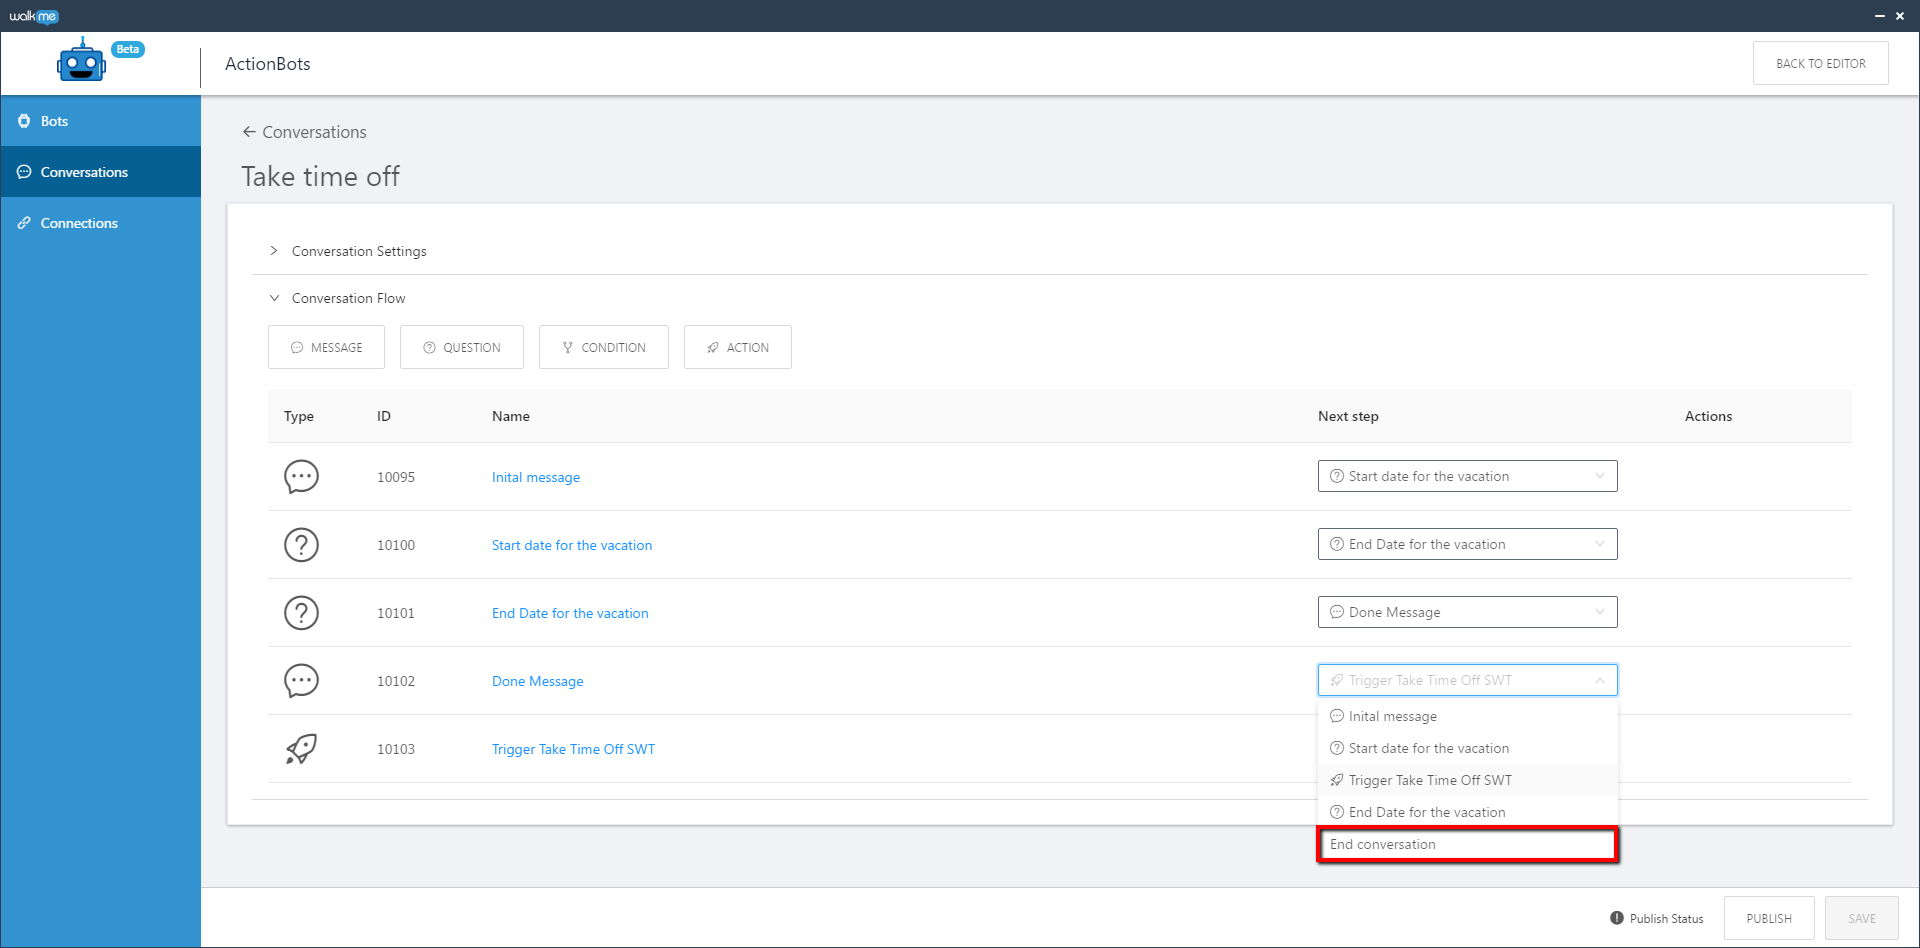
- Assign the Action as the next step. When the action start, it ends the Conversation and triggers the Smart Walk-Thru.
- Connect your Conversation blocks together by clicking the dropdown menu under Next step for each Conversation Flow item you have added and selecting what will occur after the current step plays.
- If you've only added one item, select End conversation for that item.
-
Clone
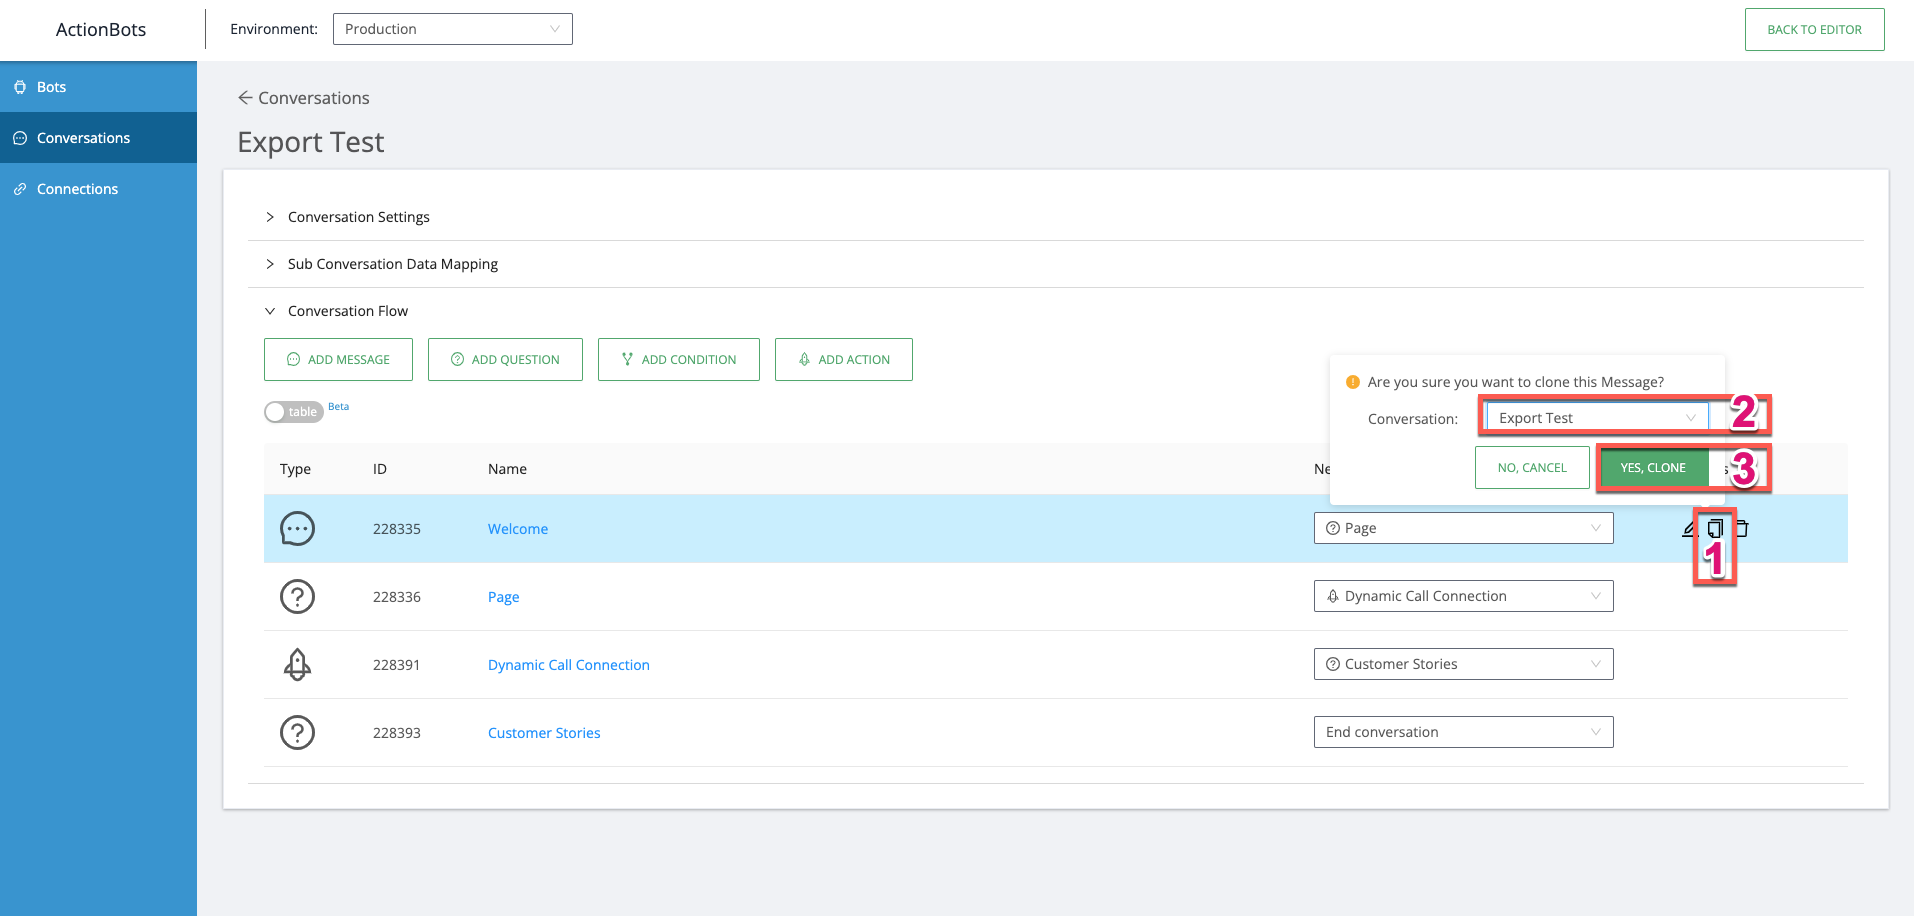
- You can now clone a Conversation message, question, condition, or action and assign the clone to a different Conversation.
- To clone a Conversation element and assign it to a different Conversation:
- Click the "Clone Element" button
- From the Conversations dropdown list, select the Conversation to assign and the cloned element too.
- Click, Yes, Clone.
Step 7: Publish your Conversation
- Once you have added everything you want to your Conversation, click PUBLISH.
- The PUBLISH button validates that the end user's experience won't be missing any crucial pieces (i.e., that all mandatory fields are filled, at least one Conversation flow item has been added, and all Next step lists items have been selected);
- Once you click PUBLISH, a popup will appear in which you can see the current status of the Conversation, select the environment to which to publish the Conversation, and publish or un-publish the Conversation as desired:
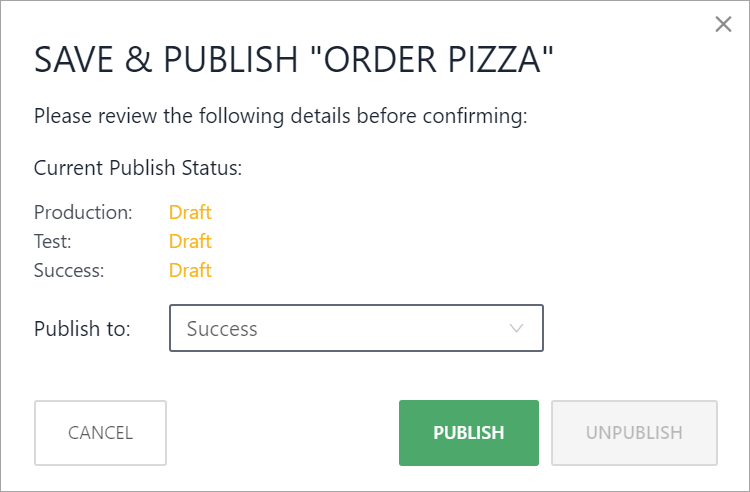
- Click PUBLISH in the popup window.
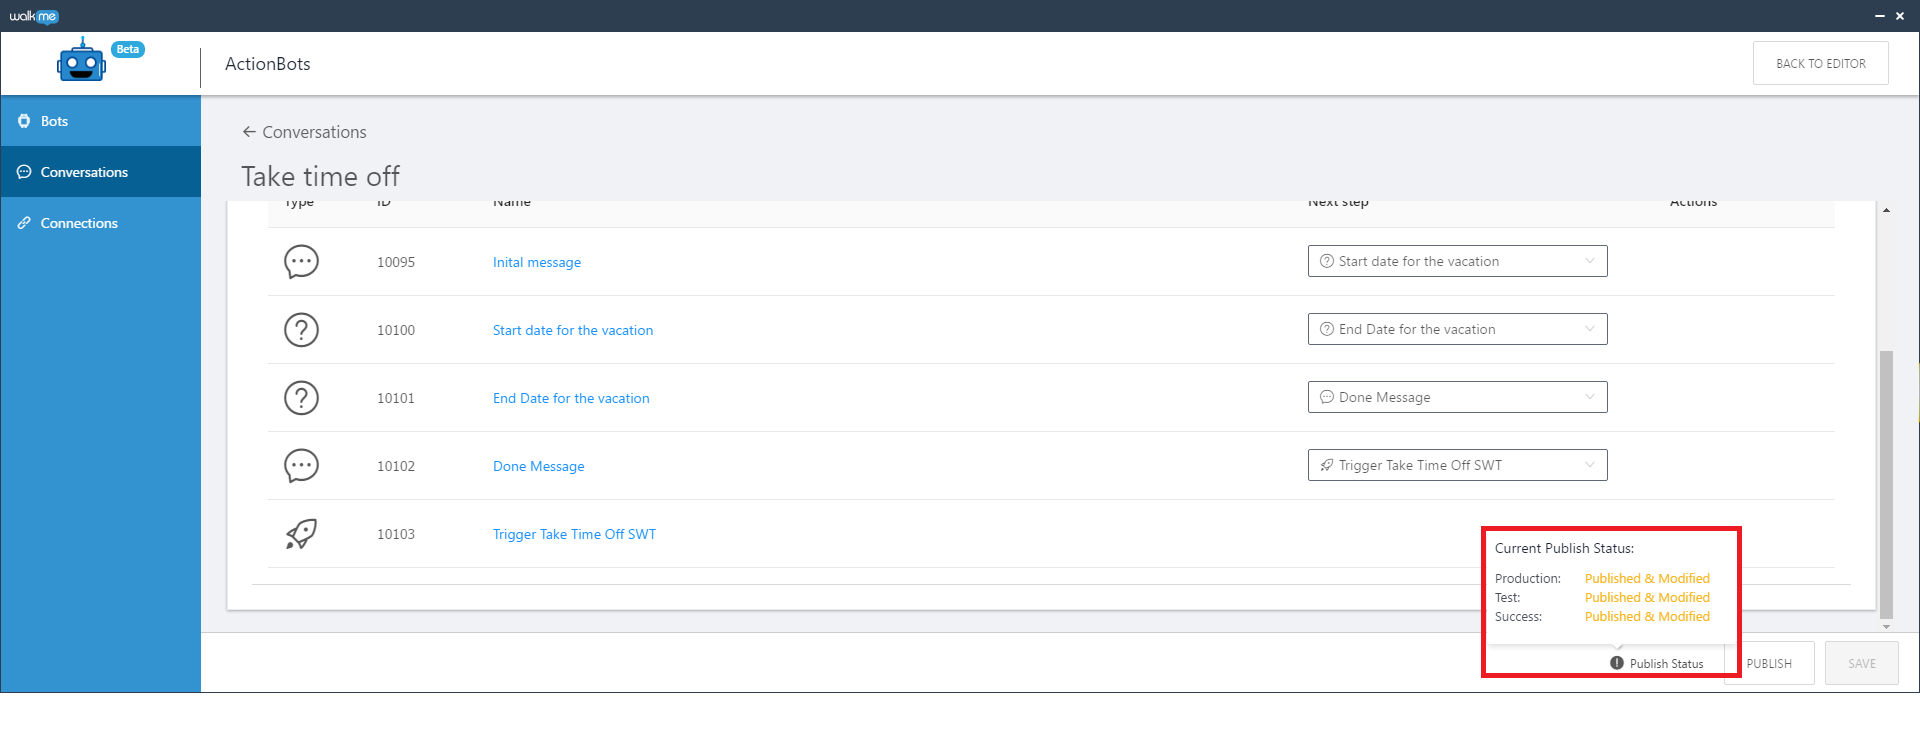
- You can hover-over the Publishing status to view publish status environment:
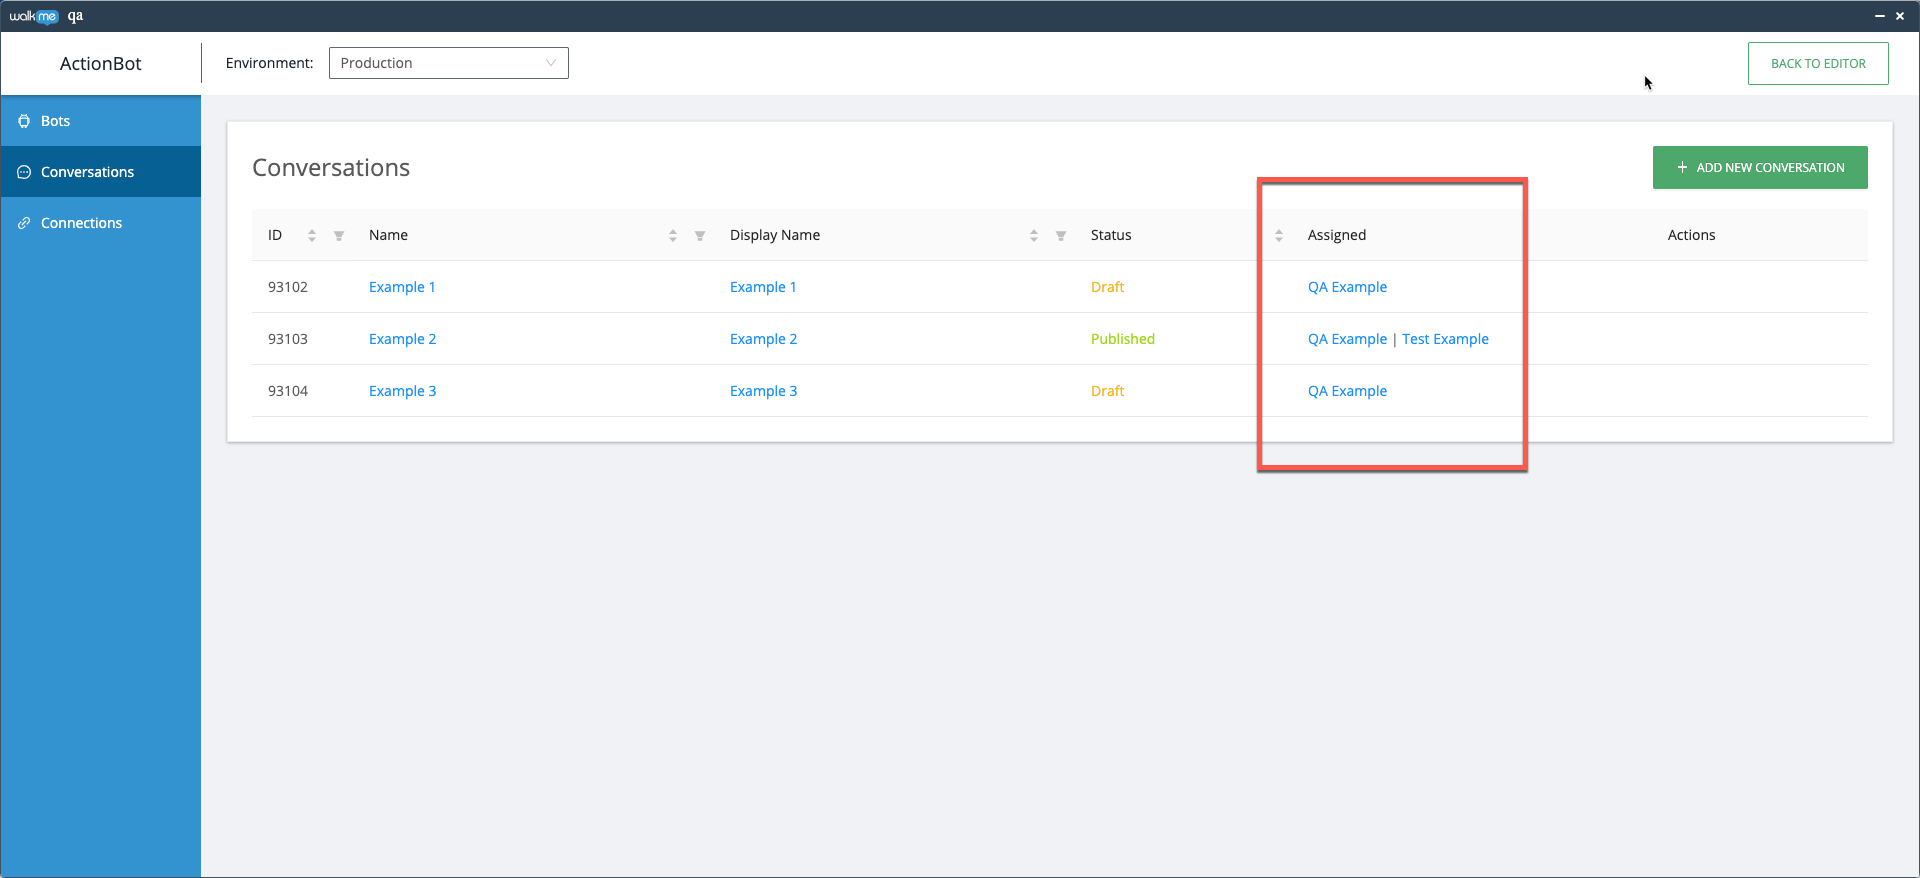
- You will be able to see all Conversation information listed:
- ID
- Name
- Display name
- Publish status
- Bot assigned to
- Action
Export Conversation List (Optional)
Users can export a Conversation, per System, and all associated Keywords within a given Conversation.
- Click the Export icon
- . CSV file will be saved to the user's computer.
CSV report includes:
- Conversation creation date
- Conversation name
- Conversation display name
- Conversation Keywords

For Workstation ActionBot
Creating a conversation for your ActionBot in Workstation follows the same process as listed in this article, but with a few limitations.
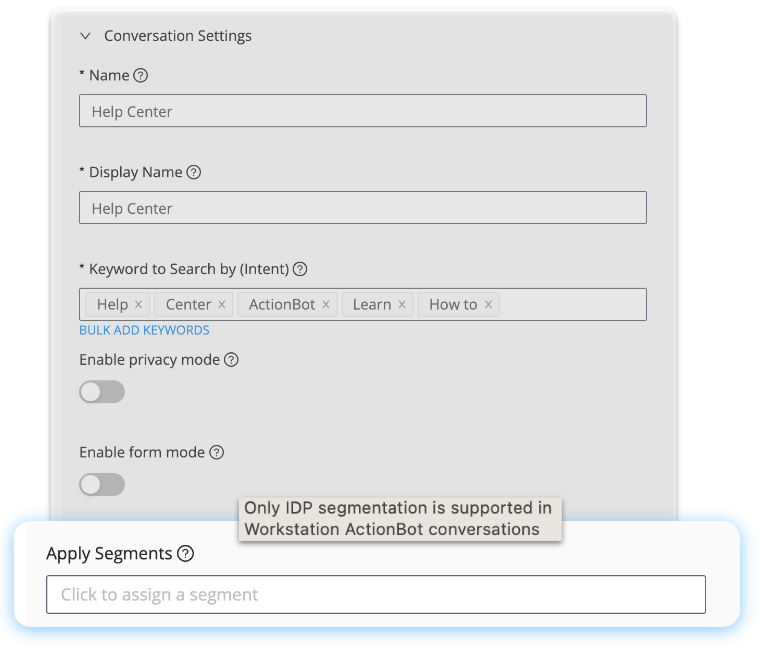
- Only IDP segmentation is supported in Workstation ActionBot conversations
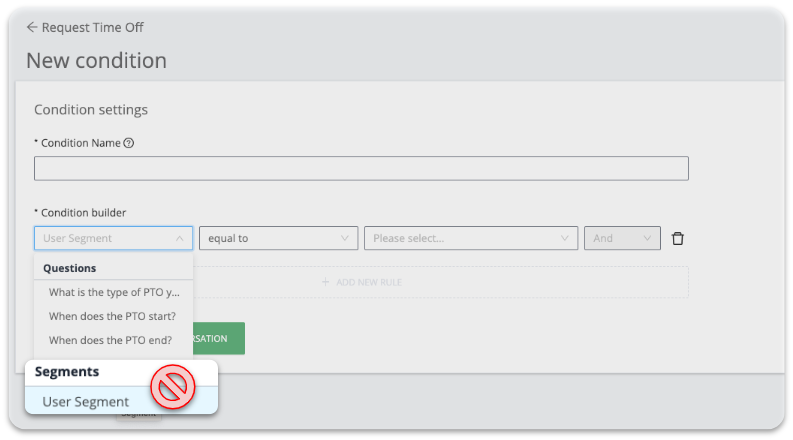
- Conversation conditions can't be split by segment in Workstation ActionBot
When adding a segment to ActionBot conversation you will see this tooltip: Only IDP segmentation is supported in Workstation ActionBot conversations.
In the Conversation Condition Builder, Workstation ActionBot conversations can't be split based on user segments.
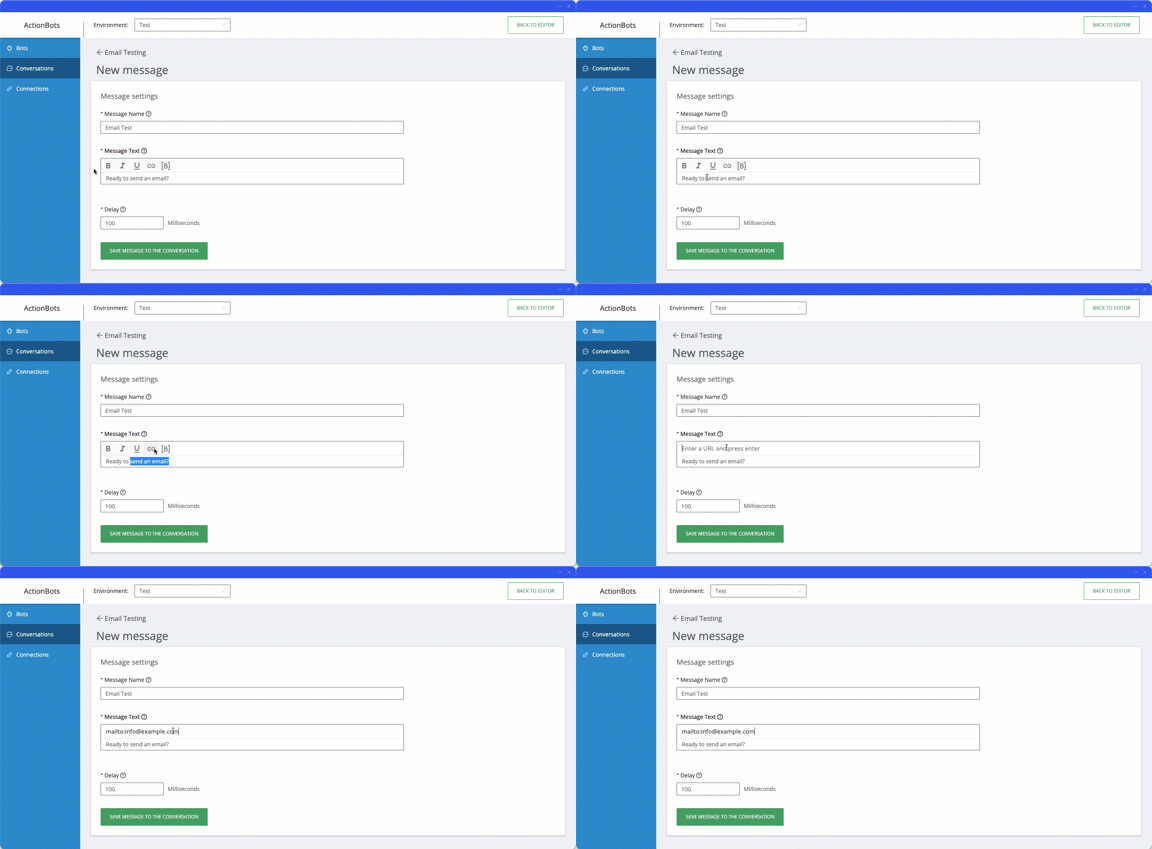
Open an email with ActionBot
When creating a new message in a conversation, you can have ActionBot send an email with a specific email you provide using malito syntax.
Users can click on a link in the bot message text that will lead them to create a new email.
Follow the steps below to create an email link in a message:
- Create a new message
- In the Message Text, highlight the text you would like the link the email to
- Click the link icon
- insert the following syntax in the URL field - mailto:info@example.com
- Click save
