Brief Overview
This article explains how to create surveys in the WalkMe Console, including how to start a new survey, add questions and pages, preview surveys, and prepare them for publishing or distribution.

Access
You can access the Surveys Builder page from the WalkMe Console.
WalkMe Surveys in the Console
How It Works
Create a survey
There are three ways to create a survey in the WalkMe Console. Choose the method that best fits your needs.
- Start from Scratch: Build a survey from a blank canvas and customize every question
- Create with AI: Let AI help you create a survey by generating questions tailored to your needs
- Import from existing WalkMe Survey: Bring in a survey you've already created within the WalkMe editor
1. Start from scratch
Start from Scratch lets you build a survey from a blank canvas and customize every question.
- In the Survey Builder page, select + Create Survey
- Select Start from Scratch
Default survey structure includes:
- Welcome message
- A question page
- A thank you message
Note
You can edit, add, or remove pages and questions as needed.
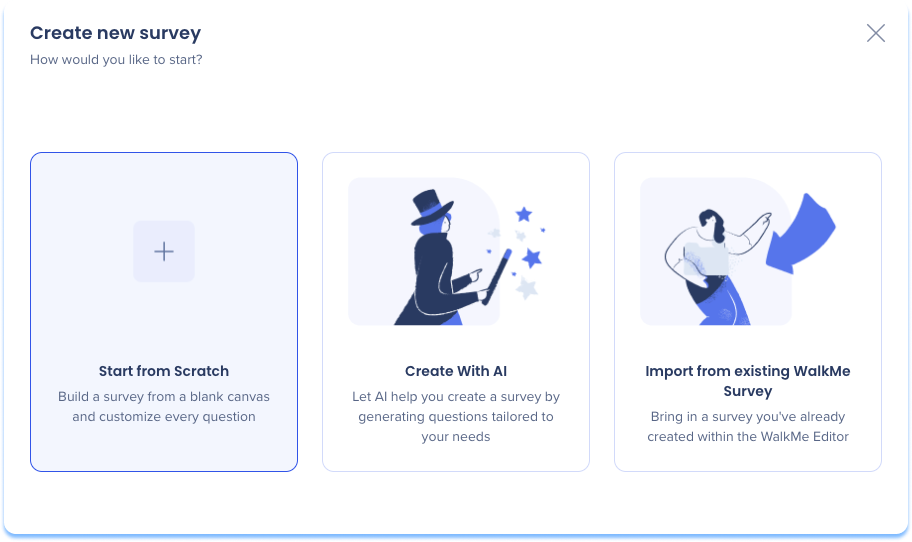
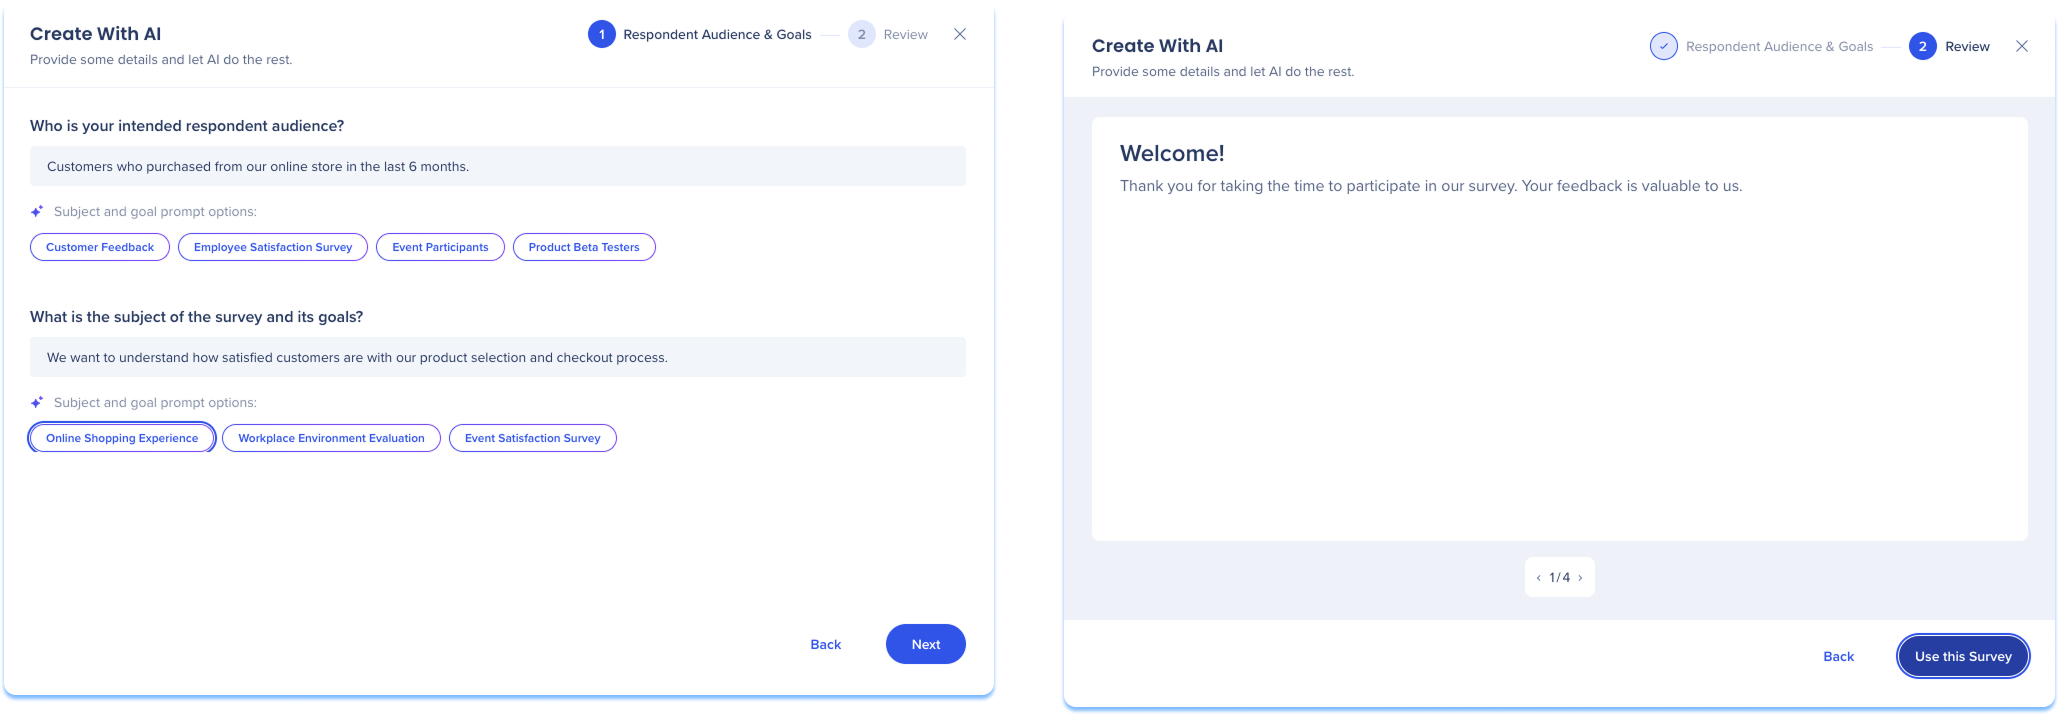
2. Create with AI
Create with AI lets AI generate a survey based on your goals and intended audience.
- In the Survey Builder page, select + Create Survey
- Select Create with AI
- A popup will appear with steps for:
- Respondent Audience & Goals
- Review

Respondent Audience & Goals
- Define the respondent audience
- Define the survey subject and goals
- Select Next
Review
- Review the generated survey
- Select Use this Survey
Note
The generated survey can be edited and customized before it is published or distributed.
3. Import from existing WalkMe Survey
- In the Survey Builder page, select + Create Survey
- Select Import from existing WalkMe Survey
- An Import Survey popup will appear to bring in a survey you've already created from within the WalkMe editor
- Select a system and survey
- Select Continue to Settings
- Select the preferred structure of your survey:
- Standard: All questions will be displayed on a page at once
- One Question Per Page: Each question will be presented on its own separate page
- Select Import
Notes
- When importing an existing WalkMe editor survey, the survey is duplicated as a copy
- The original survey remains unchanged

- In the popup, select the system that contains the survey
- From the list, select the survey you want to import
- Select Continue to Settings
- Choose how the imported survey should be structured:
- Standard: All questions are displayed on a single page
- One Question Per Page: Each question is displayed on its own page
- Select Import to complete the process

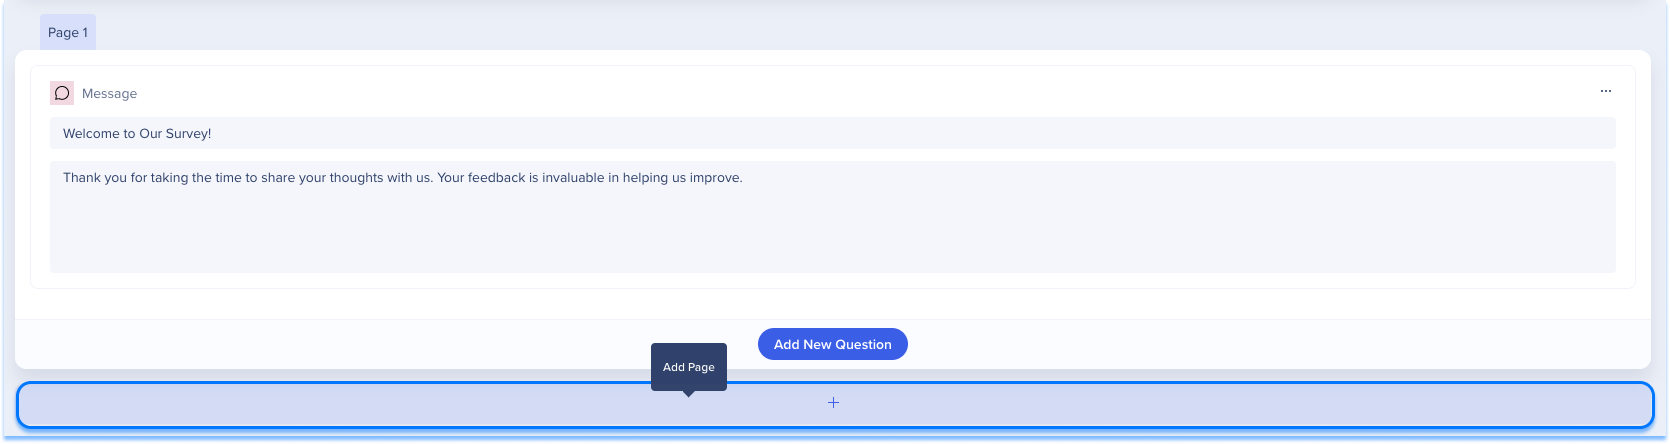
Add and manage survey content
Surveys are built using pages that contain questions or messages. You can add, edit, and reorganize content as needed while building your survey.
Add pages
Pages help structure your survey and control how questions are presented.
- Select Add Page
- Choose where the page appears in the survey
Question content
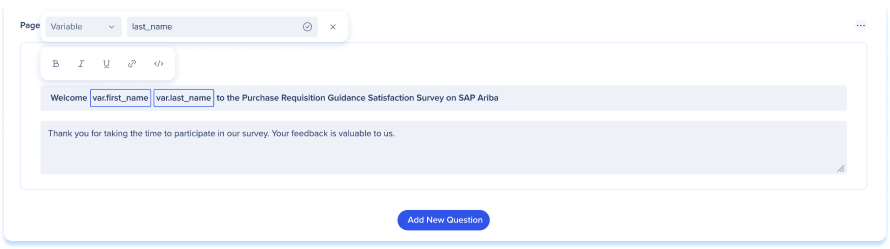
Use the rich text editor to format question titles and descriptions and add dynamic personalization
Dynamic text
- Insert dynamic placeholders, such as a user's name or environment details
- Choose from the following data sources:
- Variable: Enter a specific variable identifier
- jQuery: Enter a jQuery selector to pull data from the page
- Cookie: Enter a specific cookie name
- Dynamic Text Attributes: Select from pre-configured attributes in the attributes center
- Dynamic text appears in a styled box within the editor to distinguish it from static text
Rich text formatting
- Use BBCode-style formatting to bold, italicize, or add hyperlinks to survey content
- Combine rich text and dynamic text in the same field to create branded and personalized messages
Add questions
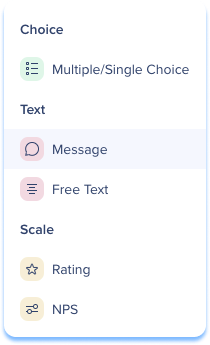
WalkMe Surveys support several question types, each with its own configuration options.
To add a question:
- Select Add New Question
Note
View the question types in the section below.

Question types
Multiple/Single Choice: Single choice and multiple choice questions allow respondents to select one or more answers from a predefined list
- Message: Add a general message to the survey that is separate from any of the questions
- Free Text: Respondents provide open-ended answers in an input box
- Rating: Respondent selects from a scale of stars or other icons
- NPS: Respondents rate how likely they're to recommend a product or service on a scale of 0 to 10
- Boolean: Respondents choose between two predefined options
Notes
- Each question type includes configuration options that control how responses are collected and displayed
- You can change a question's type at any time using the Question Type dropdown
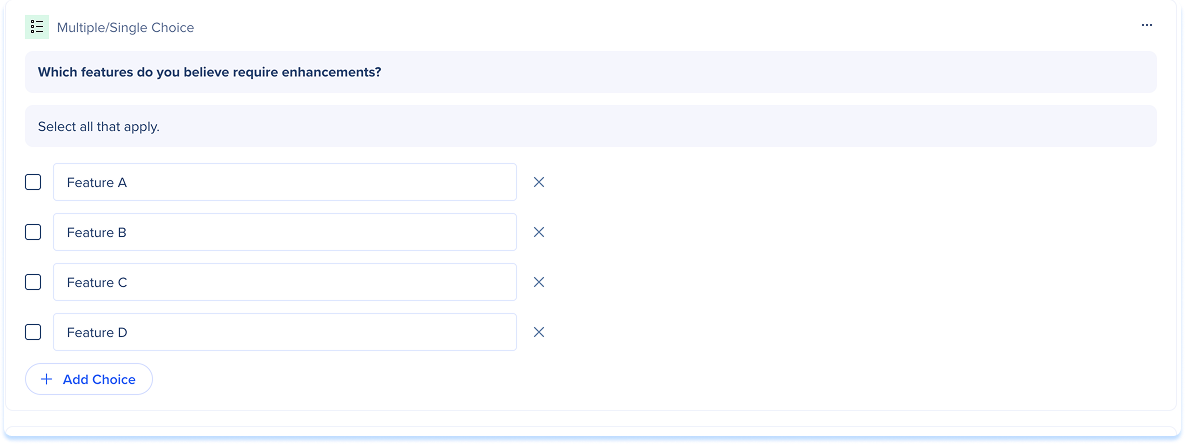
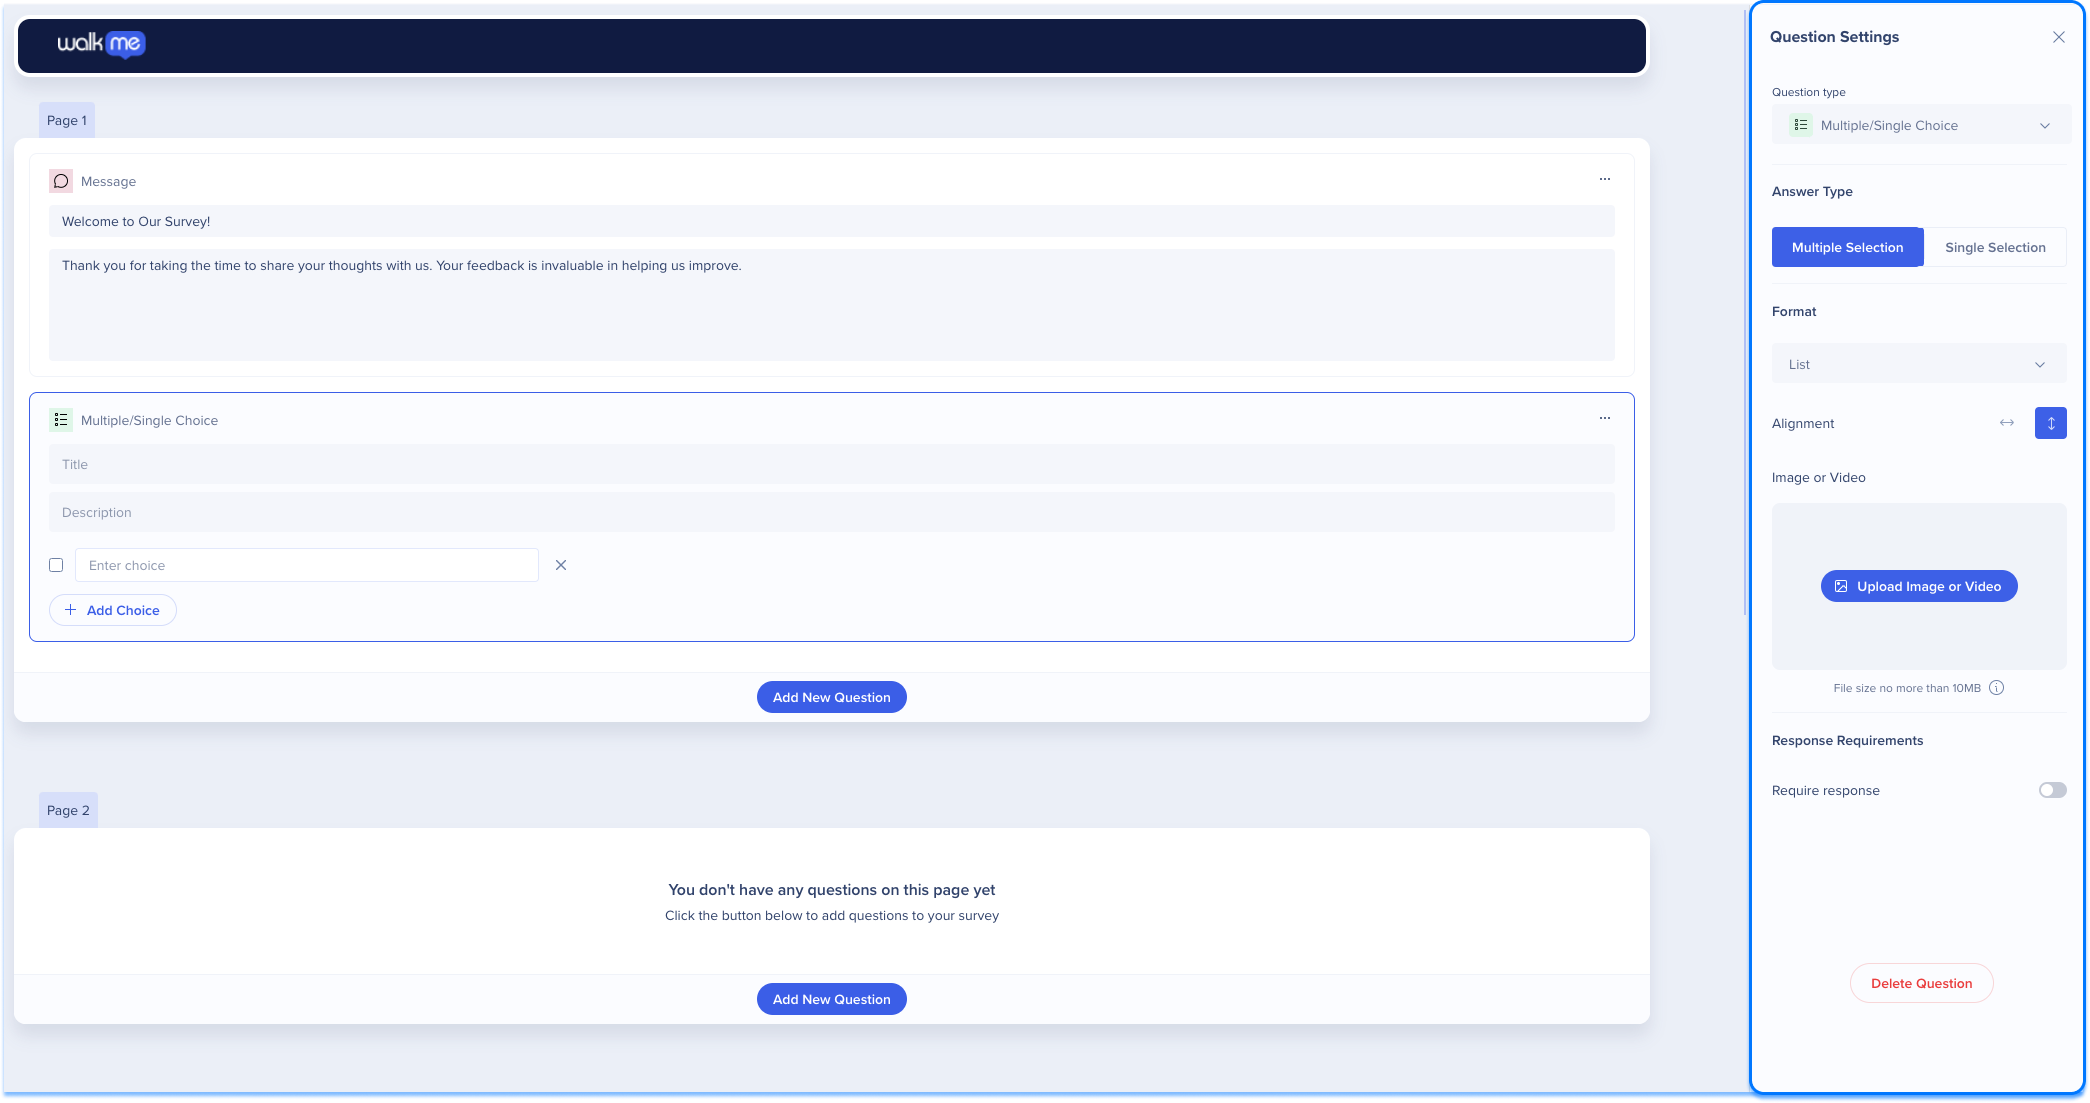
Multiple/Single Choice
How to add:
- Select Add New Question
- Select Multiple/Single Choice
- Add the question content:
- Title: Enter the question
- Description (optional): Add a short description
- Add the answer options in the text boxes
- For multiple choice questions, mark the correct answer using the checkbox
- Select Add Choice to add more answer options (optional)
Question Settings
After adding a question to the survey, you can customize it using the Question Settings panel.
- Select the question to open the Question Settings panel
- Select the Question type dropdown to change the question type
- Select the Answer Type
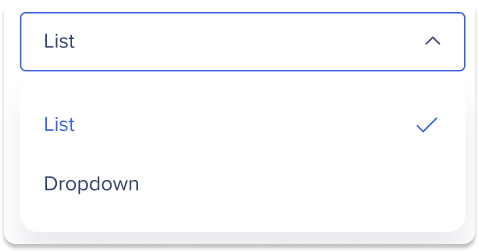
- Select the Format dropdown to change the format of the question
- List: Displays answer options as a visible list
- Dropdown: Displays answer options in a dropdown menu
- Upload an image or video
- Set the Response Requirements:
- Turn on Require response to require an answer before continuing
- Select Delete Question to remove the question from the page
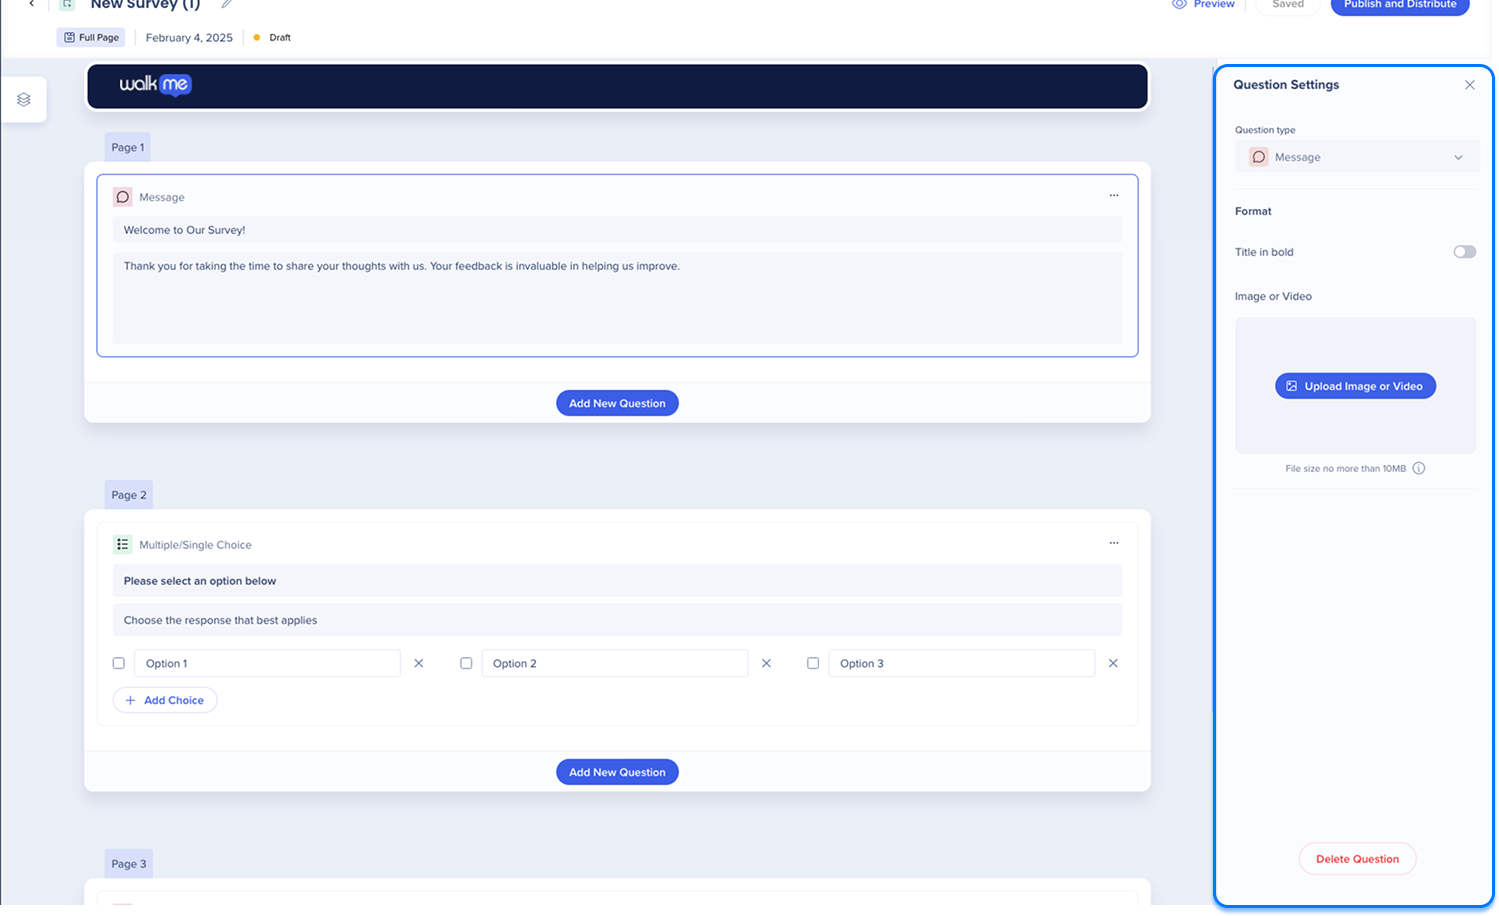
Message
How to add:
- Select Add New Question
- Select Message
- Add the question content:
- Title: Enter the message title
- Message: Enter the message content

Question Settings
After adding a message to the survey, you can customize it using the Question Settings panel.
- Select the message to open the Question Settings panel
- Select the Question type dropdown to change the question type
- Turn on Title in bold to emphasize the message title
- Upload an image or video
- Select Delete Question to remove the message from the page
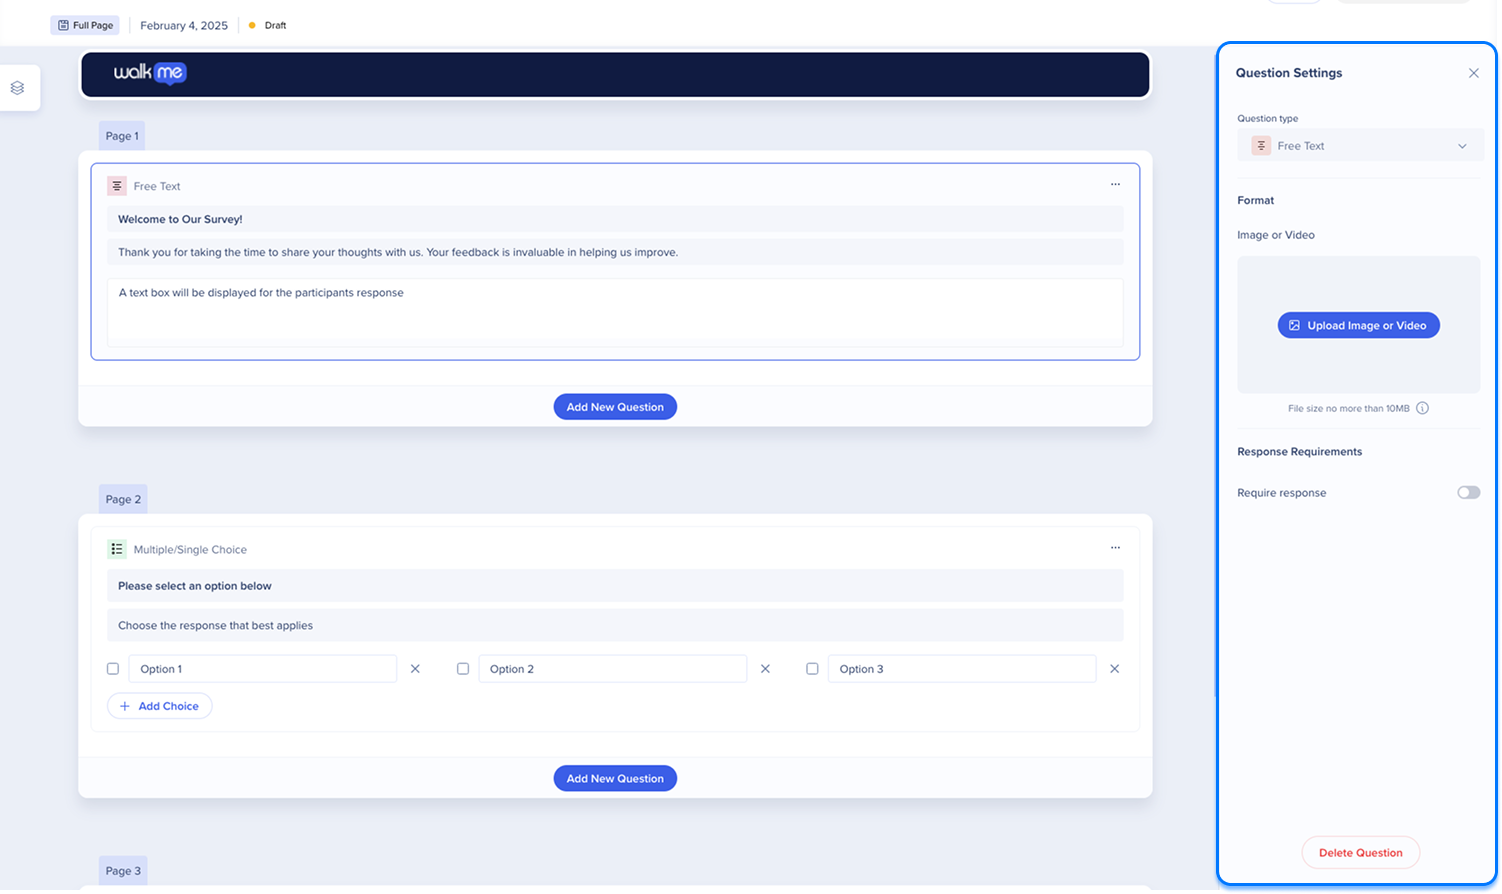
Free text
How to add:
- Select Add New Question
- Select Free Text
- Add the question content:
- Title: Enter the question
- Description: Add a short description (optional)
Note
A text input field is added for respondents to enter their response

Question Settings
After adding a question to the survey, you can customize it using the Question Settings panel.
- Select the question to open the Question Settings panel
- Select the Question Type dropdown to change the question type
- Upload an image or video
- Set the Response Requirements:
- Turn on Require response to require an answer before continuing
- Select Delete Question to remove the question from the page
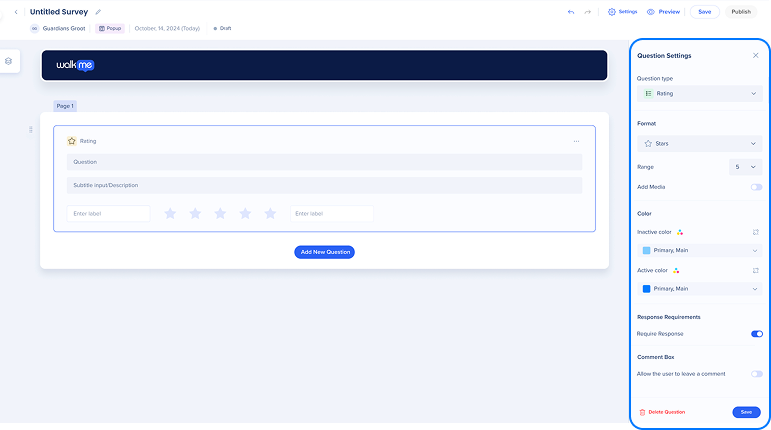
Rating
How to add:
- Select Add New Question
- Select Rating
- Add the question content:
- Title: Enter the question
- Description: Add a short description (optional)
- Scale labels: Define the minimum and maximum labels

Question Settings
After adding a question to the survey, you can customize it using the Question Settings panel.
- Select the question to open the Question Settings panel
- Select theQuestion Settings dropdown to change the question type (optional)
- Configure the Format:
- Select the visual representation for the rating (e.g., Stars, Hearts, Thumbs, Emoticons, or Numerical-only)
- Select the Range dropdown to define the number of icons on the scale
- Turn on the Add media toggle to upload an image or video
- Set the Inactive color and Active color for the rating icons
- Set the Response Requirements:
- Turn on Require response to require an answer before continuing
- Turn on Comment Box to allow text feedback
- Select Delete Question to remove the question from the page
NPS
How to add:
- Select Add New Question
- Select NPS
- Add the question content:
- Title: Enter the question
- Description: Add a short description (optional)
- Scale labels: Define the low and high score labels

Question Settings
After adding a question to the survey, you can customize it using the Question Settings panel.
- Select the question to open the Question Settings panel
- Select the Question Type dropdown to change the question type
- Upload an image or video
- Set the Response Requirements:
- Turn on Require response to require an answer before continuing
- Select Delete Question to remove the question from the page

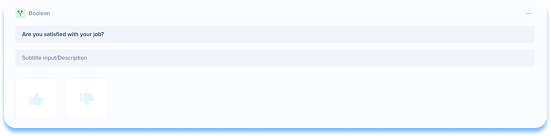
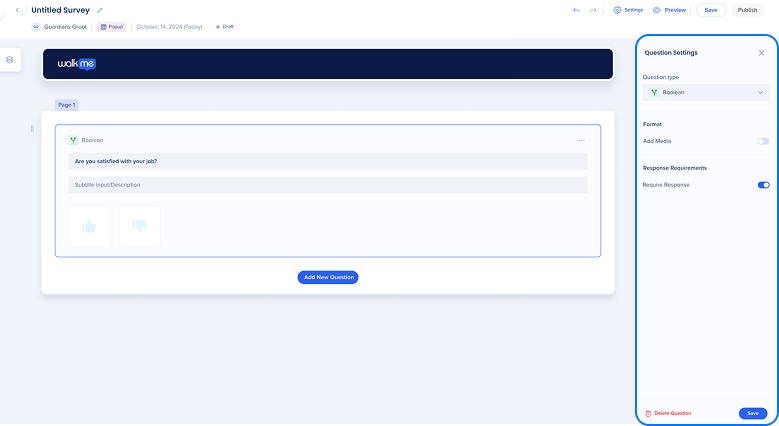
Boolean
How to add:
- Select Add New Question
- Select Boolean
- Add the question content:
- Title: Enter the question
- Description: Add a short description (optional)
Question Settings
- Select the question to open the Question Settings panel
- Select the Question Type dropdown to change the question type (optional)
- Configure the Format:
- Turn on the Add media toggle to upload an image or video
- Set the Response Requirements:
- Turn on Require response to require an answer before continuing
- Select Delete Question to remove the question from the page
Survey delivery and publishing
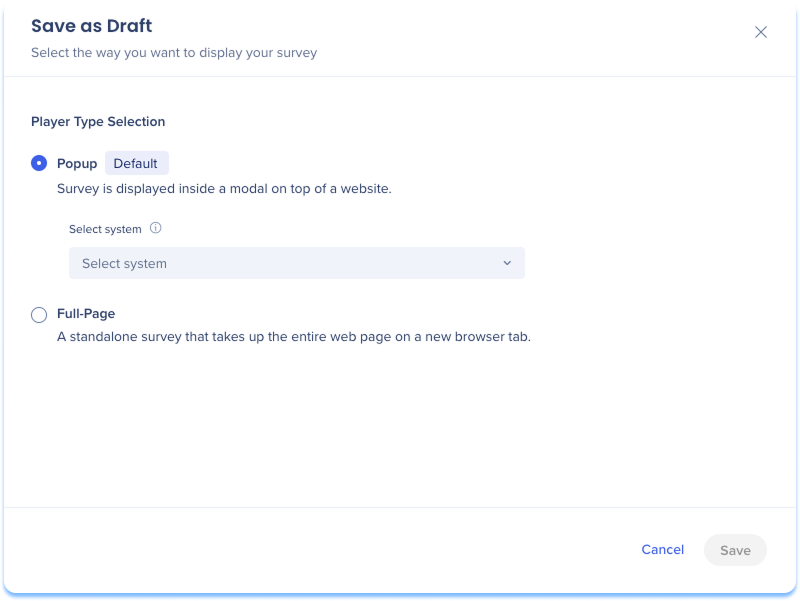
Save
- Select Save at the top of the page
- Choose the survey type:
- Popup: Displays the survey in a modal on top of a website
- Select the system that will host the survey
- Full Page: Displays the survey as a standalone page in a new browser tab
- Select Save
Note
After saving, the survey type and system settings cannot be changed.
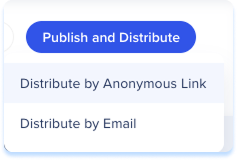
Publish & distribute full page surveys
Full page surveys are distributed using one of the following methods.
- Select Publish & Distribute
- Choose a distribution method:
- Anonymous Link
- Distribute by Email
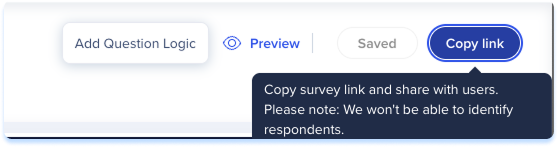
Distribute by anonymous link
Distribute by Anonymous Link generates a shareable link without identifying users.
- Select Distribute by Anonymous Link
- Select Publish
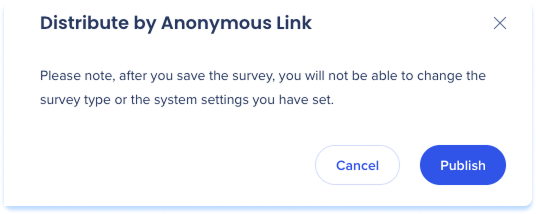
- Once published, click Copy Link to share the survey with respondents
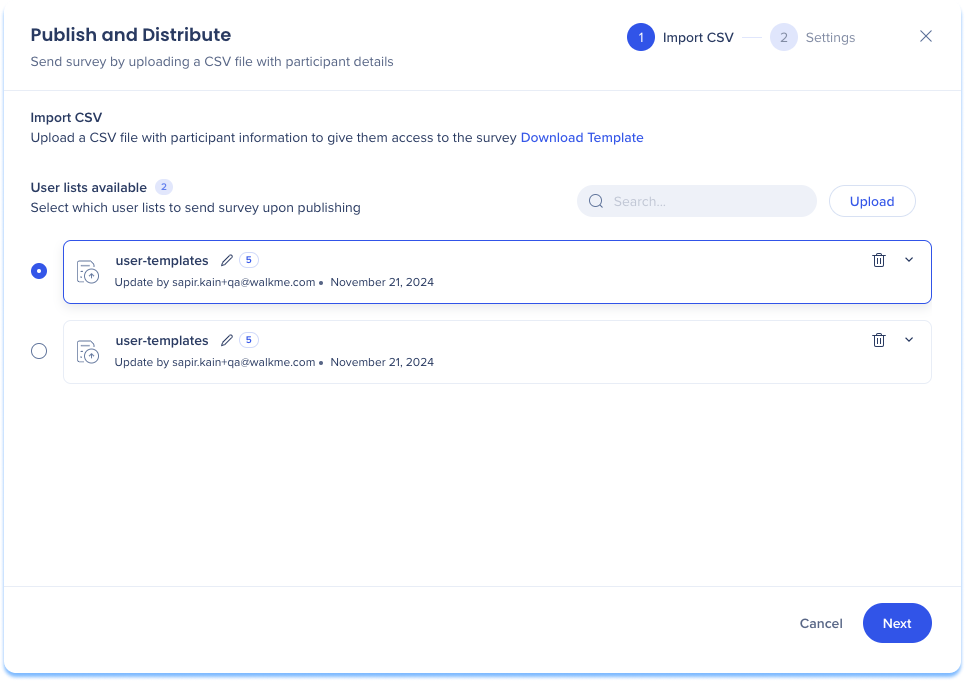
Distribute by Email
Distribute by Email sends the survey to users using a contact list.
- Select Distribute by Email
- A popup appears with the following steps:
- Import CSV
- Settings
Import CSV
You can upload a CSV file or select from saved user lists to add participants.
- Upload a CSV:
- Select Download Template
- Add participants email addresses to the template
- Select Upload
- Select Next
- Select an existing user list:
- Select one or more lists under User lists available
- Select Next
Note
CSV files are validated and saved for future use
User lists actions and details:
- Search: Navigate user lists using the search bar
- Name and email count: View the file name and total email count name and number
- Edit: Change the name of the user list
- Delete: Remove a user list from the distribution manager
- Expand: View the full list of email addresses
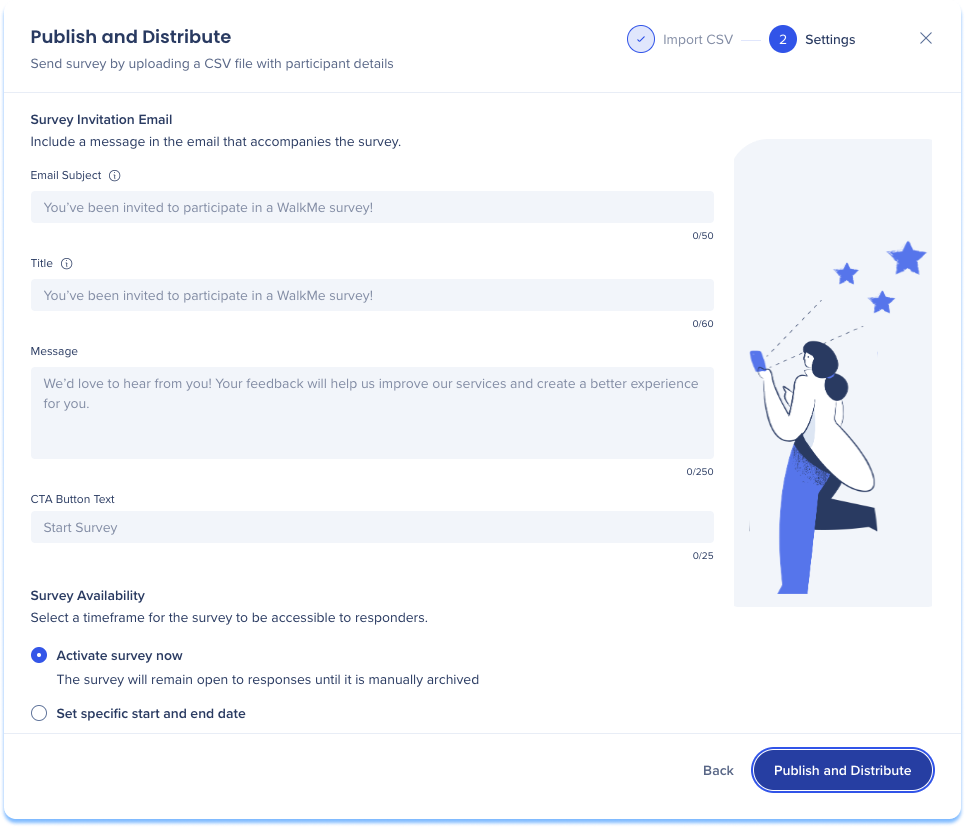
Settings
Configure the email content and survey availability.
- Survey Invitation Email:
- Email subject: Appears in the recipient's inbox and at the top of the email content
- Title: Appears as the heading in the email body
- Message: The email content sent to recipients
- CTA button text: The text displayed on the email call-to-action button
- Survey Availability:
- Activate survey now: The survey remains open until it is manually archived
- Set specific start and end date: The survey is available for a defined timeframe
- Select Publish and Distribute to send the survey
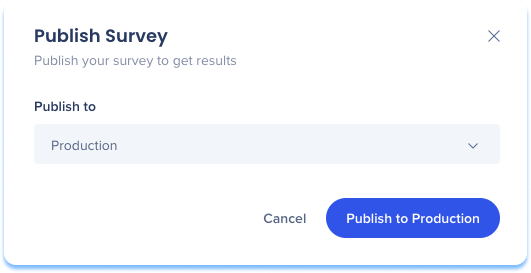
Publish popup surveys
Popup surveys are published directly to an environment.
- Select Publish
- Select the environment where the survey will be published:
- Production
- Test
- Success
- Click Publish
Editor behavior for popup surveys
- Popup surveys appear in the WalkMe Editor
- Survey settings remain accessible in the editor
- Deployment logic, such as post-Smart Walk-Thru, Launchers, and other triggers, remain available and configurable in the editor
- The Surveys console app is for survey creation only, deployment logic continues to be managed in the WalkMe Editor