Welcome to the
WalkMe Help Center
Please log in to continue

Please log in to continue

Notes allow you to add information about an individual WalkMe item that you have created. Notes can be used to collaborate with team members in the editor and will not appear to your users. Smart Walk-Thrus, launchers, SmartTips, ShoutOuts, surveys, SmartTip sets, shuttles, and onboarding tasks have a Notes section.
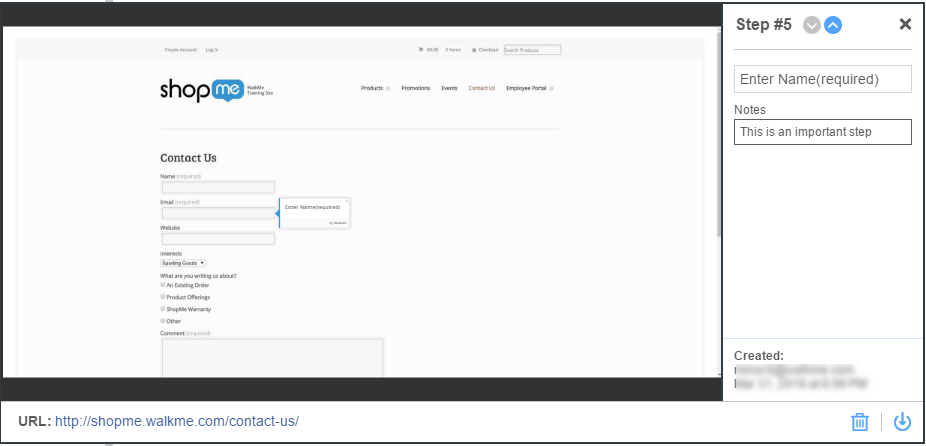
Notes provide an easy way to describe settings that have been applied or you would like to apply to an item. A note can be added at the point of creation or after the fact in the Notes tab within your item settings. The note will then be visible in the editor when hovering over the item. Notes are also displayed on screenshots for Walk-Thru steps and launchers so if you export the screenshots as PDFs to share Walk-Thrus with a stakeholder before publishing, notes can provide additional clarification.

Keeping detailed notes allows you to more easily communicate with colleagues and make edits in the future. Here are a few examples of why you may use notes:
Notes can be created by clicking on the + Add icon in the header of the item's settings.

To view a note:

The note will also be visible in the screenshot of a step or launcher:
Smart Walk-Thrus: When you first build a Walk-Thru, the best practice is to build out the basic steps (the “main path”) and go back afterward to add in advanced features. Use notes to record the necessary modifications that have been made.
Flow steps: When adding flow steps, use notes to explain why the feature is needed or explain complicated rules.
Launchers: Add notes to a launcher to record segmentation and goals that you or a teammate can go back and add later.