Surveys

Last Updated September 13, 2022

Brief Overview

WalkMe Surveys are used to collect feedback from users, and the survey data can then be tracked by WalkMe’s analytics platform (Insights). Surveys can be customized with different question types, set to play at various frequencies, or configured to play automatically.

Surveys can be implemented at any stage of your WalkMe build: as an initial questionnaire for users to pinpoint problems, or during Smart Walk-Thrus and through Launchers and ShoutOuts to collect ongoing data and assess knowledge. We recommend using Surveys in one of two ways:

  1. Ask your users about WalkMe — Add a Survey at the end of a guidance flow to ask if it was helpful;
    • Make sure the Surveys’ colors and design are similar to other WalkMe deployables;
  2. Ask your users about your website/application —  Launch a Survey asking users about a certain feature in the site, a change, or anything you want to ask your users.
    • In this case, you should design the survey to look more native to your website/application. 

The data collected with a Survey is available in Insights, using this information can allow you to make informed decisions on what you what to pinpoint next, how users are adopting a new process, or what users think of a particular site feature.

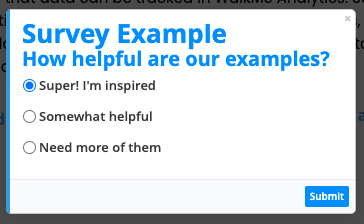
Surveys appear in the center of the screen with a faded out background over the rest of the screen. You can use multiple choice or free-text question types. 

Use Cases

  • Knowledge test: test the knowledge of employees after they have learned a new process
  • Feedback: get feedback from customers about a new feature that has just been released
  • Net Promoter Score: understand customer loyalty and satisfaction
  • User input: ask your users what topics they need help with

How It Works

Surveys can be set to play automatically, at the end of a Smart Walk-Thru, or be triggered by a Launcher or ShoutOut. Once a Survey is triggered, all the Survey’s questions appear in one Balloon on a faded-out background. When the user clicks the Submit button, the responses are sent to WalkMe’s analytics platform (Insights). 

🎓 Digital Adoption Institute

Creating a Survey

  1. Log into the Editor
  2. Click the downward app-selection triangle and select Surveys, or All Items view and select Survey from there
  3. Click the Add New icon to create a new Survey
  4. Give the Survey a name and click Continue:
  5. Click the orange plus sign with an “M” if you want to add a general message to the Survey
    • Note that:
      • A Message is not part of the question counter. When “Show questions one-by-one” and “Show questions count e.g. 1/4” are both selected in the Appearance tab of the Survey Settings, it will not include Messages in the count and the counter will not display on the Message
      • If “Show questions one-by-one” is selected and a Message is the last item in the Survey, the Submit button for the Survey displays on the previous question and a “Done” button displays on the Message
  6. Click the orange plus sign with a “Q” to add a question 
  7. Enter a title and subtitle (optional)
  8. Select the question type from among the following:
    • Free text: add your question in the Title field and include optional subtext in the Subtitle field. Click Done to finish.
      • The user will be presented with a text box and asked to fill in an answer of their choice
    • Single Selection: add your question in the Title field and include optional subtext in the Subtitle field. Type each answer option individually and click Add. Click Done to finish.
      • The user will be presented with a multiple choice question and can only select one option by clicking the radio button next to the answer
    • Multiple Selection: add your question in the Title field and include optional subtext in the Subtitle field. Type each answer option individually and click Add. Click Done to finish.
      • The user will be presented with a multiple choice question and can select as many options they want by clicking the radio buttons next to the answers
    • Net Promoter Score: add your question in the Title field and include optional subtext in the Subtitle field. Edit the Low Score and High Score labels to reflect how you want to measure your scale. Click Done to finish.
      • The user will be presented with a standard NPS question and can choose from a scale of 1-10
    • Rating: add your question in the Title field and include optional subtext in the Subtitle field. Choose the icon type and adjust its color (For emoticons, also select emoticon style). Edit the Min and Max labels to reflect how you want to measure your scale.
    • Toggle on the comment box if you want to allow the user to add free text notes to their answer. Type the hint that will be presented to the end-user before they start to type their comment.
      Click Done to finish.

  •  The user will be presented with a standard Rating question and can choose from a scale of 1-5
  • Tip Tuesday: Check out this Tip Tuesday for a quick Rating Survey guide.

(lightbulb)Tip: if you need to reorder your questions or answers, hover over the three dots on the left-hand side and drag them to the desired location.

  • Enter the answers. If you need to reorder your questions or answers, hover over the three dots on the left-hand side and drag them to the desired location.
  • Click Done.
  • 💡Tip: Use the “Required” toggle if you want to make survey questions mandatory for end users.


    Settings

    After creating a Survey, open the Survey Settings to configure how the Survey will appear to and interact with the user.

    Design

    If you wish to customize the design of your Survey, please refer to the CSS for Surveys article here.

    Engagement tab

    The Engagement tab contains settings related to user-survey interaction. This includes Auto Play options, Replay settings, and more:

    Auto Play

    • Select whether to use Auto Play to launch your Survey.
      • If you opt not to, you must launch the Survey via Launcher, ShoutOut or Smart Walk-Thru
    • Create an Auto Play Rule: Display a Survey automatically according to a Rule (Unique User Settings must be enabled in order for Auto Play to work)
    • Replay settings: Select the frequency with which the Survey should play (Once, Once a day, or Always)
    • Cancel Auto Play when user clicks: Choose whether you want to cancel the Auto Play Rule you created (and thus not show the Survey to the user again) upon these conditions:
      • The user clicks the Submit button
      • The user clicks the “X” button
      • Both of the above occurring (you may check both boxes)

    Replay After Completing a Smart Walk-Thru (Formerly, Survey Frequency)

    Control how often a user sees a Survey at the end of a Smart Walk-Thru. From the Smart Walk-Thru Initiators and End Experience menu, a Survey may be configured to automatically play either when the final step of a Smart Walk-Thru is completed, or when the user stops playing the Smart Walk-Thru:

    When user clicks “X”

    • Select the Survey you want to play when the user clicks an “X” button in one of the Smart Walk-Thru balloons. Select the frequency in which this Survey will play after the user clicks an “X”

    When user completes the Walk-Thru

    • Select the Survey you want to play when the user completes the Smart Walk-Thru. Select the frequency in which this Survey will play.

    This configuration does not affect the Auto Play settings and frequency listed at the top of the Survey Settings Menu.

    Tip: If you want a Survey to play only if a user goes through a specific branch in a Smart Walk-Thru:

    1. Create a separate Smart Walk-Thru with a Wait for Step that waits 0 seconds
    2. Click the End Experience button
      • Under “When user completes the Walk-Thru” select your Survey
      • Set the frequency for how often you want the Survey to play at the end of the branch of your original Smart Walk-Thru
      • Click Save
    3. Go back to the branch of your original Smart Walk-Thru. Add a “Connect to Smart Walk-Thru” step at the end of the branch and connect to the new Smart Walk-Thru that has the Survey

    Appearance tab

    The appearance tab contains settings related to what the user sees, and how frequently he/she sees it. These include Display Options and Enable Spotlight settings:

    Display Options

    • Show Survey name: Here you can provide the Survey with a name and edit the Survey name
      • Pro-Tip: The Survey tooltip in the Editor will show the Survey’s current name as selected or modified above.
    • Hide Survey name: Here you can decide whether the user will see the Survey’s name
      • Pro-Tip: When creating a new NPS Survey, the Survey name will be hidden by default to emphasize the title of the NPS question only. The name can later be altered manually.
    • Show question one-by-one: If toggled on, only one question displays at a time with Next/Back buttons. If toggled off, all questions will display as one form in the order they are listed in the Editor.
    • Show Survey name only on first question: The user will only see the Survey’s name on the first question;
      • This option will be disabled if you’ve elected to hide the Survey name from the user.
    • Show question count: Show users how many questions are left in the Survey.

    Enable Spotlight

    Toggle on to fade the background when displaying the Survey.

      • You can toggle the Enable Spotlight switch to disable the Spotlight overlay
      • This will allow the user to continue interacting with your site while the Popup is visible

    Types of Surveys

    Play a Survey From the Menu

    In order to add a Survey to the Player Menu, add the Survey to the end of a one-step Smart Walk-Thru (End Experience)

    1. Create your Survey
    2. Create a new Smart Walk-Thru. The Smart Walk-Thru name you choose will be the Survey’s name in the menu
    3. Click Continue
    4. Add a Wait for Step that waits for 0 seconds.
    5. At the bottom left of your Smart Walk-Thru, you’ll see an option for End Experience
      • Note: the End Experience button only displays when there is at least one step in the Smart Walk-Thru, which is why it’s necessary to have the 0 second Wait for Step
    6. Click on that and it will open the menu where you’ll see available options for Initiators & End Experience
    7. Under “When user completes Walk-Thru” select your Survey from the dropdown.
      • Set Frequency = Always.

    Tip: Check the menu organizer to make sure your Smart Walk-Thru is configured to display in the menu.

    Survey Results

    In order to see your Survey results, visit insights.walkme.com, scroll down to select the relevant system, and click Apps > Surveys in the sidebar.

    Try it Out

    Create a Survey asking users to write which topics most confuse them. A question with a Multiple Selection answer is a good choice. Check the answers periodically in analytics and build out other WalkMe solutions according to the results!

    Was this article helpful?

    Thanks for your feedback!
    ×

    Select account type

    Close
    < Back

    Mobile account login

    < Back