
WalkMe Share: Presentation Page
Brief overview
Quickly demo a WalkMe build using WalkMe Share Presentations with its flexible, collaborative, and intuitive interface. WalkMe Share Presentations can be shared, opened, and edited by multiple users simultaneously.
Do the following using WalkMe Share Presentations:
- Present a single item or a folder of items in a slideshow presentation
- Present items configured in multiple languages
- Hide certain slides from other WalkMe Share users
- Edit items on-screen positions
- Markup a slide with onscreen text, arrows, and other shapes
- Generate and embed presentations as videos
- Download presentations as PDF PowerPoint documents
- Tag and add comments for other WalkMe Share users
- Play a presentation as an auto-played slideshow
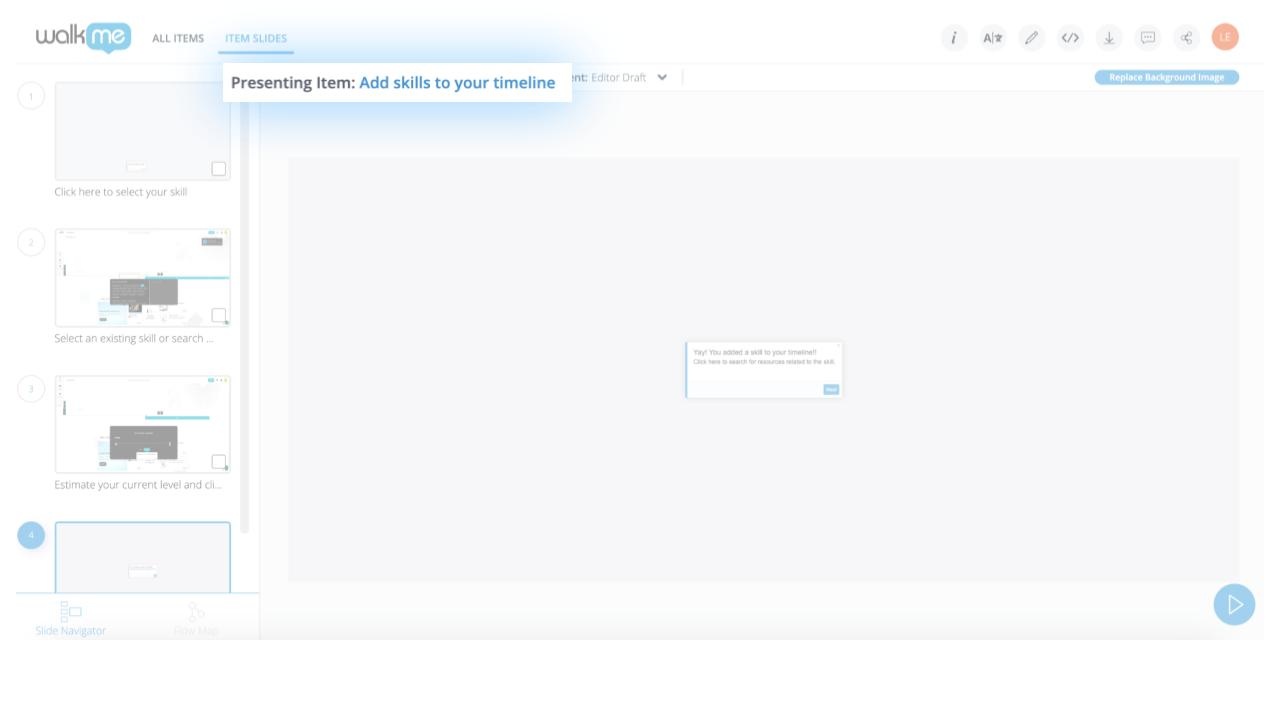
Present a single item
Share, open, edit, and document a single item as a WalkMe Share Presentation. A single WalkMe item's presentation title will read as Presenting Item: item's name. The onscreen title will indicate which item is being displayed.
Editor Flow Map View
WalkMe Editor account owners can toggle between slideshow view and flow map view
- Go to the slide drawer's footer
- Click Flow Map
- View the Smart Walk-Thru's Flow Map, as seen within the WalkMe Editor
Export Flow Map
Logged-in users can export a transparent PNG file of their flow map
- Click Flow Map
- Click Export Flow
- Locate the "exported_flow_SWT NAME.png" file within your computer's downloads folder

Environment & Version History
View how a single item appears in the Editor and then toggle to see how it appears in the production environment. Or, view a single item's version based on that item's Editor version history. This is limited to single item presentations and folder view is not supported.
View an environment and/or version history
- Select the dropdown arrow next to the environment selection
- Choose from the list of environments
- To view a version, select Full Version History from the environment selection
- Select a version from the popup table by clicking View Version
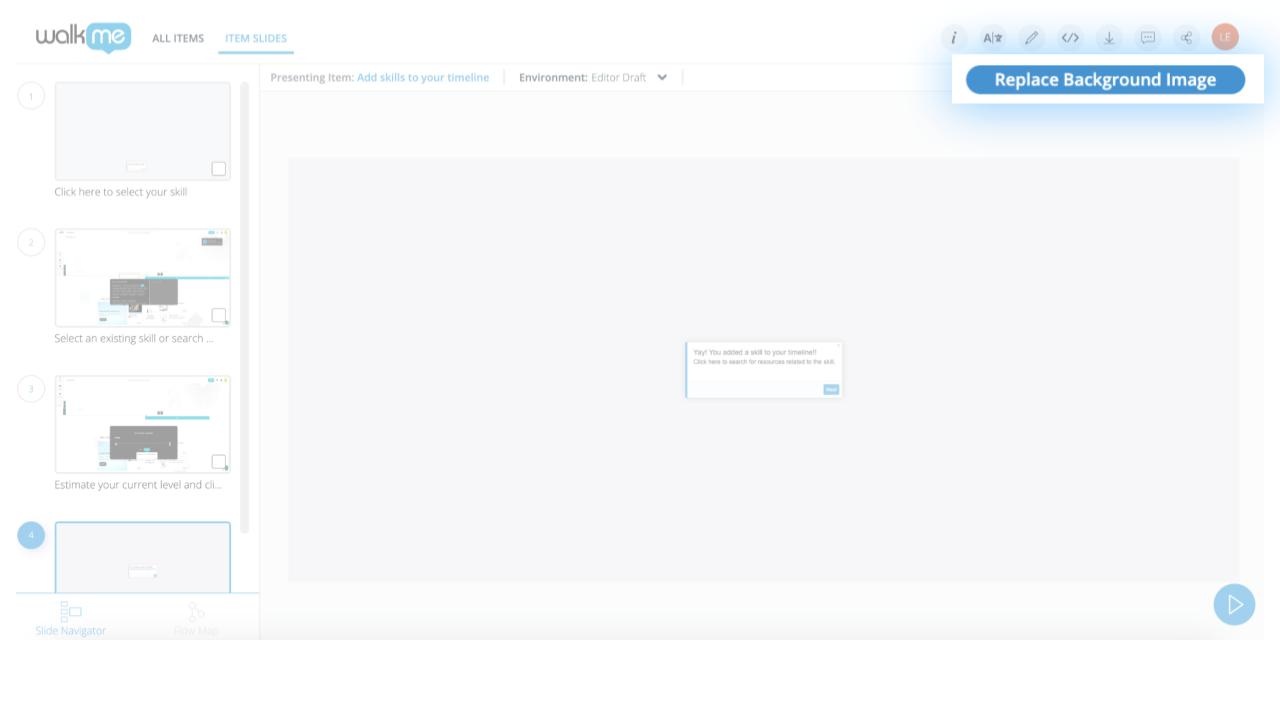
Replace Screenshot Background Quick Action
Upon entering WalkMe Share, users will see a call-to-action to replace the screenshot background on slides that do not contain a screenshot background within WalkMe Share. This CTA will display by default on items that do not capture screenshots within the WalkMe Editor.
This includes:
- Popup Steps
- ShoutOuts (all versions)
- Surveys
Multiple Slide Selection and Batch Actions:
Select multiple slides from the Slide Navigator and/or Flow Map step in order to take these supported actions at the same time:
- Replace Slide Screenshot
- Embed Video
- Download to:
- .PPTX
- .DOCX
- .JPEG
- SCORM package (.ZIP)
When selecting multiple slides and exporting them to video, the slide range will be pre-selected within the embed popup modal.
Quickly document a Smart Walk-Thru's Split's Steps by selecting the split's slides and export the selected slides to your preferred document type. Save the document as the Smart Walk-Thru's branch flow.
Present multiple items
Share, open, edit, and document a folder of items as a WalkMe Share Presentation. A multi-item presentation's title will read as Presenting Folder: folder's name.
During multi-item presentations, WalkMe Share's slide-drawer interface displays a unique category label which is defined by the item's icon type plus name to signify the separation of items within a folder

Slide Indexing
Within the WalkMe Editor, items hosted within a folder are reflected in WalkMe Share's slide-drawer interface by ascending order organized from top to bottom.
WalkMe Editor folder organization example:
- Folder name: “Demo 1”
- Launcher name: “Entry point to SWT A”
- Smart Walk-Thru name: “Process A”
- Step 1 name: “Click here”
- Step 2 name: “Click next”
- Step 3 name: “Click enter”
- Step 4 name: “Click save”
- SmartTip Set name: “ToolTip”
- SmartTip 1 name: “Learn More”
- SmartTip 2 name: “Input Validation”
- Launcher name: “Entry point to SWT B”
- Smart Walk-Thru name: “Process B”
- Step 1 name: “Auto Step”
- Step 2 name: “Confirmation”
WalkMe Share slide-organization example outcome:
- Presenting Folder: Demo 1
- Slide #1: Entry point to SWT A
- Launcher icon: Entry point to SWT A
- Smart Walk-Thru icon: Process A
- Slide #1: Click here
- Slide #2: Click next
- Slide #3: Click enter
- Slide #4: Click save
- SmartTip icon: ToolTip
- Slide #1: Learn More
- Slide #2: Input Validation
- Launcher icon: Entry point to SWT B
- Slide #1: Entry point to SWT B
- Smart Walk-Thru icon: Process B
- Slide #1: Auto Step
- Slide #2: Confirmation
Edit mode
Use the suite of flexible slide editing modes to create WalkMe implementation support articles directly in WalkMe Share
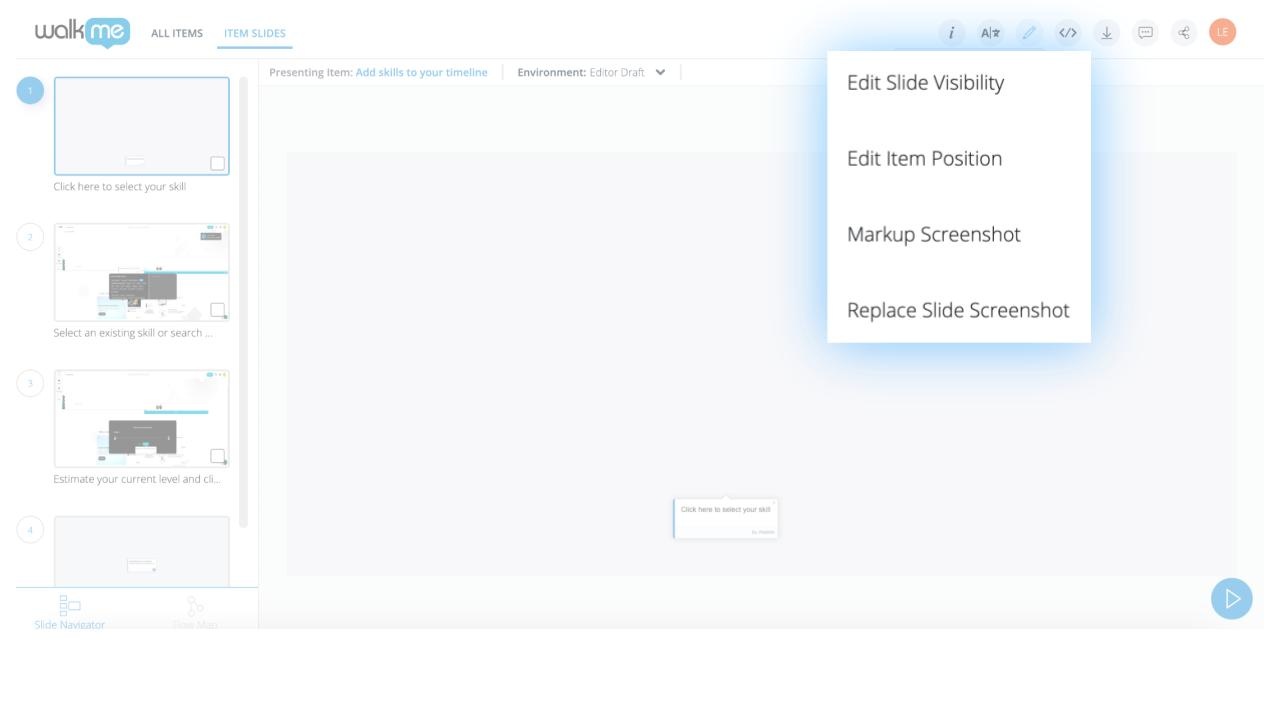
Edit Slide Visibility Mode
Editor account owners can hide slides from being generated in WalkMe Share content or from being seen by other WalkMe Share users. Slides hidden with visibility mode will not appear for other WalkMe Share collaborators or within exported WalkMe Share content
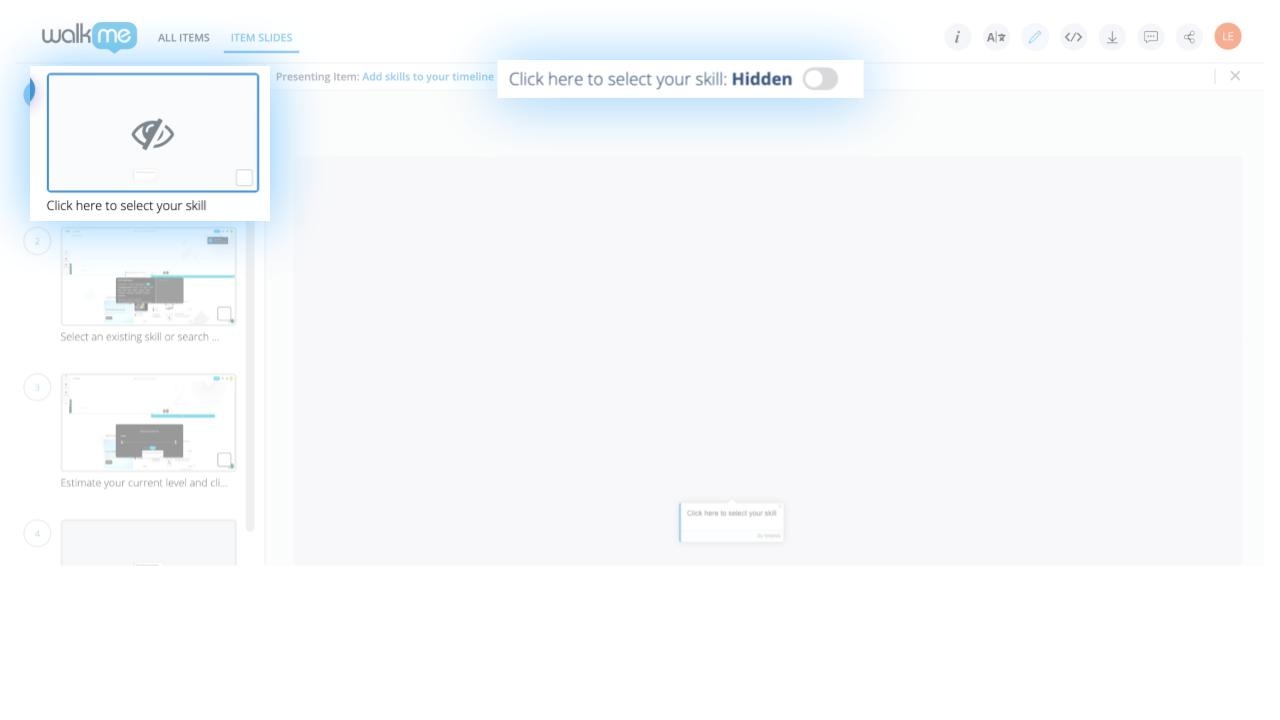
To hide a WalkMe Share Presentation slide:
- Click the pencil icon near the top-right of WalkMe Share's Presentation page header
- Select Edit Slide Visibility from the dropdown list
- Click the intended slide to be hidden
- Switch the toggle next to the slide title to Hidden
Edit Item Position mode
Often, users will locate a slide within their WalkMe Share Presentation that contains an on-screen item that is not connected to the desired on-screen element. Most times, this happens to items created with jQuery selectors. Enter the Edit Item Position mode to drag and drop the slide's item into the correct on-screen location.
How to edit an item's position:
- Click the pencil icon near the top-right of the presentation page header
- Select Edit Item Position from the dropdown list
- With the Edit Items Position mode active:
- Drag and drop the slide's item into the correct on-screen location
- Use the keyboard arrows keys to nudge the slide's item
- With the slide's item in the correct position, click Save
Clicking save is required to save the item's new on-screen position.
Alternatively, at any time, a WalkMe Share account owner may reopen a slide's Edit Item Position mode and click Reset to reposition the item back to its original on-screen position. The captured image within the WalkMe Editor will reflect the item's newly adjusted position.
Markup Screenshot mode
Use the in-app slide markup feature to collaborate and give edit suggestions to an item

- Click the pencil icon near the top-right of WalkMe Share's Presentation page header
- Select Markup Screenshot from the dropdown list
- With the Markup Screenshot mode active, users can:
- Add arrows
- Add rectangles
- Border-only rectangles
- Solid rectangles
- Lines
- Freehand brush strokes
- Small strokes
- Medium strokes
- Large strokes
- On-screen text
- Once markups are complete click Save
Clicking save is required to save the slide's markups
Alternatively, at any time, a WalkMe Share account owner may reopen a slide's Markup Screenshot mode and click “Reset” to clean and reset the slide back to its default state. Markups saved to any WalkMe Share slide will be included and presented in any exported WalkMe Share Presentation content.
Replace Slide Screenshot
Add or replace screenshot backgrounds on Presentation's slides.
- Click the pencil icon near the top-right of the Presentation page header
- Select Replace Slide Screenshot from the dropdown list
- With the Replace Slide Screenshot mode active:
- From this presentation:
- Replace a slide's background image with a background image captured within the loaded presentation
- Upload from computer:
- Replace a slide's background image by taking a screenshot and then uploading it from your computer
- By URL:
- Replace a slide's background image by entering a background image from a hosted URL
- From this presentation:
Within the WalkMe Editor account, the item's captured background image will reflect the item's newly replaced screenshot background.
Share the presentation
WalkMe Editor users can share slideshow Presentations with other Editor users or none Editor users. To share a Presentation to other users click the Share icon button to open the share popup modal. Invite a user to the Presentation by entering their email address. The invited user will receive a notification email from WalkMe Share with an entry link, which permits them to view the WalkMe item presentation within WalkMe Share.
Both Single Item Presentations and Multi-Item Presentations sharing is supported. While viewing a WalkMe Share Presentation, users can now toggle their presentation between: their Editor drafts, production and test environments.
Item Information
WalkMe Share offers users key information data about a selected slide's item.
WalkMe Share slide item information includes:
- Index number
- Title
- Creation date
- Type
- Created by
- Captured element URL
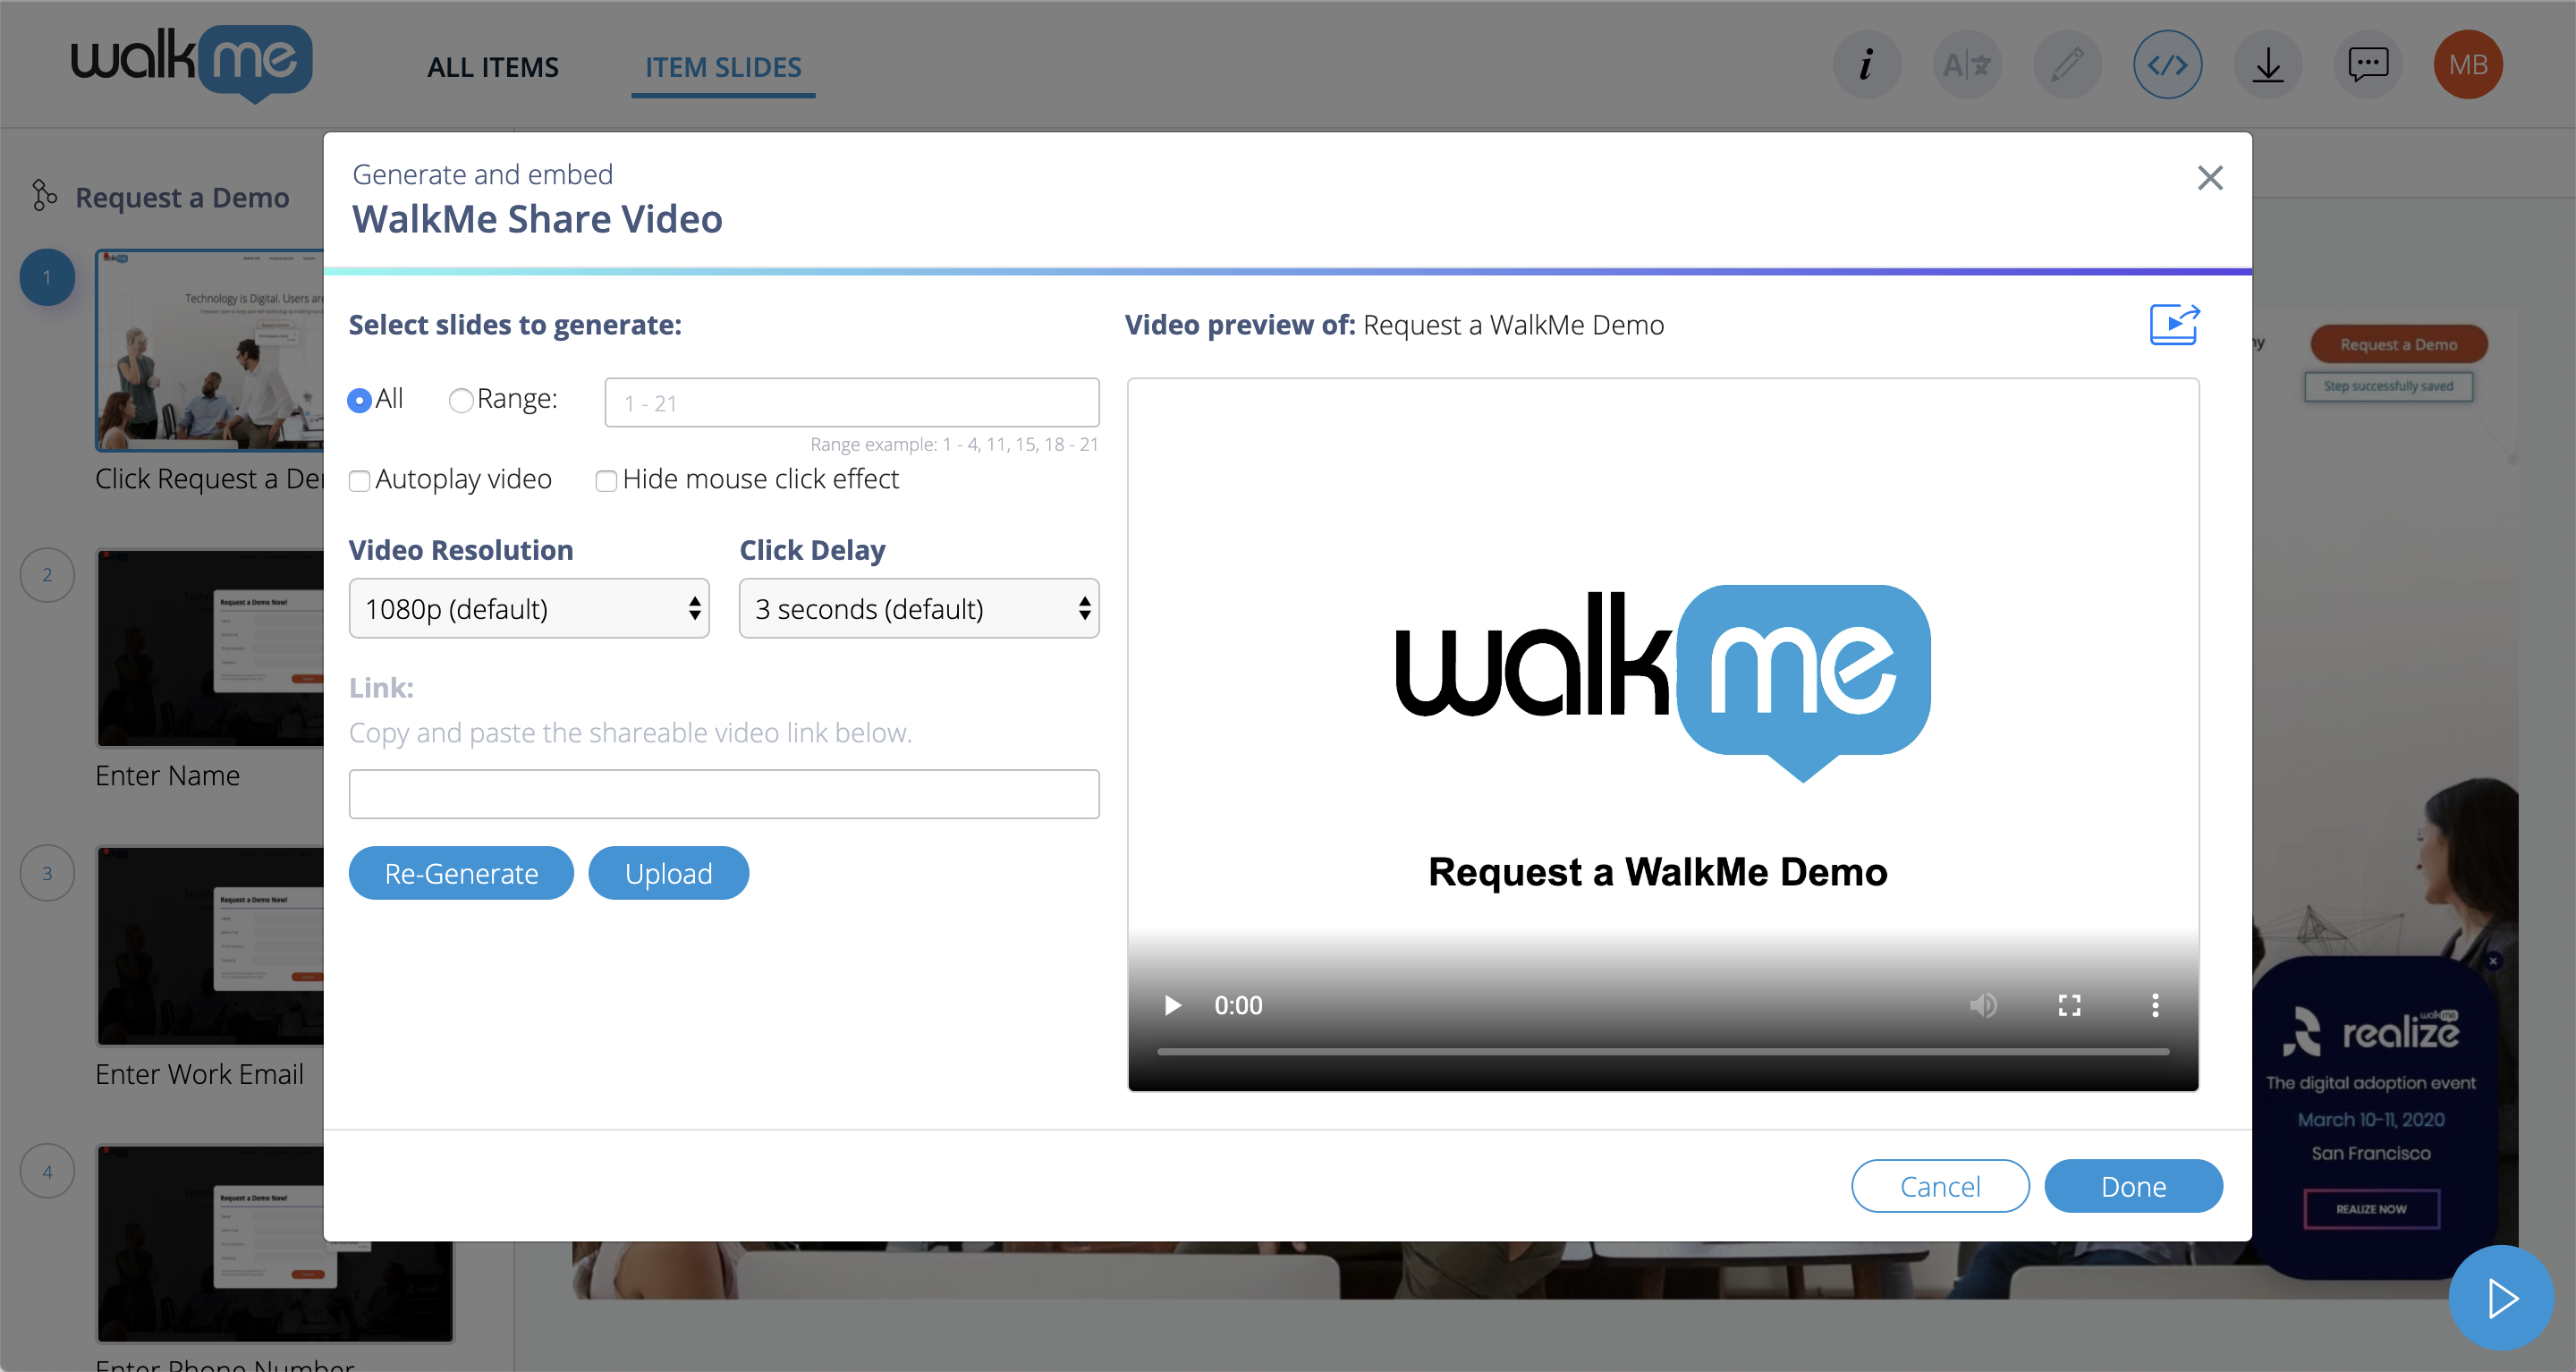
Generate and Embed
WalkMe Share's Embed feature allows users to generate Vimeo videos of their WalkMe Share Presentations.
Embed Video
WalkMe Share exported Vimeo videos as a private URL link that can, be copied and placed into any knowledge base article, WalkMe Resource, or webpage.
To generate a WalkMe Share Vimeo video:
- Click the embed icon near the top-right of WalkMe Share's Presentation page header
- Select Embed Video from the dropdown list to launch the Generate and Embed Video popup modal
- From the Generate and Embed Video popup modal, users can customize their WalkMe Share Presentation Vimeo video by:
- Selecting slides to generate
- Setting the video to autoplay
- Hide mouse click effect
- Adjusting the autoplay timing
- Adjusting the video resolution
- Once video customization is complete, click Generate or Re-Generate
- While generating, the Generate and Embed Video popup modal will automatically close, displaying the video progress bar within WalkMe Share's sub-header
- Once the video has successfully generated and is ready:
- Select Click to view your video! to reopen the Generate and Embed Video popup modal
- Click Upload
- While uploading, the Generate and Embed Video popup modal will automatically close, displaying the video progress bar within WalkMe Share's sub-header
- Once the video has successfully uploaded to Vimeo:
- Select Click to view your video! to reopen the Generate and Embed Video popup modal
- Click Copy Link
- Paste the video link into the desired knowledge base article, WalkMe Resource, or webpage
Video Privacy
WalkMe Share uses a private Vimeo account to host the video files. Users concerned about privacy may download their videos and upload them to the storage management system of their choice.
How to delete a video from WalkMe Share:
- Click the embed icon near the top-right of WalkMe Share's Presentation page header
- Select Embed Video from the dropdown list to launch the Generate and Embed Video popup modal
- Click Delete From Vimeo
Export a WalkMe Share Video File
WalkMe Share allows users to download their video files as .mp4 files.
To download a video from WalkMe Share:
- Click the embed icon near the top-right of WalkMe Share's Presentation page header
- Select Embed Video from the dropdown list to launch the Generate and Embed Video popup modal
- Click the Export Video Fill icon near the top-right of WalkMe Share's Generate and Embed Video popup modal
- Videos will download to the user's computer's download folder.
Limitation: Presentations with over 60 slides can not be converted due to Share's sever restrictions. These large video files should be uploaded to Vimeo
Using comments
WalkMe Share users can collaborate with others on WalkMe Share Presentation slides to add, edit, reply to, and resolve comments
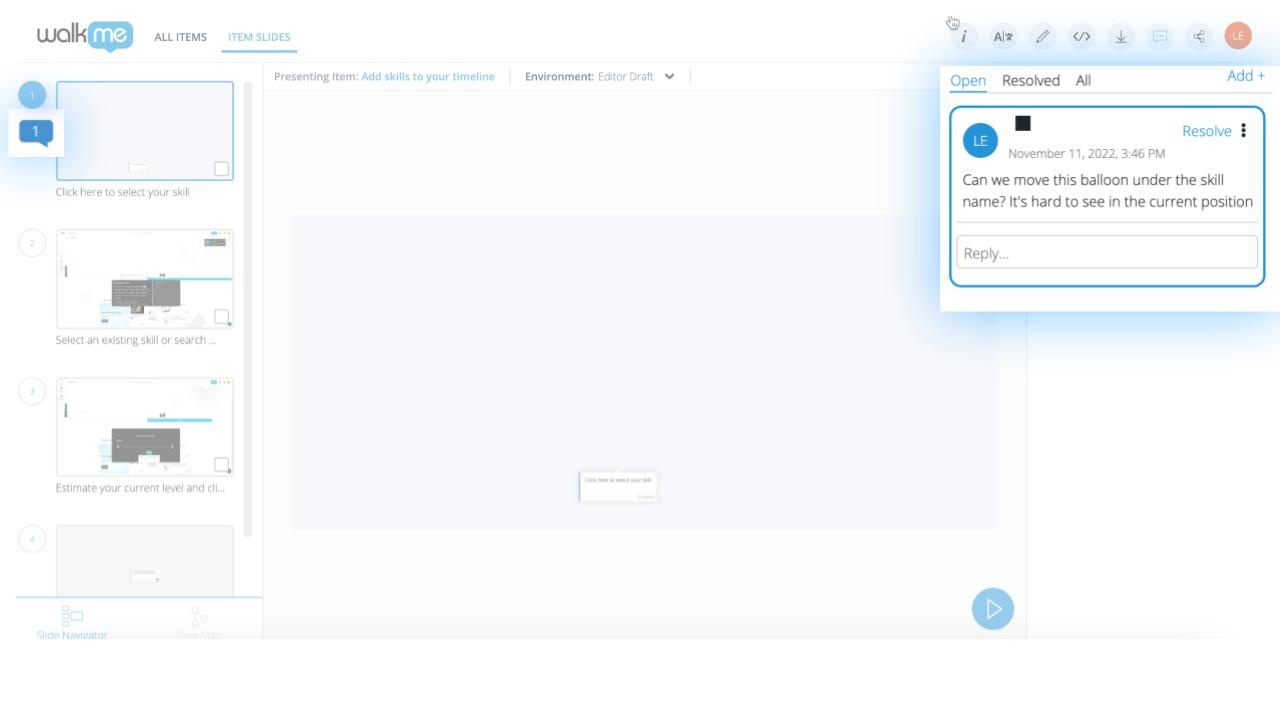
Users who are part of a shared presentation have permission to edit, comment, or reply to any individual slide. When a discussion is finished, they can resolve a comment to close it. User's who are part of a shared presentation can @chatter other shared users, sending the comment as a notification to their email address.
Viewing Comments
Users can view comments by three categories on an individual WalkMe Share slide.
How to select a WalkMe Share Presentation slide's viewing category:
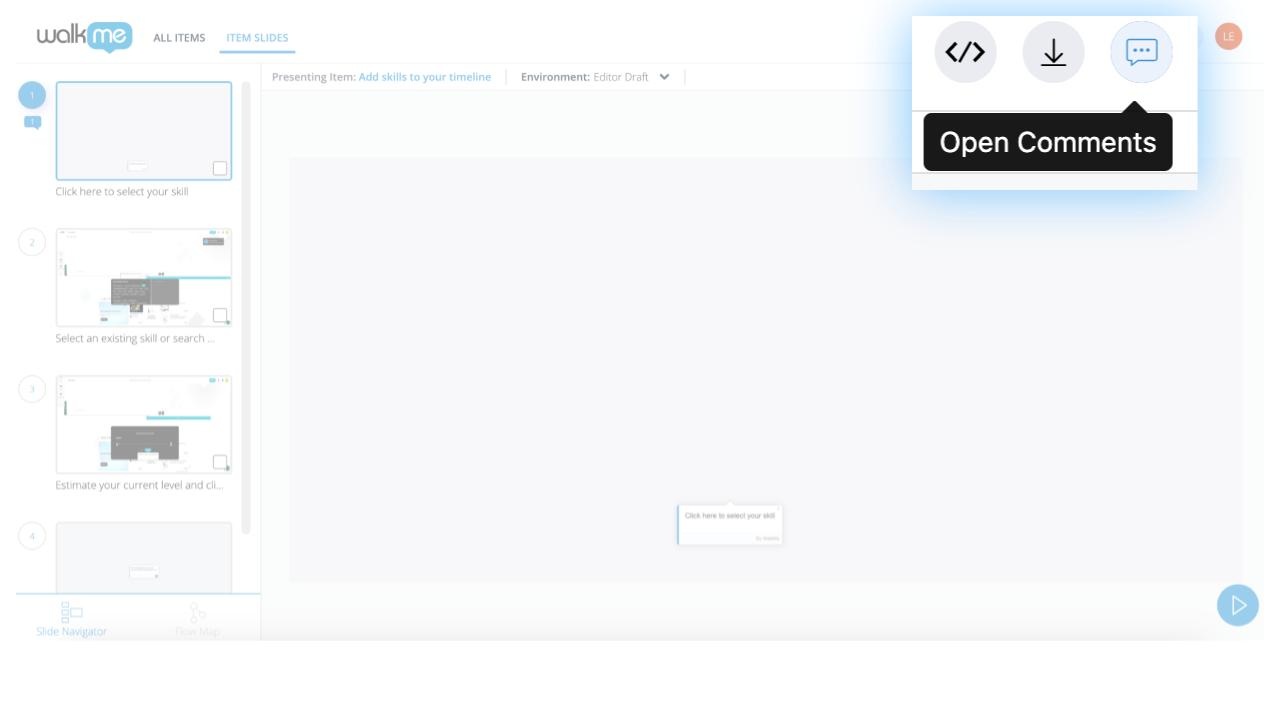
- Click the comment icon, near the top-right of WalkMe Share's Presentation page header
- With WalkMe Share's comment drawer-interface open, users can select the slide's comment viewing category by:
- Open
- Resolved
- All
Add Comments
To add comments to WalkMe Share Presentation slides:
- Click the comment icon, near the top-right of WalkMe Share's Presentation page header
- With WalkMe Share's comment drawer-interface open:
- Click Comment
- (Optional) @chatter a user within the shared presentations group
- Add a comment in the input box
- Click Add
Resolve Comments
To resolve a comment on a WalkMe Share slide:
- Click the comment icon, near the top-right of WalkMe Share's Presentation page header
- With WalkMe Share's comment drawer-interface open:
- Select the desired comment
- Click Resolve
Edit Comments
To edit a comment on a WalkMe Share Presentation slide:
- Click the comment icon, near the top-right of WalkMe Share's Presentation page header
- With WalkMe Share's comment drawer-interface open:
- Select the desired comment
- Click the comment menu icon located at the top-right of the comment container
- Select Edit from the dropdown list
- Edit the comment within the input box
- When ready, click Add
Delete Comments
To delete a comment on a WalkMe Share slide:
- Click, the comment icon near the top-right of WalkMe Share's Presentation page header
- With WalkMe Share's comment drawer-interface open:
- Select the desired comment
- Click the comment menu icon located at the top-right of the comment container
- Select Delete from the dropdown list
- Upon Delete selection, the comment will be permanently deleted from WalkMe Share
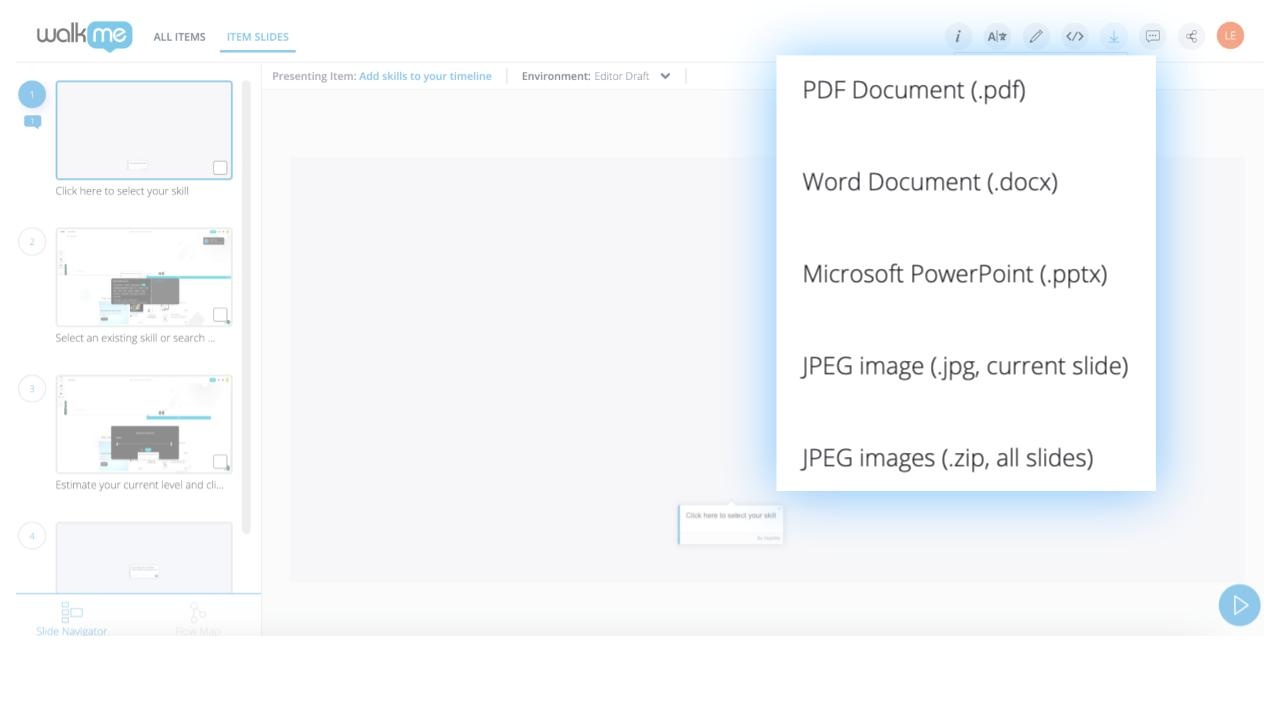
Download presentation
WalkMe Share provides users the option to download their WalkMe Share Presentation into two documentation format types.To download a presentation into one of these document format types:
- Click the download icon near the top-right of WalkMe Share's Presentation page header
- From the dropdown list, select from:
- PDF Document (.pdf)
- Word Doc (.docx)
- Microsoft PowerPoint (.pptx)
- JPEG Image (.jpg, current slide)
- JPEG images (.zip, all slides)
Downloaded documents can be located in the user's computer's local download folder.
Technical Notes
- Steps captured without screenshots will not display on WalkMe Share
- Elements captured while the Editor Screenshot Settings are set to:
- Blur (Text in screenshots is illegible): Will appear with slides that have blurred backgrounds
- Do not capture screenshots: Will not load in WalkMe Share
- WalkMe Share cannot present WalkMe items that do not capture on-screen data, such as:
- Resources
- ActionBot conversations
- Shuttles
- Onboarding Tasks
- Surveys
- Items captured with jQuery may appear cut off, floating, or attached to the wrong element
- This type of issue is not a WalkMe Share bug, but rather an issue with the element capture feature of the WalkMe Editor
- Use the Edit Item Position feature to move a balloon that is not in the correct spot