The Mobile Console displays a flow map of captured steps:

Editing Mobile Smart Walk-Thrus
Editing Mobile Smart Walk-Thrus in Power Mode
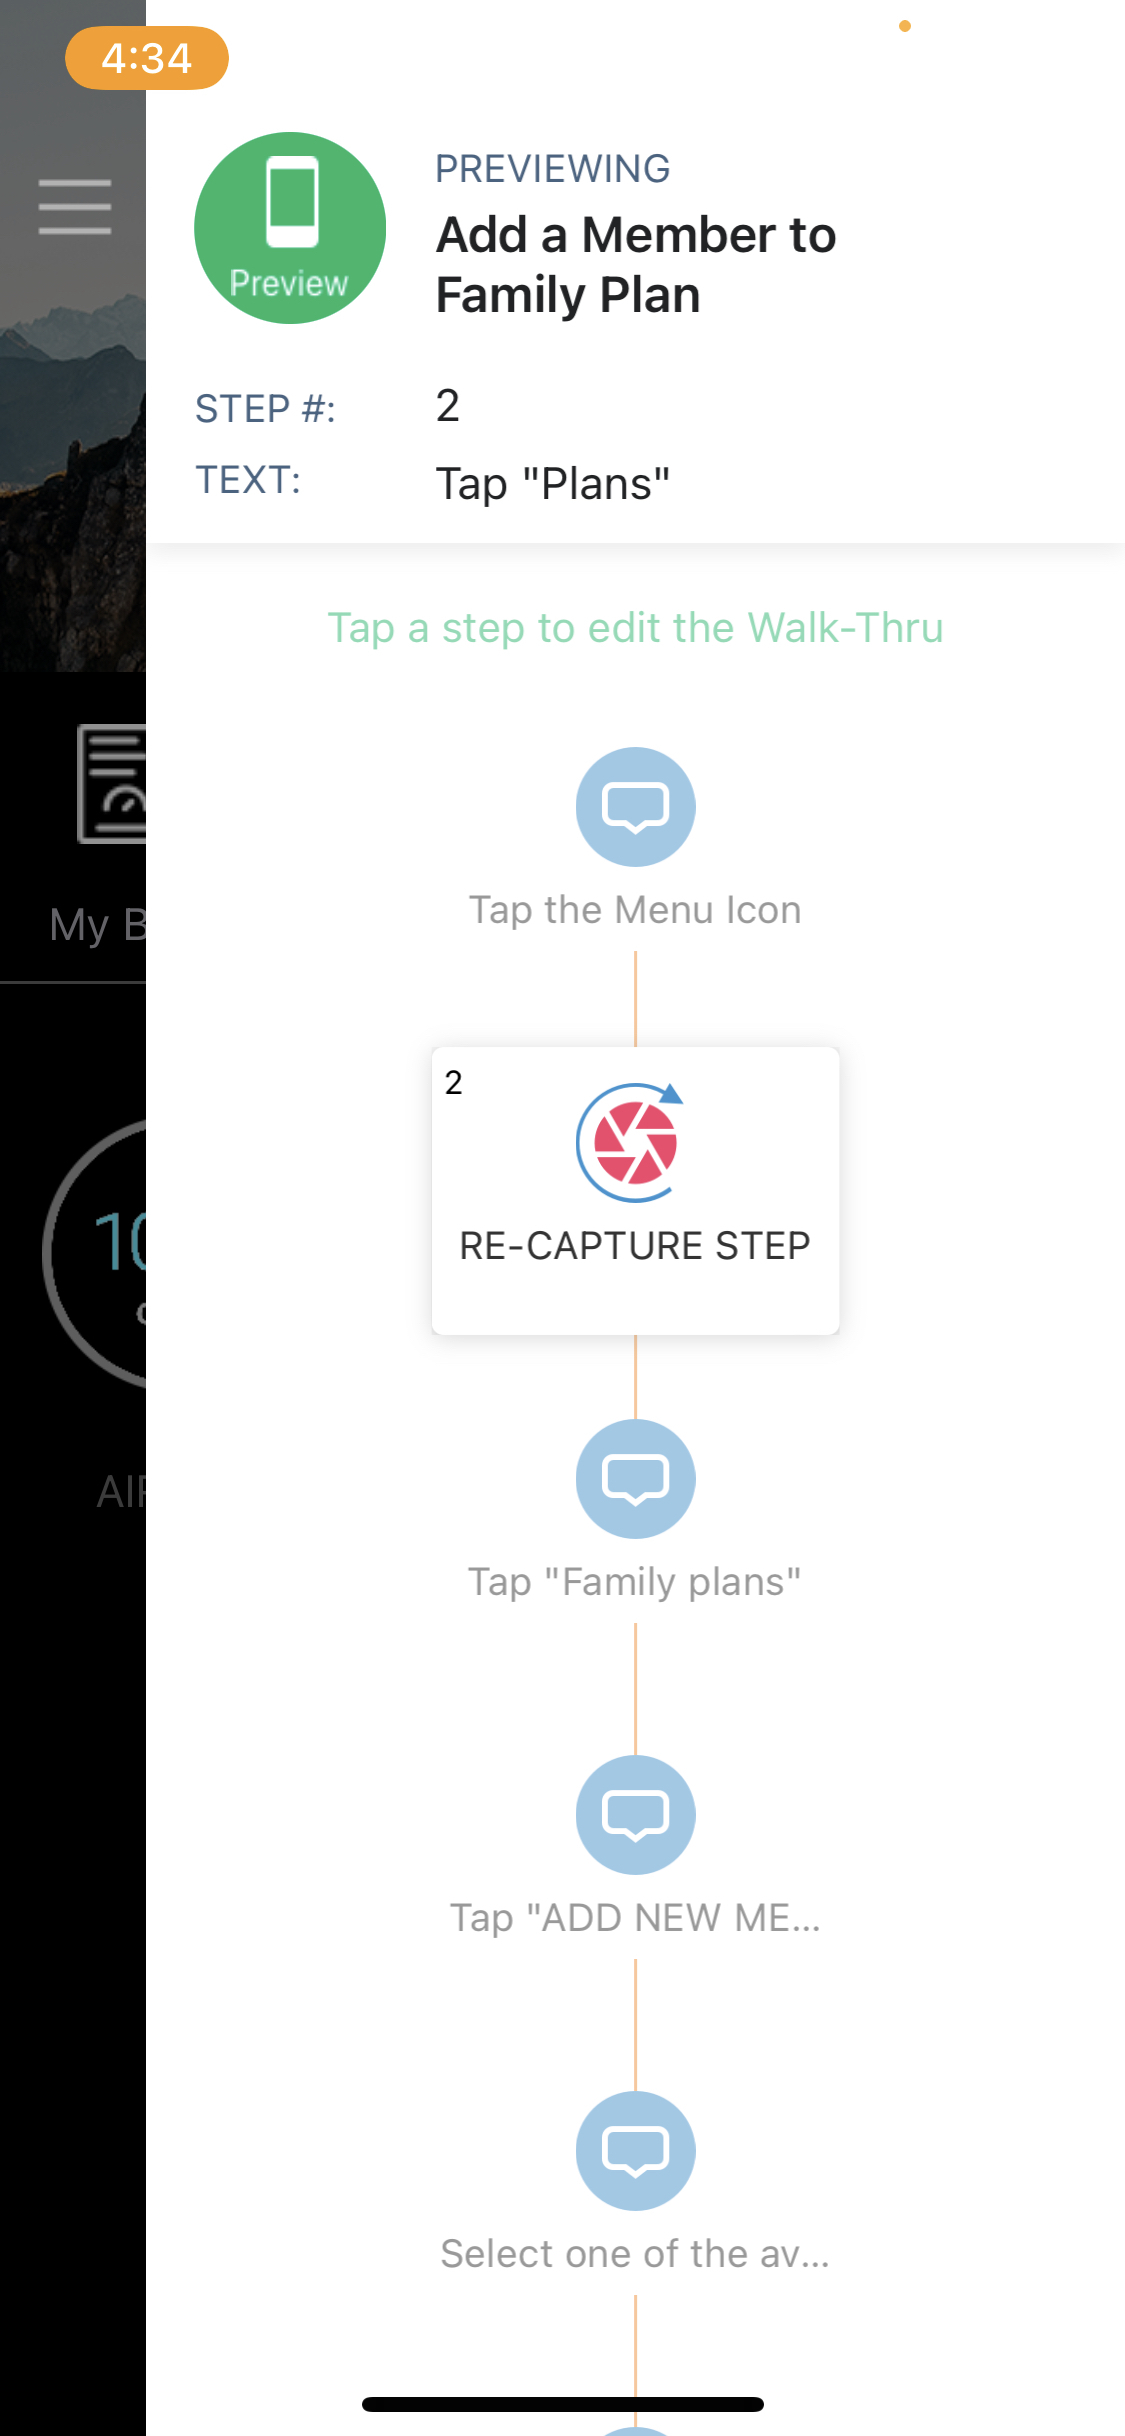
While previewing a Smart Walk-Thru and playing a given a step, you can tap the green Preview icon and tap on the step playing to re-capture the element associated with the step.
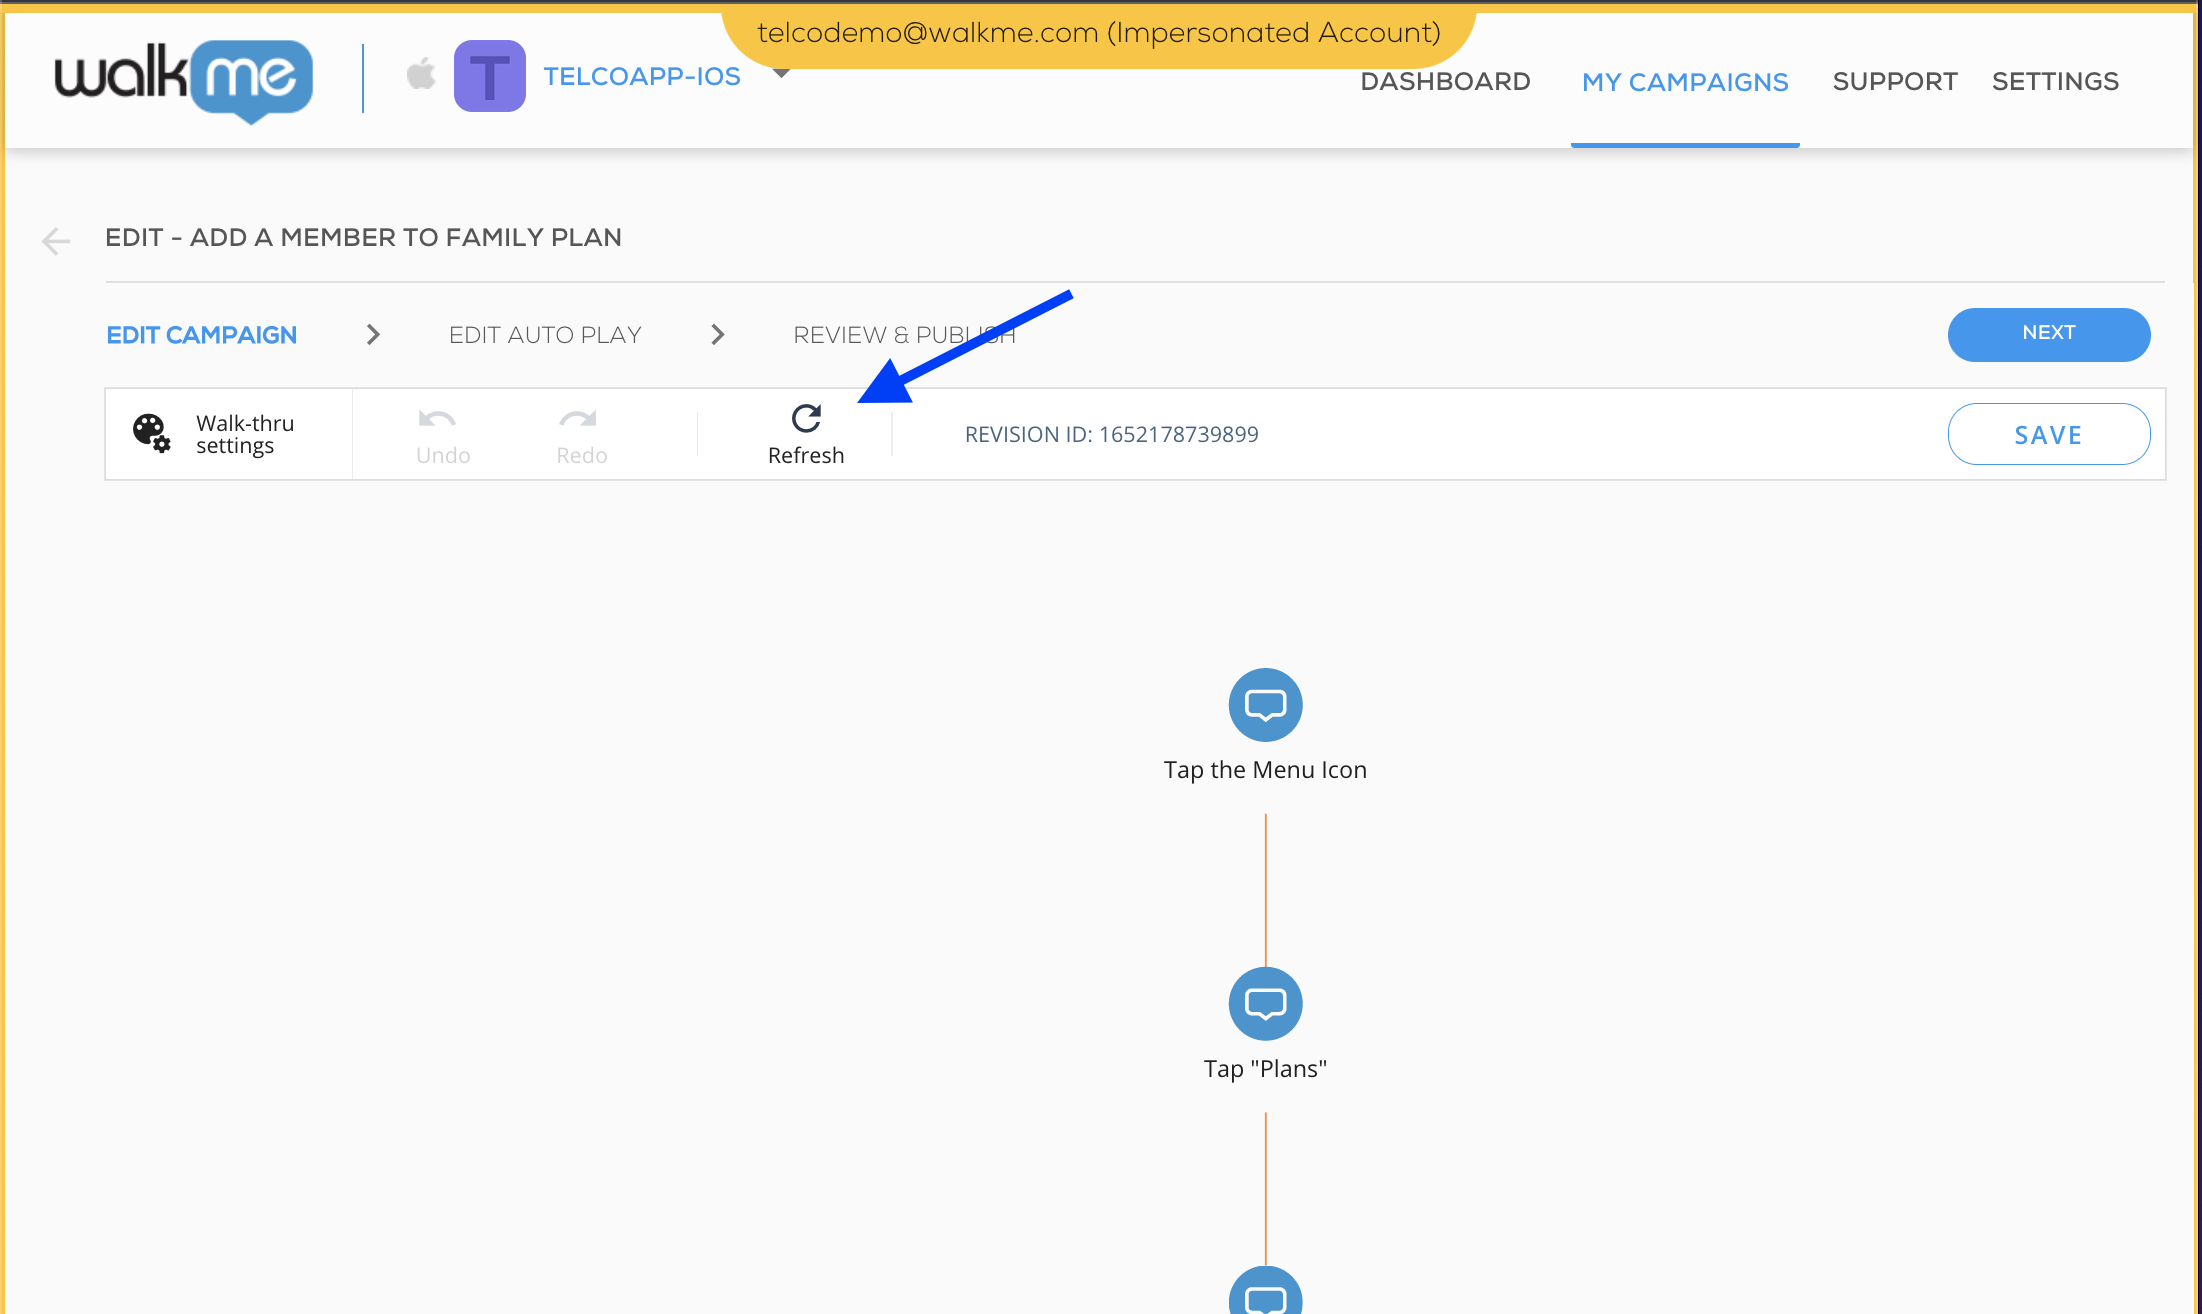
Pro-Tip: It is best to consult the Mobile Console while editing in Power Mode. As you make edits in Power Mode and save them, you can use the Refresh button in the Walk-Thru's WYSIWYG editor (next to the Walk-Thru settings icon) to see the new edits reflected in the Mobile Console.
After making an edit, the Walk-Thru will continue to play so you can continue reviewing the flow and decide whether to make additional edits before saving or discard the edits altogether.
Starting from WalkMe Mobile SDK version 1.6.0, edit state is differentiated from regular Preview by a different purple color.
After performing an edit, it is not automatically saved. The number of unsaved edits is represented as a number badge on the Preview/Edit bubble:
You can tap on the purple icon again to save the edits or discard them.
While a Walk-Thru is undergoing edits, it cannot be refreshed, since, at this point, there are two sources of truth: the unsaved version you are working on, and the version that will be fetched if you refresh.
After saving or discarding the edits, you are returned to the Smart Walk-Thru's Preview and can refresh as usual. Decide whether you want to save or discard your edits before moving on to other campaigns.
Customizing Mobile Smart Walk-Thrus in the Mobile Console
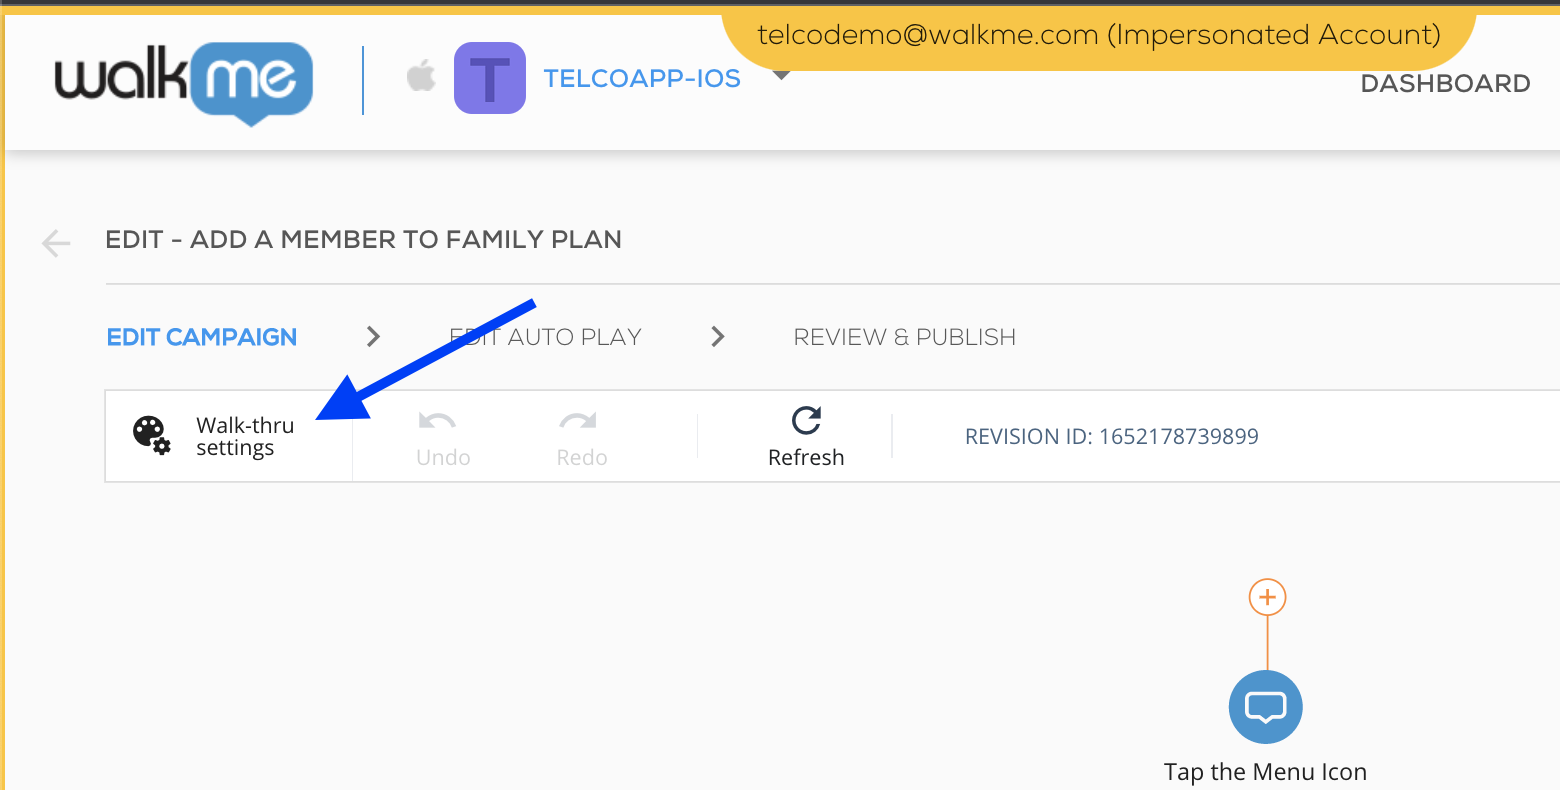
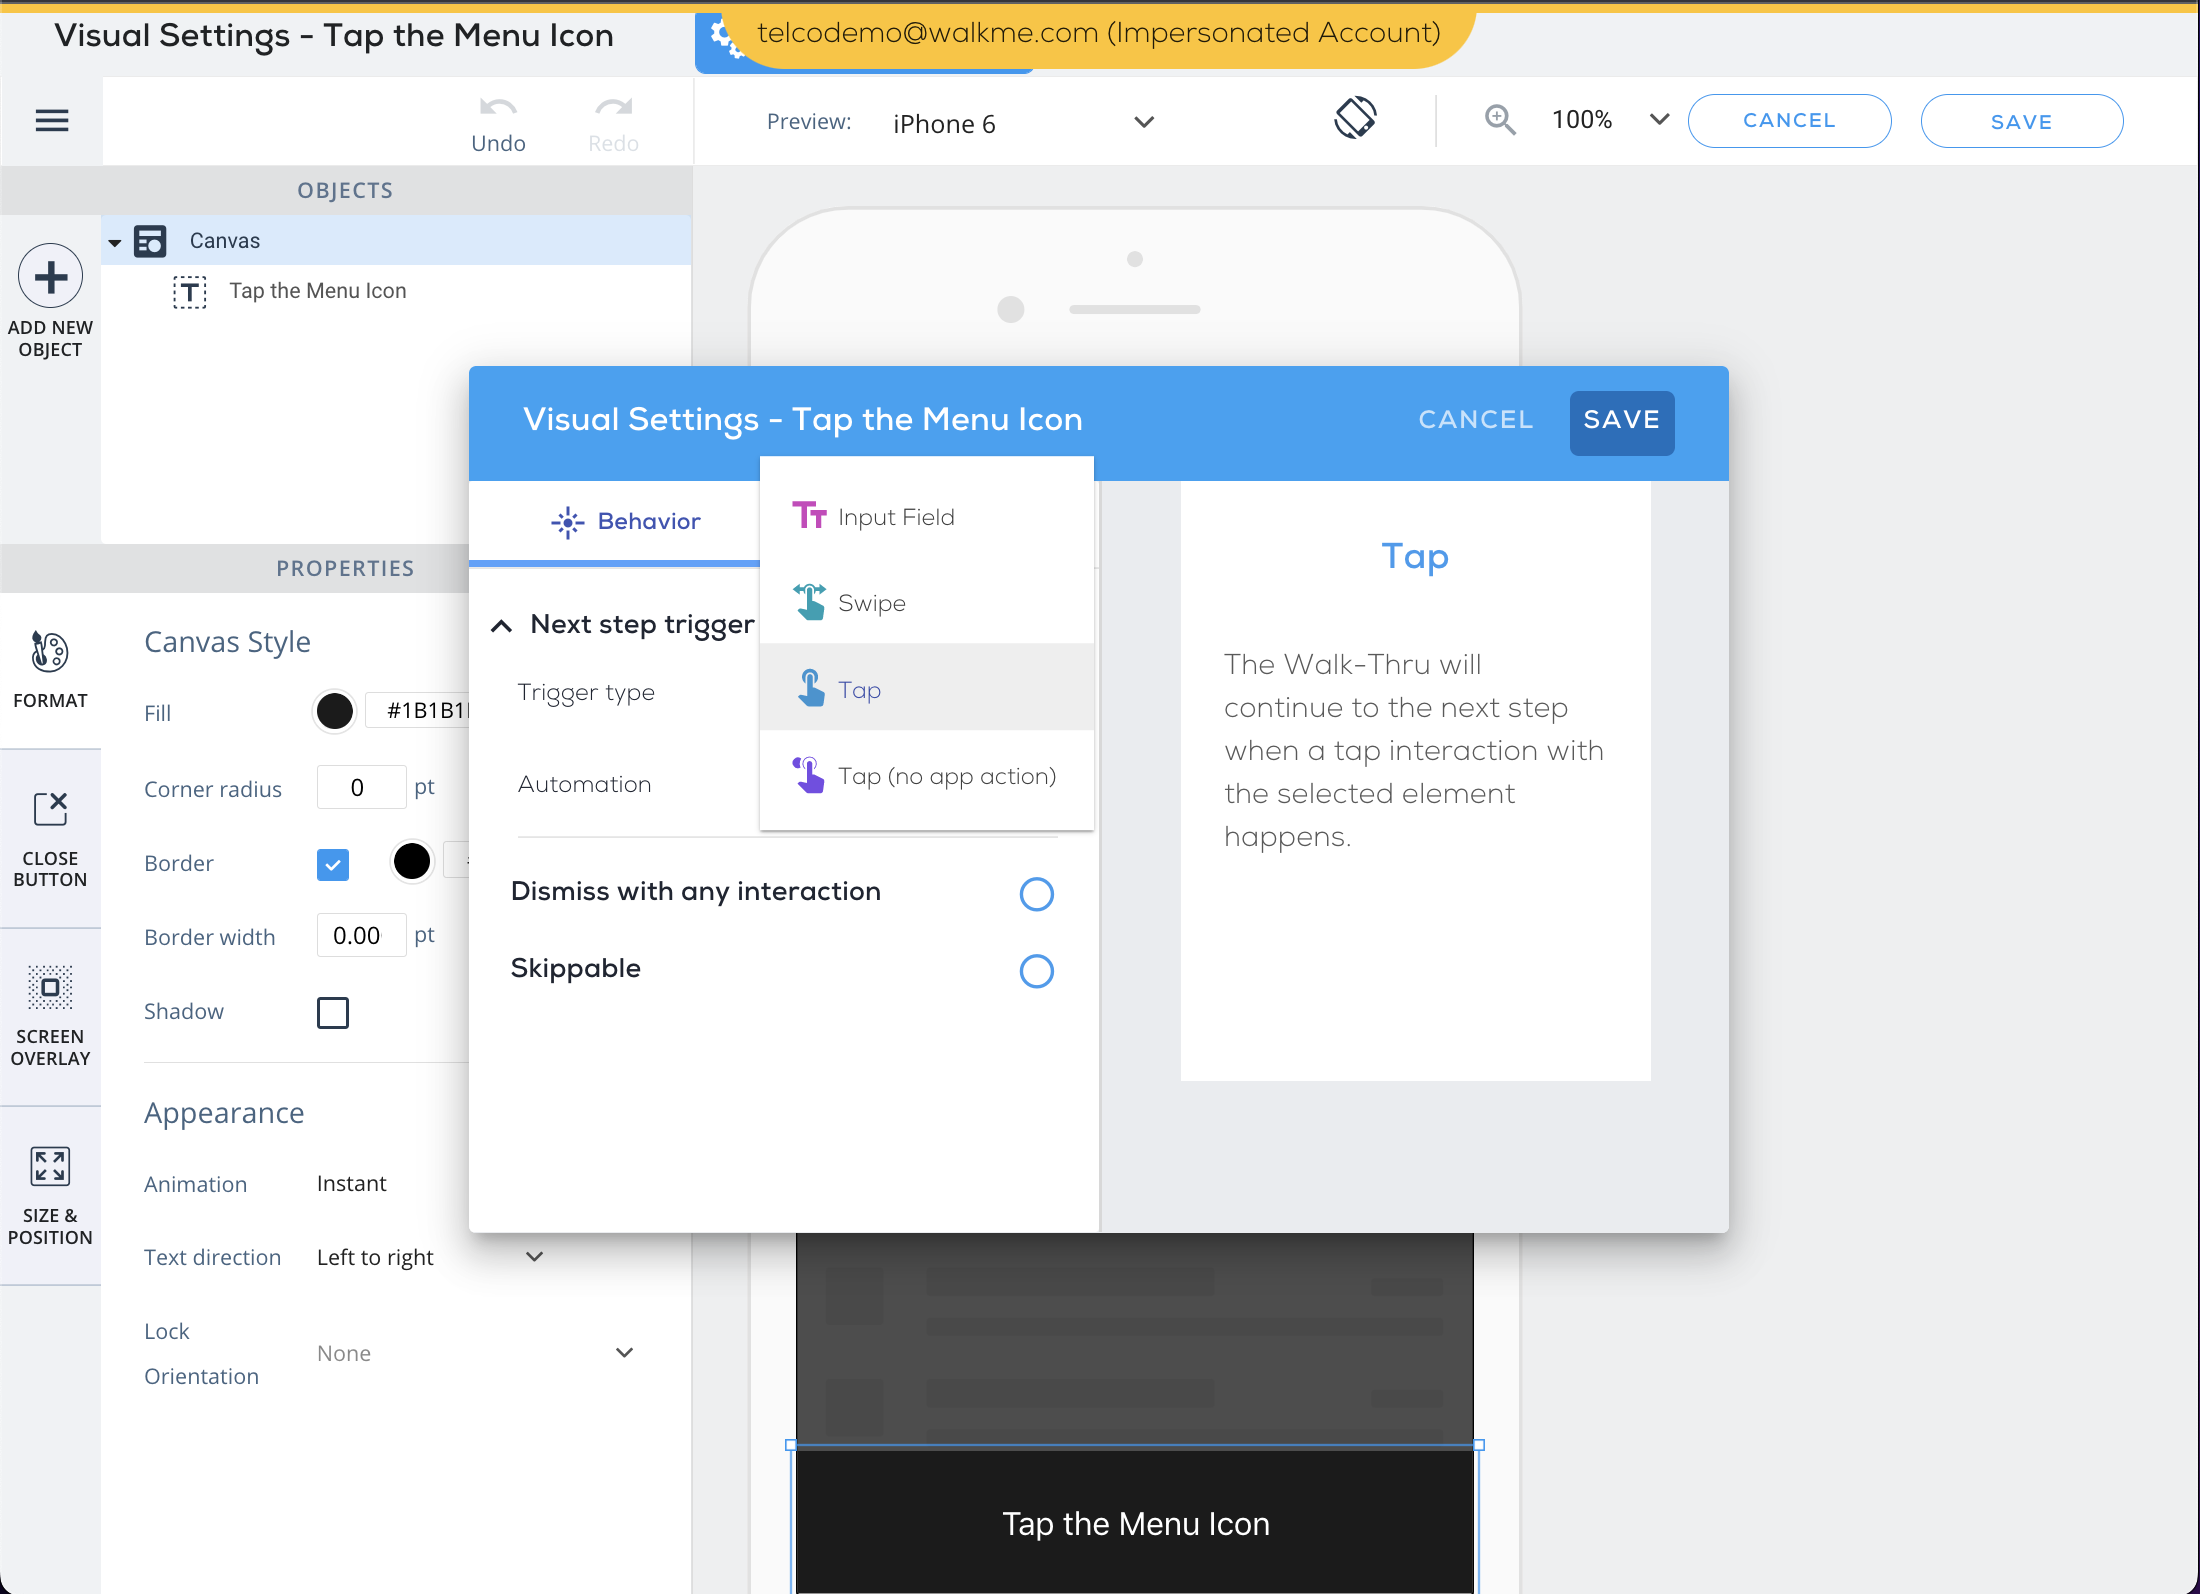
You can customize a Smart Walk-Thru or set the default style that will then apply to all steps by clicking on the Settings (paint palette + gear) icon:
You can also customize individual steps by clicking on one and using the visual editor or clicking on Functional Settings.
If a Step's individual settings are changed from those in the Walk-Thru's default style, that Step will no longer reflect the default style unless you restore it (click on Restore to default in the individual step's settings screen).
A Walk-Thru can be set to display in Spotlights layout or in Balloons layout.
Visual settings
Spotlight customization
Currently, Spotlight Steps have the full range of WYSIWYG customization available; each Spotlight Step can be customized through its own WYSIWYG editor.
Use the WYSIWYG to customize the step's text, or add Elements to it (e.g., images, buttons, shapes, etc.).
Spotlight Steps contain some unique features, including the following:
- Button and Shape elements added in Spotlight Steps have a unique call to action ("CTA") available for triggering the next Step: Next Step. This option is not available if the Step is the last in the screen.
- Spotlight Steps contain the option to disable default element interaction events, meaning you can prevent an element interaction event if desired during a Smart Walk-Thru.
- For example, if element interaction is disabled for a Step pointing at a button that opens the app menu, and the user taps the button while the step is playing, the menu will not open, and the Walk-Thru will continue to the next Step.
Balloon customization
Currently, default balloon customization has the following settings:
- Background color;
- Corners radius;
- Font family, size and color;
- Balloon direction: Which direction of the element the balloon will appear on. This setting is applied as possible (if there is not enough space for the balloon to appear where set, it will fall back to another direction);
- Balloon offset: How far from the element the balloon will appear;
- Balloon back-cover: Supported only from WalkMe Mobile SDK version 1.8.0.
- Animation: Supported only from WalkMe Mobile SDK version 1.13.0. Options include Fade (where the balloon fades in and out), Fly in (where the balloon flies into view from the direction of your choice; you may also select "auto" if you want the SDK to decide the direction for you) and Instant (where the balloon just appears instantaneously).
To enable more visual customization, check out rich design for SWT steps.
Functional settings
Customizing Step types
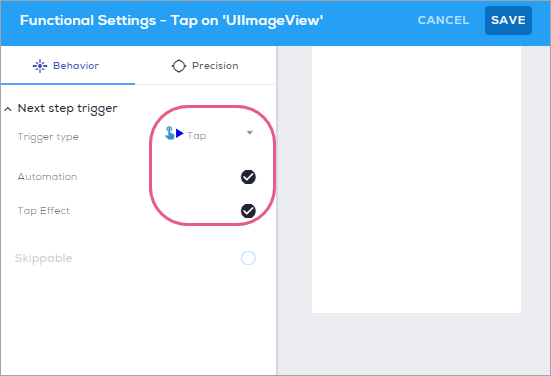
WalkMe identifies the element type associated with a given step and sets the Step type according to the user's expected interaction with the element. If needed, the default Step type can be overridden in the Behavior tab of a Step's Functional Settings:
The possible Step types are as follows:
- Input Field: Steps that will be dismissed once the device's mobile keyboard is dismissed or a keyboard Done button is tapped.
- With WalkMe Mobile SDK v1.13.0+, you can choose to consider the following actions as the dismissal of an input field:
- Keyboard Closed;
- Focus Lost;
- Keyboard Enter Tapped:

- Note that mobile keyboards aren't only text keyboards, but also include number, date, or other value picker keyboards;
- In the Step's Functional Settings, you can set Input Steps to receive Auto Focus, which makes WalkMe put the app focus on the Input Step's element.
- Swipe (available with WalkMe Mobile SDK v1.14.0+): The next Step will be triggered when the end-user swipes left or right on the app screen;
- Configure which direction counts as a swipe trigger;
- Set the swipe sensitivity (how hard the end-user must swipe before the next step is triggered:

- Tap: Steps that will be dismissed once the element they point to is tapped;
- Complex elements will always be captured as Tap Steps;
- Scroll does not count as a Tap interaction that triggers a Walk-Thru Step.
- From WalkMe Mobile SDK v1.13.0+, you can check the Automation radio button to make WalkMe perform the Step's tap action for the end-user.
- Automated Steps won't show any message to the end-user, but you can add a tap effect so the end-user will see a wave effect when the tap occurs:
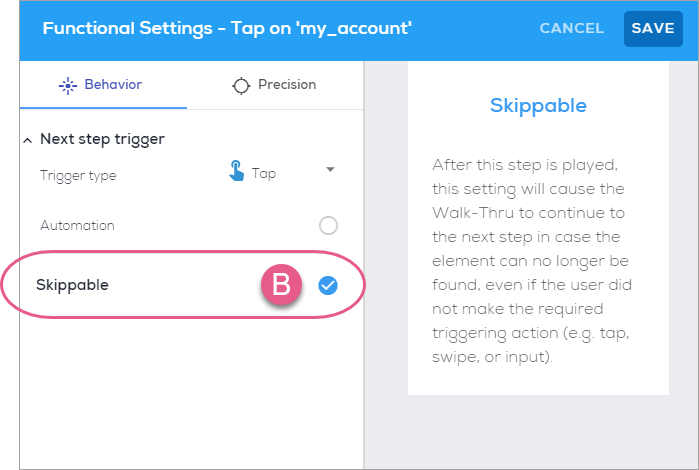
With WalkMe Mobile SDK v1.8.0 and above, you can designate steps as skippable, meaning the Walk-Thru will proceed beyond the skippable step despite it not having been triggered (by a tap or keyboard dismissal). The Walk-Thru will move on from a skippable step onto the next step in one of two scenarios:
- The Step's element was interacted with;
- The Step's element is no longer visible on screen.
Pro-Tip: In order to be skipped, the Step's element must be visible on screen in the first place.
Make a Step skippable by clicking the Step's Functional Settings and then checking the Skippable radio button.
Starting from WalkMe Mobile SDK version 1.7.0, you can tweak Walk-Thru step precision settings to improve WalkMe's ability to identify elements in you app(s). Available tweaks differ between Native and Hybrid apps due to algorithm differences.
To toggle precision settings on, do the following:
- Navigate to the MY CAMPAIGNS tab in the Mobile Console.
- Click on the Walk-Thru whose precision settings you want to tweak.
- Navigate to the Walk-Thru Step whose precision settings you want to tweak.
- Hover over the step and click the Function Settings gear icon of Step.
- Click on the Precision tab:

- Select your desired settings and click SAVE.
- Preview the Walk-Thru in your app's Power Mode and use Refresh Campaign to re-fetch the Walk-Thru with the recent changes made in the Mobile Console.
Precision Settings on native apps
Upon clicking the precision icon For Walk-Thru steps on Native elements, you will see the name of the Element and the sub-heading Text Bypass, and you will be able to select one of Default, Ignore text, and Match text:

If you select Match text, an empty field will appear with the placeholder text "Enter Regex Here," and this is where you can enter the regex to match the text by.
Precision settings on hybrid apps
For Walk-Thru steps on Hybrid elements, the UI is the same as above, except the options are Ignore ID, Identify by text and Ignore text.
Pop-Up Steps (supported from WalkMe Mobile SDK v1.12.0+)
Pop-Up Steps allow you to add a Step that is not attached to an element as part of a Smart Walk-Thru.
To add a Pop-Up Step, simply hover over and click the plus icon between steps:
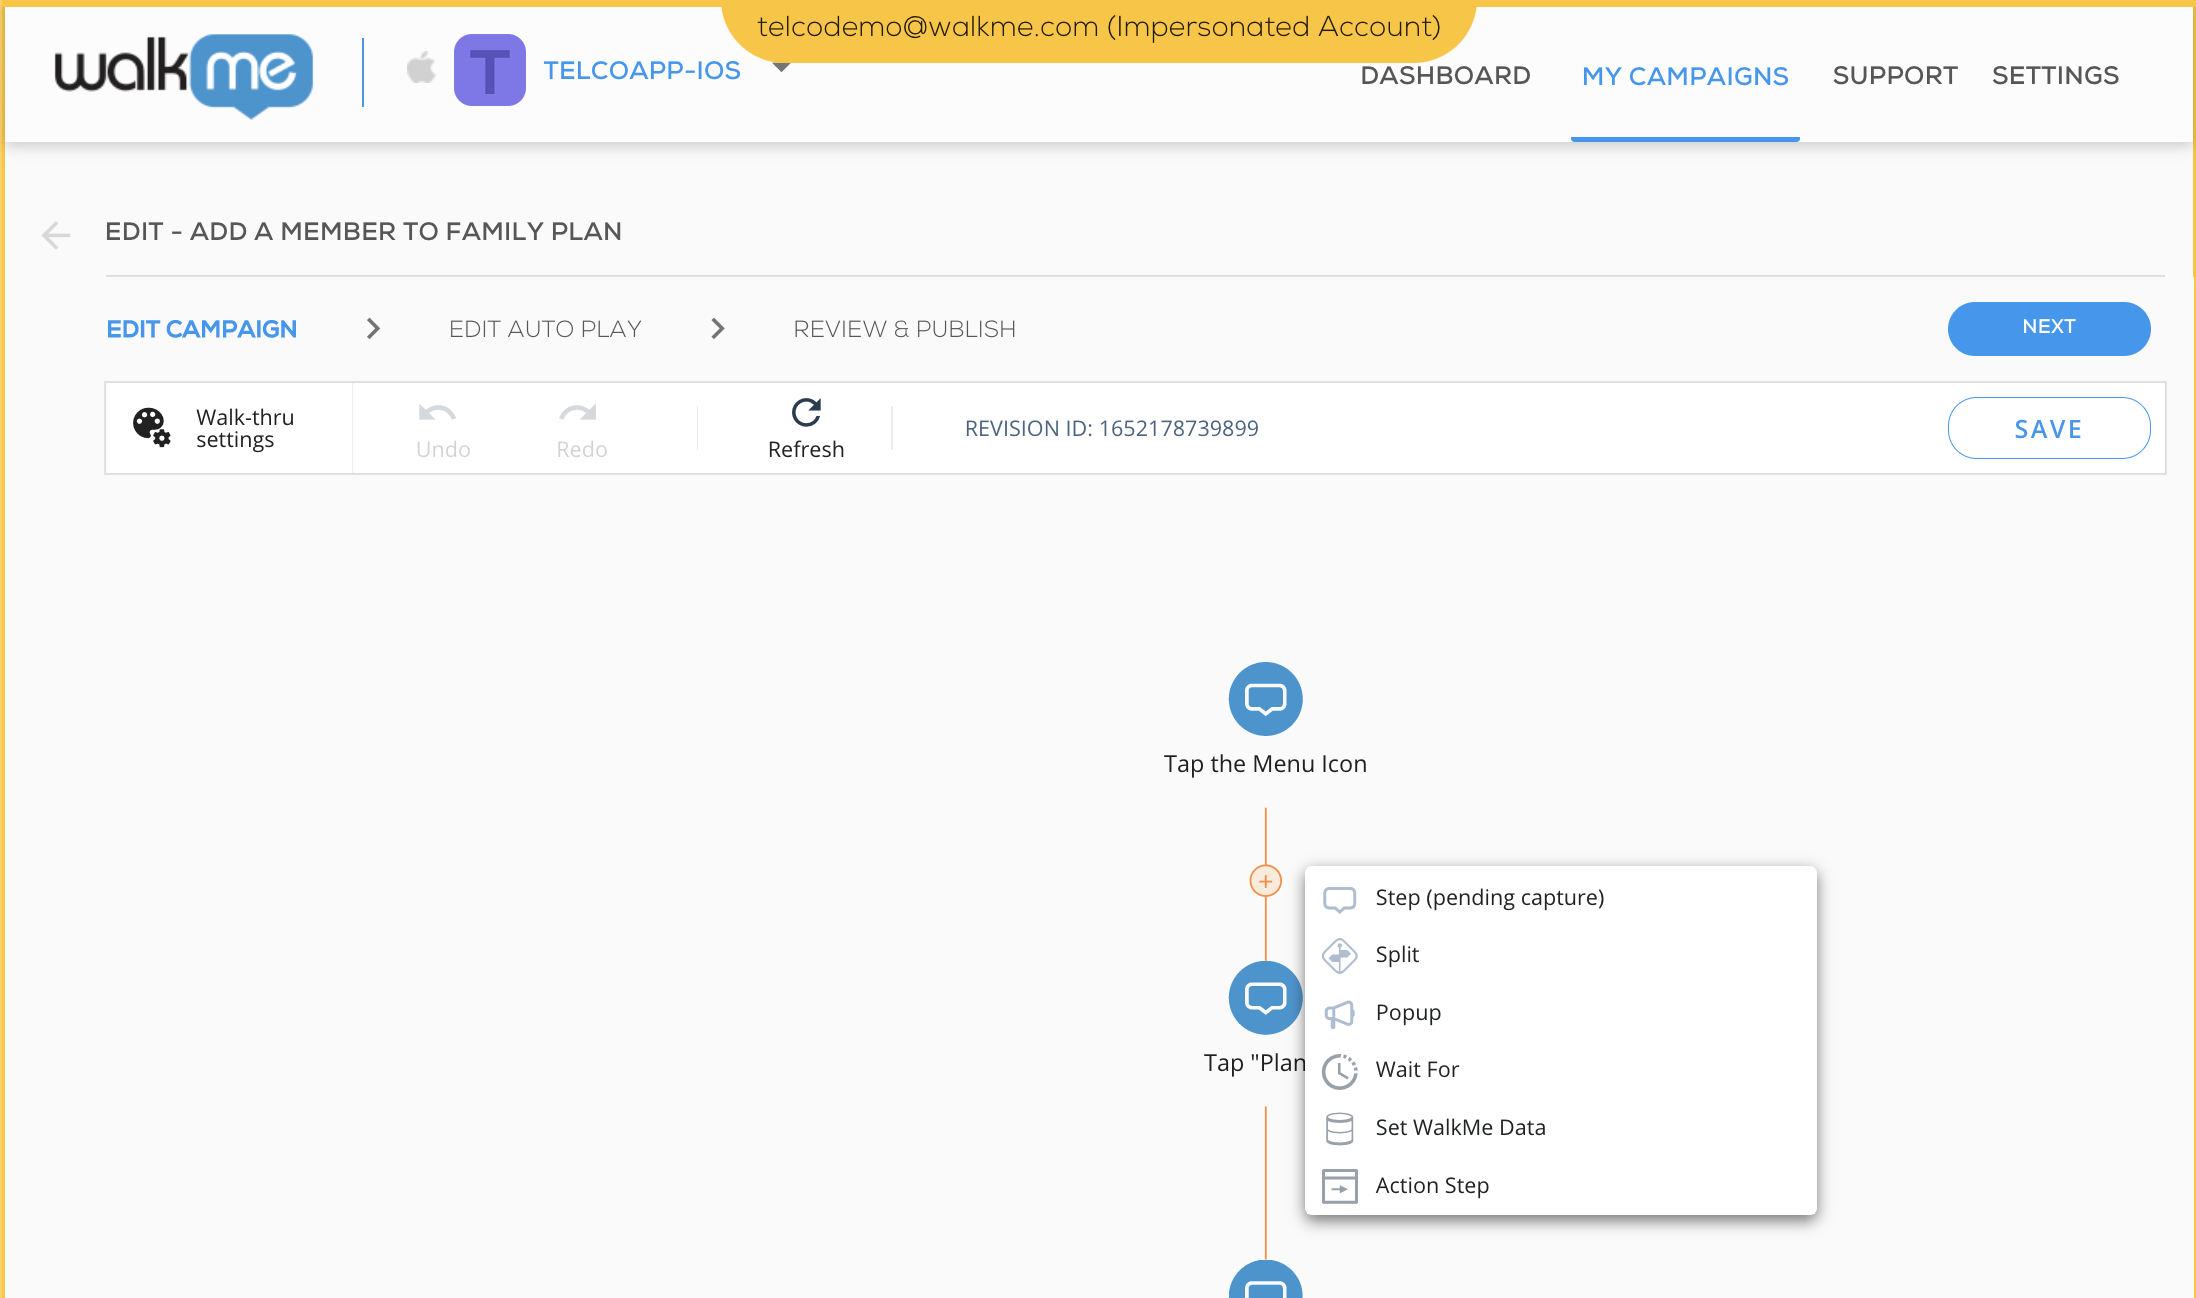
As they are not limited by the position of an element, Pop-Up Steps can be customized using the WYSIWYG to appear anywhere on the screen. They are useful for when you want to ask the user to select an option from a list, or if you want to stop mid Walk-Thru for an elaborate explanation of a process.
The best practice is to set a button with an explicit action for a Pop-Up Step. Note that "Next step" is the only action that can be associated with a button in the Pop-Up that will not close the Walk-Thru when tapped. Any other action set for the button (e.g., "OK", "Maybe", "Campaign", "Settings", etc.) will close the Walk-Thru.
If a Pop-Up Step is set as the final Step on a specific screen and your use case requires that the Pop-Up Step be dismissed without user interaction when the user moves away from the screen on which the Pop-Up is displayed, you can set the Pop-Up Step to be skippable.
Because they are not attached to an element, Pop-Up Steps can only be edited from the Mobile Console and will not have a "recapture" option from the Edit Walk-Thru menu in Power Mode.
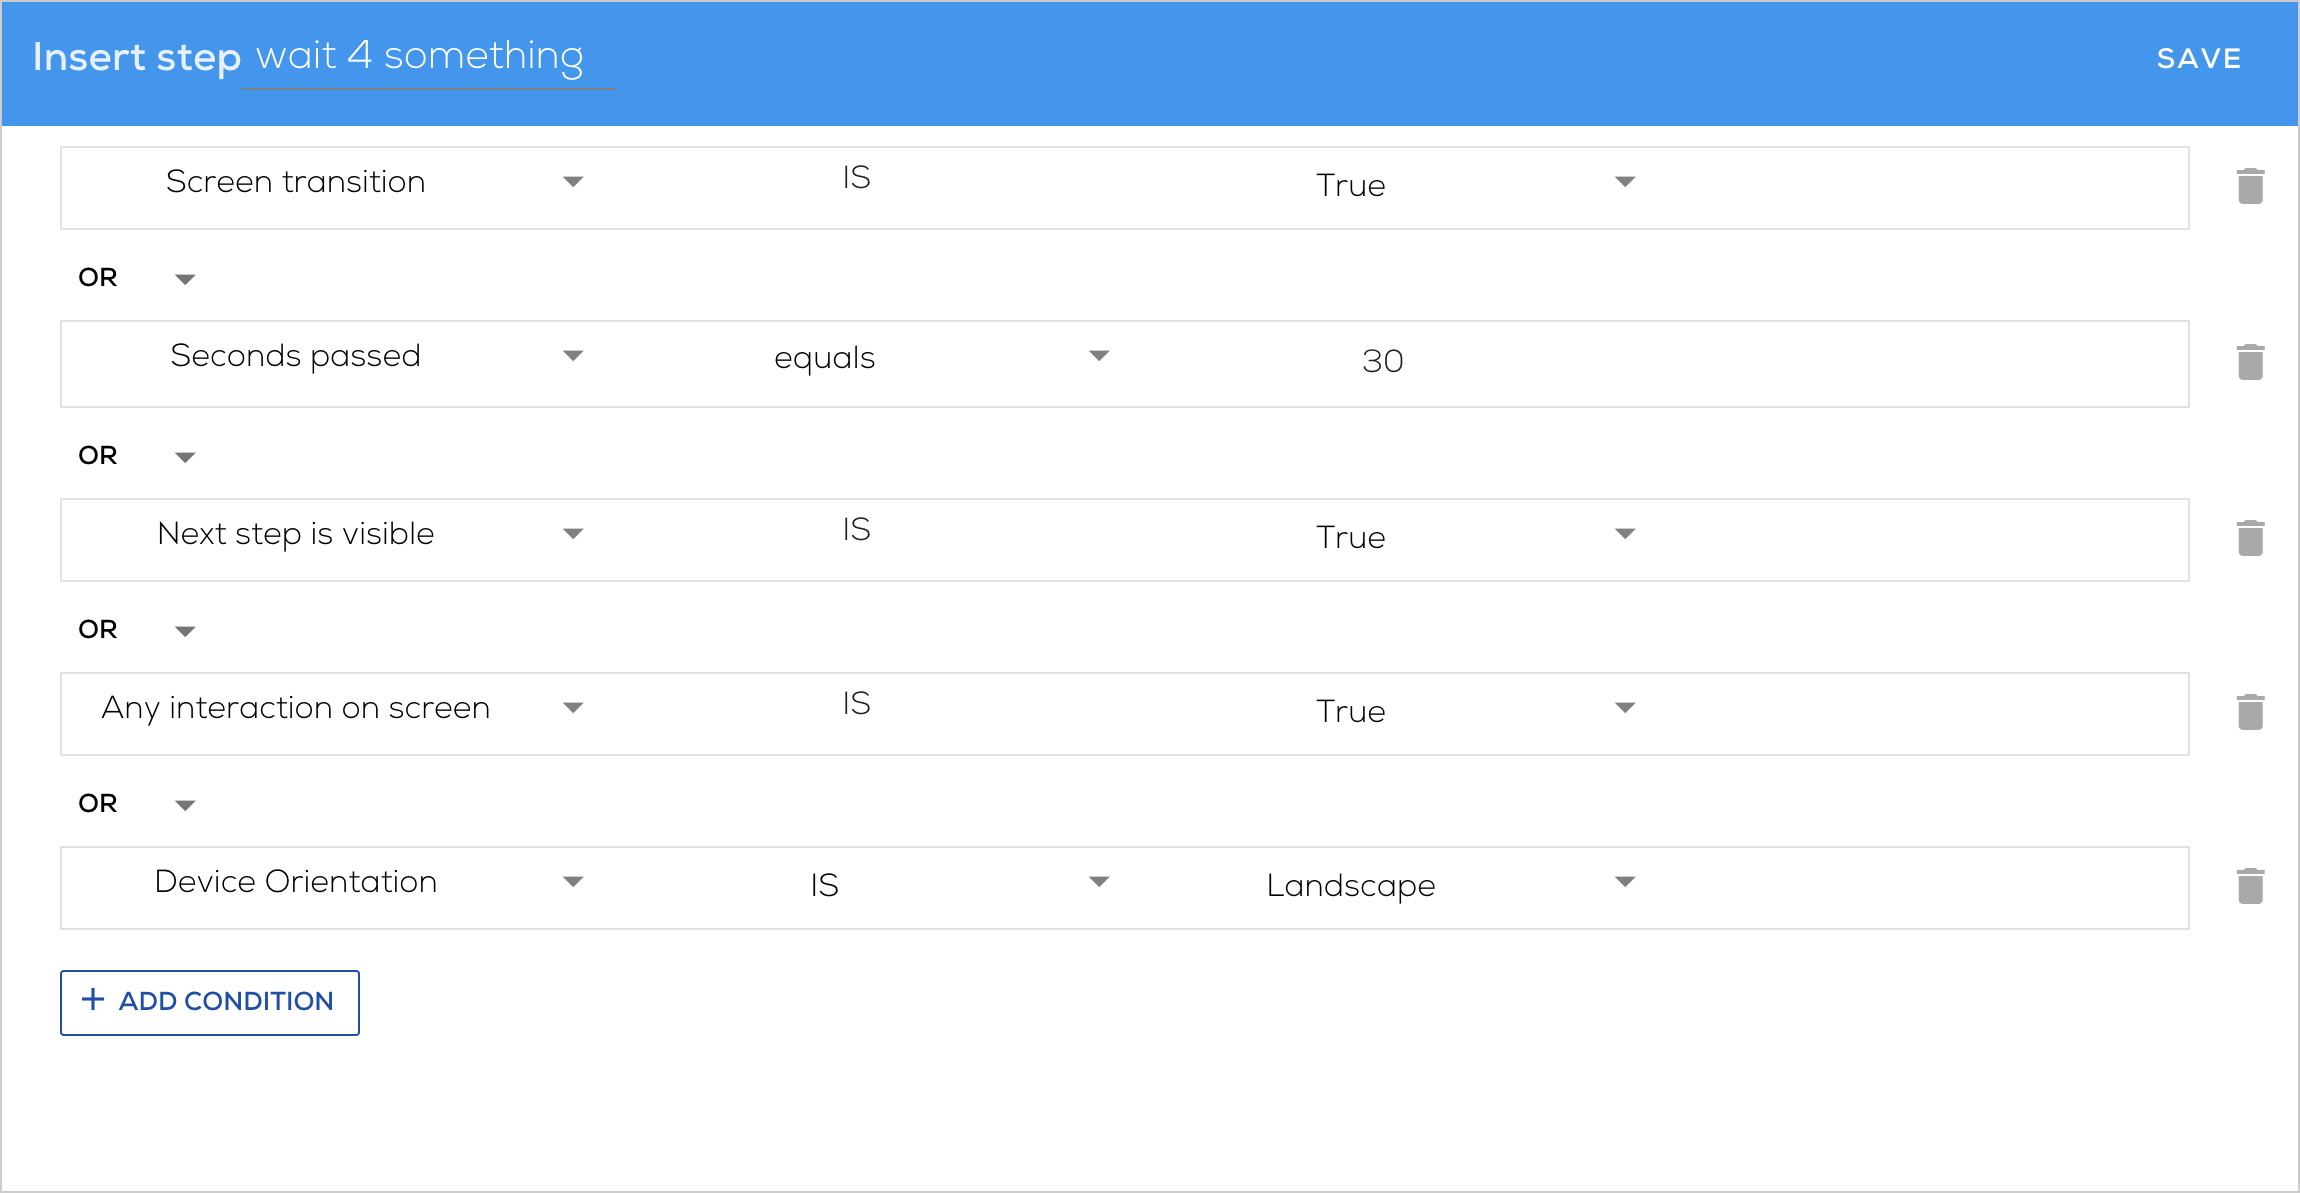
"Wait for" Steps (supported from WalkMe Mobile SDK v1.12.0+)
"Wait for" Steps allow you to make a controlled stop in the Walk-Thru flow when you are waiting for a specific action to happen. When playing a Smart Walk-Thru, a "Wait for" Step will pause guidance until the set of rules defined for the "Wait for" Step is evaluated as true.
"Wait for" rules include a subset of the rules that are usually available for campaign segmentation or Rules Based Goals, including the following:
- Session time;
- Time on current screen;
- Device orientation;
- Screens;
- Elements;
- Goals;
- User Attributes.
"Wait for" rules can also be set on rules that are unique to in-flow context, such as the following:
- Seconds passed: Create a delay in the Walk-Thru flow;
- Screen transition: Wait for the screen to change before continuing to the next Step;
- Next step is visible: Wait for the next Step in the flow to become available before attempting to play the next Step;
- Any interaction on screen: Wait for the user to make any interaction with the current screen in order to continue the flow.
Connect to Campaign (Supported From WalkMe Mobile SDK v1.4.0+)
You can set a campaign to be triggered immediately after the last step in a Smart

Start Smart Walk-Thru from Specific Step (Supported From WalkMe Mobile SDK v1.13.0+)
When linking one Smart Walk-Thru to another campaign, e.g., through Connect to Campaign, or when selecting a SWT as the action for buttons and shapes in the WYSIWYG, you can decide which Step the Smart Walk-Thru will start from.
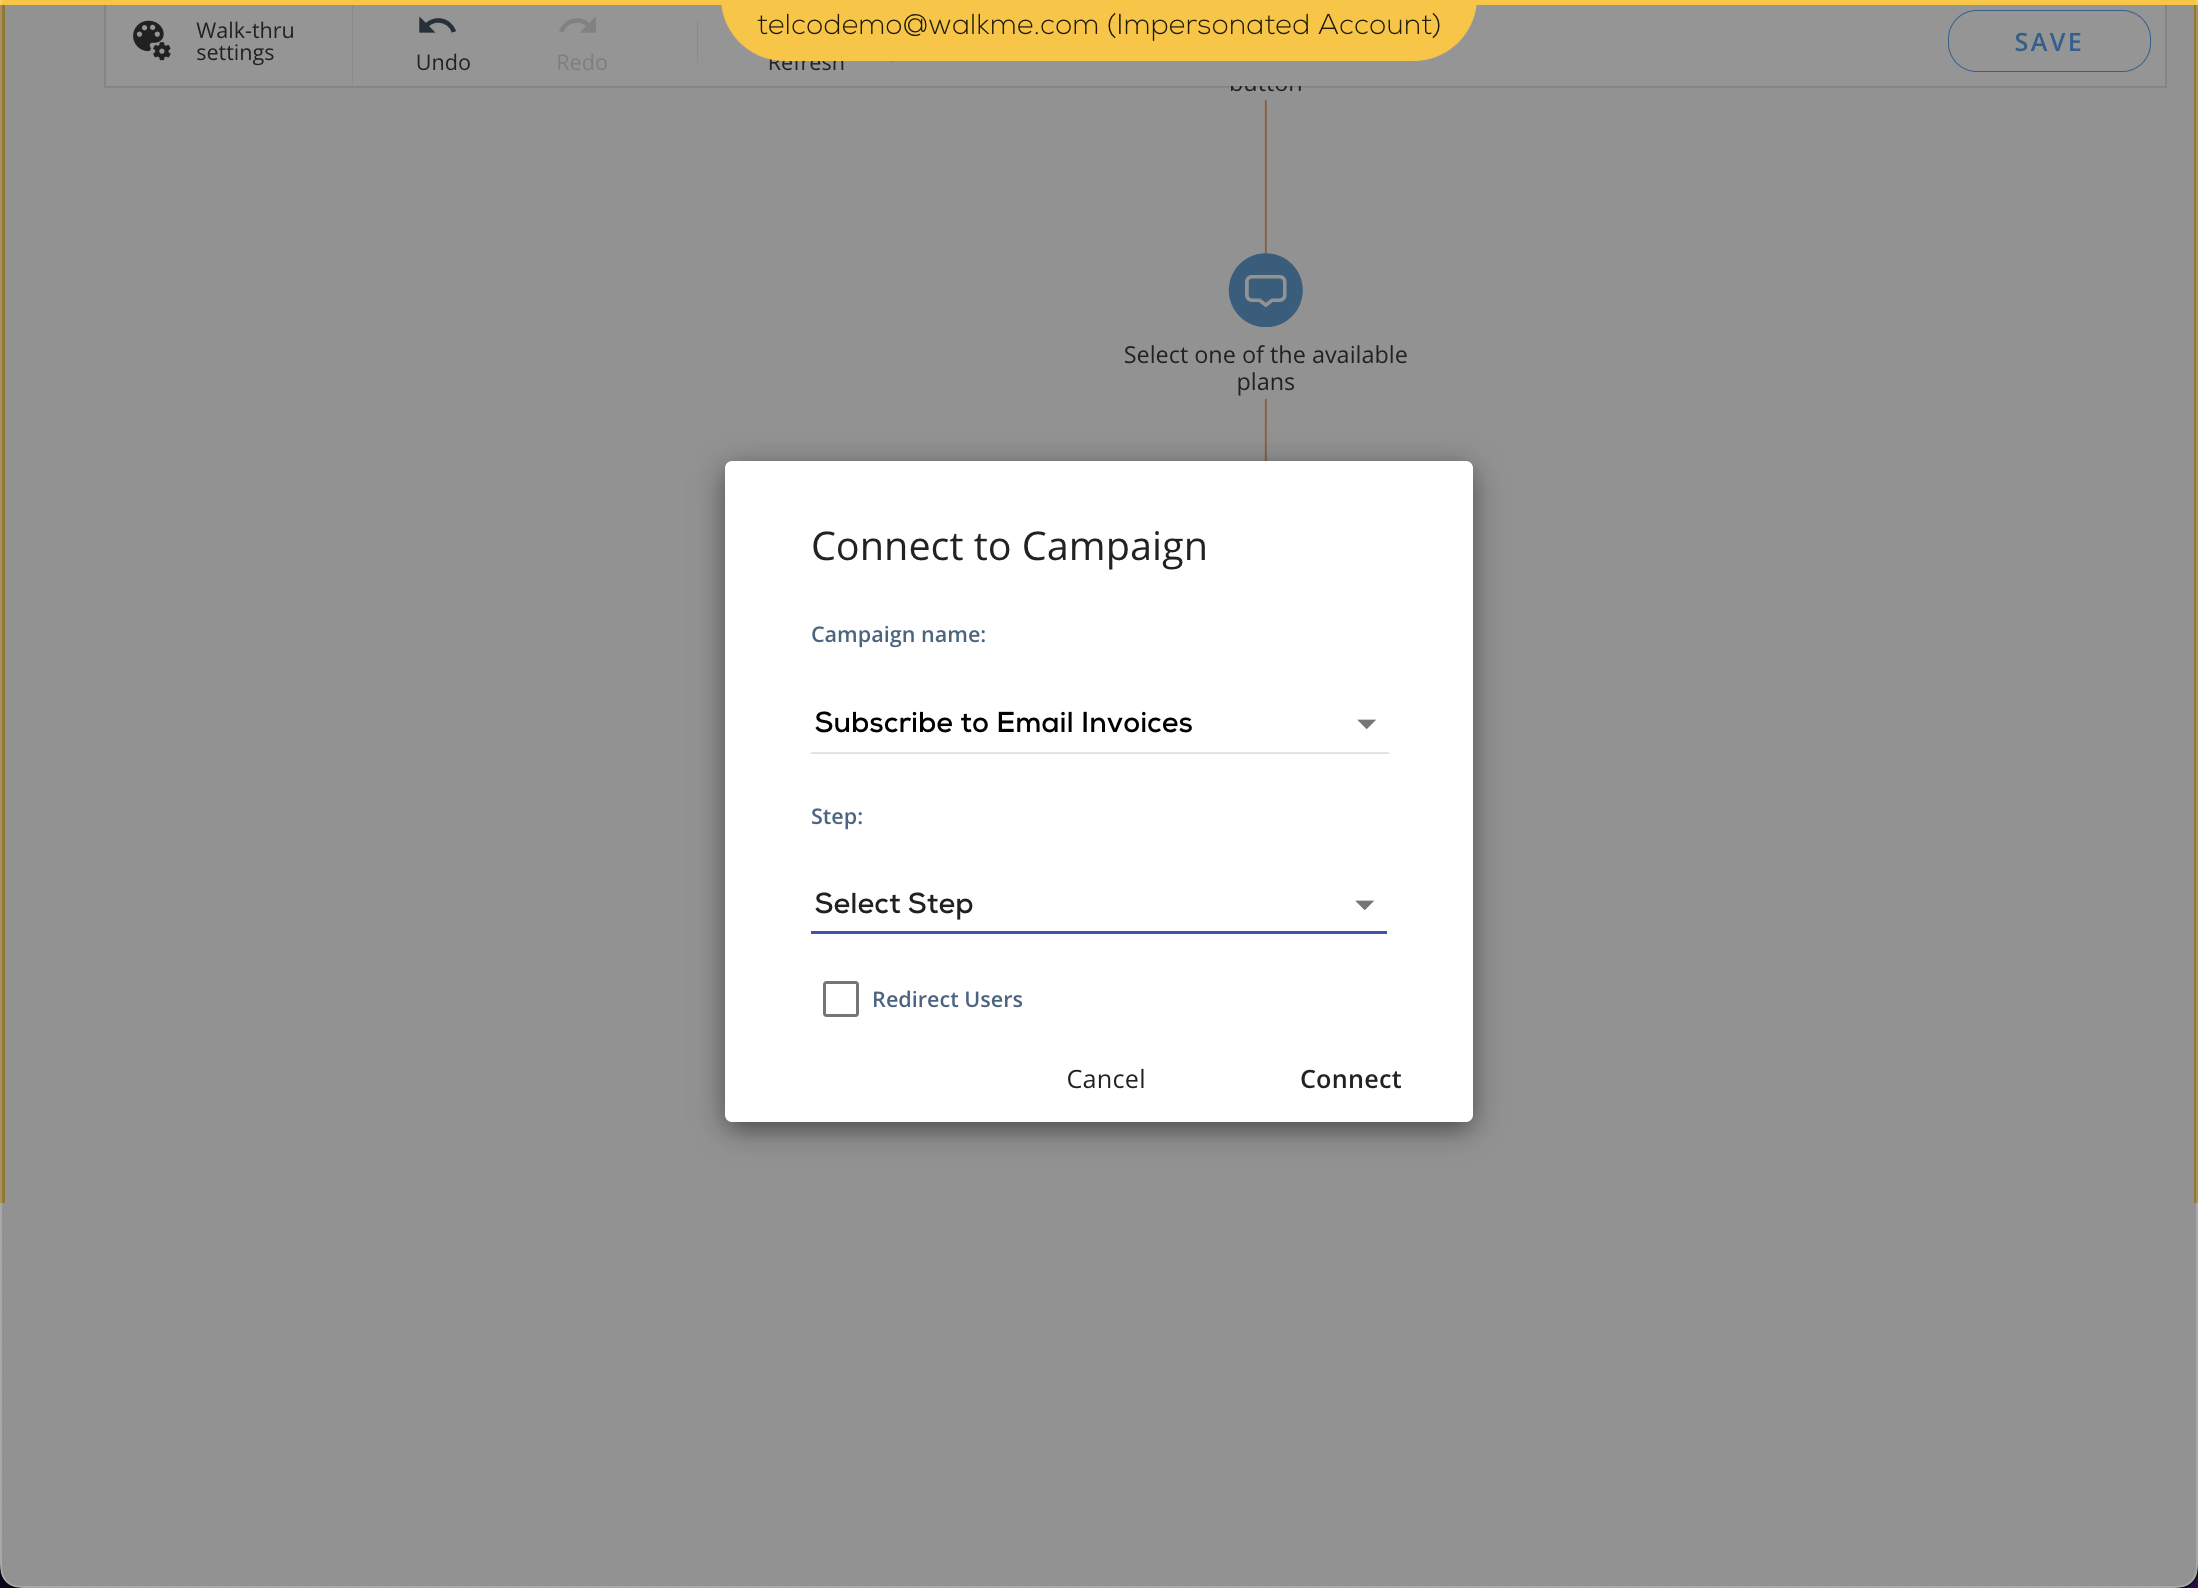
If you select Auto, WalkMe will start from the most relevant step according to the app screen it is currently on.


