Welcome to the
WalkMe Help Center
Please log in to continue

Please log in to continue

This article covers the process for creating new systems in the Admin Center for WalkMe customers whose license agreements provide them the ability to independently create new editor systems for new applications.
Please follow these self-service instructions to properly create and configure the new editor systems. To ensure a successful implementation with your new system, please complete all steps in the article to avoid any misconfigurations that could lead to published content not functioning as intended.
By following these instructions, you will ensure your system is set up correctly, minimize the time spent searching for desired applications and potentially decrease the need for custom systems. Custom systems, lacking essential configurations, may hinder the smooth operation of WalkMe content and require assistance from WalkMe for further configurations.
2. Select the Create System button
3. Choose Web
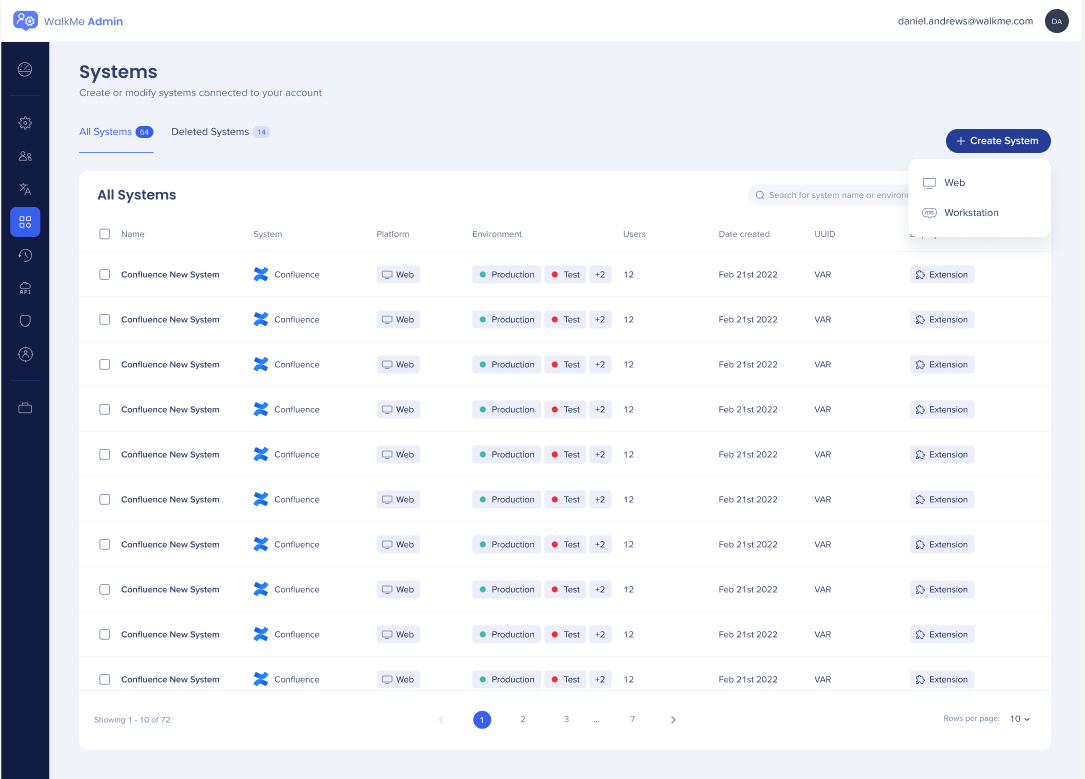
Choose between the Commercial system type, indicating it's intended for full production deployment and will be attached to an existing contract, or the Trial system, designed for demos and WalkMe content evaluation.
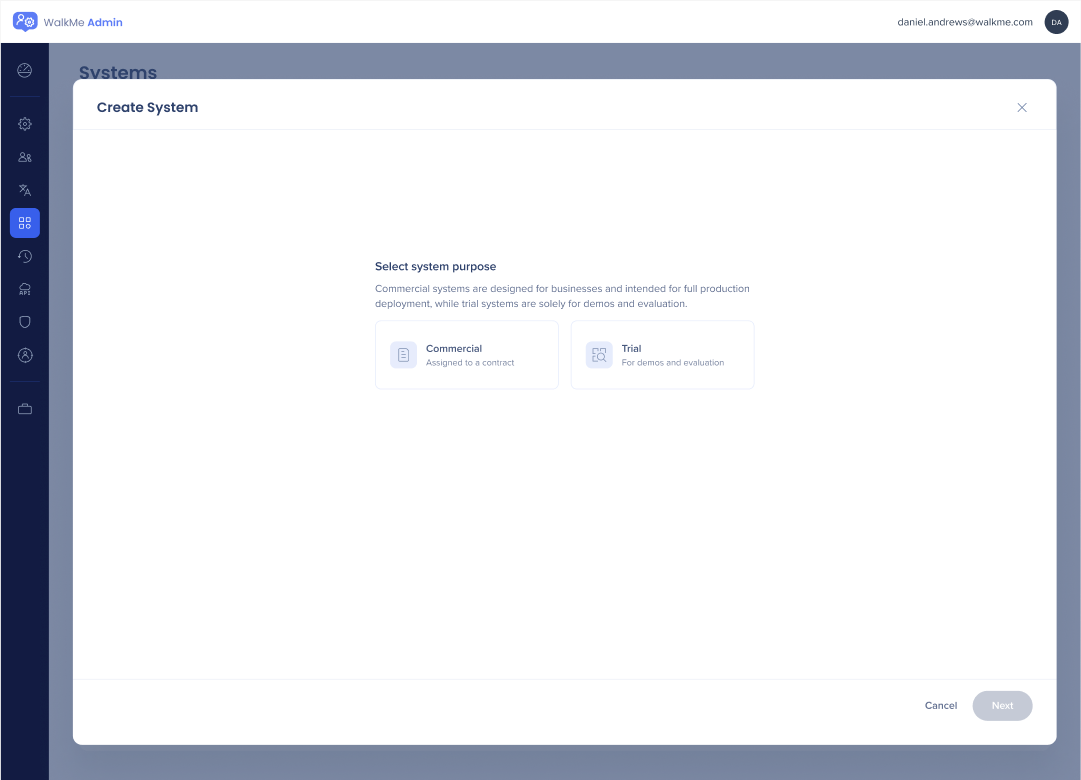
Use this to select the audience for the WalkMe implementation. This can influence factors like use case (WalkMe for employees or customers), deployment method (snippet or extension), and analytics capture (UUID or analytics properties).
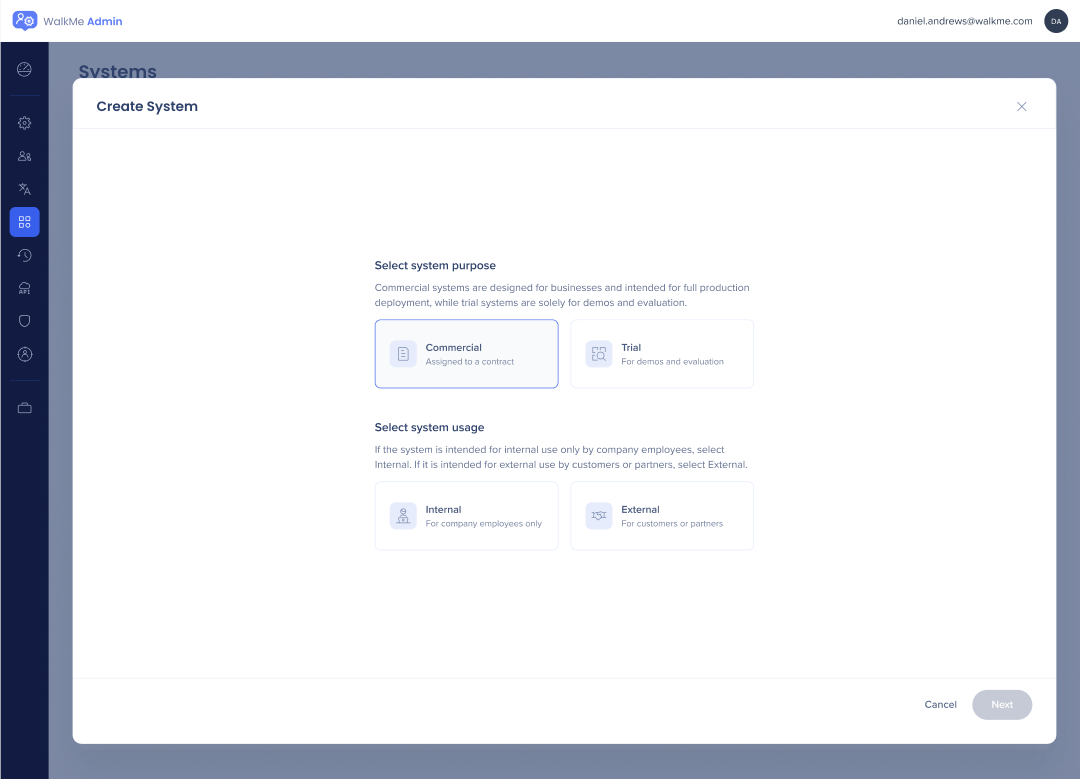
The system creation wizard is comprised of three steps:
Select Application
Select Contract
Configure (Optional)
In the Select Application step you need to choose the relevant web app that you want to create the system for.
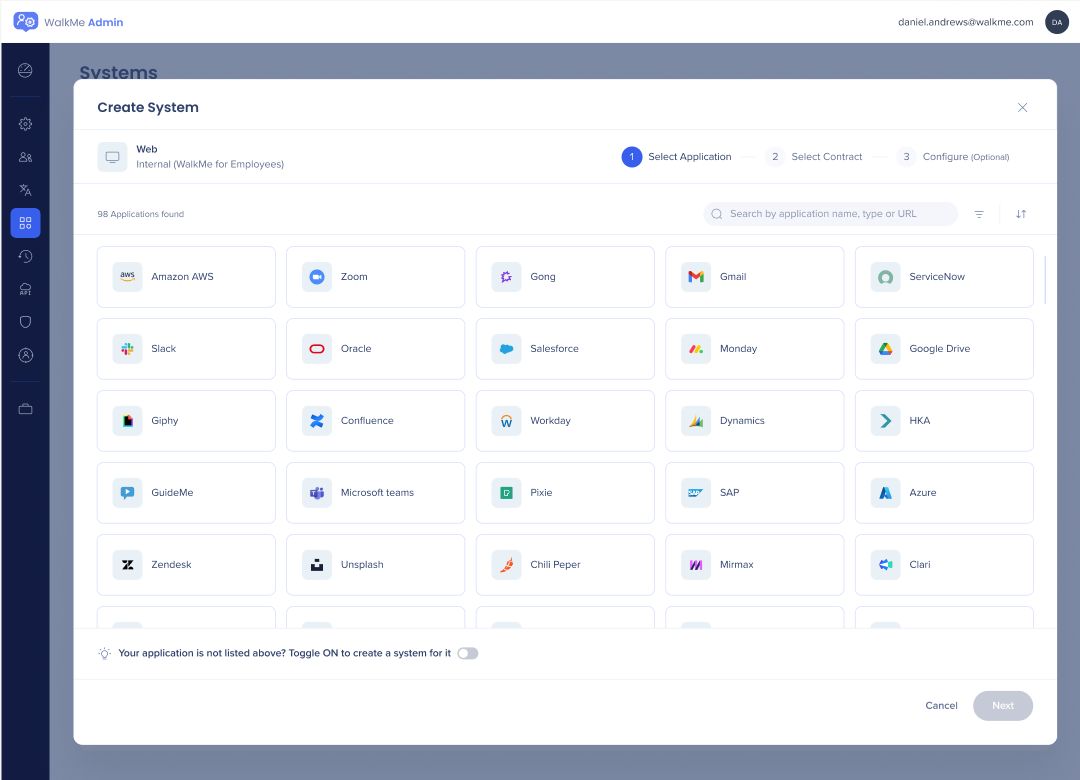
The applications are sorted by popularity, representing the systems most commonly created by all WalkMe customers.
You also have the option to sort them alphabetically from A-Z or Z-A, or search by name, type, or URL. Pasting a URL triggers the "Discovery" mechanism, which suggests a relevant app based on our database records.
Additionally, there's an option to filter by Business domains. Examples of business domains include Sales, Finance, and Healthcare.
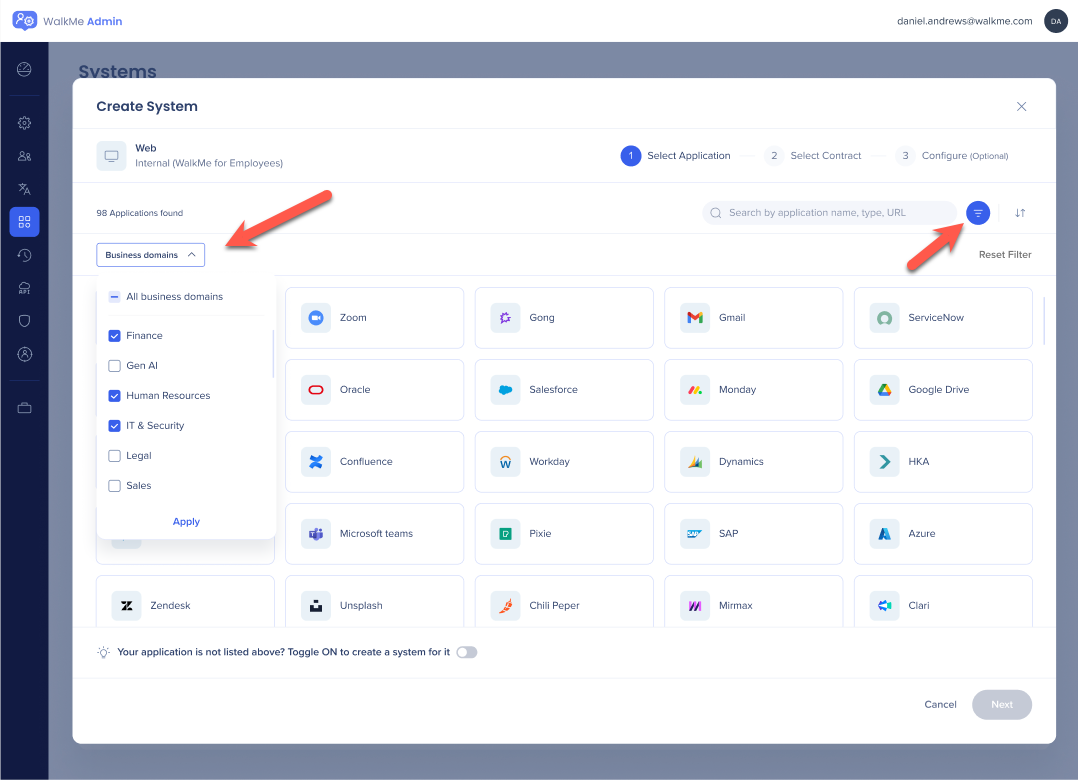
The option to create a custom system is available at the bottom left corner of the screen.
To activate, turn on the toggle , the screen switches to "create your own system" mode.
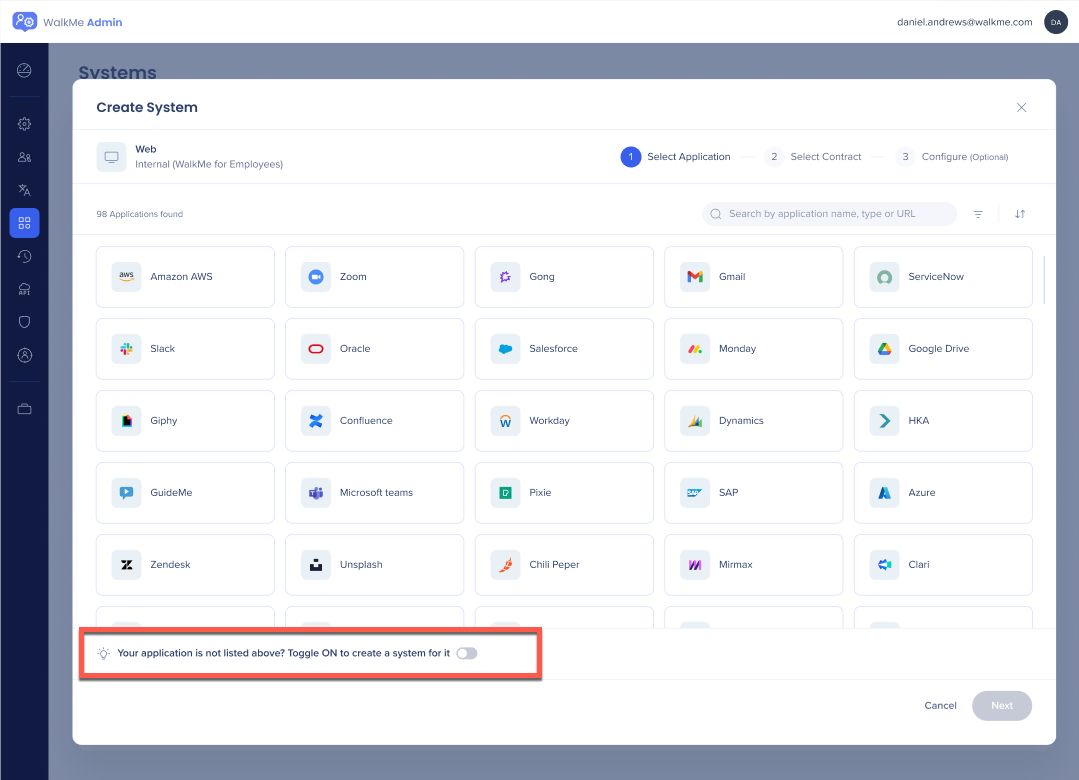
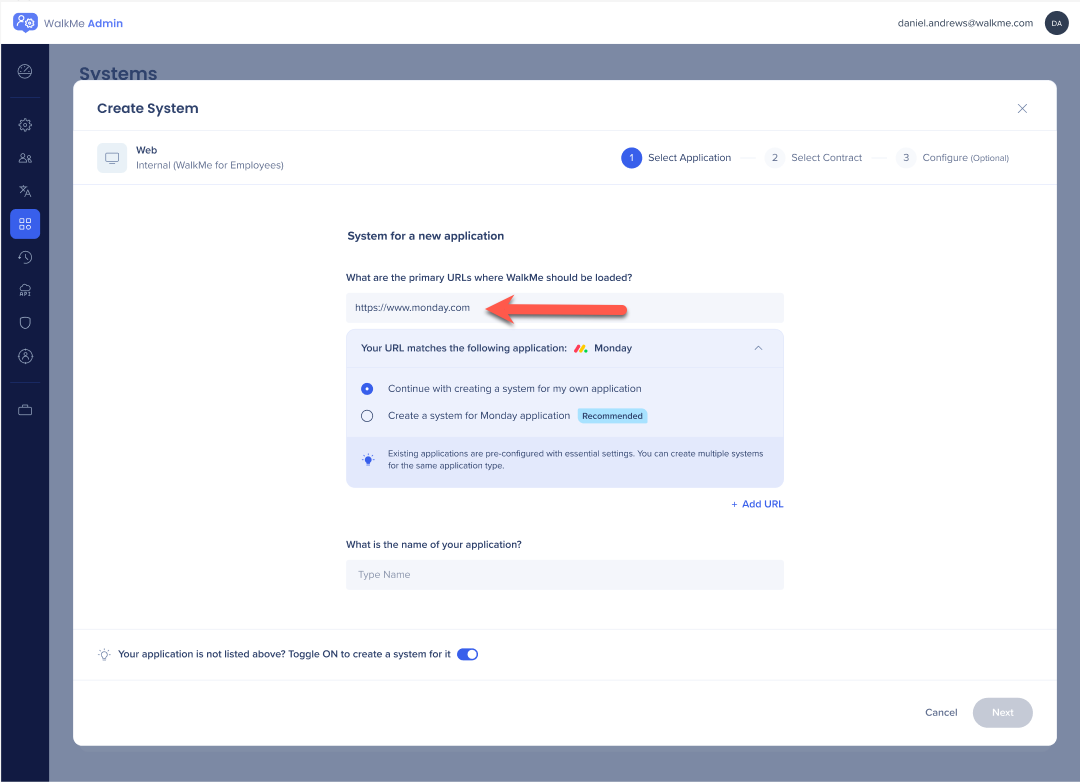
This mode enables users to create their own "custom" system.
It includes two questions aimed at gathering information about the "custom" system to be created:
What is the primary domain where WalkMe should be loaded? (Optional - you can continue without setting a URL at this point)
What is the name of your application? (Mandatory)
What is the primary domain where WalkMe should be loaded?
Here you need to provide a URL in the correct format. If there are multiple URLs, users should click on Add URL.
Discovery Mechanism: For the first URL entered only, WalkMe scans its database of applications to see if there is a match between the provided URL and a relevant application.
If a match is found, you will be presented with two options:
Continue with creating a system for my own application
Create a system for [matched application] (RECOMMENDED)
By choosing the first option, you can proceed to create your own application.
By choosing the second option, we will automatically create an application for the user based on the suggested type, rather than a custom application. The benefit of the second option is that existing applications come pre-configured with essential settings, avoiding the need to contact someone at WalkMe for custom system configuration in the future.
What is the name of the application?
This is a free text field.
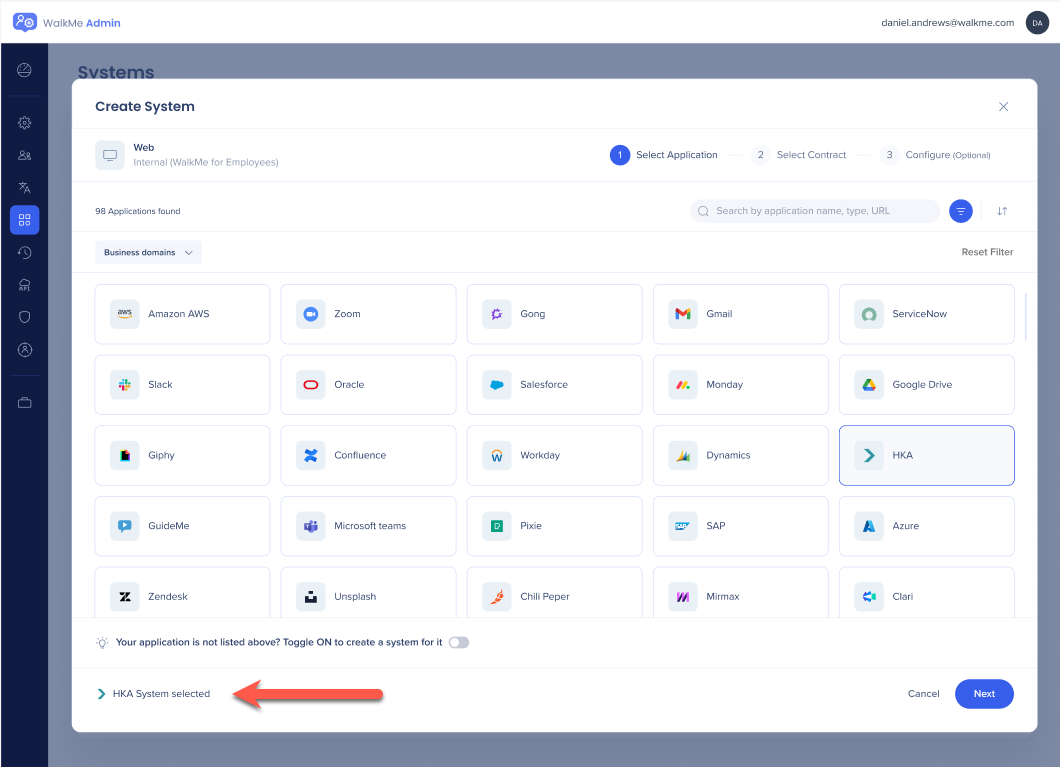
The user can exit the System for a new application mode at any point by turning the toggle off.
This action will return the user to the applications screen.
A selected application by the user will appear at the bottom left corner below the toggle, indicating the user about the system they are about to create.
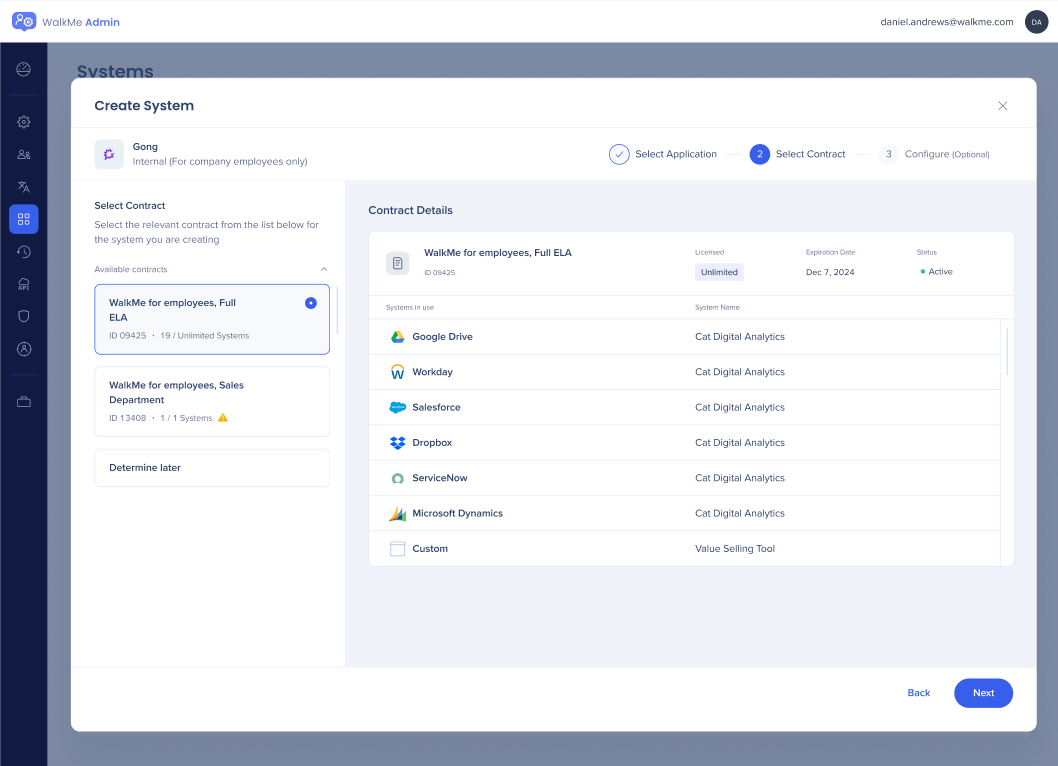
The second step in the system creation wizard involves assigning the system being created to the relevant contract.
On the left side of the screen, users can view all the contracts available on their account. Each contract is accompanied by its ID and the number of systems currently assigned to the contract, as well as the remaining systems available for the user's convenience. The contract data is sourced from Salesforce.
On the right side, there is a list of systems assigned to each contract.
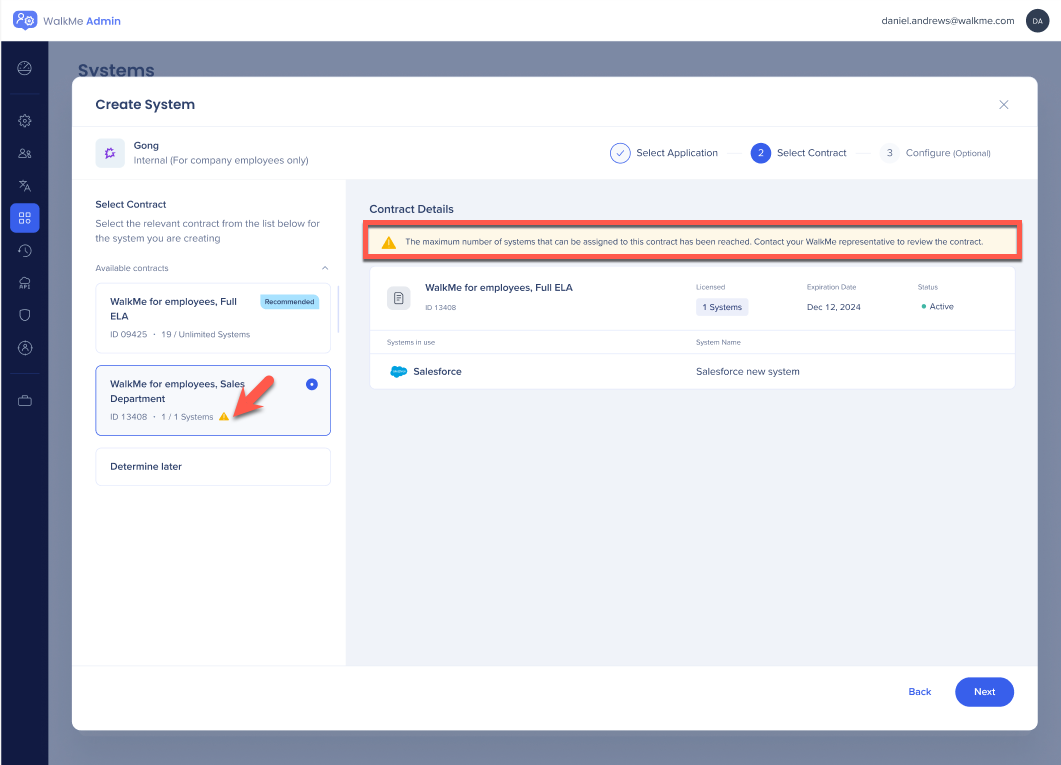
Contracts that exceed their system limit will be identified with a pay attention icon, accompanied by a relevant explanation at the top of the screen.
While there won't be a hard stop to assigning a system to the contract by the admin, it's important for the admin to pay attention and contact a WalkMe representative for further steps.
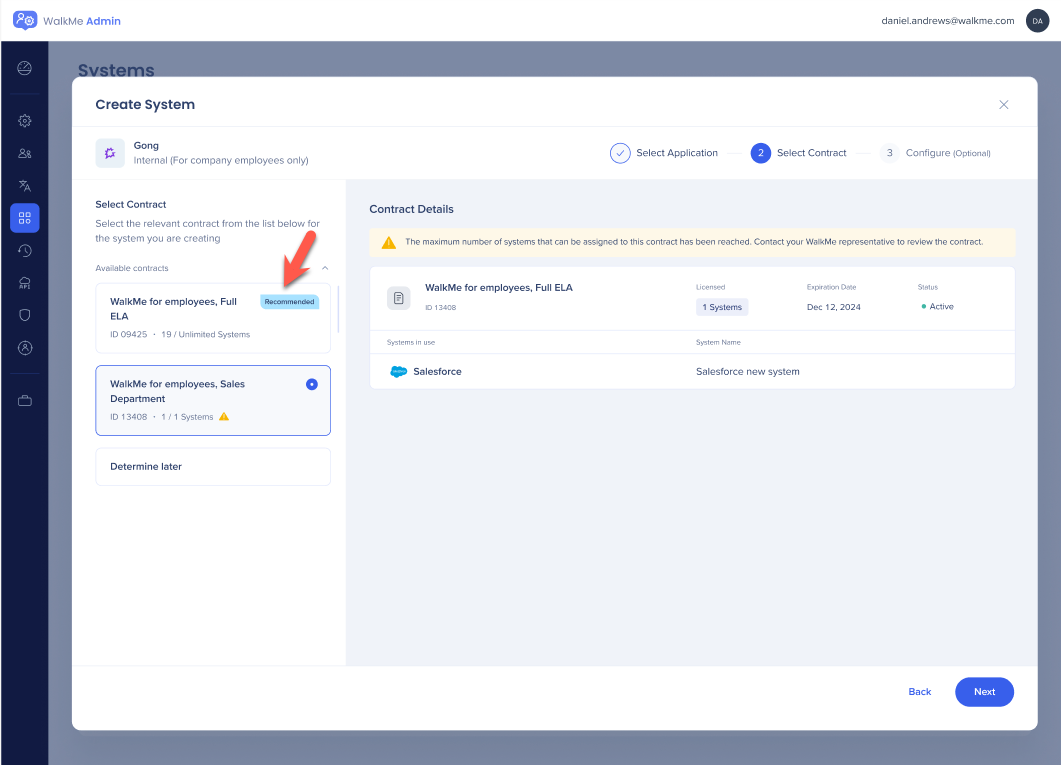
Recommended contract
This icon will be displayed on contracts that WalkMe recommends for assigning the system, based on the use case for creating the system.
For accounts that have contracts for both internal (WalkMe for employees) and external (WalkMe for customers) use cases, a Recommended badge will appear on contracts that match the use cases selected by the admin in the preliminary questions step.
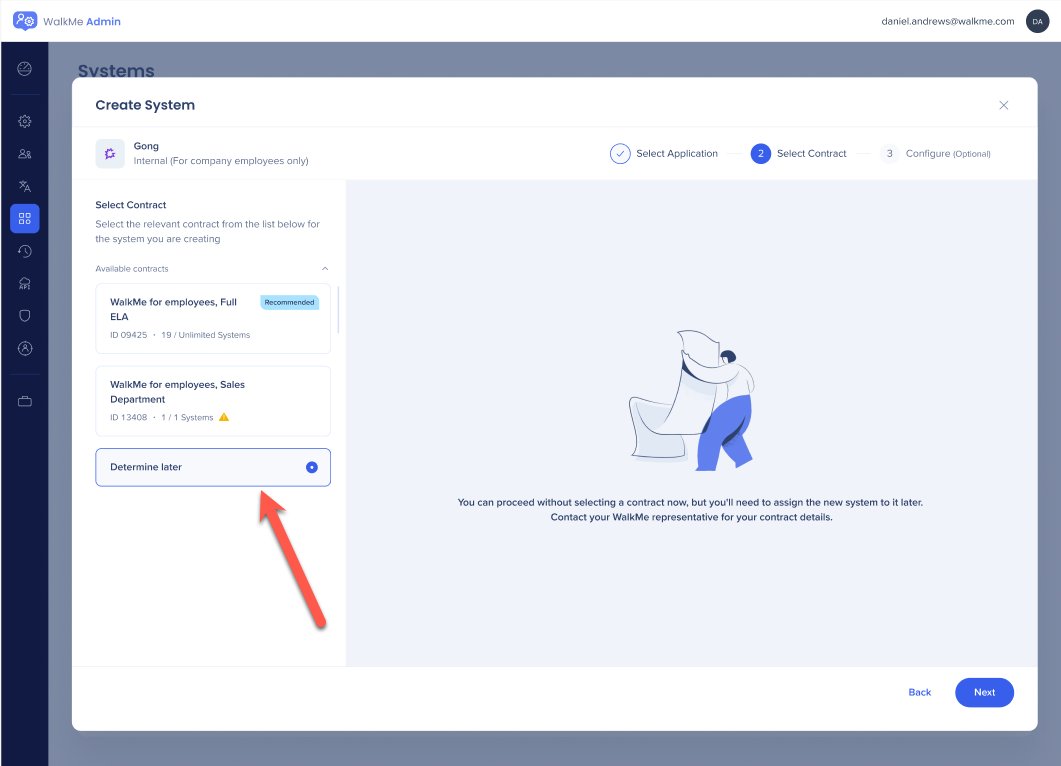
Determine later
This option is always accessible and is designed for admins who are unsure about which contract to assign the system to.
It's particularly useful for admins who are new to the concept of contracts and want to consult with someone from their team before making a decision.
They can choose the Determine later option and continue with the system creation process.
They can later navigate to the Contracts tab in the Admin Center and self-serve to assign the system to the appropriate contract.
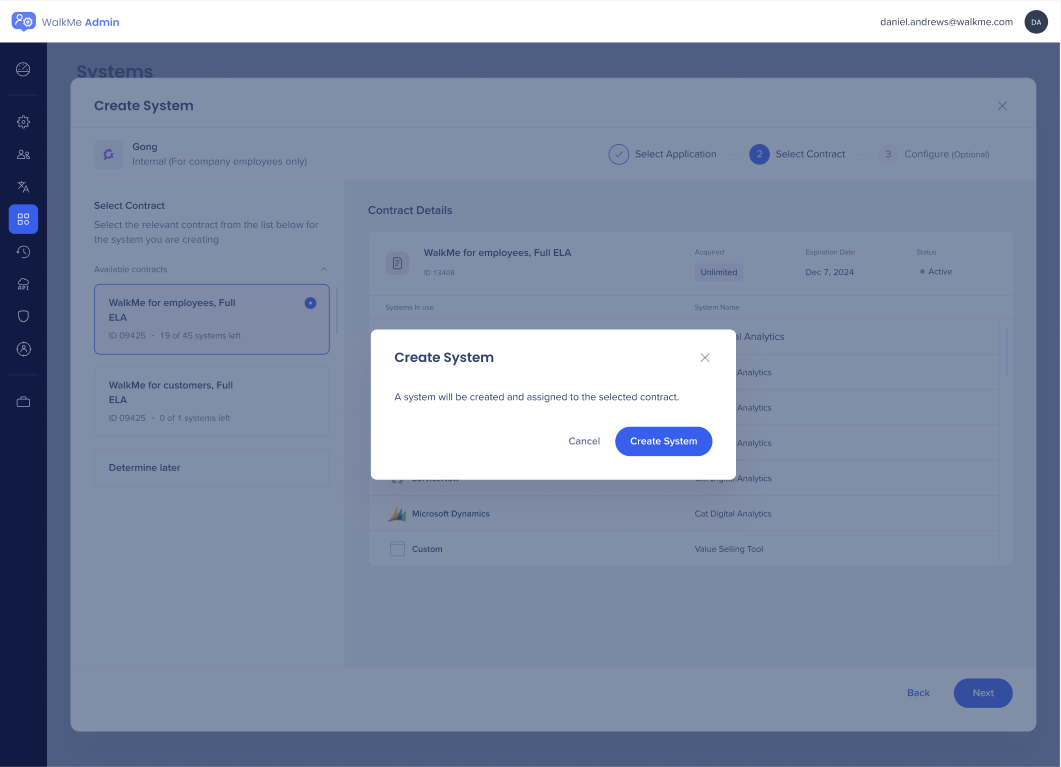
Following the contract assignment (or determining it later), the system is created.
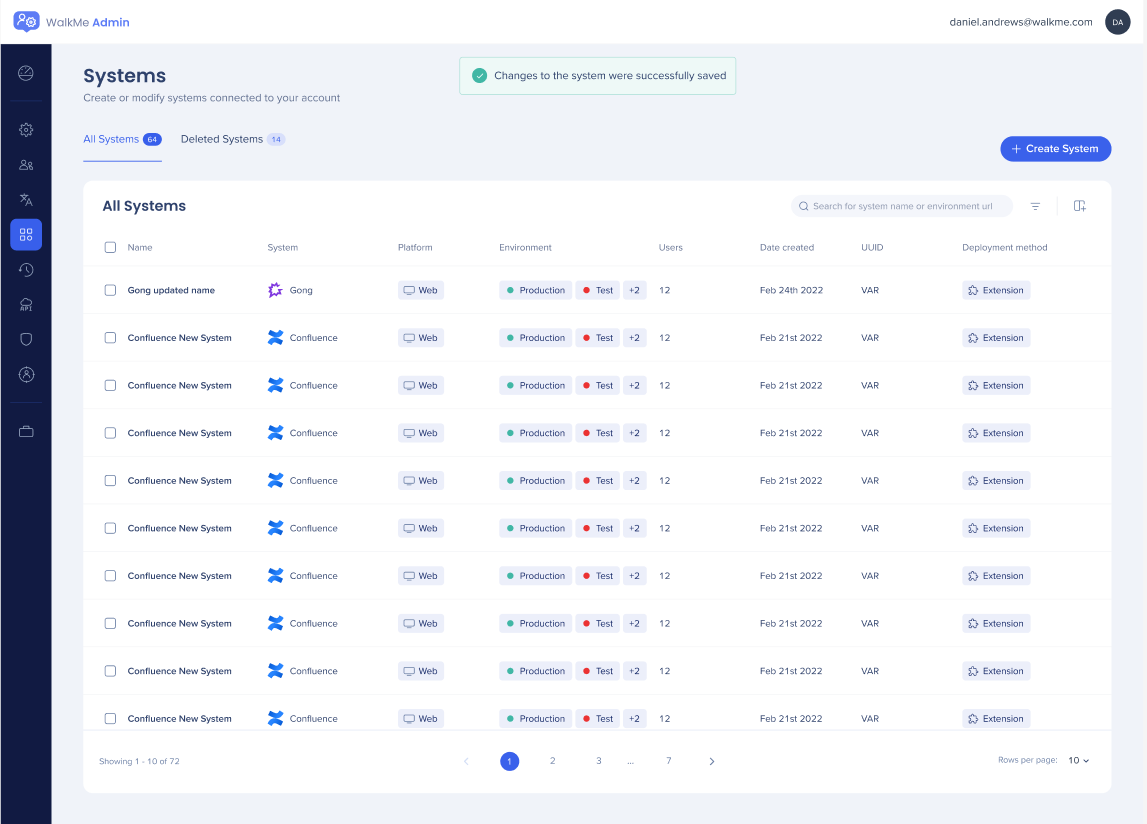
Once the user clicks on the Create System button, the system is generated in the WalkMe database and will also be visible in the Systems tab for any necessary modifications.
However, even if the system has been created, the user will proceed to the third step, Configure, which is optional. If the user decides to close the wizard at this point without completing the configuration, they will still be able to locate the system under the Systems tab.
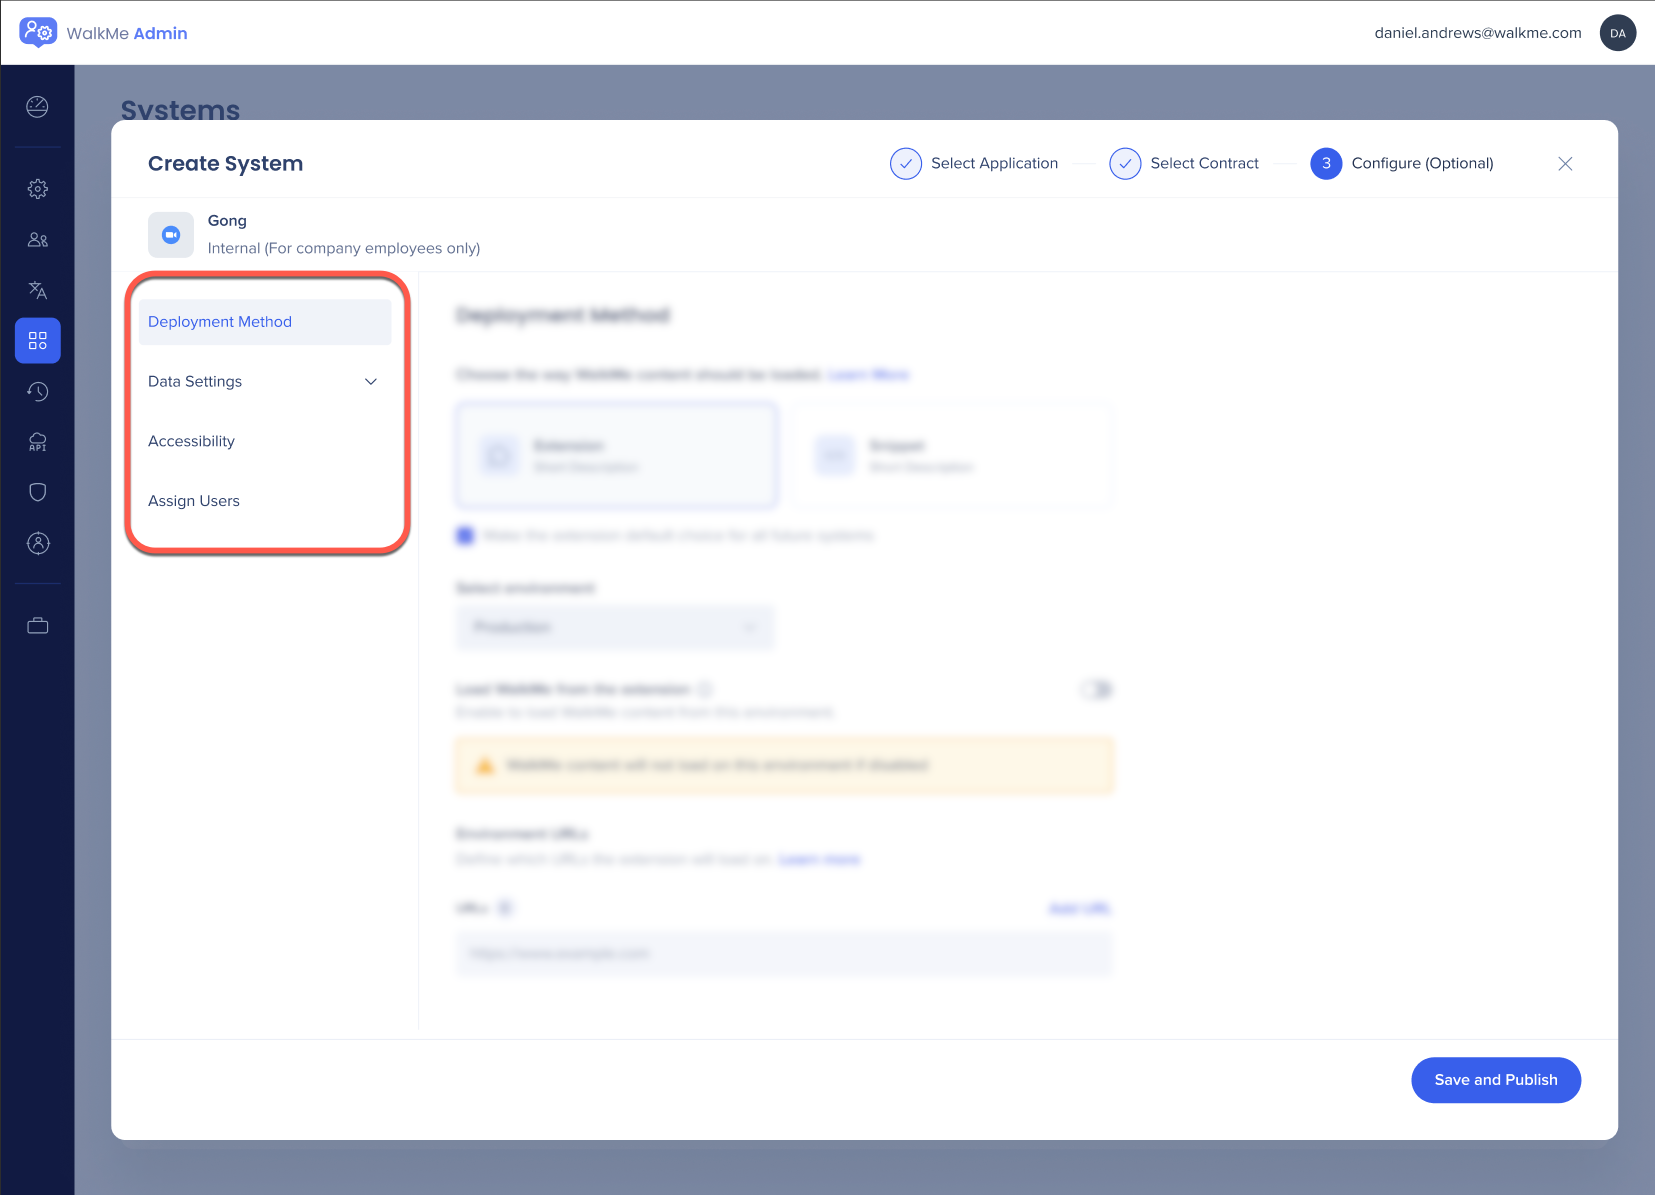
The third step for this phase includes 4 tabs:
Deployment Method
Data Settings
Accessibility
Assign Users
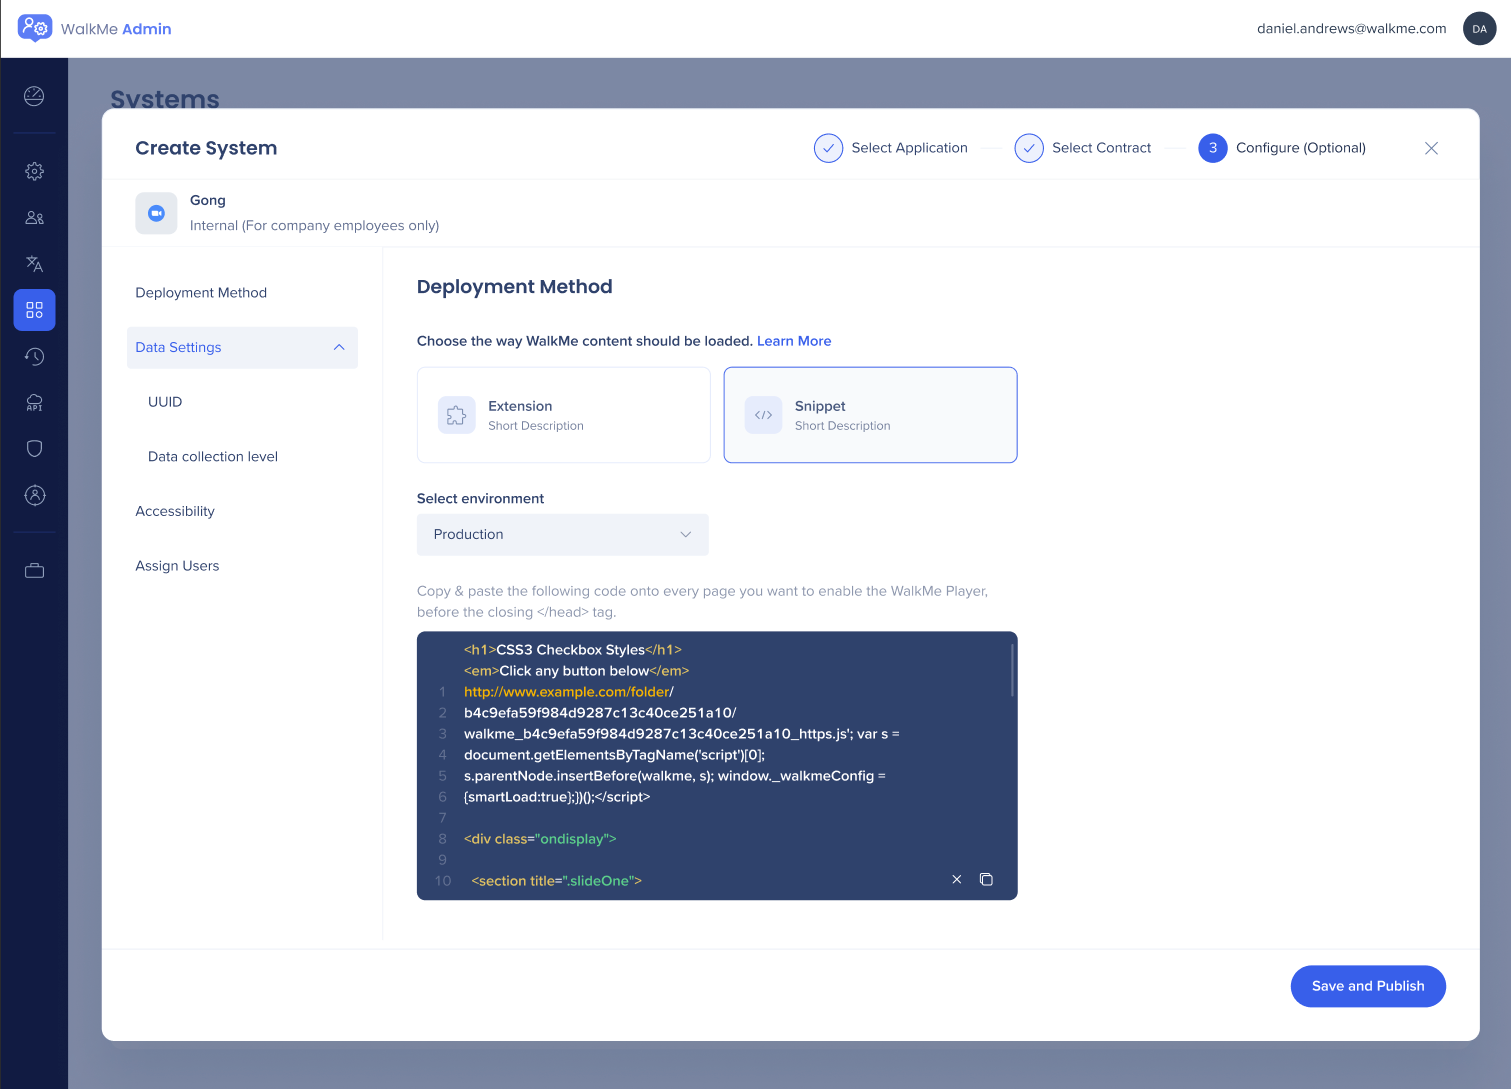
The newly created system can now be assigned to the desired deployment method.
For the first time, the admin will need to select whether to deploy the system via Extension or Snippet.
If Extension is selected:
Default Deployment Method:
The Admin can choose to set the extension as the default deployment method for all future systems created on the account. This means that in the next system creation flow, the extension will already be selected, as shown in the screenshot on the left.
Select Environment:
The admin can choose between Production and Test environments. Production is the default option. All settings beneath this field will only affect the selected environment.
Load WalkMe from this environment:
By default, Load WalkMe from the extension is turned off for newly created systems. When this toggle is turned off, WalkMe will not load in this environment. Once the toggle is turned on, the admin can enter the Environment URLs where they want WalkMe to load. This setting is per environment and needs to be configured separately for test and production environments.
Environment URLs:
We use URL match patterns as the default syntax for defining the URLs where the extension should load. It's crucial that each environment is based on the unique web address of the application. Avoid matching the same URL for two or more environments to prevent conflicts, as only one environment can be loaded at a time.

If snippet is selected:
The snippet code changes based on the environment. The admin needs to choose the relevant environment from the Select Environment field to get the correct snippet code.
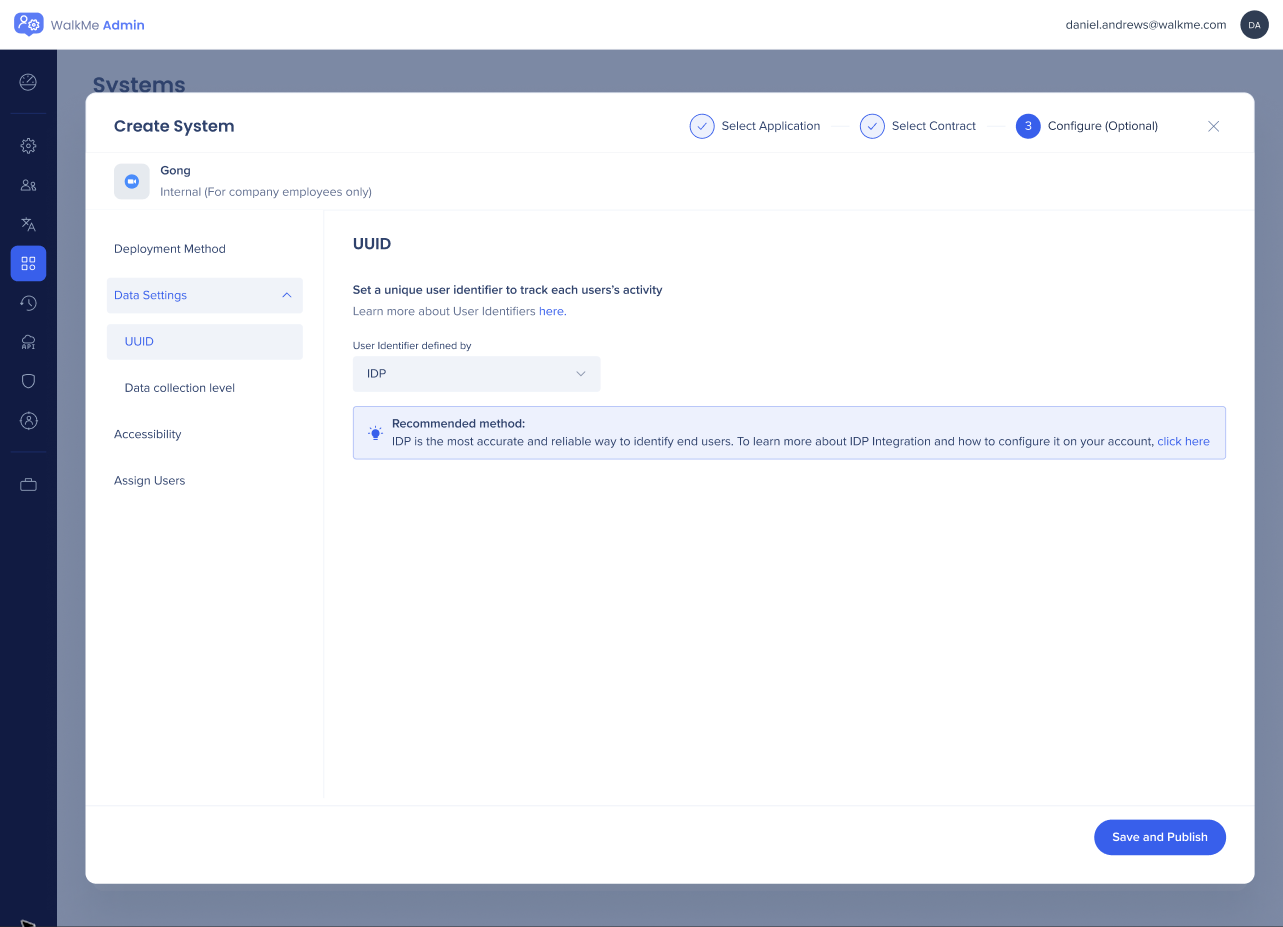
Unique user identifier (UUID)
Setting up a Unique User Identifier (UUID) is crucial to ensure you maximize the benefits of our platform, such as accurate data and analytics about system users, reliable use of tasks and progress tracking, Improved personalization and segmentation of your WalkMe content. It's easy to identify or create a UUID.
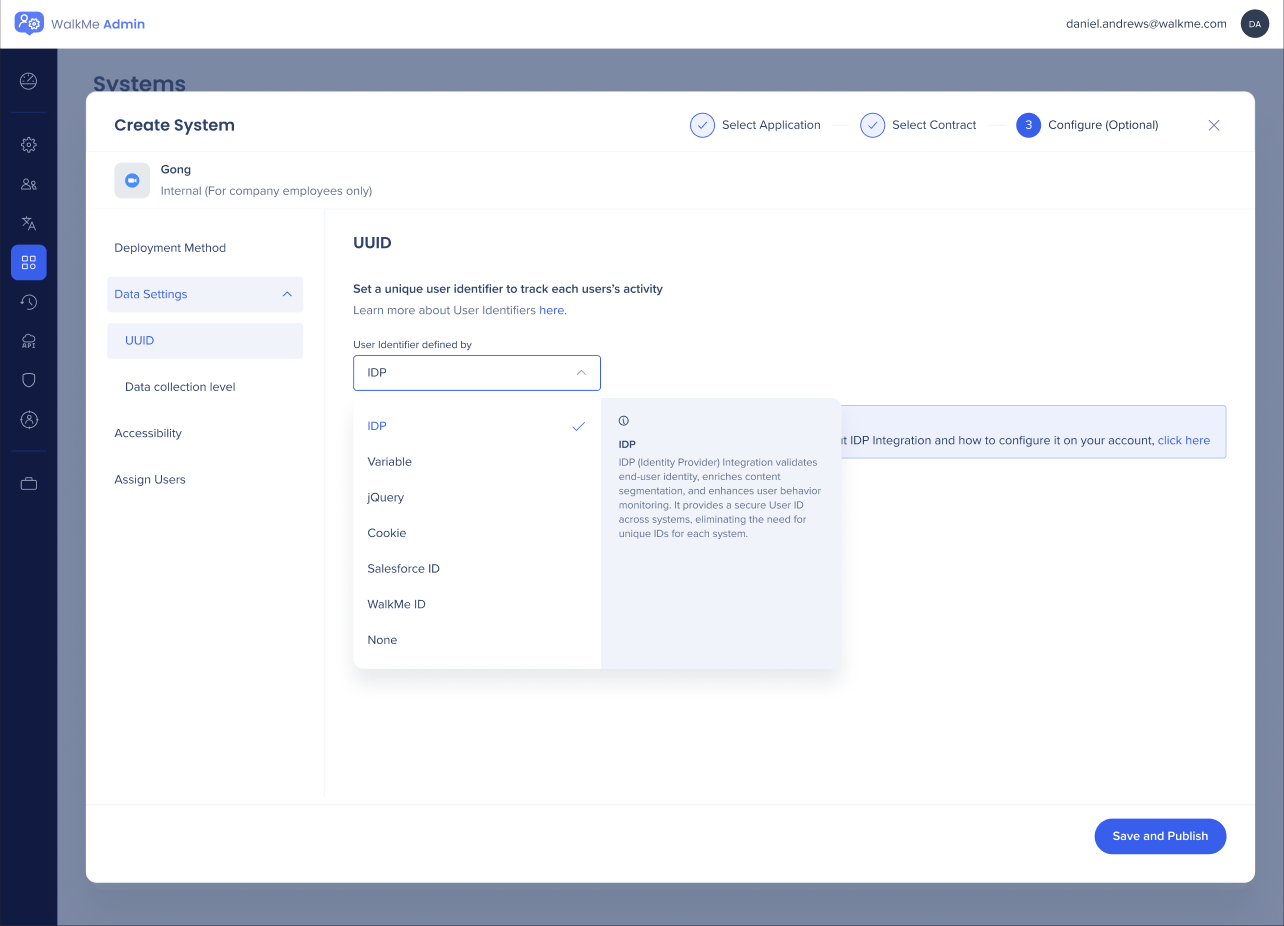
UUID can now be configured directly from the system creation flow
The configuration process is the same as it has been in the editor up until today
For each value in the UUID dropdown, hovering over it will show a short explanation of what it means
For accounts with an IDP already configured, this option will be pre-selected

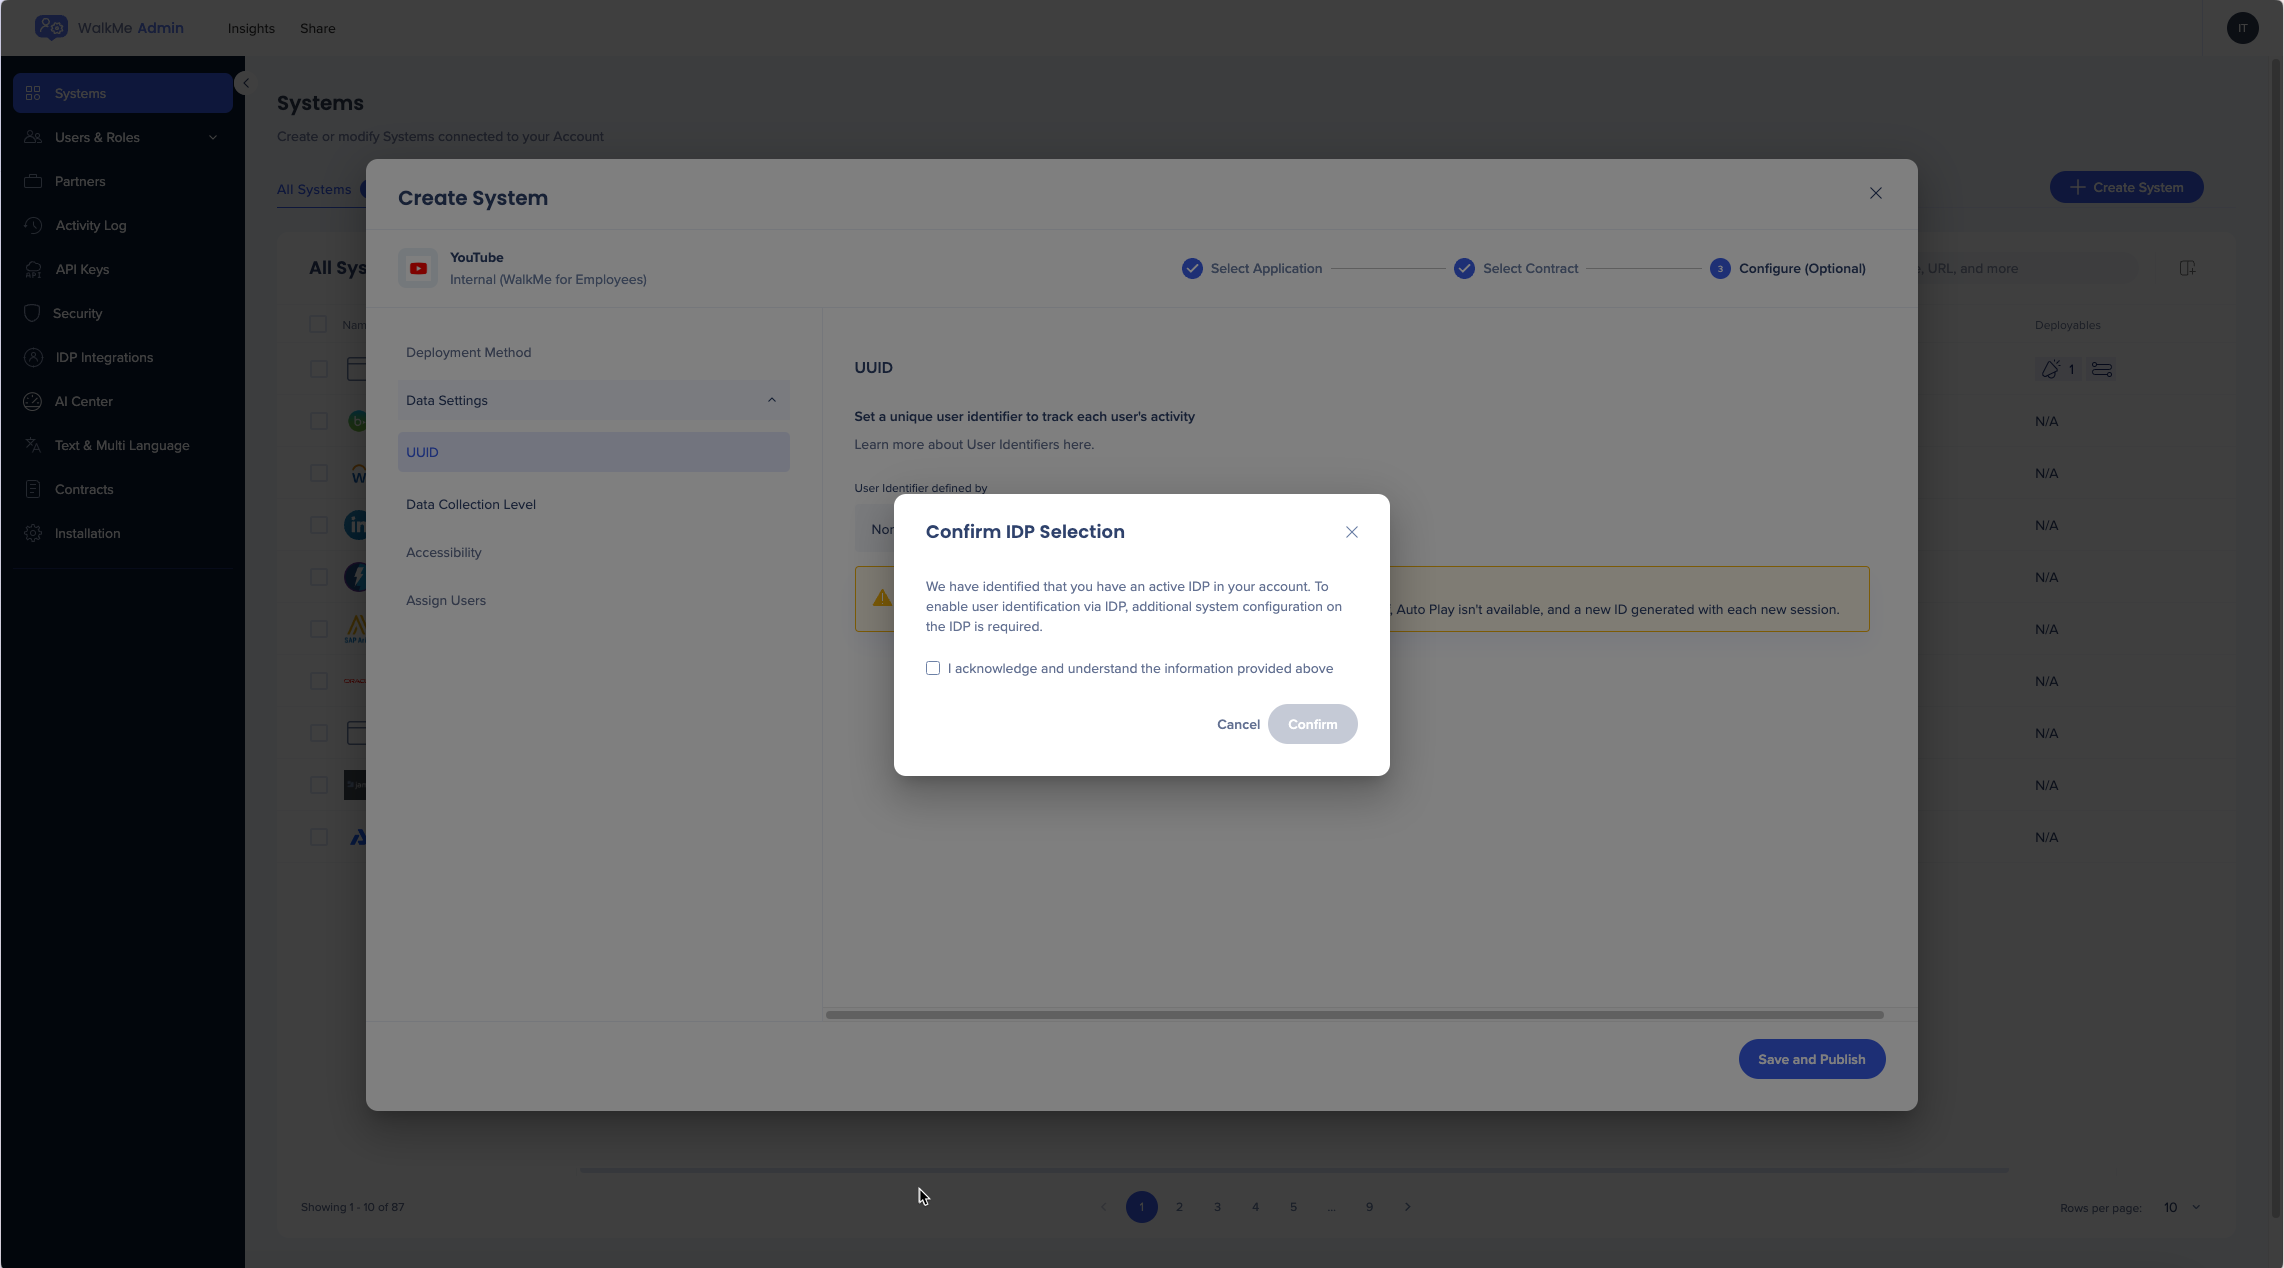
For accounts with at least one active IDP, a Confirm IDP Selection popup will appear
Expected Format
The purpose of the expected format is to validate the value entered by the user in the User Identifier field
The values available under the Expected Format field include:
GUID
Integer
Custom Regex
None (Default)

Data collection level settings, previously configured by users in the Admin Settings area in the editor, are now accessible as part of the system creation flow
This change aims to ensure that only admin users can configure this setting, preventing it from being overlooked and ensuring that content is published with the correct data collection level, avoiding missed or delayed data gathering

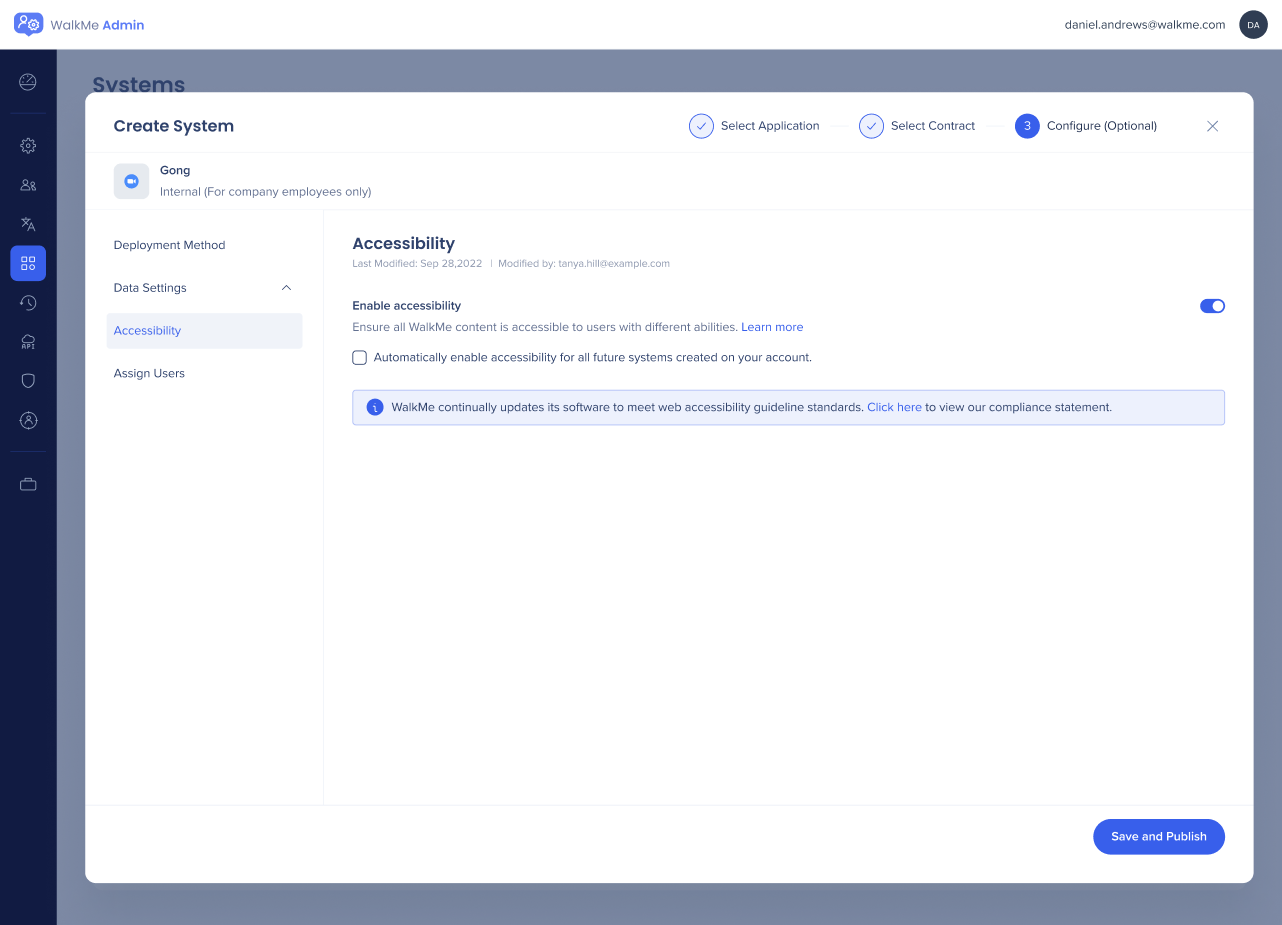
Admins now have the option to enable accessibility on the system or account level
To enable the accessibility setting, turn ON the toggle
If you wish to enable accessibility for the entire account, meaning any new system created will have accessibility settings turned ON by default (not apply on already existing systems), check the relevant checkbox
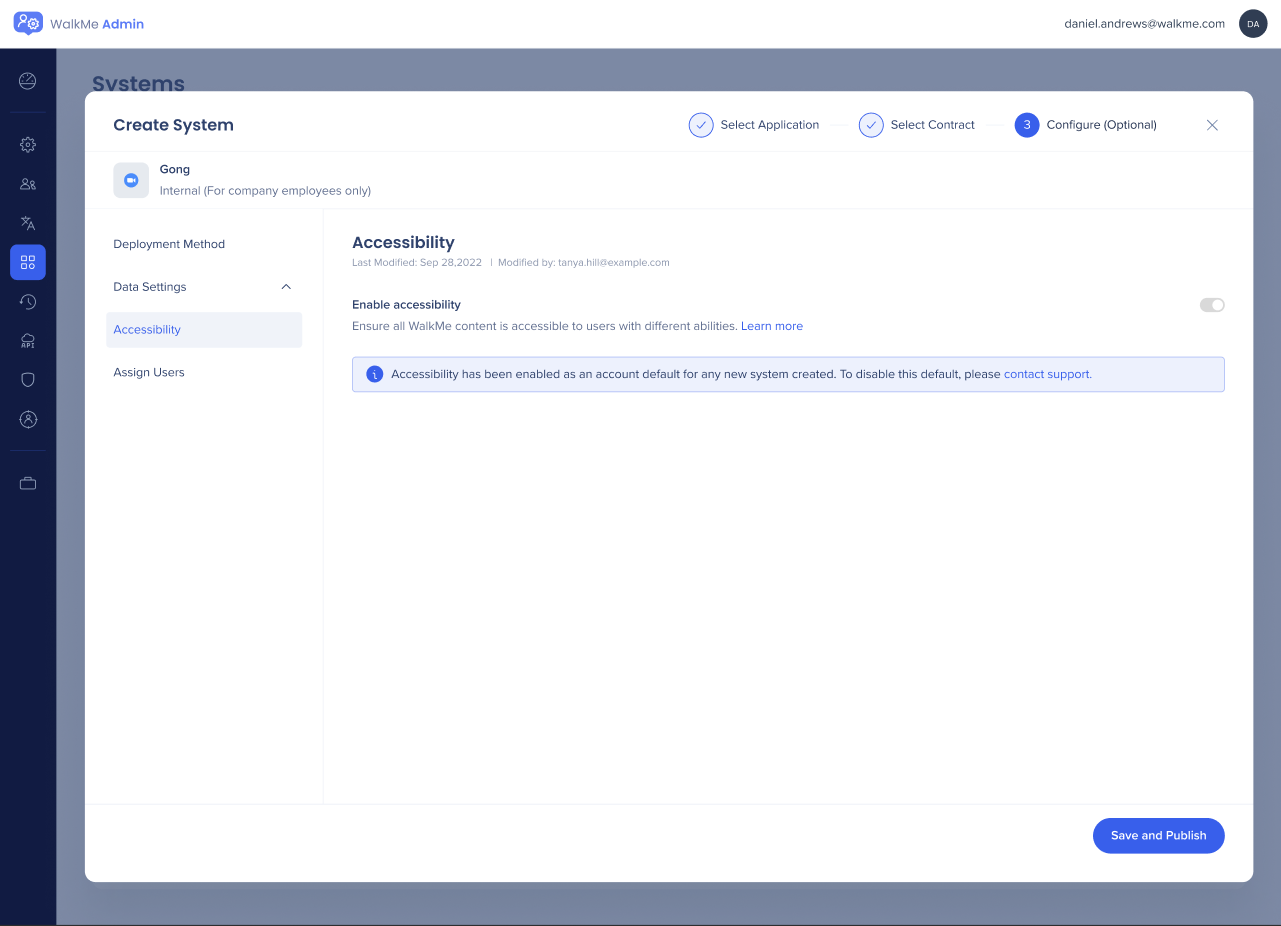
If accessibility has been enabled at the account level by a WalkMe employee, the toggle will be turned ON by default
There will be no option to turn it OFF independently; contact support if you want accessibility to be disabled
If your organization utilizes any security configurations, please contact your Customer Success Manager to have your new system configured to your organization's security requirements prior to publishing any settings to ensure compliance.
For settings to take effect, they must be published
Admins can now publish directly from the system creation flow by clicking the Save and Publish button
The admin will be shown which settings have been changed and will be able to choose the environment to publish to: Production, Test, or both Production and Test

The admin can bulk assign existing users from their account to the newly created systems. To create new users on the account, they need to navigate to the Users tab.
The admin who creates the system is automatically assigned to it by default.
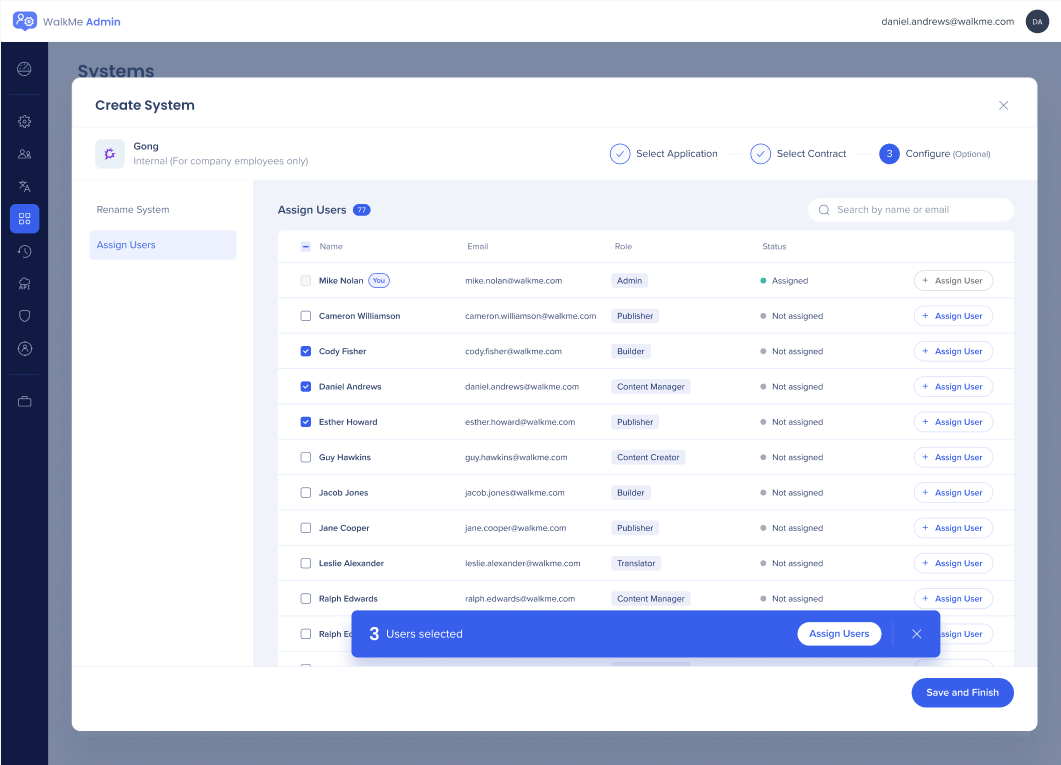
When you click Save and Finish, you will be redirected to the Systems tab.
Additional Editor Settings
After completing the new system creation process, you can access your new system in the editor and begin building!
If you come across any challenges in your new system that you did not experience on previous systems that match the symptoms below, please open a ticket to our support team here for further assistance:
Refer to the document below to have a detailed overview of how to add a new WalkMe system to your account for Digital Adoption teams that manage WalkMe for multiple systems.
 Loading...