Brief Overview
This article explains how to build a WalkMe ActionBot.
A WalkMe ActionBot is a chat interface that end-users interact with to complete tasks and answer questions. You can place the ActionBot on any web application using a Launcher. ActionBots, created in the WalkMe Editor, determine what the user needs to complete, or their intent. Based on this information, an ActionBot can select the correct conversation, also created in the WalkMe Editor.
To learn more about what the WalkMe ActionBot is, visit our article What Is the WalkMe ActionBot?
Steps For Building a Bot
Step 1 - Open ActionBot App
In the WalkMe Editor, click "ActionBots" from the All Items Menu |
|
|
Make sure Bots is selected in the menu. |
|
Step 3 - Add a New Bot
Click on the "ADD NEW BOT" button. |
|
Step 4 - Mandatory Fields
Fill in the following mandatory fields:
Name -
- This serves as an identifier for you, end-users will not see this name
Greeting Messages -
- The bot will greet the end users with this message
- Once the greeting message is displayed, the bot try's to match a conversation to the end-user's input
- If more than one greeting message is entered, the bot will choose a greeting message randomly
Tip: The message should also have a call-to-action like "How can I help you today?" to encourage the end- users to write what are they looking to do using the bot.
Greeting messages are limited to 255 characters.
Message When No Matched Conversations -
- This message will appear if the bot couldn't understand which conversation matches the end-user input
- Once this message is displayed to the end user, the bot will continue to try and match one of its assigned conversations to the end-user's search
- If more than one message is entered, the bot will choose a message randomly
Tip: The message should also have a call-to-action to encourage the end- users to write what are they looking to do using the bot. |
 |
Step 5 - Assign Conversations
Assign all conversations that are relevant to the Bot.
The bot will try to match one of its assigned conversations to the end-user's input.
- On publish, a validation will occur to ensure that at least 1 conversation is assigned to the bot
- Make sure that the bot and its assigned conversations are published to the same environment in order to see them in the bot
- Tags within the Bot Settings page are now color-coded and reflect the Conversation's publish status
Tip: If only 1 conversation was assigned to the bot, the bot will start directly from its assigned conversation skipping the stage of showing the greeting message and searching the right conversation |
|
Step 6 - Set Suggestions
From the conversations you have assigned to the bot, you can choose which ones will be automatically suggested and presented to end-users.
The suggested conversations are visible to the end-users in order to help them get the right conversation.
- You can set as many suggested conversations as you like
- Up to 4 suggestions will be visible at a given moment to the end-users
- The end-users can either start typing to filter the suggested conversations or scroll to see more
Tip: Most end-users tend to choose a suggestion rather than write to the bot.
Suggest Conversations When Bot Search fails-
- You can define which conversations will be suggested to the user if the ActionBot search was unable to match a conversation to the user's text
- You can also define how many search failures will prompt the conversation (default is 3 attempts)
Accept Suggested Conversations Only -
- If you prefer your end-user to avoid making mistakes or input answers you can't expect, you can disable the users' ability to write to the bot and force them to choose one of the suggested conversations by enabling "Accept Suggested Conversations Only"
Integrate With WalkMe Menu Search -
- You can enable the user search to suggest existing Smart Walk-Thrus, Resources and Shuttles, in addition to Conversations
|
|
Step 7 - Initiators Settings
Assign Launcher
Click to assign Launchers that will trigger the ActionBot.
- A Launcher can only trigger one bot
- Before you can add the Launcher to the Bot, the Launcher must be assigned Action = Open ActionBot, have your desired Bot chosen, and, if appropriate, your desired Conversation selected (OPTIONAL)
- If selecting a Conversation, check the Start a conversation checkbox and select a Conversation from the Conversation dropdown menu
Tip: Use segmentation on the launcher in order to trigger different bots to different end-users
Assign Permalink
- Allows the ActionBot to open upon page load
|
|
Step 8 - Save / Publish Bot
Save -
- Click the Save button to save your changes
- The changes will only apply to your end users once you'll publish the bot
Publish -
- After the first save, you are able to publish the bot
- Publishing also saves your recent changes and a validates that all mandatory fields are filled and a launcher was assigned
|
|
By clicking the Publish button a window will appear with indication what is the current state with all your available environments
- Choose which environment you would like to publish changes
- You can publish and unplublish the Bot at any time
- An indication if something has changes since your last publish is available
Please note: Publishing the Bot will not effect anything on other items already published in WalkMe. |
|
Note:
- You can switch environments with the Environment dropdown.
- The Status of the Bot will be shown in the status column.
|
|
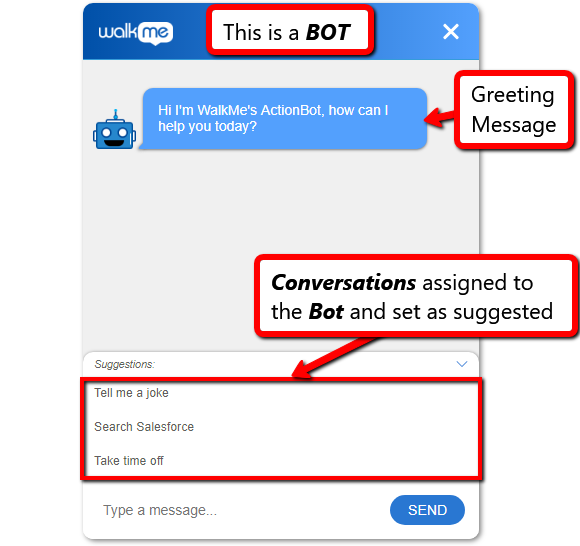
| End-user View |
|
ActionBot Diagram View
Enabling Diagram View gives you a visual representation of your ActionBot build. You can then view, edit, and export an ActionBot conversation as a graph (flow).
To do so follow these simple steps:
- Open a conversation
- Enable the "table" toggle:
- You will then see the ActionBot process in a visual diagram view like below:
Below is a quick video demonstration showing the feature: