Install the WalkMe Editor
Brief Overview
The WalkMe Editor is an Electron-based desktop application that is used for building, managing, and publishing all of your WalkMe content. This includes Smart Walk-Thrus, ShoutOuts, and other WalkMe items that your users will view.
Using the editor, you can build WalkMe content on the most popular browsers, including Chrome and Chromium Edge. This guide explains how to install the editor and is aimed at non-tech-savvy employees.
Getting Started with WalkMe Editor
The WalkMe Editor app (version 5.0.0+) supports Windows and macOS operating systems with built-in auto update functionality.
As an Electron application, the editor leverages a powerful and flexible framework. This includes a built-in mechanism for auto-updating applications. This feature enables Electron applications to check for, download, and install updates automatically.
1. Download the WalkMe Editor
Download the editor installer from this WalkMe download page, following the table below:
|
Operation System |
Package Name |
Objective |
Notes |
Installation Path |
|---|---|---|---|---|
|
Windows |
User (.exe) |
Plug & Play version. |
Auto-starts editor after installation. Note: Different installation files don't override each other (for example, MSI vs EXE). You should uninstall previous editor versions. |
%localappdata% |
|
Windows |
System (.msi) |
Enterprise installer. Designed for mass deployment |
Will not auto-start editor after installation, but will auto-launch it after system restart. |
%localappdata% |
|
Windows |
Machine (.msi) |
Centralized installer. Designed for Citrix, Windows Servers, and other VDIs |
This MSI should be installed on Server-side only. Auto-update is disabled by default with this version. Will not auto-start editor after installation, but will auto-launch it after system restart. |
<system drive>\Program Files\ |
|
macOS |
Intel (.pkg) |
|
|
/Users/Shared/walkme |
|
macOS |
M series (.pkg) |
|
|
/Users/Shared/walkme |
2. Deploy the WalkMe Editor
Once you have the installer available, you can move on to the deployment process.
Install the Editor
Installation differs from organization to organization, mainly depending on the IT methodologies and MDM software.
The .msi and .dmg installers are straightforward. However, Windows "Machine" MSI has auto-update disabled by default.
If enabling auto-update is necessary for the "Machine" installer, use the following msiexec command to enable it:
| msiexec /i <msiPath> INSTALLLEVEL=3 |
Install for Testing Purposes
Any user with administrator privileges can double-click on the installer and follow the installation wizard. Once done, the editor will be installed on the computer.
Install over MDM
MDM (“Mobile device management”) is used to distribute desktop and mobile applications across the organization's devices.
MDM installation is only possible by the organization's IT department. Once the installation has been done, the editor will be available for designated builders on their desktop.
2. Install the WalkMe Editor Extension
The WalkMe Editor Extension connects your selected browser with the WalkMe Editor desktop application. This allows you to select elements on your site when building Smart Walk-Thrus, SmartTips, and other WalkMe items.
- Double-click the WalkMe Editor application to open it
- Log in to the WalkMe Editor - A pop-up will appear
- Select your preferred browser type on the pop-up
- Click the Add Extension button - You will be redirected to the Extension download page
- From your browser, click Add Extension
- If a pop-up appears, click Add Extension to confirm
- Done! You can now use the Editor with the browser
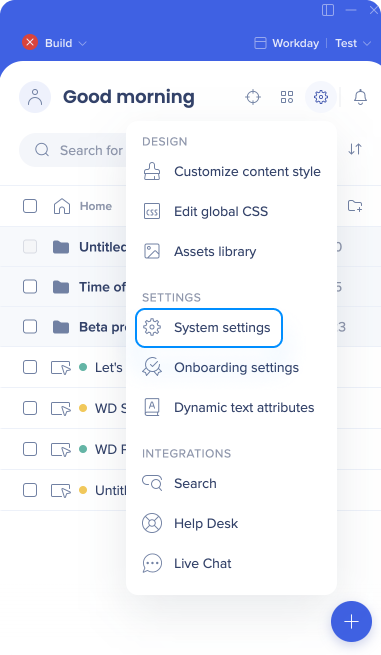
- Click on the Settings icon and select System settings

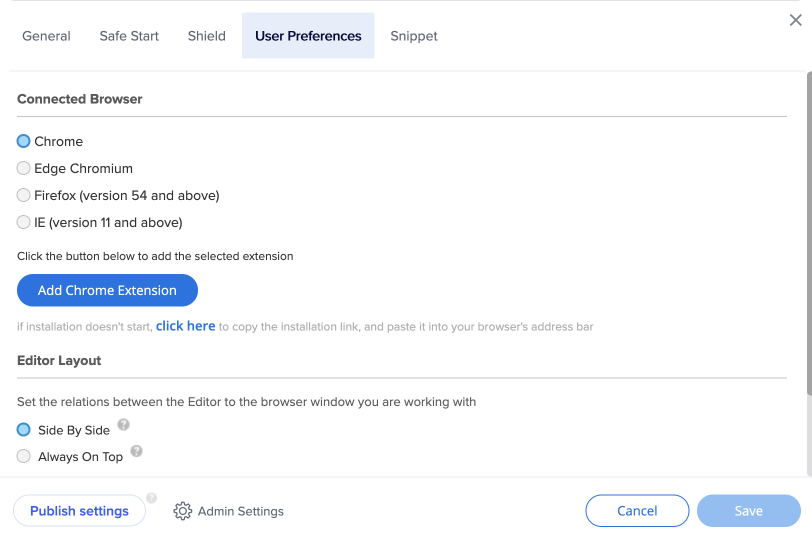
- In the User Preferences tab, select your desired browser and click the Add Extension button

- The Extension download page will open in your selected browser
- From your browser, click Add Extension
- If a pop-up appears, click Add Extension to confirm
- Done! You can now use the Editor with the browser 😃
Technical Notes
- The WalkMe Editor app supports English, Japanese, French, and German languages
- Editor updates are automatically checked for, downloaded, and installed - Existing users need to uninstall the previous versions before updating to the new one
- If you have trouble with any of the steps in this article please check out this helpful troubleshooting article, or please contact our great support team
- If you have issues with your extension after installation or cannot connect your editor to the page you want to, please refer to the following article:
How to uninstall the editor
Windows:
-
Open the Control Panel (you can search for it in the Start menu)
-
Select Programs > Programs and Features
-
Find the program “WalkMe X.X.X” in the list
-
Right-click on the program and select Uninstall
-
Follow the on-screen instructions to complete the uninstallation
macOS:
-
Open Finder
-
Go to the Applications folder
-
Find the WalkMe app
-
Drag the program to the Trash
-
Empty the Trash to complete the uninstallation
Editor versions
To view your current editor version, click on the profile icon in the top left of the editor. The version is shown at the bottom of the menu.
