Brief Overview
Live Chat Integration lets you connect your existing live chat provider with the WalkMe Menu, funneling users through your WalkMe guidance before enabling them to start a chat. By exposing users to self-service options first, you reduce the number of users who need live assistance — freeing up your chat agents for those who truly need it.
Supported providers: Habla, Intercom, LiveAgent, LiveChat, Olark, PureChat, SnapEngage, Tawk, Zendesk, Zopim, and more.
Note
This feature only applies to legacy web menus. The Live Chat vendor snippet must already be embedded in your website for the button to appear.
Use Cases
- Encourage self-service by exposing users to WalkMe guidance before enabling live chat
- Reduce the time agents spend per session by filtering out users who can self-help
- Improve first contact resolution rates and reduce customer hold time
- Free up chat agents so they only engage with users who truly need one-on-one help
Enabling Live Chat
- Log in to the WalkMe Editor
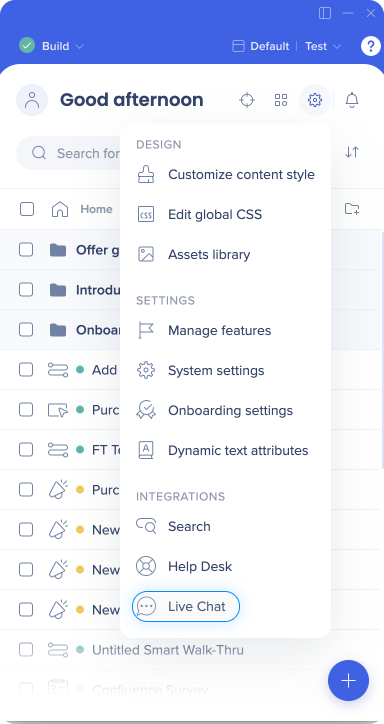
- Open the WalkMe apps dropdown and select Live Chat
- In the Live Chat settings screen:
- Turn on Live Chat
- Select your chat vendors
- Enter your license key
- Type the text for the chat button
- Update Display Conditions to set which users or processes see the chat button — for example, only Safari users (optional)
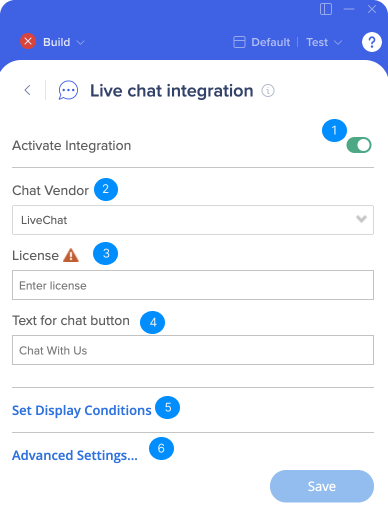
- Select Save
Once set up, a chat button will appear in the WalkMe Menu. When a user selects it, the chat window opens.
Note
You must have someone assigned to address user requests in real time to support your Live Chat implementation.
Advanced Settings
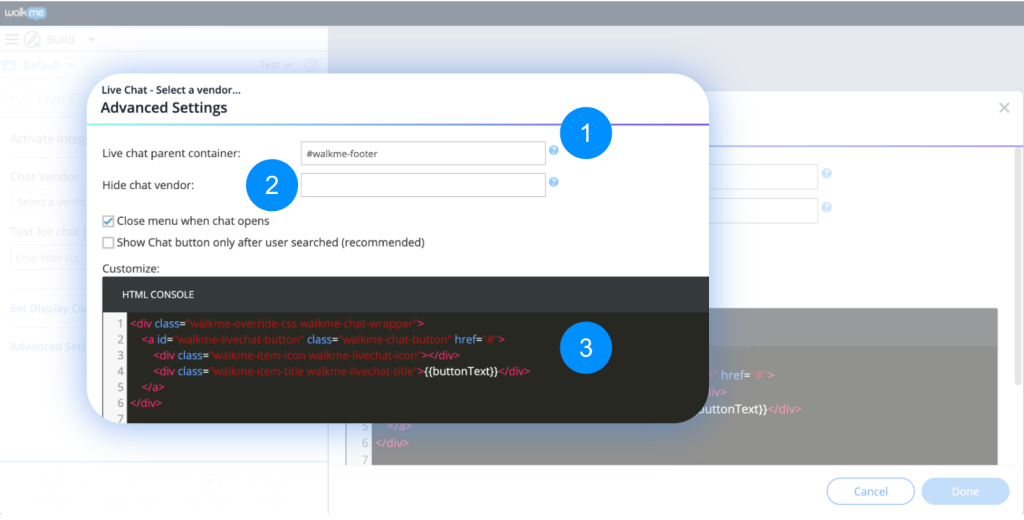
Live Chat parent container
Use an HTML selector to define where in the WalkMe widget the chat button appears.
Enter the HTML selector of the original chat vendor button to hide it. This lets users access chat only through WalkMe rather than through the vendor's own button.
Segmentation and display rules
Segment the Live Chat button based on URLs or variables
Turn on Show chat button only after user searched to display the button only after a user searches for solutions in the menu and gets no results — this is the recommended setting
Customization
Customize the look and feel of your chat button to match your brand.
Supported Providers
Live Chat currently supports the following vendors:
- Zopim
- Snap Engage
- LiveChatInc
- Intercom
- Olark
- LiveAgent
- HelpOnClick
- PureChat
- Habla
- Zendesk
- Tawk
Troubleshooting
The button only appears when the Live Chat API is active on the page. Check the following:
- The Live Chat snippet or API is present on the page
- Agents are currently available — some providers only return the API when chat is active
- The agent ID is configured correctly for LiveAgent — check using liveAgentConfig.chatId
- The correct provider is configured — Zendesk and Zopim are separate even though Zendesk acquired Zopim
Checking if Live Chat is active
Run the relevant API call in your browser's dev tools console to confirm whether your Live Chat service is active on the page where the button should appear:
- LiveAgent: liveagent.startChat('chatId')
- Zopim: $zopim.livechat.window.toggle()
- Olark: olark('api.box.expand')
- Intercom: Intercom('show')
- Habla: habla_window.expand()
- LiveChat: LC_API.open_chat_window()
- SnapEngage: SnapEngage.startLink()
- Zendesk: zE.activate()
- Tawk: Tawk_API.toggle()
- Pure Chat: purechatApi.set('chatbox.expanded', true) — only if purechatApi.get('chatbox.available') returns true


