Brief Overview
The Rule Engine is the logic center used to define when WalkMe content appears and how it behaves. By creating logic statements that evaluate as true or false, you can ensure that support, training, or promotional content reaches the right audience at the right time.
Elevate your building experience
Explore the Condition Builder—our modernized engine that pairs the same robust logic capabilities with a streamlined, high-performance interface for even faster rule creation.
Use Cases
The Rule Engine is an integral part of making your implementation responsive and contextual. Key use cases include:
- Segmentation: Targeting specific user groups, such as showing content only to the Sales department based on a user variable
- Smart Walk-Thru flow: Determining which path a user takes in a flow based on their actions or application state
- Goals: Tracking user success by checking if a specific page was reached or an element was clicked
- Display conditions: Controlling the visibility of launchers or resources so they only appear on relevant pages
Access
The Rule Engine is accessible throughout the WalkMe Editor whenever logic is required.
How It Works
The Rule Engine functions as a conditional logic processor. It evaluates specific data points within your application—such as a user's location, their behavior, or the presence of an element—to determine if a statement is True or False. When a rule evaluates as True, the associated WalkMe action or content is triggered.
Think of these rules like the logic in a board game: IF you land on a specific square, THEN you get to jump ahead. In WalkMe, this looks like: IF a user is on a specific URL, THEN play the ShoutOut.
🎓 Digital Adoption Institute
Evaluation logic
To build effective rules, it is important to understand how WalkMe reads and displays your logic.
- Top-down processing: WalkMe scans your statements in order from top to bottom; the engine combines these statements to determine if the overall rule is met
- Live browser state: The engine evaluates the page exactly as it appears to the user in that moment, requiring you to be on the correct page to see a rule evaluate as True
- Real-time status: To the right of each statement, WalkMe provides a status indicator to help you debug your logic
- True (Checkmark): The condition is currently met
- False (Exclamation mark): The condition is currently not met
- Cannot Assert (Question mark): WalkMe is unable to check the condition in the current state (often occurs if the target page or element is not loaded)
- Final result: At the bottom of the engine, the system displays the status of the entire rule based on how your And / Or relationships and groups interact
Create Rules
Once you understand the underlying logic of the engine, you can begin building the specific conditions that drive your WalkMe implementation. Creating a rule involves selecting your data source and defining the exact criteria that will trigger an action. Every condition you create is essentially a sentence composed of three parts: a Type, an Operator, and a Value.
Statement structure
Each statement is created by first selecting a Type of criteria to check, such as URL or Element on screen. Once a type is selected, define it further using rules, operators, and specific values.
Rule types and descriptions
Selecting a rule type allows you to specify the exact conditions WalkMe should evaluate using additional menus, operators, and input fields.
- On-Screen Element: Checks an element you select on-screen for visibility, content, length, or type
- URL: Checks either the current URL or referrer URL (the URL from which the user navigated prior to the current step)
- User Data: Checks cookies in the user's browser, JavaScript variables including website functions, or WalkMe Data
- Browser Type: Checks the current browser type or window size
- Date: Checks dates such as day of the week, month, or a specific date (Note: items set to Auto Play until a certain date expire at the end of that day)
- Time: Checks specific time of day on the end user's operating system using 24-hour format HH:MM, such as 16:00 (do not use 4PM)
- jQuery Element: Checks an element as identified by a jQuery selector; these are used when an element is difficult to identify or to optimize performance
- User Activity: Checks whether Goals for Onboarding Tasks have been achieved
- WalkMe Language: Checks the selected language of WalkMe, such as English, French, or Spanish (available only when Multi-Language is enabled)
- Current Flow: Checks if an iframe, frameset, or popup window appears
- Salesforce: Checks either the Tab or URL within Salesforce (available when sfVars is enabled)
- User Attributes: Checks the WalkMe End User Object for data imported using incoming integrations or predefined calculated End User Metrics such as First Seen, Last Seen, or Number of Sessions
- Platform: Checks the platform WalkMe is running on, such as Windows, Mac, or Web (available for Desktop/Mobile system types)
- Segment: Checks if a given segment is met or not, allowing the creation of complex conditions that reuse existing segments
- If a referenced segment is deleted, an indication is provided and the condition will no longer reference that segment
- SKU/Model: Checks the SKU, model number, and serial number from a PC or Mac (available for Desktop/Mobile system types)
Note
Some rule types are only available for specific features.
On-screen element options
When On-Screen Element is selected as a rule type, several menu options appear to allow you to refine, change, or view the selected element.
- Re-select Element: Change the target element for your rule
- Settings: Modify the precision settings for the element to ensure it is identified consistently across different page states
- View Element: See a screenshot of the selected element for verification
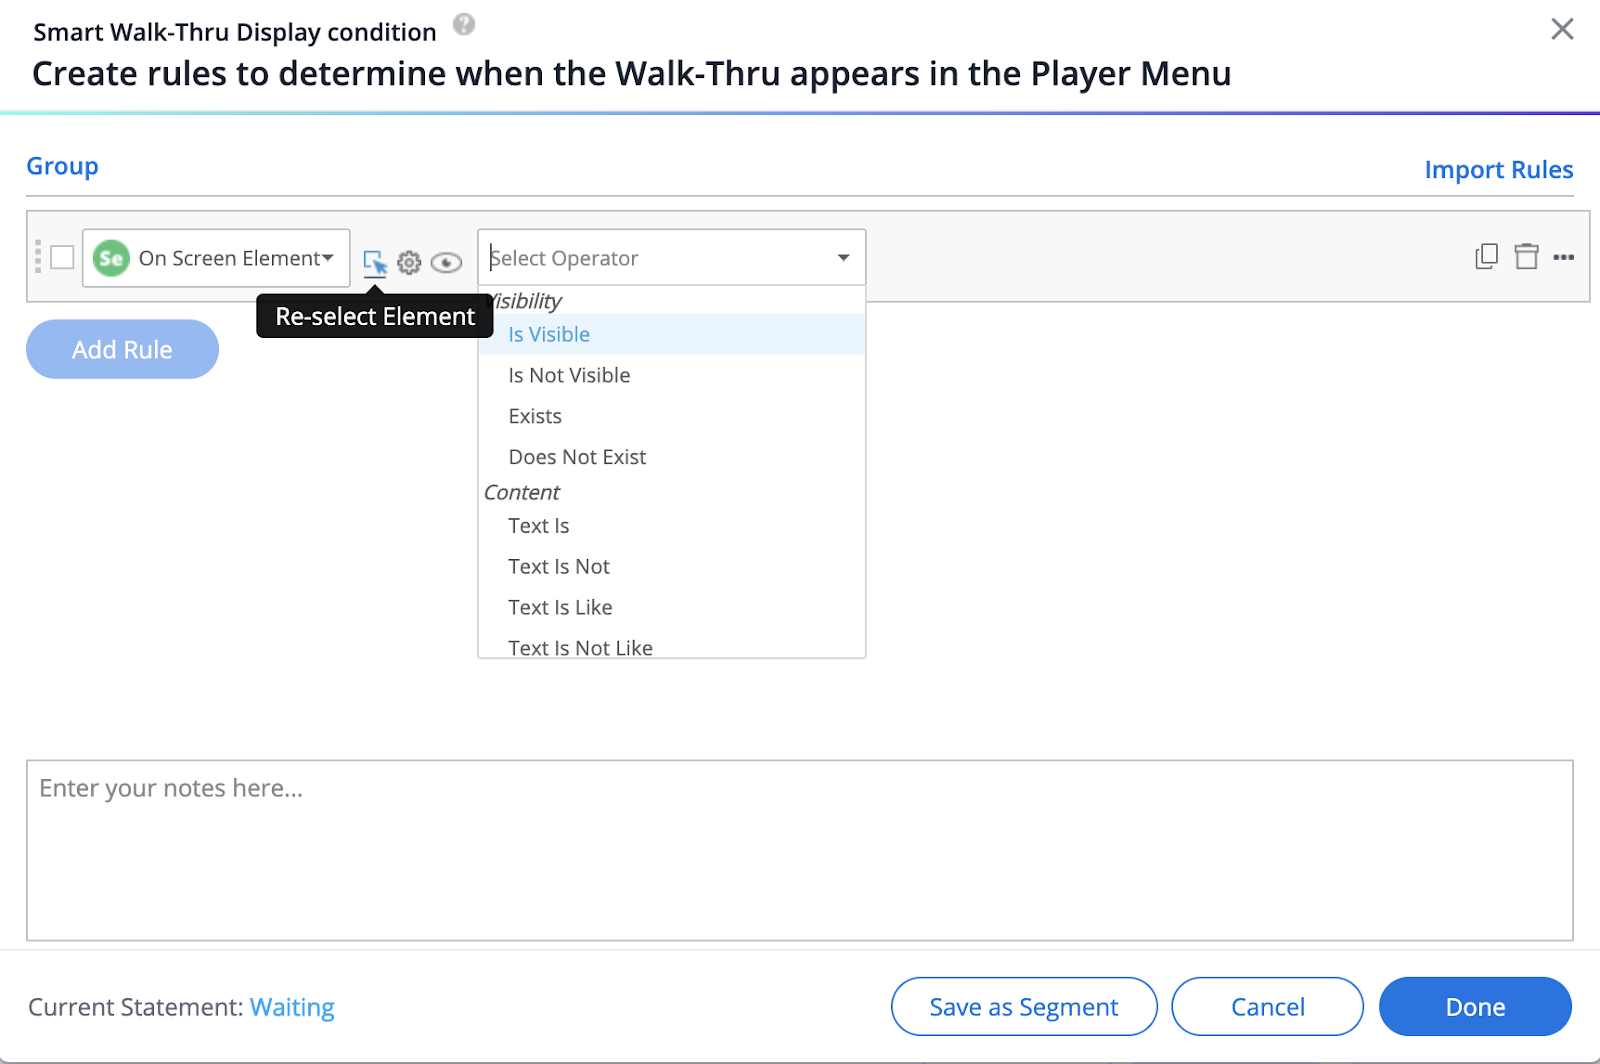
On Screen Element vs. Selected Element
On-screen element refers to any element found on a page. Selected element refers to a specific element you have already captured in the WalkMe Editor when building content.
Selecting operators
Operators define the specific logic for your selected rule type. Only relevant operators will appear based on the element type you select.
- Is: Use this for an exact match; for example, the full URL must match your input
- Contains: Evaluates as true if the value exists anywhere within the string, such as a keyword within a URL
- Like: Allows for flexible matches using an asterisk (*) as a wildcard to represent any character or set of characters
- Matches: A combination of Is and Like that allows for partial or full URL matches
Note
The Matches operator is case sensitive. Ensure your input matches the application's casing exactly.
Operator categories
- Visibility: Includes Is/Is Not Visible, Exists/Does Not Exist (present in HTML regardless of visibility), True/False (jQuery only), and Element Count
- Sticky operators: Clicked (Sticky) and Hovered (Sticky) constantly search for the interaction rather than checking once (Contact support to enable these features)
- Content: Includes Text is, Text Is Like (supports asterisk * wildcards), Contains, Text is Empty, Value is Greater/Less Than, and Length/Word Count
- Type: Checks for specific formats such as Valid Number, Valid Date, Valid Time, Valid US Phone Number, Valid Email, or Is Selected (used specifically for radio buttons and checkboxes)
Note
Use content operators like Text is with caution. If your application is translated, switching languages will break rules based on specific text strings.

Dynamic conditions
Dynamic conditions allow you to create a rule that compares two different elements on the screen rather than comparing an element to a static value.
- Capture an attribute: Select the first element on the screen and define an attribute for it, such as a jQuery selector
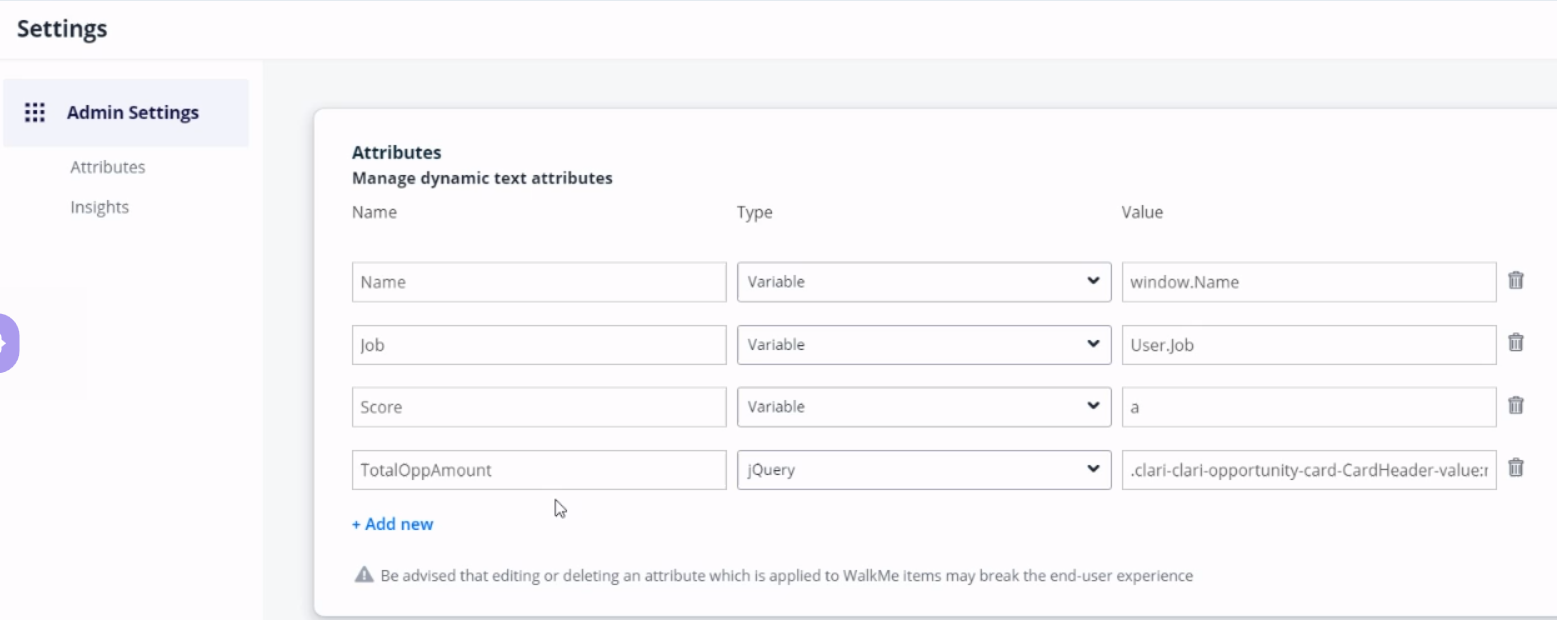
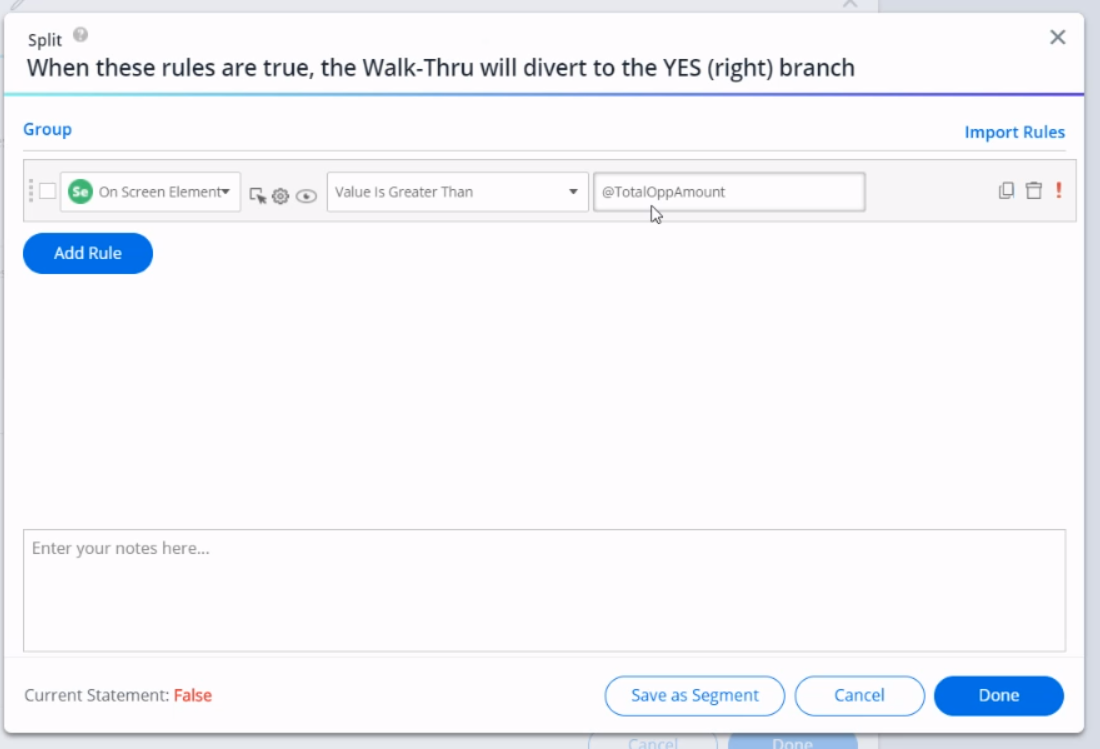
- Compare elements: In the Rule Engine, select the second element you wish to evaluate
- Apply the attribute: Enter the attribute of the first element into the value field to create the comparison
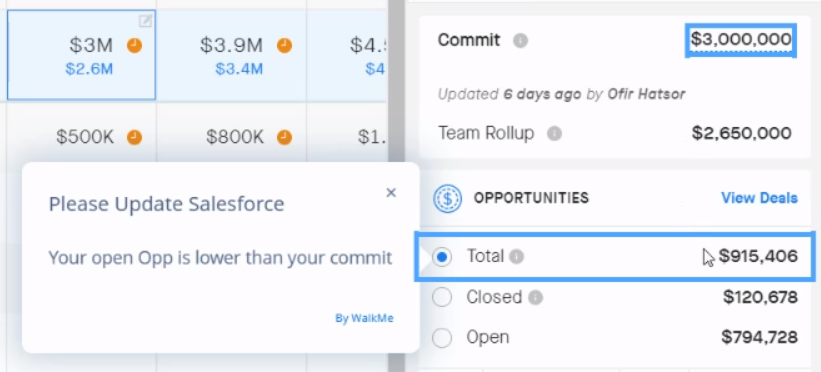
- Popup showing that Total Opportunities is below the Commit
Some rule types require manual text entry to complete a statement. WalkMe offers tools to simplify this process and ensure accuracy.
- Current value filler: Select the magnifying glass icon within a value field to automatically pull data from your current page. For example, use this to instantly fill the URL or jQuery fields with your current location or selection.

- Expanding text fields: If your input is long, select the text field to expand it, allowing you to view and edit the full string without scrolling.
- Case sensitivity: Remember that while URL inputs are generally not case sensitive, jQuery elements and the Matches operator require exact casing to evaluate correctly.
Using multiple statements
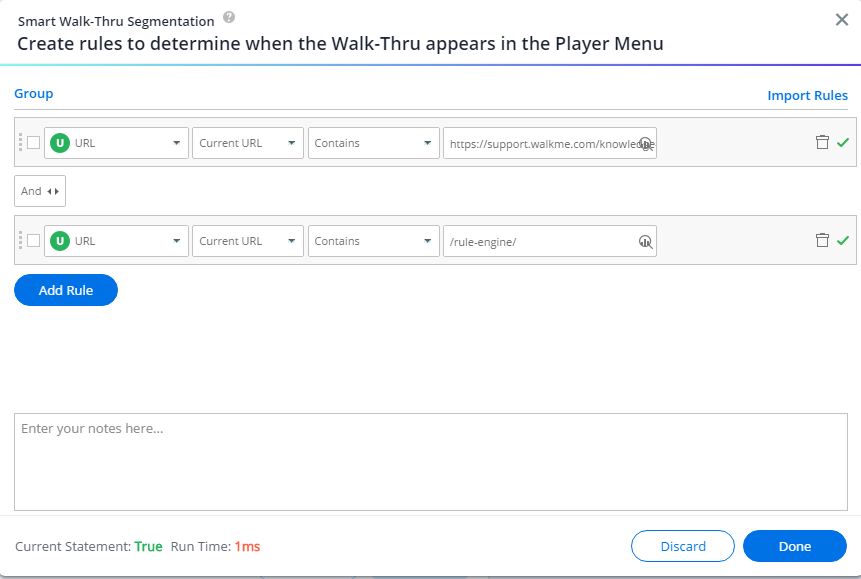
Adding multiple statements allows you to create more specific and sophisticated logic. You can add up to 60 rules within a single engine.
- Add Rule: Include additional logic statements

- And / Or: Define the relationship between your statements
- AND: Both statements must evaluate as true for the entire rule to be true
- OR: Only one of the statements needs to evaluate as true for the entire rule to be true

- Reordering: Drag and drop rules to change their order by hovering over the left-hand side of a rule statement
- Note: You must first unlink rules if they are part of a group
Grouping statements
Grouping allows you to evaluate blocks of logic together. It functions like placing parentheses around a portion of a mathematical equation—the Rule Engine checks the grouped statements as a single unit to determine if the group is true or false.
- Creating a group: Select the rules you wish to combine and group them to define their hierarchy
- Nested logic: You can group specific rules inside a larger container group to create complex "if/then" scenarios
- Limitations: It is not possible to include every rule in a single group; at least one statement or group must remain independent for the logic to evaluate
Example: If you are creating a Goal, you might use multiple statements connected by AND.
- Statement 1: Checks if the user is on the correct URL.
- Statement 2: Checks if the user Clicked the submit button. By connecting these with AND, the goal is only achieved if the user clicks the button while on that specific page, preventing false positives from other areas of the application.

Using multiple values
To improve performance and simplify your build, you can check multiple values within a single rule statement using the Multiple Value syntax. This reduces the need for multiple rows of logic.
- Syntax: Type Any("value1","value2","value3") into the value field
- Formatting: Ensure each value is enclosed in "quotation marks" and separated by a comma
- Logic: The relationship between these values is automatically treated as an OR statement
- Benefits: Improves performance by requiring WalkMe to check the property only once before evaluating the list of values
- Supported types: Currently available for URL, On-Screen Element, jQuery, User Data, Workday, and Active Directory rule types

Using Regular Expressions (RegEx)
For advanced users, Regular Expressions allow you to create complex patterns for full validation flexibility. This is particularly useful for validating specific input formats that standard operators cannot cover.
- Supported types: RegEx can be used with the jQuery and On-Screen Element rule types
- Validation: Use this to ensure an input field follows a specific pattern, such as a custom serial number or a unique ID format
- External tools: You can use third-party sites like Regex101 to test your patterns before entering them into the engine
Manage Rules
After building your initial statements, you can use the management tools within the engine to organize, duplicate, or reuse your logic across different parts of your application. Efficiently managing your rules ensures that your implementation remains scalable, easy to maintain, and performs optimally for the end user.
Saving a condition as a segment
If you have created a complex rule that you intend to use frequently, you can save it as a segment. This allows you to reference the entire logic block in other areas of the WalkMe Editor without rebuilding it.
- Open the condition in the Rule Engine
- Select Save as Segment

- Enter a unique name for the new segment
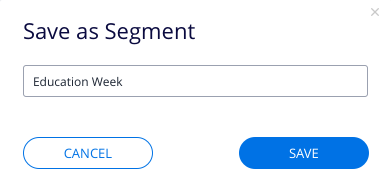
- The engine will automatically replace the rule with your new segment condition

Importing rules
Importing allows you to search for and copy rules previously created for segments or goals within different apps. This saves time by reusing logic that has already been tested and verified.
- Select Import Rules
- Select the App where the rule is located
- Choose the Item to copy the segment or goal logic from
- You can also import start point rules for logic steps within a Smart Walk-Thru flow

Duplicating a rule
If you need to create multiple statements with similar conditions, you can quickly duplicate them.
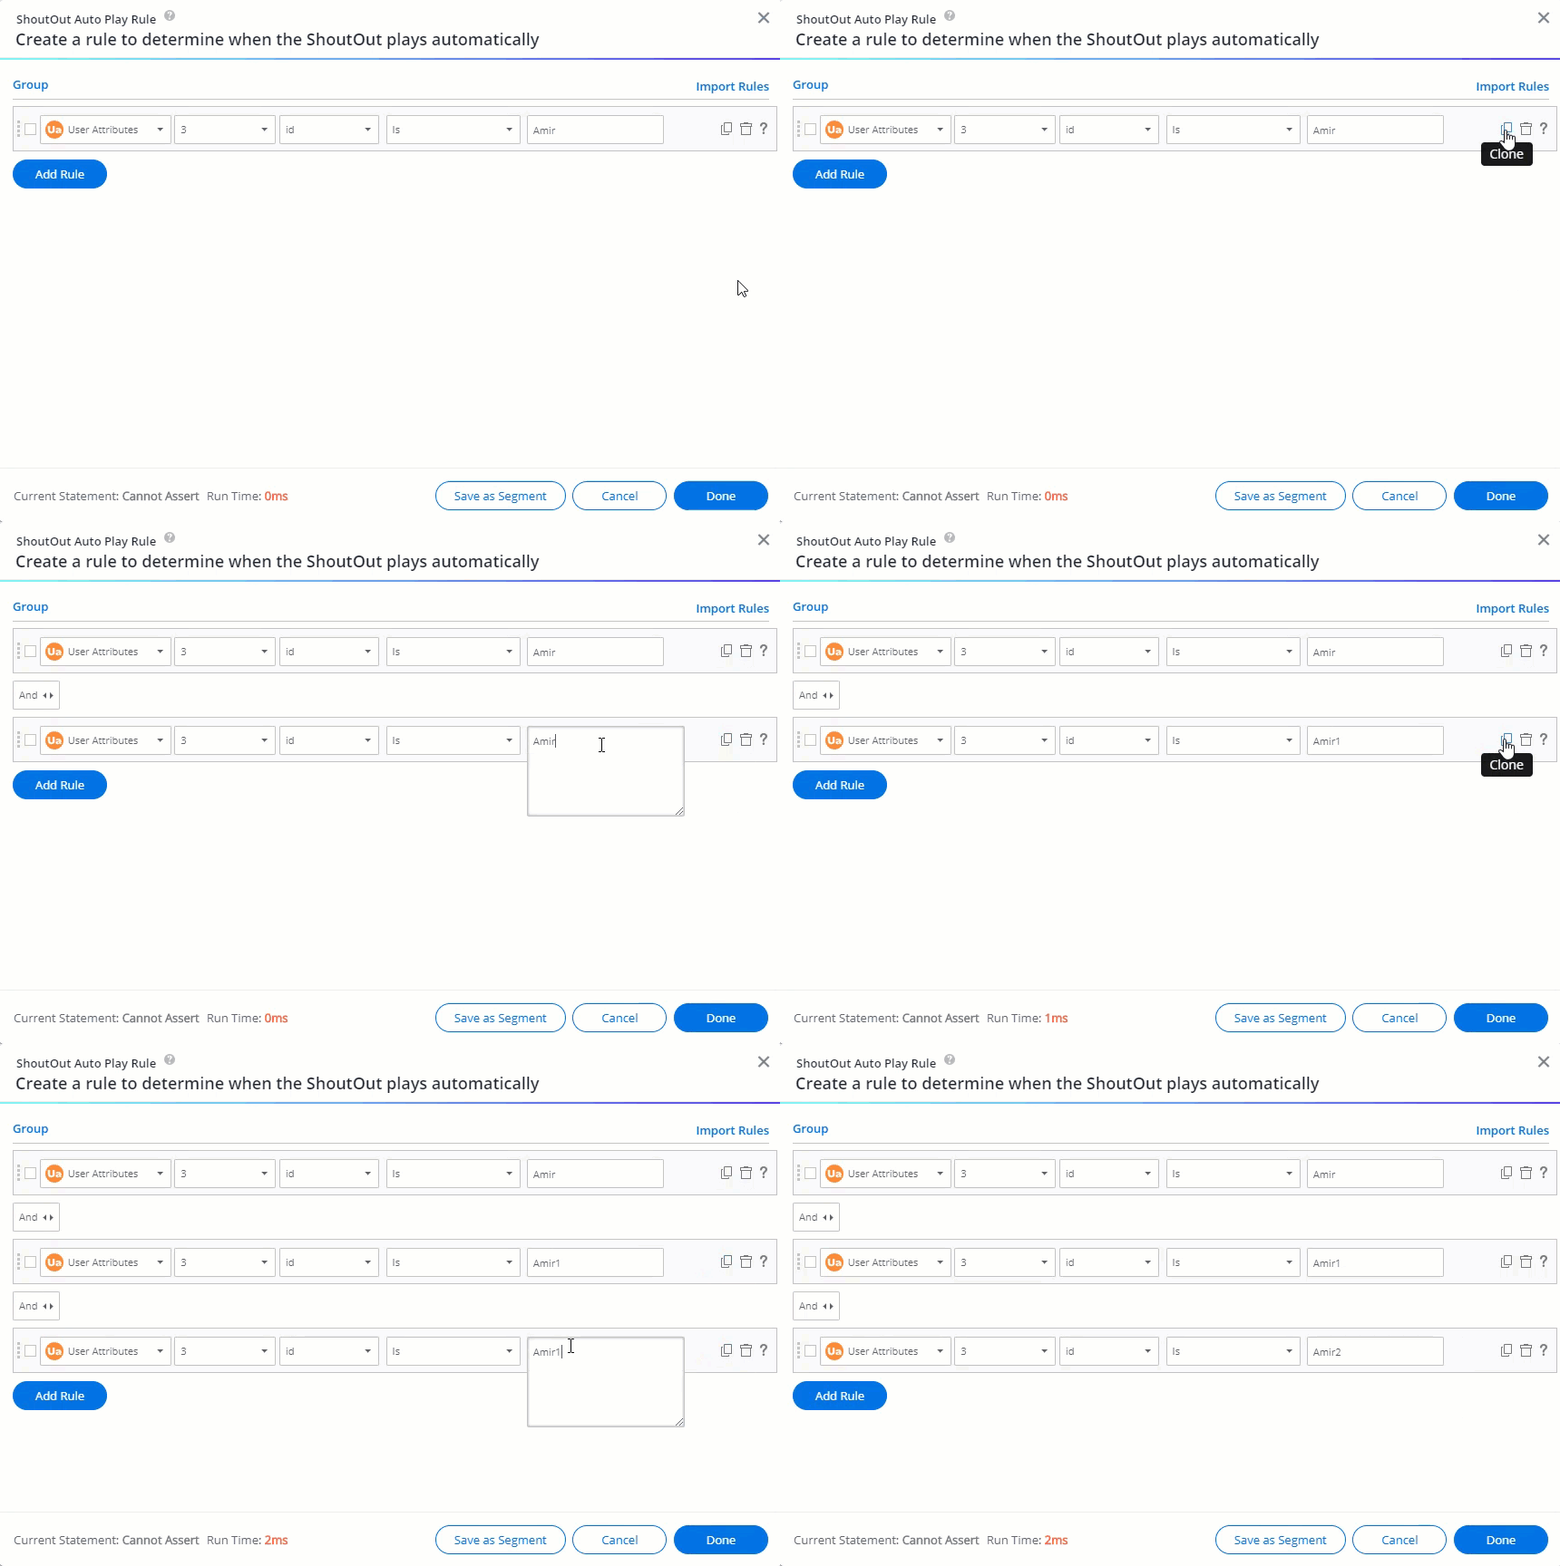
- Select the Clone icon next to a statement to create an identical copy
- Adjust the specific values or operators without rebuilding the entire statement from scratch
- Select Done
The speed at which WalkMe evaluates rules can vary based on the type of criteria being checked. While the difference is measured in microseconds, it can impact the user experience when multiple complex rules are used.
Rule types are categorized by the amount of processing power required to evaluate them, listed here from fastest to slowest:
- Light: URL, Variable, Cookie, and User Data
- Moderate: On Screen Element using Is Visible or Is Not Visible
- Heavy: jQuery and On-Screen Element using Clicked or Hovered
- Prefer light rules over heavy rules whenever both are applicable to the scenario
- Accompany heavy rules with a light rule to ensure WalkMe only evaluates the heavy logic if the light condition is met first
- Limit the total number of heavy rules within a single engine to maintain application responsiveness
Tip
By placing a URL rule as your first statement, WalkMe will stop evaluating the rest of the engine if the user is on the wrong page, preventing unnecessary scans for "heavy" on-screen elements.
Technical Notes
- The Rule Engine checks your active browser window to evaluate statements, so you must be on the target page or logged in as the correct user type to verify if a rule is evaluating accurately
- Statements designed to check if a user clicks or hovers over an element cannot be evaluated while the Rule Engine is open because you cannot interact with those page elements while the editor window is active
- Each Rule Engine screen has a character limit of 65,534
- You can add up to 60 rules within a single engine
- Regular Expressions are supported for both jQuery and On-Screen Element types
- The Condition Builder is the default interface for all new builds; if you need to use SFTP or S3 integration data, select the use the old version link to switch to the legacy engine
- Any unsaved changes are lost if you switch between the legacy and modernized interfaces during a build


